Showing posts with label PTI vintage button. Show all posts

Sunday, November 29, 2015

Christmas Roses Gift Bags

Howdy.  I hope this post finds you all well, and busy making stuff {smile}.  Me, of course!  I had such a great time making my previously posted fabric scrap 'trees' that I decided to make several more, using various fabric scraps.  Today, I want to share a new red gift bag.
I am entering this bag into these three challenges:  Die Cuttin Divas, Inky Impressions Challenge, and Crafting By Desings.   
The wonderfully talented ladies over @ Die Cutting Divas have a great holiday preparations challenge:  Tag, Bag, or Box.  Sounds perfect! and let's just admit it, something we need to get crafting, anyways.  {smile}
I am playing along with the creative design team over @ Inky Impressions Challenge.   Their current challenge is to use: Traditional Christmas Colors: Red, Green, and Kraft.  I believe this is right up my alley, so to speak.  The design team has done a wonderful job at providing us with some inspiration.  
I am also playing along with the ever inspiring design team over @ Crafting By Designs.   Their current challenge is themed: getting ready for Christmas.  I think all of us can create something beautiful to play along with their challenge, too. {smile}
Finally, I am using the inspirational photo from the card Concept.  I am not 'playing' along with their challenge, due to the fact, that their challenge site is for cards, and not projects.  But their inspirational photo is very beautiful, home-y, and a bit vintage-country. {smile}


and here is my Red Holiday bag:


close-up of the 'tree'
Recipe:  The outside of the bag measures 4 3/4" x 12" .  The 'bag' itself measure 4 1/2" x 9 1/2".  For the base of the gift bag, I used a rich, dark red card stock, very similar to Cherry Cobbler card stock by Stampin' Up!.
I used very vanilla card stock for the main panel, and matted that with my favorite Kraft card shock by Paper Studios.  I used a snowflake stamp set to hand-stamp the snowflake background in crumb cake classic ink.  I just love how 'soft' this color is on vanilla.  {smile}  I added a single border stitch with my sewing machine.  I think it really adds a 'finished' and homespun touch to my projects.
I used a kraft striped paper straw as my tree trunk/branch.  And then I just tied various fabrics, crochet trims, ribbons and trims to the straw.  I then added my tree topper (red velvet bow), and vintage buttons tied with kraft twine.
I trimmed the fabric strips in varying lengths to create the 'tree' shape.  I used hot glue to adhere the 'tree' to the snowflake stamped panel.
The sentiment is from a homespun holiday stamp set by Paper Trey Ink.  And then finally, I added a wooden snowflake to the sentiment rectangle and topped it off, with a green faux half pearl.

I finished the bag with a decorated mini clothes pin, and a gift tag.
Thank you for looking.  I hope you have been inspired to craft something beautiful for your holidays.


Saturday, January 3, 2015

XO's For You

Welcome.  I hope you are having a good first weekend of the year!  Me, I'm doing good.  {smile}  I don't know if it is the 'freedom' I feel, now that my craft room is clean and organized, or I simply found some mojo.  Either way, I will take it!
I visited a favorite sketch challenge blog site this week, Cardabilites, and finally got a chance to sit down at my crafting desk, and whip up a card.  Ok, I don't really 'whip-up' a card.  For those who know me, a 'fast' made card still takes me an hour or so.  This one, a bit longer.  I wanted to use some pattern papers I had already cut.  So, I dug through my scrap box to find: colors that I liked, pattern that went together, and papers that made me smile.  Simple process, really.  Now, I just needed to sit and put it all together.  And that is not always so easy.  Three hearts later, and two different blossom centers, I found created what works for me.  

To start, the sketch looks easy to work with.  Use a doily, add a blossom, and you have your two circle elements.  Well, that isn't exactly the direction I went.  


Recipe:  The card base is crumb cake by Stampin'Up!.  The first text matt is from Melissa Frances.  The next blue matt is a pattern paper I received as part of a prize from playing along with the lovely ladies over @ Craft Hoarders Anonymous Challenge.  The pink main panel is the only piece of this pattern paper from Bazzill I have left.  I sponged the edges with crumb cake classic ink, by Stampin' Up!, adhered them together and then did a purposefully 'sloppy' machine stitch.  I went around the card twice.
My first circle element is a doily.  The doily was cut with a doily die, by Paper Trey Ink, using glitter paper by, Stampin' Up!.  The second circle element is a circle {smile}.  I used a white text, aqua pattern paper I think is from Carta Bella.  (It's another scrap piece.)  I used a die to cut this 2" circle.  For the cluster in the second circle element, I built my piece.  I cut a heart shape from some cream felted wool.  I used a retired heart die, by Stampin' Up!   I cut the same heart shape from some silver polka dot vellum card stock.  The flower shape was cut with another retired die, by Stampin' Up!  I used a small scrap piece of another pattern paper from the collection by Bazzill.  The smaller blossom was cut with the same retired die, by Stampin' Up!, but I used some aqua mist felted wool, by Paper Trey Ink.  I ran this circle collage through my sewing machine, using a simple stitch.  
I tied some cream twine through a cream vintage button, both by Paper Trey Ink.  I used hot glue to attach the button.  The leaves were made with a scrap of green pattern paper from Nostalgia.
I added a scrap piece of cream crochet trim, by Paper Studio.  I didn't have a long enough piece to wrap around the card front.  But after 'playing' with this trim, I found I really like how it doesn't cover the card front.
I didn't add blossoms and banner for my sentiment.  Instead, I made a multi-loop bow with 1/4" silk ribbon, by Paper Trey Ink.  I also cut a tag from Whisper White card stock, by Stampin' Up!.  I used the tiny tag die, by Paper Trey Ink.  I stamped my tag with two sentiments from the same stamp set, by Stampin' Up!.  This set has been retired for over 6 years.  I sponged the edges of the tag with more crumb cake classic ink.  
And finally, to give my card a more feminine feel, I added a collection of white half faux pearls and clear rhinestones.
I originally set out to make a St. Valentine's Day card.  So, that is why the sentiment is 'XO's For You'.  This card will be for sale in my Easy shop, HERE.   I hope you enjoy the rest of your first weekend this year.  I am off to the kitchen to make some fresh bread.  Nothing fancy, just white bread.  But it makes the house smell wonderful! and it tastes amazing!  I'll post a photo on my InstaGram page, HERE.


Friday, January 2, 2015

Aqua Happiness, Today

Welcome! Whew, I think I am starting the new year off right!  Crafting!  Oh my goodness, this feels soooooooo good!  I know you crafters out there know this feeling!  Its bliss, happiness, accomplishment, and satisfaction all in one!
Ok, so I stalk visit Mojo Monday blog multiple times a week.  {yes, multiple}.  I know the challenge is posted for a week.  But i love to visit to see what people have posted.  I love to see what others create.  Sometimes, it really gets my mojo working, and I can 'see' the sketch in a different light.
So, this week, (yes, I have visited at least 4 times) I decided to play along with this incredibly talented group of ladies.  Here is this weeks sketch:
One of the things that I have noticed over the years with MOJO, is that they get on these little 'kicks'. A few years back, they would add a 'round' card to each month of sketches.  This past  year, and well it continues, is to add 'tall & skinny' sketches.  I don't know about you, but I'm not a big fan of this style of card.  Maybe its because I don't have envelopes for this 'size'. 
Anyways, I did create a card.  I'm not sure it will 'count' as 'tall & skinny', as I trimmed a 1/8" off the sides.  But, I do love the sketch.  So, here is my 'not so tall & skinny' card:

original image posted
photo taken 1/3/15
* the sun came out this morning, so I was able to re-photograph this card in natural light.

Recipe:  The card base is Pool Party card stock by Stampin' Up!.  The matt is Kraft by Recollections. The first layer is a wood grain floral pattern paper.  This is actually a digital paper I purchased.  It's pretty sweet!  
For the two flagged ended papers, I used a digital bookmark pattern paper, and an actually pattern paper. 
For my belly band, I added a strip of gold glitter paper by Stampin' Up!.  I really wanted to add some sparkle.  I machine stitched some cream colored tulle fringe to the glitter paper.  I thought it added some interest, and a touch of softness.  I then machine stitched (zig zag stitch) a piece of cream crochet trim to the front of the card.
For my circle element, I added a cream fabric blossom.  But it looked too random and 'alone'.  So, I added a multi-loop bow made from 1/4" white silk ribbon from Paper Trey Ink.  
To me, the card needed a sentiment, or something, so I cut a tag with a tiny tag die, by Paper Trey Ink.  I used whisper white card stock, by Stampin' Up!.  I stamped the sentiment in basic black classic ink, by Stampin' Up!.  I attached the tag to the card front with a tiny metal button brad, by Stampin' Up!.  I also tucked in an aqua mist vintage button, by Paper Trey Ink.  I tied the button with a piece of cream twine, but only through 2 of the 4 thread holes.  And finally, I added a trio of marshmallow colored faceted sequins to the card front.
This card is also for sale in my Easy shop: InkwoodDesigns, if you love it some much you need to have it {smile}.  Now, if the sun comes out today, and I can get a better shot of this card, this post will be edited. {fingers crossed}
Enjoy the beginning of this new year!


Saturday, December 27, 2014

love u

Howdy!  I hope everyone had a fabulous holiday! and that you were able to share it with family & friends.  We did!  We had a wonderful Christmas.  My mom came into town, and as always it is wonderful to spend some time with her {smile}.  We got to spend sometime at our daughters house.  Her children are just so precious.   Anyways, one of my new years resolutions (typically every new years) is to spend less on crafting supplies, use what I have, and get my supplies in order.  So, before I head into my craft room to clean up the clutter of holiday crafting these past several months, I want to share a card I made this morning.
The wonderful ladies over @ Divas by Design have a final challenge: anything goes!  
And here is what I made:


I didn't purposefully set out to make a valentines card.  It just kinda happened.  So, lets get started with the recipe and a few close ups {smile}.
The card base is aqua mist card stock from Paper Trey Ink.  I just love the weight of their card stock - heavy, yet workable.

The matt is lagoon from stampin' up!.  I just love this new color.  The floral pattern paper is a digital paper I recently purchased.  Love the polka dots and the colors.    The middle panel is also a recent digital purchase, also.  I thought the blue 'love' piece matched the blue in the floral pattern paper.  i also loved the flowers on this piece.
I matted that piece onto a textured pool party card stock by Stampin' Up!.  
I did a little machine stitching.  I just love the look.  The top banner piece is actually a christmas pattern paper that I had a scrap of, so I just flagged the end.  I did a sloppy machine stitch.
I tied a blush button by Amuse Studios with a thin silver cord.  I added a white tag that I had laying around my crafting space.  I die cut the 'U' from silver glitter paper, by Stampin' Up!.  

I added a scrap piece of white lace trim piece I had left over from holiday card making.  I also added some pink pirouette seam binding, by Stampin' Up!. I tied the seam binding into a multi-loop bow, and added a vintage kraft button by PTI.  I hot glued a Melissa Frances key hole.  And I added a pink heart stick pin.  To finish off the card, I added several white faceted sequins.

All the edges of the different papers were sponged with crumb cake classic ink, by Stampin' Up!

Thank you for stopping by.  Now, I must head into my craft room, and clean up the mess I created from my crafting for the past holiday craft shows.  See ya soon!


Sunday, August 3, 2014

Nostalgia Friend #252, #104

close-up
Welcome to my little slice of blog-land!  I have a card that I want to share with y'all.  I made this card for a new friend.  A lady I know introduced me to her yesterday.  We are both stampers and really do love what we do.  Anyways, long story short, we hit it off!  
I had such a grand time chatting with her, that I set out into my craft room, pushed a few projects to the side, and started working.  I knew that I wanted to make her a card, and I knew that I wanted to use a new stamp set I acquired, but needed some direction.  So, I set out to search my favorite challenge sites and see what this week had conjured up.

Just Us GirlS has recently changed their challenges, so I set out to see what they are doing this week.  This week, their challenge is to use Ribbon!  Well, I can do that.  It is probably one of the embellishments that always seem to find a spot on my crafts (along with a button, or two [smile]).

Cardabilities always has a wonderful sketch.  Their sketches are easy to work with, and easy to translate into the style you already create in.  Gotta love that!

Diva's by Design is a new challenge site for me.  They use a variety of different challenge elements each week, so its' not always the same.  Variety is the spice of life, right?  These gals really love to mix it up!  So, this challenge site is a new favorite of mine!
Our challenge this time is a favourite of everyone's, it's
ANYTHING GOES

So, here is what I created:


Here is what I used, and how I put it all together:  I started with kraft card stock from Paper Trey Ink. They have wonderful heavy weight card stock.  I took a piece of Nostaligia pattern paper by My Mind's Eye, and cut it down to 4" x 5 1/4".  I used a background chicken wire stamp from CTMH and inked it in going gray classic ink by Stampin' Up! and stamped on the right lower corner and the left upper corner.  I then inked a text stamp from Stampin' Up! in crumb cake classic ink, and stamped over the chicken wire image.  I ran this piece through my sewing machine.  (I didn't want the stitches to show on the inside of the card.)  To give this layer some 'interest' I did a zig zag stitch on the left upper corner.
The scallop piece is the other side of the colored dot pattern paper.  I used the Tasteful Trims die from Stampin' Up! to create that piece.  I used a zig zag stitch to hold the crochet trim to this scallop piece. I purposely left the ends unfinished.  I thought it added some vintage charm to the card.
I used a Martha Stewart doily and sponged the edges with crumb cake classic ink.  The doilies are bright white and it looked too new, so I aged it a bit.  I used the Lexicon of Love stamp set by Stampin' Up! to create the text in the circle, as well as the sentiment on the banner.  I stamped both pieces in Baked Brown Sugar classic ink, and stamped onto very vanilla card stock.  I used my 1 3/4" circle punch to create the circle, and I cut the banner by hand.  I sponged all the edges with crumb cake classic ink.  I adhered the circle/doily with foam tape, due to the bulk of the crochet trim.  I adhered the banner with foam tape to lift it off the front of the card.  I tied a simple bow with Blushing Bride ribbon.  I tucked a paper blossom by Recollections (#277003) just inside the bow.  I tied some cream twine to the button and adhered it just above the paper blossom.
I tucked two tickets I created with a Prima Cling stamp set #555153.  I stamped one ticket with Blushing Bride classic ink, and the other in Pear Pizzazz classic ink.  Both tickets were stamped onto very vanilla card stock.  I only added adhesive to the top of the tickets as they hand below the doily.
I also added 5 iridescent clear sequins to the left side of the card.  Two sequins by the tickets and three sequins above the button.
Thank you for stopping by.  I hope that you have been inspired to create something beautiful! and play along with your favorite challenge!


Sunday, June 15, 2014

Trio of Roses

close-up of the button card
Welcome.  And Happy Father's Day, to all the wonderful dads out there!  I know your job isn't the easiest, and we do appreciate all your efforts, commitment, and nurturing to our children.  {smile}   
I don't make my husband cards.  It's not that I don't love him enough, or that he isn't worth it.  I just can't.  To make a masculine card is like me trying to change the oil in my car.  I could if my life depended on it, but it won't be pretty, and the job will literally take me  a l l  d a y!

I am hosting Bunco next month, and I have been making some 'prizes'.  As promised, I will continue to post them here.  Not that my Bunco buddies don't love what I do, but I am pretty sure they don't 'follow me'.  Know what I mean?  So this is a safe venue to share.

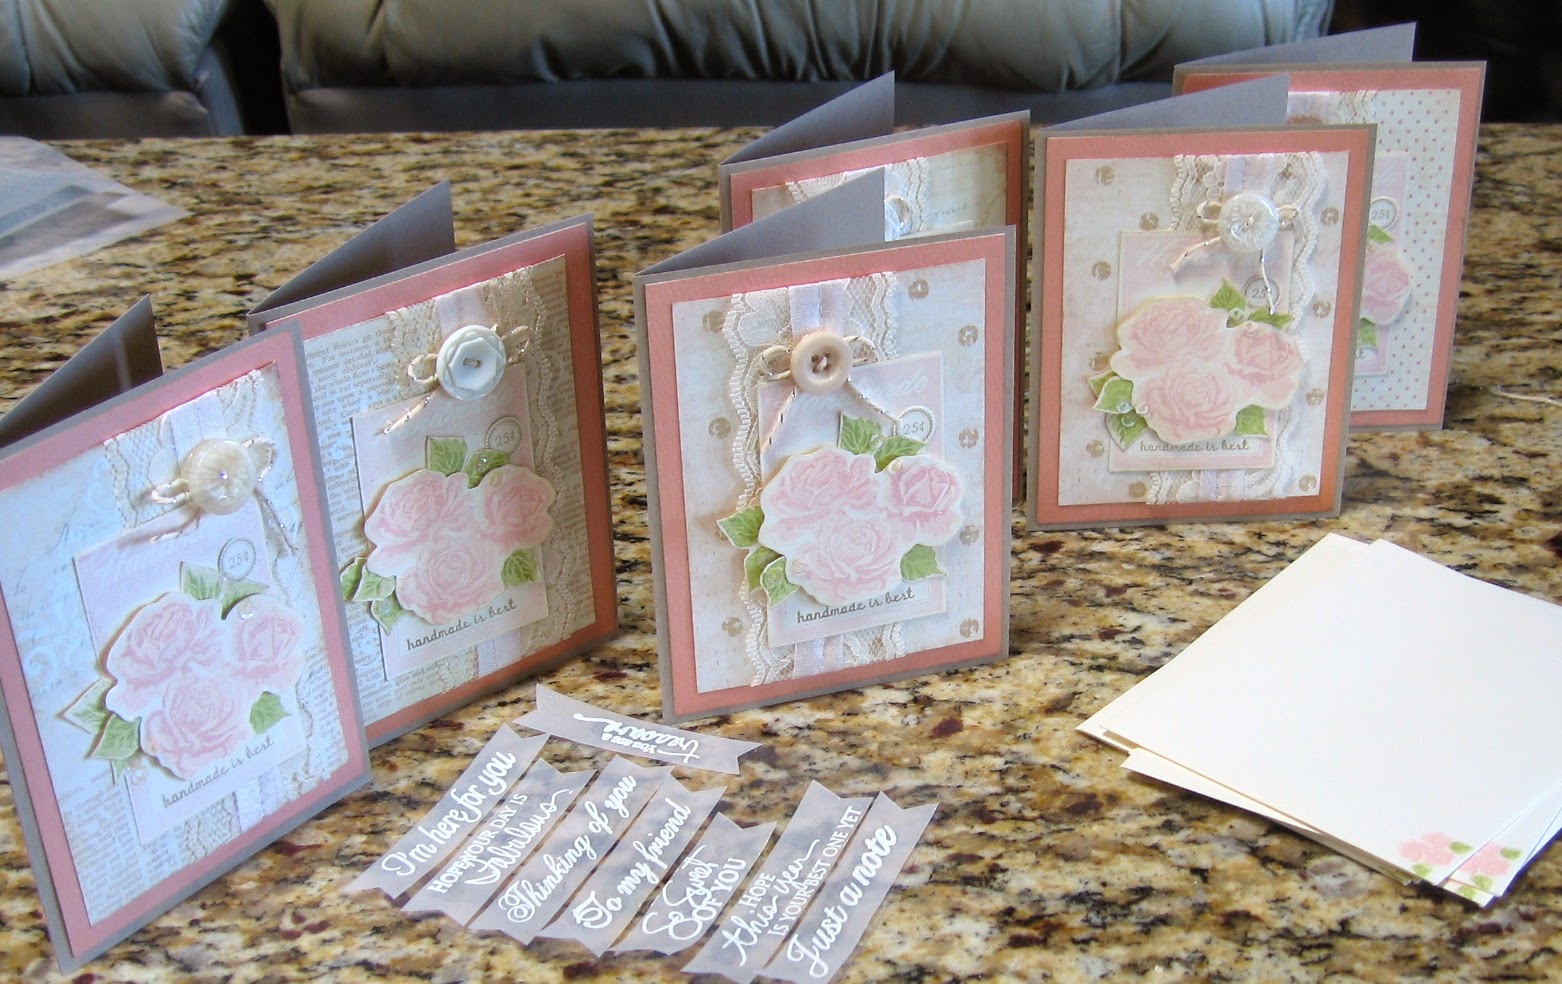
This is a close-up of the focal point on a set of cards I made for one of the prizes.  Yeah, sorry, it's pretty girl-y.  But, I am trying to keep the crafts to follow the theme 'farmland'.  
I used the button boutique stamp set for the button card, and Life is Sweet, for the trio of roses.  It's one of those three-step stamps.  You stamp the main color first, then the petal base in another color, and then the outline in another color.  Sounds complicated, but really not.  The leaves are a two-step stamp.  The button card, trio of roses, and the leaves were all cut by hand, and the edges were sponged with crumb cake classic ink.  The trio of roses and one leaf were adhered with foam tape.  The iridescent sequins were glued-on by hand.
For the full-card:


I used crumb cake card stock for the card bases (6).  The rose colored paper is actually the back side of a green floral print paper I have had in my stash for almost 7 years.  Its from My Mind's Eye, their Tres Jolie collection, Ooh la la pattern line (Sunshine flowers paper).  The neutral pattern paper is a digital download (love them!).  The lace I purchased last year, or so ago.  I buy it in bulk, I believe this is a 25 yard roll.  It's about 2 1/2" wide.  Love it!  I machine stitched the pink pirouette seam binding and lace to the digital pattern paper and adhered to the rose colored paper.
I tied silver bakers twine to a cream vintage button and hot glued it on, just above the button card.  The 'handmade is best' and '25 cents' were stamped in crumb cake classic ink.
There is no sentiment, because I wanted to make a card set that allowed you to select your sentiment. I left a place across the card front, between the sequins for you to add the sentiment.  For those, I stamped them on vellum card stock and heat embossed them in white.  I cut a flag end to the banners, by hand.   I also stamped a tiny trio of roses in the same colors onto the cream envelopes.

6 card set.
I created the banners, in a way, so you just peel the one you want, off the piece of clear card stock, and place it on the card front.  The adhesive that holds the banners on the clear card stock, will also hold them to the card front.  Pretty clever, huh?  The neutral digital papers I selected are a mix of polka dots, text, and random designs in white, on a cream-colored background.  I wanted something with character, but not to distract the eye.

Thank you for stopping by.  Hope you have found some inspiration today {smile}.  


Sunday, April 20, 2014

Easter Wishes

Happy Easter!  I hope you have a chance to spend time with family, friends, and those who mean the most to you {smile}.  We are heading out the door, to go on an Easter Egg Hunt with 4 of our grandchildren.  It's pretty exciting!  and then we will be sitting down to Easter dinner.  Yum!
But, before I get on the road, I wanted to share with you an Easter card I made.  Ok, I actually made 6.  They are all packaged and in the car waiting.  (a lot of family will be at this years Easter Egg Hunt.)

I used a beautifully constructed sketch by Retro Sketches.  A lot of potential!  You can keep it clean and simple, or really add layers.  This sketch would be easy to do a shabby chic or vintage style card, too!  The possibilities are endless!


I did move the top layer over a bit.  So, if this doesn't qualify for the challenge, I totally understand.


I had a difficult time trying to find some suitable pattern paper for easter, and just couldn't find one I really liked.  So, I used digital pattern paper.  All these pattern papers are digital.  Even the bunny ticket.  The only stamping I did was the sentiment.  I added a button and bow with cream twine.  And to give the card a little visual interest I added a trio of half faux pearls.

a pink version
a green version

Thank you for stopping by.  Hope you get a chance to play along with the sketch challenge over @ Retro Sketches.


Monday, March 24, 2014

Text, Flowers, and Buttons

Oh my.   What a busy weekend.  Let me start by saying that my two passions in life are paper crafting and baking.  Both of these activities give me joy.   P u r e   j o y!  
I just love creating.  Creating beautiful things of the eye, heart and soul.  And beautiful things for the palate, tongue and stomach.
Sunday, I participated in a baking competition @ the Chocolate and Coffee Fest here in Albuquerque, New Mexico.  I made a dark chocolate cupcake, spiced with cinnamon and cayenne pepper, dunked in dark chocolate ganache, topped with a sweet cinnamon whipped topping, and drizzled with dark chocolate ganache.  I didn't win. {frown}  And I didn't remember to take a photograph of my cupcakes.  {double frown}
Today, however, I want to share a paper craft project I made as the Guest Designer for the Shabby Tea Room, this week.  I know, how wonderful to be a guest designer, right?  This week, we are asked to make a paper craft item, using the inspirational photo and required products:  text, flowers, and buttons.  I got this!


how sweet is this inspiration photo!
and here is what I made:


We (the family) were celebrating our mother's birthday this past weekend.  (yes, in conjunction with my baking competition.)  Our mother turned 70 on her birthday.  And that fact alone makes me feel super old.  Ok so back to the paper crafts I created.


Let's start with the card.  I used crumb cake card stock for the card base.  I matted the pattern paper onto very vanilla card stock.  I then ran this stack of card stock and pattern paper thru my sewing machine.  I just love this touch.  I used a running stitch.   
The decorative shape of text paper is from Melissa Frances.  I wrapped a piece of white lace trim around this text pattern paper.  I topped the lace trim with a kraft polka dot ribbon.  I added two white buttons to the ribbon, and then tied a kraft button to the bow with cream twine.  I added a small tag that was stamped and cut from very vanilla card stock.
I added a piece of floral grid paper on top of the text paper.  I just love the curves of this shape.  I added three paper blossoms to the left side of the blossom grid paper.   I cut leaf shapes from a different text paper.  I added a hand-made white glitter button to the left side of the large pink paper blossom.  
I stamped my sentiment in soft suede classic ink, using a stamp from the Water Color Trio stamp set.  I added a silver glitter butterfly, to add some sparkle.  For the final touch, I added a trio of cream diamond cut pearls.  I added the same decorative pearls for the body of the butterfly.

and the bag:


I used the same patterns of papers and the same shapes.  However, I changed the paper blossoms.  I used a cream large paper blossom.  The two smaller paper blossoms were white.  However, I wanted to change the color.  So, I sprayed the paper blossoms and then added glitter.  I also added a hand-made white glitter clay button to the left side of the cream paper blossom.  
I added a trio of silver glitter butterflies.  I added the same decorative cut pearls to the bodies of the butterflies and then a trio near the sentiment piece.  I also added a Maya Road butterfly pin to the trio of paper blossoms.
Finally, I added a 'made with love' banner to the bottom of the bag.
The bag is held closed with a painted and glittered clothes pin and tied with a wide kraft polka dot ribbon.  Inside the bag is a jar of home-made, rough-cut, vanilla-sugar cubes.
Thank you for looking.  I hope that we have inspired you to create something wonderful  using the inspirational photo.  Remember, you need to use text somehow, buttons, and flowers.  And join us @ the Shabby Tea Roon.  Can't wait to see what you create {smile}.


Saturday, March 1, 2014

Life is Good . . .

Life is Good in the Country.  Wow.  That pretty much says it all!  Life is good out here.  There is a peace, a calm, but also a workable energy.  
I created a little framed sentiment today.  I used some pretty paper from Prima Marketing.  And then I added embellishments from my stash.  I'm still working with what I have, and not purchasing any new stuff with family money (another new year's resolution).

here is what I made:


I had a scrap of the Prima paper sitting on my craft table, and I thought the abstract images were the perfect back drop to my sentiment.  The frame I had left over from last year.  I made quite a few pin cushion frames, and this one hadn't been converted yet.  I used some seam binding, a vintage button, a clay rose, a tulle spray and a few paper blossoms.  
The sentiment I heat embossed, with an espresso colored embossing powder.  I really like how it turned out.  Sweetly simple!
This item will be for sale at the Spring Craft Fair in Albuquerque, New Mexico, later this month (March 15th).  I'm still trying to get the permits settled to sell some cupcakes.  Hope to see you there!


Wednesday, February 26, 2014

Baby Girl

I have been busy crafting products for sale at my Spring Craft Fair next month.  And well, I've been making baby themed stuff.  I made a card this time.  I just love how it turned out.  
Anyways, sometimes I need a little direction/inspiration, so I search out some of my favorite 'spots' and it does help.  I knew what papers I wanted to use.  I knew what I wanted to make.  I just needed some guidance to put it all together.  So, without further ado, here is what I created:


I used the same papers that I used for the Card-Gift Combo I created earlier this week.  But, I added a few other 'pieces'.  I kept the main color pink.  Just love pink.  But I also wanted to highlight the aqua mist color, so I matted my yellow pattern piece on Aqua Mist card stock.  I am in love with the pink text/flourish pattern paper from Teresa Collins, so I used it as my main piece.  I'm also loving this silver metallic thread I purchased recently, and just had to use it!


The metallic thread adds just the right amount of sparkle, without looking over done.  I used a sentiment and frame set from Paper Trey Ink: Boutique Borders - Baby Stamp Set.  I just love that piece.  It really gives your sentiment rectangle a bit of flair!  Gotta love flair, right?  I love pairing buttons and bows with baby girl cards/projects.  There is something about the softness, the simpleness of them, that just seems to make it all work.
Anyways, thank you for stopping by.  I hope you have been inspired, or at least loved the eye candy, so to speak.  I'm working on a few 'Spring' themed items (think Bees and Bunnies) for the Spring Craft Fair March 15th, so stay tuned for those.  I should have some photos up by the weekend, if not sooner.  We'll keep our fingers crossed for sooner {smile}.


Wednesday, October 16, 2013

Glistening Pretty

I had a very productive day, yesterday.  I  made some covered note pads, gift bags, canned 2 recipes of  Christmas Cranberry Relish, and 30/+ bottles of homemade vanilla.  I have a few holiday Arts and Craft Fairs coming up, soon.
When I started crafting for Arts and Craft Fairs, about 5 years ago, I have alway created holiday paper crafts with non-traditional Christmas colors.  When I say, 'non-traditional' I mean color combinations that aren't 'red and green', or 'blue and silver'.  My first holiday card of non-traditional colors, was Spring Moss and Basic Black.  It was a big hit.  Alot of folks liked the 'freshness' of this color combination.
Over the last few years, I have become a big fan of Authentique paper.  I love the colors, patterns and graphics.  One of the new holiday collections I have purchased and crafted with is:  Glistening.  It has a soft brown, a pale aqua, a mauve, and cream color combination.  The patterns have polka dots, snowflakes, plaid, lines, and vintage drawings.  I purchased a few sheets to see what I could make with this pattern paper.  And, now I am in love with this pattern paper!
Here is a sneak peak of a gift bag I crafted today.

sneak peak: gift bag
I used a retired mauve card stock: pale plum.  I also used Aqua Mist by PTI and Soft Suede by Stampin' Up!.  I cut a snowflake using silver glitter cardstok.  I painted the edges of the heart with some picket fence distress paint and glitter.  I tied an aqua mist vintage button to the cardboard heart with some cream twine.  The snowman and children silhouette stamp is from CTMH, and was stamped with baked brown sugar classic ink.
Thank you for stopping by, and see what I've been doing.  Tomorrow, I will share a sneak peak of a covered notepad I made yesterday.  I used some vintage inspired pattern paper.  A little teaser: I used a stamp set from Farm House.


Monday, August 19, 2013

Text Mannequin

I have 'fixed' this card.  A tiny change, but I believe that it makes the card looked 'finished'.  
I have not uploaded the 'new' card to either challenge.
This week is off, to a crafty start {smile}.  It feels good to get time in my craft room.  I have craft deadlines, and so any free time, to create what I want to create, is time well spent.
I am playing along in two of my favorite paper challenges this week: the Shabby Tea Room and Mojo Monday.  The Shabby Tea Room (#180), has a beautiful inspiration photo, along with a few requirements: fabric, flowers, and use the colors in the photo.  Mojo Monday (#307), has a sketch.  Sounds like a match made in heaven, huh?

the Shabby Tea Room challenge #180
use these colors, fabric, and flowers

the Mojo Monday sketch #307

here is what I created:  (original)

'fixed' card (not an additional submission to either challenge)

I used bits and pieces from different companies, and brought them all together.  I started with juniper cardstock by CTMH.  The matt is crumb cake cardstock by Stampin' Up!.  The main pattern paper is Out and About by My Mind's Eye.  The triangle pattern pieces is Grace by Authentique.
I machine stitched the triangle pattern papers to the main panel.  I just love this little touch.  The inside edge was distressed with scissors.  I used a narrow piece of crumb cake cardstock and used a heart border punch to create the decorative edge.  I layered this decorative edge piece under the distressed edge of the triangles.  I cut two 3/4" strips of Life Stories pattern paper by My Mind's Eye.  I added a scrap piece of crochet trim for my third banner piece.  
I added two buttons tied with cream twine from Paper Trey Ink.  The top button is from the vintage button collection by Paper Trey Ink, in aqua mist.  The bottom button is from Amuse Studios in Bermuda.
I did not use a circle for my large shape.  I really didn't like the look of the circle.  So, I changed the shape to a mini top note shape.  I really liked this look better.  I used a tiny blue floral print from Life Stories collection.  
I stamped the sentiment in basic black classic ink by Stampin' Up!.  The stamp set, is from Paper Trey Ink, and is one of the Signature Series stamp sets.  The dress form.  This set is a treat.  I added a aqua mist button tied with cream twine, just below the sentiment.
I used the dress form die to cut the shape, from basic black cardstock.  I used the die, again to cut the body of the mannequin from text paper.  I used scissors to trim the shape, and adhered it to the black card stock.
I wanted to add some kind of trim to the dress form.  So, I did a random pleat with some Paper Studio crochet trim.  I machine stitched the crochet trim to the dress form, to help secure it.  
I used a thin, 1/4" pear pizzazz taffeta ribbon to create the rolled ribbon rose.  I adhered it to the dress form with my hot glue gun.
I printed a digital spool label, and used a 1" circle punch to cut the shape.  I sponged the edges with crumb cake classic ink.  That way, there wouldn't be a stark white space.  I tucked this spool label just behind the dress form.
I had an aqua blue paper blossom in my stash from a purchase I made almost 2 years ago.  I brushed picket fence distress paint on the petals.  While the paint was still wet, I dunked the painted blossom into my tub of dazzling diamond glitter.  I used my hot glue gun to adhere this sparkly paper blossom to the bottom of the dress form.

I hope you get a chance to play along with both of these fabulous paper craft challenge sites: the Shabby Tea Room and Mojo Monday. 


Tuesday, August 6, 2013

Pink Baby

I was looking at a few of my favorite crafting challenge sites earlier this week.  And well, one challenge site that I always look at, but don't always participate in, is celebrating their 200th post!  I think that is great! and I wish them continued success and I hope the next 200 challenges are more fun, more exciting, and have more and more participants!
Just Us GirlS challenge site, have a sketch this week.  All you have to do, is use the sketch, and enter!  


here is what I created:


Every now and then, I really need to play along in a challenge that doesn't require a specific manufacturer.  So, in this challenge, I used a little bit of products from quite a few different favorite manufacturers.
I started with crumb cake cardstock as my card base.  I just love this heavy weight card stock.  The two pink pattern papers are from Teresa Collins, Sweet Afternoon collection.  I just love this pretty, soft, pink with a variety of collage images.  I wanted to provide a break to the mirage of pink patterns and images.  So, I added a strip of polka dot pattern paper from Authentique, Grace collection.  
I matted the polka dot pattern paper with pink pirouette cardstock and machine stitched a simple border.  I did a zig zag machine stitch to adhere the seam binding to the polka dot pattern paper.  I wrapped some brown bakers twine around this panel.  I adhered a multi-loop bow, with a bakers twine tied button to the center of the bow.  I included a tiny tag, stamped with 'SWEET', in baked brown sugar classic ink.
I matted the variety text pink text pattern paper with crumb cake card stock, and machine stitched a simple border.  I inked a stork image with soft suede classic ink, and stamped it onto the pink text pattern paper.
I added three cream vintage paper trey ink buttons to the bottom lower right corner.  I wanted to repeat the pink, so I cut thin strips of pink pirouette card stock and threaded them through the vintage buttons.
I added a sentiment label to the pink text pattern paper.  I stamped the sentiment in soft suede classic ink and used my modern label punch to create the label.  I matted the label with pink pirouette card stock, and added half pearls to each end.  I adhered the label to the card front with foam tape.  Finally, I gave the whole card with a few spritzs of my home-made frost shimmer spray.  To help give this sweet baby card, a bit of sparkle!
I hope that you get a chance to play along with the wonderfully talented ladies over @ Just Us GirlS challenge.  I know that they would love to see what you create!