Sunday, January 31, 2016

Banner Love Card

Welcome.  I had a few minutes this morning, to create a blank greeting card.  So, it was a good morning {smile}
I am entering this card in three different challenges.  A color & theme, a tic-tac, and an anything goes.
So, let's start with the color & theme challenge:  {Cupcake Inspirations}
The colors are kraft, cream, white, and a sweet vintage blue/mint.  And don't forget Banners!


The next challenge is the tic-tac challenge.  These are always fun, because you decide what 'squares' you want to play with.  Just Us GirlS wild card challenge.
ribbon, die-cuts, buttons
And finally, the last challenge, is an Anything Goes themed challenge: Brown Sugar Challenge
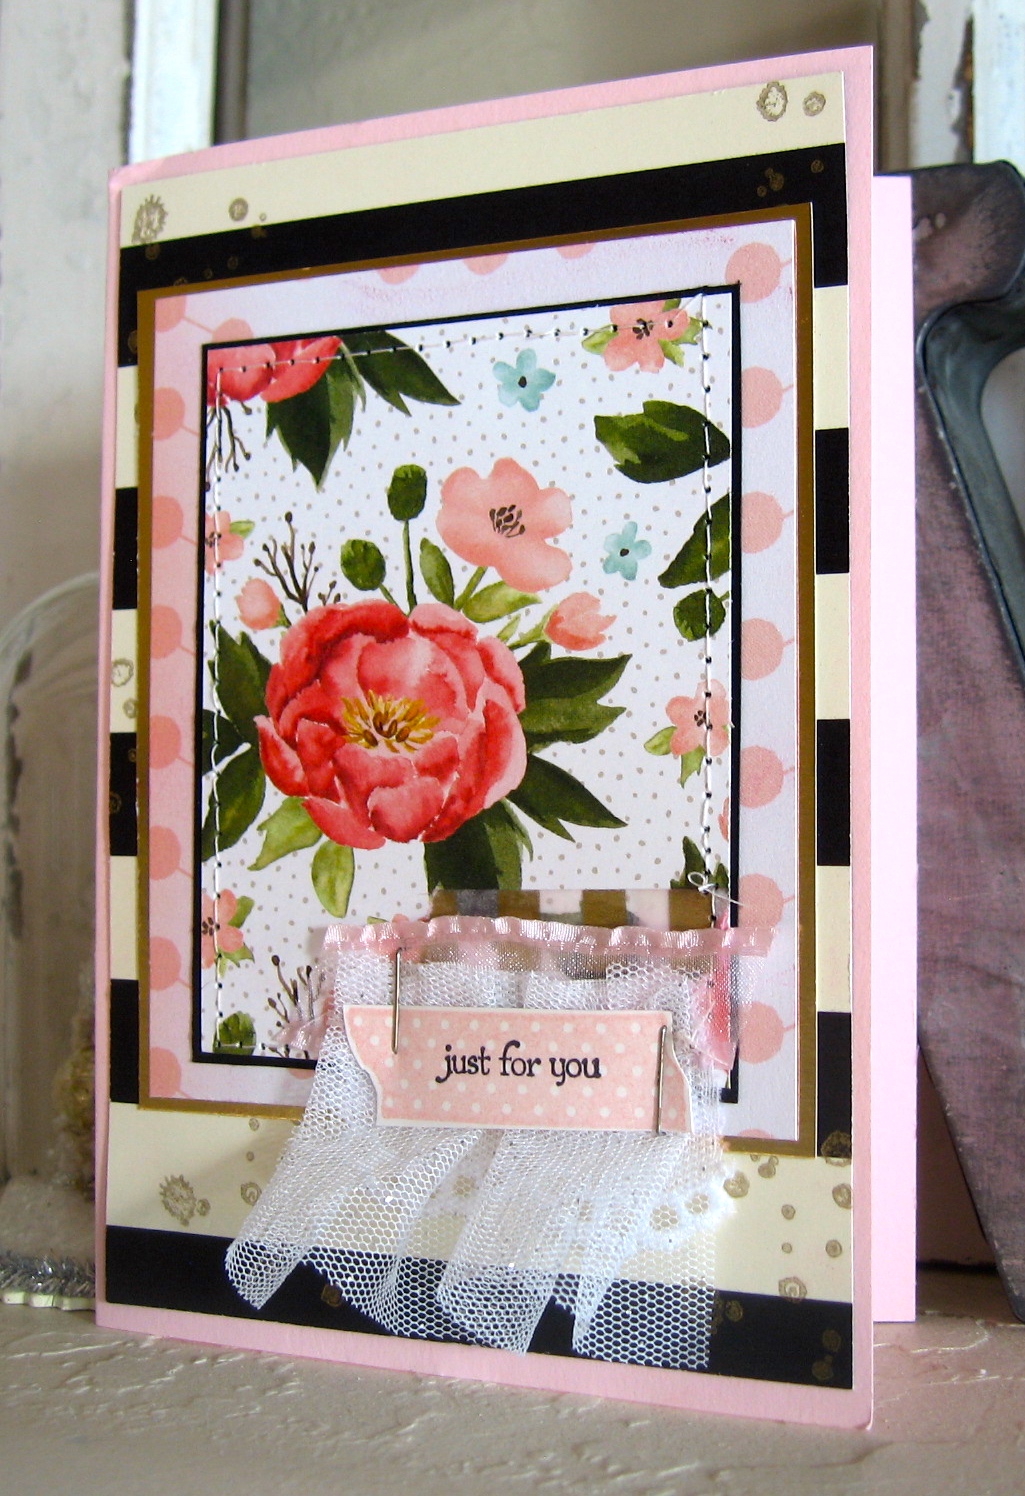
and my card:

Recipe:  The card base is made with mint macaroon card stock by Stampin' Up!.  I just love this vintage color.  I added a piece of background text pattern paper by Melissa Frances.  To jazz up the text paper, I did some stamping onto the paper.  I inked two stamps from the Timeless Texture stamp set by Stampin' Up!  I inked the flourish stamp with mint macaroon classic ink, and the rings stamp with baked brown sugar classic ink.
I had a scrap piece of this laurel printed kraft paper, so I cut a banner end.  I machine stitched some taupe lace and lost lagoon striped cotton ribbon to the top.  I added a trio of buttons tied with light brown bakers twine.
And now, time for the banner!  I used the gold bakers twine by Stampin' Up! and then strung various banner pieces.  I cut two short banner pieces with a hand held punch (by Stampin' Up!)  I die cut two tags from gold glitter paper and music paper.  I used a banner die to cut the two long gold foil pieces.
I wanted to add some bling to the banner, so I strung two charms: black bow, and white love pendant.  
Finally, I added three banner trims: thin gold tinsel, and thick twine in baked brown sugar.

I'm off to get a few chores done.  I hope you have been inspired, to play along with any or all of these challenges.  {smile}


KEEP Collective

Welcome.  I just wanted to share with you, a new adventure I am going on.  I saw these beautiful bracelets with slider charms, and just HAD to make one for myself.  Anyways, I signed up to be a 'designer' and I am ready to help you create your own one-of-a-kind jewelry statement piece!
here are some ideas as to what you can create:

I just love the gold charms with the brown leather double bracelet 
a sweet collection of rose gold mesh bracelet, and ivory leather
or, a little something more grungy in black and white
a smaller statement, but a lot of impact


Please, check out my PAGE, and create your own one-of-a-kind, personalized jewelry piece!  Oh, if you would rather share this new discovery with your friends, host a party!  Just invite your guests, and we can spend an hour creating beautiful jewelry pieces OR host a party on-line!  Either way, you will get to enjoy the benefits and create something meaningful for yourself!


Thursday, January 28, 2016

Modern Chic Card

Howdy!  I forgot to post this greeting card over the weekend.  {frown}  And the challenge has already closed.  Oh well.  I need to get a bit more organized.  But I still want to share it with you! {smile}


and a different view


I couldn't really decide which angle I liked best.  So, I'm sharing both with you!  This card is a bit 'flat' for my usual style, but I just thing it's perfect!
Recipe:  The card base is pink pirouette card stock, by Stampin' Up!  I just love this shade of soft pretty pink.  
The black and cream layer is a pattern paper from Stampin' Up! Timeless Elegance DSP.   I did add some gold stamping to this pattern paper.  I used a retired splatter stamp, randomly.
The pink polka dot pattern paper is a scrap piece I had left over from an earlier project.  So I don't remember who makes it.  I matted this pattern paper with gold foil card stock by Stampin' Up! as well.  
Next, I added a scrap piece of Birthday Bouquet DSP, by Stampin' Up!  Isn't this floral pattern paper just gorgeous!  I love it!  It is matted with basic black card stock, by Stampin' Up!  I added a simple border stitch with my sewing machine.  It holds all the layers together.  {smile}

Then, I added layers of embellishments!  First I added a piece of gold and white striped washi tape from Stampin' Up!.  A scrap piece of pink sheer ribbon, a piece of cotton eyelet trim, and a scrap piece of pleated tulle.  
I stamped the 'washi' tape in blushing bride classic ink, using another stamp set by Stampin' Up!  I stamped the sentiment from teeny tiny wishes stamp set, in basic black classic ink and fussy cut it out.  I stapled the sentiment right on top of the trim collection.  I used a gold sharpie to color the staples.  And Viola!
Thank you for stopping by!  I hope you have been inspired to create something pretty, even if it's just for yourself! {smile}


Tuesday, January 19, 2016

Pretty Vintage Mason Jar

So, I've been busy crafting.  I'm trying to get a few different, and new, items for this weekends Trash to Treasure Trunk Show.  But, I want to have repurposed, recycled, and reused items, that have a new, pretty life!  {smile} And one of the things I love to make for parties, is painted mason jars.  But I didn't just paint and distress my jars.  I also added some trims to jazz-up the jars! {smile}

To start, I painted the jar with cream/vanilla chalk paint.  I wanted a warm color under the main color, of white.  I allowed the paint to dry in-between coats.  I painted the jar with white chalk paint, as my final color and layer.
Once the paint was dried, I started distressing the jars with sandpaper.  I used three different grits of sandpaper.  I started with a medium grit, to knock off the most paint.  I did that, over all the raised lettering.
Then, I used the fine sandpaper to distress areas of the jar that would normally receive some 'wear and tear'.  And finally, some super fine grit sand paper, over the whole jar.  That way, all the brush strokes and 'thick' painted areas could be removed, and allow some varied imperfections to shine through. {smile}
The final touch was a layer of a creme sealant.  I hand-applied the sealant with a sponge and in a circular motion.  Once it set for 30 minutes, I used a soft rag and buffed the sealant.  Now, this distressed jar, will not 'distress' any further with normal handling.
No paint was applied to the inside of the jar; that way you can add fresh flowers, or a plant, or anything else that may require water.  *Just be careful not to soak or scrub the outside of the jar.
Now, let me share another jar.  This one is distressed in the same manner as the other jar.  However, I added some silver gilding randomly to add some antique sparkle.
I wrapped some taupe colored lace around the mouth of the jar.
I then added some antique pink tinsel just above the lace.
And then I added some pink and white paper shred garland.
The final touch, was a pale pink seam binding multi-loop bow, tied with thin silver cord, and an antiqued star added.
Thank you for stopping by today to see what I have been crafting.  I hope you have been inspired to paint and distress an empty jar for yourself.  And have FUN decorating it with what you have on hand.  {smile}

Sunday, January 17, 2016

Pretty Pink and Purple Fabric Strip 12-inch Wreath

Howdy!  I am still making torn fabric strip crafts.  Today, I made a 12-inch wreath.  The wire wreath form I used is 12 inches wide, and has 4 rows of wire.  I tied the fabric strips, ribbons, and trims, to all four rows of wires, making this wreath full and simply beautiful!


For the fabric part, I used three different pink pattern fabrics, and two different purple pattern fabrics.    The fabrics used, measures almost a whole yard.
I also added some ribbons and trims, to help convey the feminine, shabby chic, and vintage style of this hand-torn fabric wreath.  
I used over 25 yards of ribbons and trims.  I added pink and purple seam bindings.  Along with a chevron pattern cotton ribbon in both pink and purple.  I added white lace and white velvet ribbon for softness.  And finally, I added pink glitter tulle and silver-trimmed pink satin ribbon for sparkle.


Finally, I added a yard of this beautiful wide (1 1/4-inch) rose-pink ribbon to hand this beautifully sweet fabric wreath, to provide you with a way to hang this wreath.  This gem of a wreath will look perfect hanging at your next tea party, sweet 16th birthday party, or that very special first birthday celebration!  
This pink and purple hand-tied fabric wreath will add the perfect final touch hanging at a cake table for your next big event: wedding, engagement, retirement, or special birthday celebration.  You can purchase this one-of-a-kind hand tied fabric strip wreath HERE .  


If you would like me to create a one-of-a-kind, fabric strip wreath for your next celebration or for that perfect final decor item for your newly decorated room/home, please contact me with your requests: size, color(s), and materials.  Or simply come out to the Trash to Treasure Trunk Show next weekend, to see my creations in person.


Saturday, January 16, 2016

Pink, Aqua, & Yellow Fabric Strip Banner/Backdrop

I wanted to share with you the latest fabric strip banner/backdrop with you.  I finished this last week.  But with the limited day light hours, I wasn't able to get a decent photo until earlier today.  I can now finally share with you what I have created.
I used fabric from Tilda.  I just love the patterns, and the material washes very nicely.  It's a big investment.   The fabric is sold at a premium price and international shipping is a bit steep in price.  But, just look at the finished product.  I think it's worth it {smile}


The fabric banner measures 4 feet wide.  Yes, that's 48 inches of beautiful fabric and trim pieces!  Each fabric strip and trim measured 22-inches long before they were hand-tied to the jute twine.   I used a total of five fabrics: 3 tilda, one aqua blue with gold foil blossoms, and a white cotton with taupe heart trees.  I used trims, laces, and ribbons to help accent the colors and over-all look of the banner.

There are seam binding, laces, ruffled chiffon, cotton ribbons, and pink glittered tulle to accent the beautiful fabrics.  I just love how this shabby chic, pretty banner turned out!  And yeah, you can buy it! HERE

Why not add some sweet, shabby-chic prettiness to your home, or next party?  This banner would look adorable over a crib, or to decorate a cake table at a farmland, shabby chic wedding, or to the top of a window for a 'no-sew' window treatment in your creative space, or simply to add some homespun beauty to a kitchen.


I have shared a few banners, and I hope you like them.  If you love these, but would love a different color combo, or length, or width, just convo me.   Give me the opportunity to create something beautiful for you.  And as always, special orders/custom orders do NOT acquire an additional charge.  Ok, I am finishing a few wreaths, so I need to sign off.  I'll post photos of the new wreaths as soon as possible.  Also, these banners and wreaths will be for sale @ this years Trash to Treasure Trunk Show in Albuquerque, on Jan. 23rd, 2016, 9a - 5p.


Monday, January 11, 2016

Cream & Gold Fabric Strip Banner

Howdy!  I'm having a lot of fun, and excited to share with you another fabric strip banner.  This one is a little more elegant.  I used all neutral colors: cream, vanilla, white, beige, taupe, brown, and gold.
I also used a variety of textures: linen, cotton, satin, sequin, and chiffons.


The particulars:  I used five different, but beautifully coordinated fabrics: taupe polka dot, beige diamond pattern, gold foil polka dot, cream, and gold sequin fabric.  I just love how pretty and elegant these look together!  This hand-tied fabric strip banner is 4feet wide.  There is 18 inches of twine at each end to make it easy to secure this banner.  The strips measure approximately 10 inches long.
So, I added some pretty trims {smile}.  I added a brown natural cotton wired ribbon.  I just love the texture that it adds.  I also added three different but beautiful laces: antique gold, cream floral, and white lace.  For the ribbons, I added two different satin ribbons: beige and vanilla striped.  I also added gold sequin trim and white rosette trim.  I love how the stripes and polka dots work so well together.  {smile}


Use this hand-made, homespun banner to dress-up a window, a headboard, a wall, or crib, etc.  You can also use this decorative piece to decorate your next party!  Hang this banner at the edge of a cake/gift table, use as a backdrop for the cake table, or photo booth!  Let the pinks and purples add that special girl-y touch to your next birthday party/tea!
This banner has been added to my Etsy shop, HERE.  This beautifully hand-tied fabric banner is ready to ship, but if it doesn't sell soon, you can see it in person at this year's Trash to Treasure Trunk Show @ Nativo Lodge in Albuquerque, NM on Jan 23, 2016.


Sunday, January 10, 2016

Nostalgia Fabric Banner Finished

Whew.  So, I finished my Nostalgia Banner.  YAHOO!  I ended up adding some silver/grey double faced satin ribbon.  I added silver/grey, because I had added some silver sequin trim.  And, it is for Sale in my Etsy shop, HERE.


The particulars:  I used five different, but coordinating patterns of fabric in pinks and purples from Moda.  I also added, pink seam binding, purple seam binding, white velvet ribbon, silver/grey double faced satin ribbon, silver sequin trim, lavender tinsel trim, two patterns of white lace, purple chevron cotton ribbon, pink satin ribbon with silver piping, and pink sparkle tulle.  The fabric portion of the banner measures 4 feet wide.  The strips measure approximately 9-inches long.  The fabric has been cut 1-inch wide.  The banner is strung on thick jute twine.  There are 18-inches of twine at each end of the fabric banner to allow plenty of room to secure it.


Use this hand-made, homespun banner to dress-up a window, a headboard, a wall, or crib, etc.  You can also use this decorative piece to decorate your next party!  Hang this banner at the edge of a cake/gift table, use as a backdrop for the cake table, or photo booth!  Let the pinks and purples add that special girl-y touch to your next birthday party/tea!

I'm making a fabric wreath with the same materials.  Stay tuned!  But don't fret, I'm also making more, but with different colors (red/pink, blue/brown, cream/gold, mint/cream, and a few more!) and patterns.  I have my cream and gold material washed and dried, now all I have to do, is cut it into strips!  {smile}  I'm making fabric strip banners and wreaths.  These will be for SALE in my Etsy shop and @  this year's Trash to Treasure Trunk Show (Jan. 23, 2016) in Albuquerque, NM.


Saturday, January 9, 2016

Nostalgia Fabric Banner

Ok, as promised, I have a picture of my latest fabric strip banner.  I used some new fabric from the Nostalgia collection by Moda.  It is simply beautiful!  Pinks, Purples, Creams, with elegant and fresh patterns.  Be still my heart! {smile}
To help bring out the beauty of the pinks and purples, I added some pink pirouette and wisteria wonder seam bindings, and a few extra sweet trims.


I added two different white lace trims, wisteria wonder chevron stripe ribbon, pink pirouette and wisteria wonder seam bindings, silver sequin trim, white velvet ribbon, pink satin ribbon, pink sparkle tulle, and pale purple chenille trim.


I made this fabric strip banner this morning.  And I don't 'think' that it is 'done' yet.  It looks like it is missing something, that it's not quite finished.  So, I hasn't been added to my Etsy shop yet.
Anyways, the fabric portion is 4 feet wide.  Each strip is 18 inches long, so when 'tied' to the twine, each strip hangs 9 inches.
I will be making a fabric strip wreath using this same fabric and trims.  Hopefully I get the wreath completed tomorrow.  Thank you for looking!


Saturday, January 2, 2016

Berry Pretty Basket

Howdy! and welcome!  I hope this new year is off to a wonderful start for you! {smile}  Me? well, I have been in my craft room, when I'm not shoveling/plowing the new snow fall.  So, I'm doing good! {wink}  Last month, I met this charming lady, Elma.  Elma, just loved the crafts she saw at one of my Holiday Craft Fairs.  Anyways, Elma, is putting together a Trash to Treasure Trunk Show, and  invited me to participate (be a vendor) at this years Trash to Treasure Trunk Show, and well, I accepted.  {super happy!}  I have been brain storming as to what I could create/craft to sell at the Trunk Show, and I believe I have a few 'new' crafts to sell! {Yeah!}


My main focus, is to craft/create stuff that is repurposed.  Because let's face it, isn't that the whole premiss behind a 'Trash to Treasure' Trunk Show?!
I found a stack of these plain white berry baskets in my craft room.  Originally, I purchased them to decorate for Easter.  And I did.  But only 4 were used.  So, I have quite a few left, and I knew I could do something 'pretty' and shabby chic with them.  I took out my bin of fabric scraps, trim, and sewing machine and I decorated the outside of one berry basket.  [It's my 'sample'.]  
and here it is:


I stacked a strip of red velvet, a strip of red and white seersucker, and a strip of white eyelet trim, and machine stitched them together.  Adhered the layered material to the outside of the white berry basket.  Made a hand sewn red velvet blossom, and adhered over the seam of my stacked material.  Viola!  Now, before we get too far ahead of ourselves, I haven't 'finished' this berry basket yet.  I haven't quite decided on what to add to them.  I was thinking about adding a tag,  or leaves, or an altered clothes pin, or shred, or a doily, or something else.  I just wanted to share my creation with you.  I believe that I will 'package' these gems in cello bags, that way you can 'see' it without leaving finger prints.    And unfortunately I don't come up with a price yet either. {frown}

But stay tuned, I have been 'working' on a few fabric banners and wreaths, and I want to share those with you soon.  {smile}  I hope you have been inspired to create something 'new' out of something old.  {smile}