Showing posts with label lace. Show all posts

Thursday, September 13, 2018

Something Blue Plastic Money

Welcome.  If you were here the last few days, you saw a paper tote and a Birthday card I created with the Something Blue collection by Prima.  And today, I want to share the large packaged gift card holder I created with the same collection.  I know that this paper collection has a wedding theme.  But I just love the patterns, colors, and images.  It has that shabby chic, vintage look.  And we all have used themed collections for different projects. {smile}


Recipe:  This gift card holder, holds one of those gift cards that you purchase at the grocery store, or Walgreens that comes 'packaged'.  So, instead of ripping open the packaging and pulling out the gift card, you simply slide the whole thing inside.  Like a big, beautiful 'pocket'.  [yes, I make quite a few of these for craft fairs - it makes gift giving easy.]
To keep each part of these 'gifts' coordinating, I repeated the colors, the pattern papers, the embellishments, and the little touches.  It's the easiest way to make all parts of the package look like they all belong together.  [repeat, repeat, and repeat.]
I started with Kraft card stock by PaperTrey Ink.  [I can't rave enough about the quality, strength, and durability of this card stock.  It holds up to all of my embellishing!]
I used the dark grey polka dot pattern paper as the matt.  I just love the simple beauty of polka dots.  I then used the dark grey, white, and kraft bird print pattern paper as the main panel.  I love the birds!  I did pay close attention, to make sure all my patterns are oriented in the correct direction.  [Little details like this, do show your love.]  I did a simple border stitch with my sewing machine to the layered papers.  Now, before you get anxious, it really isn't that hard.  I always have my sewing machine out, so access to it, is a breeze.  I add a little adhesive to the middle of the stacked papers, and stitch along the border.  It doesn't have to be perfect - actually that adds visual interest.  But please don't be sloppy.  There is a difference between sloppy, tailored, and allowing the machine to run in its own direction.  {smile}
I used one of the journalling cards as my sentiment piece: true story.  I wanted something already printed, to add to the 'finished' look.  I used a few different 'book' themed stamps for my sentiments, but wanted something more personal.  So, I used a fancy script stamp set from PaperTrey Ink: Penned Elegance.  The sentiments are general, but have this beautifully fancy font.  
I didn't want to compete with the beautiful pattern paper, so I simply added trims that complements the paper.  I used a scrap piece of cream lace.  It's about 2" - 2 1/2" wide.  I then layered a mint striped ribbon over the center of the lace.  
I wanted to make the white accents in the pattern paper pop, so I added a white paper blossom.   This big, beautiful paper blossom, is from the 1$ bin at one of those big box craft stores.  [yes, I have a few packages of paper blossoms from these bins, always on hand.]  I added a mint glitter leaf from Prima to the paper blossom.  I believe these glittered leaves are from the Peppermint collection by Prima.  I felt the blossom needed a little more, so I added a simple bow to the upper left of the blossom.  But I wanted it to have a presence, so I added it upside down.  I just love how this little change in orientation adds something pretty!
All of my metallic additions to this birthday package collection have been silver.  So here is where I made a change.  Something I usually don't do.  But these large white blossoms came with gold accents.  I didn't want to fuss too much with the blossoms, so I ran with it.
I added two vintage buttons just below where the journal card falls.  I selected one mint and one white.  Both to tie in the color theme.  But since the paper blossom has gold accents, I used gold cord to tie the buttons.  I only added two buttons, because I added the clay star.  Yes, the star is made from clay - glitter clay, by me, and baked.  
Inside the gift card holder, I used the same dark grey classic ink, to hand stamp Happy Birthday.  I used a stamp from the same collection: Penned Elegance, so the stamping would match in font.
Thank you for looking.  I hope you have found some inspiration.  Inspiration to either create something new, or use a color you aren't fond of, or use a collection in a direct direction, or simply get back into your craft room.  Whatever you do, to express your creativity does speak volumes to your soul.  {smile}

Tuesday, September 11, 2018

Birthday Blue

Howdy, and welcome.  Oh my goodness, I hadn't realized that it's been a month since I last posted.  I have been crafting.  I guess life has me pulled in too many different directions.  Just like the rest of you.  Life gets busy, and we don't always have enough time in the day to get everything done that we want.  {frown}
This past weekend, a sweet, dear friend was celebrating her birthday.  And well, I wanted to craft something special for her. {smile}  My friend, is a lover of shabby chic, and a junking girl, just like me.  She also loves simpler things in life: a good book, afternoon tea, needle-work, family, and close friends.  
My favorite styles of crafting are shabby chic, retro, and vintage.  So, crafting something for this special girl friend, is easy.  I pulled out some pattern paper by Prima: Something Blue.  I know, this is a 'wedding' themed collection.  But, I think I can make it work {wink}.
I am sharing with you a gift tote that I created.  I also crafted a Birthday card, a bookmark, an extra card for her stash, and a packaged gift card holder.  Let's start with the tote:


Recipe:  The card stock tote is made from Kraft card stock by PaperTrey Ink.  I just love their heavy weight card stock.  Sturdy, and strong!  I layered the pink and cream polka dot pattern paper as the matt.  I then added the text & fauna printed pattern paper.  I love how the two pattern papers contrast each other.  I added a simple border stitch to the pattern papers.  
I wanted to add some visual interest and design, so I decided to add two large banner pennants.  I wanted to keep with the contrast, but to play-up the main floral pattern paper.  I used the mint text and black text pattern papers for these banner pieces.  The pattern paper that I truly love, is the floral pattern paper that was added last.  I wanted a decorative shape, so I went with a 'top note' shape.  
I wanted to soften the contrast of the black pattern paper, so I added a small piece of a white paper doily peeking out of the bottom of the pretty floral pattern piece.  To help add a little feminine touch, I added a pair of pale mint half faux pearls parallel to the edge of the tote.
This dear friend, has a love of books.  So, I wanted to include 'books' as an underlining theme.  I pulled out my All Booked Up stamp set by PaperTrey Ink.  I inked the 'tag' portion of this sentiment piece in Mint Macaroon by Stampin' Up!.  I stamped the sentiment and circle piece in Dark Grey classic ink.  I used foam tape to the back of the circle piece and sentiment piece, to lift them off the front of the tag piece.  
I tied a simple bow with rose seam binding to the top of the 'tag'.  I tied a faux pearl and an aqua mist button to the bow with silver cord.  I wanted soft, shabby colors that contrast (rose and aqua), but also a feminine touch (pearl).  To help add some bling & metallic, I selected the silver cord.
I wanted to continue with the softness that trims can add, so I selected a white lace, a rose cotton scallop trim, and a kraft seam binding.  To continue with the metallic, I added a piece of cream and silver bakers twine across the kraft seam binding.  I added a paper blossom from the same Something Blue collection by Prima.  I tied a simple bow with the silver metallic bakers twine just behind the paper blossom.  I used a small snippet of the rose cotton scallop trim, in place of leaves.  This continues with the rose color with the seam binding and cotton trim.
Thank you so much for looking.  I'll post an image and write-up for the Birthday card tomorrow.


Thursday, May 3, 2018

a bowl of cherries

Howdy, and welcome.  I am super excited today to share with you some happy news and a card!  I recently won the challenge over @ Tic Tac Toe Challenge and was given the opportunity to be a guest designer!  How fabulous is that, right!  So, without any delay let's get to their current challenge #tttc046!

right column: fruit, watercolor, free
Now, before you get discouraged, here are some ideas.  For the 'fruit', you could add apple(s) and create a Teacher Appreciation card.  Or lemon(s)/lime(s) for a Summer themed card.  Or add a pineapple for a Hostess card.  For the 'Free', simply add your favorite item: machine stitching, a button, sequins, a paper straw, etc.  The list is almost endless.  Don't forget to use what's in your stash, and most importantly have fun!  This Tic Tac Toe card, really does lean towards a Summer theme.  I can't wait to see what you create.  Here is what I made:


Recipe:  my card, is a typical A2 size greeting card.  (4 1/4" x 5 1/2").  
FRUIT: cherries, WATERCOLOR: color wash on watercolor paper, FREE: machine stitching, button, seam binding, and lace.
The base of the card is made with Crumb Cake card stock by Stampin' Up!, due to their lovely heavy weight card stock.  The main panel is made from a linen plaid card stock by Paper Trey Ink.  I love this soft color!  I added a piece of 6" lace over the main panel.  I 'attached' the lace with some machine stitching along three sides.  I did a quick, purposefully sloppy double border stitch.  I love adding machine stitching to my crafts.  I think it adds a homespun look/feel.  
I adhered a 4" paper doily to the right side of the card.  I simply folded the over-hang around the main panel.  I machine stitched a strip of pale blue seam binding along the lover third of the card to help anchor the seam binding to the card front.  I tied a double-loop bow, and tied a 'swirl' red button to the center of the bow with some gold twine.  This 'fancy' button reminded me of a cherry with its imprinted design.  {smile}
The sentiment is stamped and heat embossed on a scrap piece of white card stock.  I rounded one end, and pointed the other end.  I thought this shape looked like one of those garden/plant markers.    Super sweet, right? {smile}
I made my own embroidery hoop.  I used a die to cut the shape.  I used a scrap piece of wood veneer 'paper'.  I just love this stuff.  But my shock is dwindling.  {frown}. For the inside of the hoop, I took a scrap piece of watercolor paper and stamped my bowl in Versa Mark ink, and added white detail embossing powder.  I used Versa Mark ink to stamp the cherries, and added deep red embossing powder.  I heated the paper, and my bowl of cherries came to life!  I misted the water color paper heavily with water, and then washed it with a pale blue color.  I wanted the cherries to pop! and the bowl to have some contrast, to showcase the bowls design.  I used a fine tip brown marker to create the cherry stems.  (hand drawn)
The final touch was the trio of wood grain printed sequins.  I felt that they helped tie the wood-grain hoop to the card.  I adhered the main panel of this card to the card front with foam tape.
I believe that if you repeat elements/colors, it helps tie that element to your card.  The color I washed the watercolor paper with, matches the seam binding.  The red in the cherries is repeated with the same color of the button.  The wood grain of the hoop is repeated with the sequins.  The white doily and card base are repeated in the plain paper.
I hope that you join this beautifully talented group of ladies over @ the Tic Tac Toe Challenge.  Just let them know which row you are using on their tic tac toe card, and don't forget to have FUN!  Create something beautiful to share with us, but to also share with your family and friends!  Trust me, they will appreciate your efforts in creating something handmade!


Thursday, February 22, 2018

Spring Challenge

Welcome.  I am sharing a post from an international challenge site, that is preparing for a project-based challenge for the month of March.  The site:  Shabby Chic.  This challenge site says:
Привет дорогие читатели нашего блога! 
Сегодня мы хотим рассказать о нашем новом совместном проекте - SWEET HOME! Стартует он 1 марта, в первый день долгожданной весны! И как вы догадались - мы будем украшать свой дом! И творить будем альтер-объекты! А что и как - вы скоро узнаете! Одно пока можем открыть - у нас будет 4 этапа, на каждый из которых будет отводиться по 10 дней, и творить мы будем в неизменных стилях нашего блога - шебби шик и прованс! Почитать и ознакомиться с этими стилями заранее, а также посмотреть примеры работ и мастер-классы вы можете в нашем блоге. И нашими мастер-классами можно и даже нужно пользоваться! :)
Today we want to tell you about our new joint project - SWEET the HOME ! He starts March 1, the first day of the long-awaited spring! And you guessed it - we will decorate your home! And do we alter the objects! But how and what - you'll soon find out! Until one can open - we will have 4 phases, each of which will be given for 10 days, and we will do in the unchanging styles of our blog - Shabby chic and Provence ! Read and become familiar with these styles in advance, as well as see examples of work and master classes you can on our blog. And our master classes could and should use it! :)

inspiration board:

and here is their schedule:
So, you're in 4 stages:
Phase 1, March 1 
Stage 2 on March 12,
3 phase, 22 March 
Stage 4, 2 April 

So, stay tuned, to see what I enter, and don't forget to play along.  And yes, this challenge site does have a 'translate' button, so you won't be left wondering the guidelines.  Finally, your entry must be done in Shabby Chic or Provence style.  See you soon!


Saturday, January 20, 2018

Sweet Peppermint Kisses for Santa

~ photo heavy ~

Howdy, and welcome to my little piece of blog-land.  I hope your new year has gotten off to a roaring start!  Me, I've been doing what I always do: crafting, baking, running, and chores.  So, not much of a change.  But, I am ok with that.   
For my holiday break I got the Flu, and boy was that awful!  I was in bed for a week, and couldn't get  the energy to do much of anything productive.  Then, it was back to work, back to marathon training, back to life.  I have been working on a few special orders: cupcakes, and crafts.  Let's just admit it, those are my two favorite things!
I am entering one of my creations in three paper crafting challenges:  Paper Story, As You See It, and Word Art Wednesday.  We will start with International first, and finish at home.
I stumbled upon this incredible paper craft challenge site while following a favorite paper crafter overseas.  And I am happy I did!  The folks over @ Paper Story have a super talented group of designers who I am sure will inspire you!  This challenge site is from Russia, but they have a 'translate' button, so it is super easy to play along!  Their current challenge is called: Olivier.  It is a 'recipe-based' challenge.  They have given you mandatory elements, just like in a recipe, but with an option to switch one 'ingredient' with something else, just like a recipe.  How super fun is that?  Here is their recipe: Paper, Flowers, Lace, Beads (brads, buttons, chips, dots, sparkles), Chip (chipboard), Tape (cord/braid ok), and Machine Line.  

My next stop:  As You See It.  This challenge site has some very creative challenges, and their design team has a range of styles, so no matter yours, you will be inspired.  Their current challenge is a sketch.  (Love these)
I rotated this sketch 90 degrees left, and then mirrored it
And my final stop was Word Art Wednesday.  I just can't brag about this site enough.  The design team is super talented, the write-up is inspirational, and the site is just plain NICE!  Their current challenge is: Anything Goes & Family Friendly.  Who wouldn't want to play along?

and  here is what I made:

Paper: Sweet Peppermint, Flower: manufactured, Lace: two kinds, Beads: button and sequins, Chip: chipboard mittens, Tape: thin silver cord, and Machine Line: machine sewing on both panels.
another view:


Recipe:  This gift card holder was made with pattern paper from the Sweet Peppermint holiday collection by Prima Marketing.  The base of the 'card' is crumb cake card stock by Stampin' Up!  I just love the heavy weight of it.  The matt is real red card stock by Stampin' Up!, as well.  
I used the tiny green dot pattern paper for the panels.  I didn't want any distractions from the focus: Santa!  I machine stitched this pattern paper to the red matt.
I then layered 4 different pattern papers from the Sweet Peppermint collection: the red stripe, the multi-check, the snowflake, and the multi-colored dot.  I did matt the snowflake pattern paper with crumb cake card stock, to give the layered rectangles a 'base'.  The sentiment/journaling card is adhered to the front with foam tape.  I also added a file tab, from the Sweet Peppermint collection, to the side of the Santa journalling card.
I wrapped two different lace trims around the top portion.  I just love the softness this brought to my 'card'.  I tied a double bow with one of the lace trims.  
The flower and leaves are both from Prima Marketing, as well, and yes, the same collection: Sweet Peppermint.  I just love the contrast between this mint color and the reds.
I added a chipboard piece from the same collection.  I thought mittens were a nice touch.  And the silver outline adds a nice sparkle!
I added some silver sequins to mimic the sparkle from the glitter on the flower and the silver on the chipboard.  I added an aqua vintage button to the lower right corner of the journalling card.  I thought it matched the flower beautifully, and tied it with some slim silver cord.  
here is what the 'card' looks like opened:


I love making these 'packaged' gift card holders, because it makes gift giving super easy.  Now, when you purchase your gift cards from the store, you no longer have to rip them open, to give the card.  Just slide the whole thing, right into the pouch, and viola!  I make a lot of these for my Holiday Craft Fairs, and folks seem to really enjoy them.  {smile}  My crafts are 'one-of-a-kind', in that I do NOT mass produce.  It makes each item special.  Now, I do make similar, but not match-matchy, carbon copies.  
Thank you for stopping by.  I hope that you have been inspired to play along with any/all of these challenge sites.  Enjoy your weekend, and take care!

Saturday, December 30, 2017

fa la la Peppermint

Howdy! and welcome.  I hope you all had a great holiday.  Me, I got the flu.  I have been in bed sick for a week now.  And for those who know me, I don't do well being 'down' or laid up in bed.  So, today, I decided, I'm getting up.  I am getting on with life.  Change your mindset, and you body will follow.  It's like when you have been running for 4 hours, and you have 3 miles left, and your legs are tired and heavy, and your mind is screaming at you to stop.  Just stop.  But, you have to turn down the volume in your head, push forward, and keep going.
I made another gift card holder this morning.  I am entering it in three of yesterday's challenge post.  I just loved the themes - Sparkle, Lace & Paint, and the sketch was super easy to work with.  So, here we go again!
First stop:  the wonderfully talented ladies over @ As You See It Challenge, have a fun challenge: Sparkle.  You have to add an element of sparkle to your project: glitter, sequins, glimmer paper, etc.  And let's just be honest here, who doesn't love sparkle?  It just makes you happy!


My next stop is Mistress Owl.  Their current challenge is a sketch.  It was super easy to work with yesterday, so why not use it again today.  This challenge site, is from Russia.  They do have a translate button, to help with the language barrier.  I just love their easy-to-work-with sketches.


And finally, my last stop is Shabby Chic.  Another challenge site from Russia, and again, they have a translate button.  This design team will certainly inspire you!  Their current challenge is Magic Frost.  The mandatory elements are: Lace & Paint.  And your entry must be in Shabby Chic or Provence style.  (they have their definition of these styles on their challenge site)


and here is what I created:


different view:


Recipe:  I used Fine Linen card stock by PaperTreyInk for the gift card holder.  I thought it matched the angels in the pattern paper beautifully.  Again, I used Pure Poppy card stock by PaperTreyInk for the matts.  Its a deep red with orange undertones.  I used the red stripe pattern paper from the Sweet Peppermint collection by Prima, again.  I just love the look of the stripes. {smile}  The pattern paper I used for the main panels is a digital paper.  I printed it onto whisper white card stock by Stampin' Up!.  I love using their white card stock to print my digital papers.  It takes the ink very well, and the card stock is light weight; making layering a breeze.
I used my sewing machine to add a simple border stitch around each panel.  I think this little element adds a lot of homespun charm.  {smile}
I did a better job of lining up my trims.  I layered a white crochet trim, a taupe lace trim, and a mint ribbon.  I machine stitched them to the panels with silver thread.  The silver thread is beautiful, but quite a pain to work with.  The metallic in the thread gives it a bit of stretch, with little tension, so it breaks easily and frequently. {frown}.
I stacked two small journalling cards to the top panel.  I selected the 'fa la la' girls, and a December Bingo board card, this time.  I like how the 'fa la la' color matched the reindeer in my pattern paper.
I die-cut, stamped, and heat embossed the wreath.  I die-cut the wreath from Fine Linen card stock.  I stamped the wreath in VersaMark ink, and used my fine detail  white embossing powder.  This delicate wreath takes a steady hand in stamping.  My trick: place a contrasting color of card stock under the wreath, so when you stamp, you have a better view of lining-up the image.  I adhered the wreath to the front panel.
I tied a double bow with the mint ribbon.  I tied a small plastic peppermint candy to the mint bow with silver twine.  I wanted a bit more red on the card, so I adhered a red button to the bow's center.  To add a bit more sparkle, I added a mirror plastic star just above the button.
The paper blossoms were painted and glittered.  I used a white pearl paint to the petals, and while the paint was still wet, I dunked the blossoms into glitter.
I painted two silver jingle bells with gesso, and glitter.  I tied them with silver bakers twine.  Then tucked them under the larger blossom.  Again, I wanted more red, so I tucked in a red pom pom by the cream paper blossom.
My sentiment was not hand-stamped.  The sentiment is actually from a holiday tag.  I simply trimmed it down with scissors, and did a double matt: pure poppy and fine linen card stock.  I added foam tape to the back of the sentiment.  I wanted it to be lifted off the card front.
Thank you for looking!  I hope this last weekend of 2017 ends just how you want it to.  For me, I will be enjoying the quiet time at home.  And I am sure you have guessed that I will be out running.  I am going to do my best at getting in 10-12 miles tomorrow. {smile}


Tuesday, August 29, 2017

Beyond the Page Cupboard

Howdy!  Welcome back {me}, and thank you for hanging with me {you}!  {smile}  I have been busy with all sorts of things.  One of which is a cupboard I have been working on.  Now, no, it hasn't taken me a month to get it done.  But each week, I think, 'oh, let me finish it, and photograph it, and then I'll post it'.  Well, as most of you know, sometimes life has other plans for you.  I actually have had this cupboard completed to this point for almost 4 weeks.  Ugh.  Time is going by too fast.
So, here is my latest project, not complete yet, but getting there!

front view
How gorgeous! right!  I painted the whole thing with black chalk paint.  I wanted black, but not black black.  and not any shade of grey.  So, a soft, not a deep black, is what I (believe) I achieved with the chalk paint.

side & door view

I used quite a few products from Prima Marketing, like the pattern paper collection {Rossibelle), the coordinating blossoms, and tags, and that large ornate resin frame.  I am in love with the rose gold accents!  I love the copper-ish color and the sparkle it provides!

back view

I started covering the bigger pieces first, then using the scraps to cover the two huge pieces.  The two huge pieces are the top and back.  The cupboard is 14" x 10".  And the papers I had are 12" x 12".  So, I tore edges and pieced them together.  
I did add some pieces from my stash.  The door knob, the ribbons, trims, brads, buttons, floral sprigs, and drawer pulls (which aren't finished, yet).
The whole project is rather simple to put together.  Just time consuming.  After I painted each piece, I let them dry for 24 hours (some cases more) and then hand-applied a sealant.  I sealed the paint, because chalk paint can be removed with water.  I then allowed the sealant to dry for another 24/+hours, before I could add the papers.  I used a paper glue to apply the pages.  I adhered the embellishments with hot glue.  The door knob is actually screwed into the door {smile}.  And yes, the whole inside is painted and sealed!
Well thank you for looking.  I just have two drawers left.  Easy peasy.  And to add the last 4 drawer pulls and viola!  Hopefully, I can get this completed before September!  {fingers crossed!}  Oh, this cupboard, and at least 2 others will be for sale at this years holiday craft shows, along with a few Christmas countdown calendars.  Yahoo!!!


Monday, May 1, 2017

Rustic Love

Howdy.  I've been busy.  Busy with life.  But, I imagine you have, too.  I went out of town for several days (had a GREAT time) and then it was back to baking, crafting, cleaning, laundry, working, and taking care of my husband and dog.  See, life.
I took almost a week off from my normal chores and headed to Phoenix with 2 of my granddaughters and daughter.  It's dance competition time of year.  But, we headed out a few days early, to enjoy some fun activities, and some girl time {smile}.  We had a great time.  Spent sometime in the swimming pool, ate some great food, enjoyed some education spots (think Children's museum), and tried our hand at golf.  Yes, golf.  We spent that time laughing more than hitting hole in ones!  Ok, none of us hit a hole in one.  {smile}
Now, I have returned to reality.  The chores never stop, but moms know that.  Once back home, I had to get busy with a few cupcake orders and the never-ending chores.  I also wanted to get some crafts completed.  I am working on an altered art piece.  It's a wooden book-box.  But, I needed some direction, so I headed over to Mojo Monday to get a sketch going.  I loved their sketch so much so, that I actually used it for the cover of the box.  (this sketch is expired)  Here is what I made!


I am using some 'old' pattern paper.  I think, it may still be available at some on-line paper sources.  The Rustic Elegance collection, by Carta Bella, is a beautiful mix of mint, blush, green, and neutrals.  There are mixes of florals, chevrons, circles, text, and flourishes, with a country flair!  Mason jars, bicycles, floral wreaths, wooden plank backdrops, and so much more!
I used various pattern papers from this collection (Rustic Elegance) added a paper doily, some paper blossoms, and lace.  I added simple machine stitching around two of the main pieces, to give it a homespun look.  The sentiment 'love' is lifted off the piece with foam tape.  I haven't yet, but I am thinking of adding some sparkle to the paper blossoms.
I have added white wax to the wooden book box, and now I am adding my paper pieces.  Yes, I will photograph it once it's done.  Hopefully, I get a chance to work on it this week.  But, I have a few cupcake orders to work on late this week.  So, we will see how well I can manage my time.  {smile}
I hope you have a great week!  and Happy May Day!

Tuesday, February 21, 2017

Pennant Birthday!

~ photo heavy ~

Howdy, and welcome to my little piece of blog-land.  I am having a good week!  Hope you are too!  One of the changes I have made this year, is to start each week writing down three things I am thankful for, from the previous week.  It is a way to reflect on my blessings.  By taking my life in smaller pieces, and reflecting, I am truly able to see the good.  And I am super happy with how this small step to 'count my blessings' is working for me!
I had a few moments, ok an hour, to create a card.  And I am sure you all can understand the drive to get your ideas made out of paper {smile}.  And I do know how truly blessed I am, to have a hoard stash I can craft from, when I can't get to a store.  {wink}
I am entering this card in four challenges.  I have to say, I typically don't enter this many, but I will relish in the oddity of this opportunity!
My firs stop is Mistress Owl.  This is an Eastern European challenge site.  They can a sketch for you to work with.  I strongly encourage you to pop on over to the their challenge site.  The design team will inspire you!  Their sketch was easy to work with, so that is always a huge plus in my book.


My next stop is Cupcake Inspiration.  I am always intrigued by their challenges.  This design team will knock your socks off!  Between the very user-friendly inspiration board, and the creativity of the design team, you will be crafting in no time!  I just love their photo this week!  Theme: Chalkboard!  And who doesn't love chalkboard.  It instantly reminds me of school days.  So retro, shabby, vintage.


Now, I just HAD to stop by another favorite challenge: Really Reasonable Ribbon.  This design team will certainly get you to add ribbon, twine, trim, and lace to everything!  The creations will inspire you to try a new technique, and put a bow on it!  Their current challenge is Celebrate!  So birthday, anniversary, new baby, new couple, etc.  You get the idea.

And finally, I stopped by Brown Sugar Challenge.  This challenge site encourage all crafting styles.  And the design team works with their sponsors, to showcase their products.  I think that's wonderful! Their current sponsor has digital images.  I just love digital paper.  And I am starting to embrace digital images/stamps.  Their current challenge is: Birthday!  And who doesn't need a birthday card in their stash?  So, please stop by and see what they have created.


now, roll all these challenges together, and here is what I created:


~ disclaimer: photographing a card with a flair button, is a bit of a challenge in itself!


my card was selected as a 'top 3' for the Really Reasonable Ribbon blog challenge!

Recipe:  This card is a typical A2 size card: 4 1/4" x 5 1/2".  And yes, it fits inside its envelope.  The card base is kraft card stock.  I just love the color and weight of this paper.  It looks so 'old school'.  
I added this beautiful light blue and pink rose digital paper as my main layer.  I did dampen the edge of the paper (top right corner) and scrunch it a bit.  I also distressed the edges, and tore the bottom edge. I sponged a tea stain ink on all four edges.
I added a lace doily from Stampin' Up! to the top left corner.  I just love it peeking out from behind my journalling cards.  (I used two 'chalkboard' journalling cards for my Chalkboard element.)  I also inked the edges with the tea stain ink.
I stamped my sentiment onto the top journalling card in white craft ink, and then added clear embossing powder and used my heat gun to set the embossing powder.  
I fussy cut a digital tag and added it to the lower right of the journalling cards.  
I originally wanted to add my sentiment across the card, very similar to the sketch.  And place my bow to the left of the journalling cards, but I don't have anything that would have worked.  {frown}  I guess I need to go paper craft shopping! {wink}
And then, I layered trims!  Oh my!  My first layer is a cream cotton eyelet trim.  Then a white sparkle tulle box pleat trim.  Then a mint swiss dot lace.  And finally, a pale pink seam binding.  Who doesn't love seam binding?
I tied a double bow with the seam binding, and added a silver metal button to the bow.  Then I tucked in a cupcake flair button just above the bow.  Viola!

Thank you so much for stopping by!  I hope you have been inspired to play along with any/all of these creative challenge sites.  You will not be disappointed in both the talent and the inspiration!


Sunday, February 19, 2017

Love Pink

~ a few photos ~


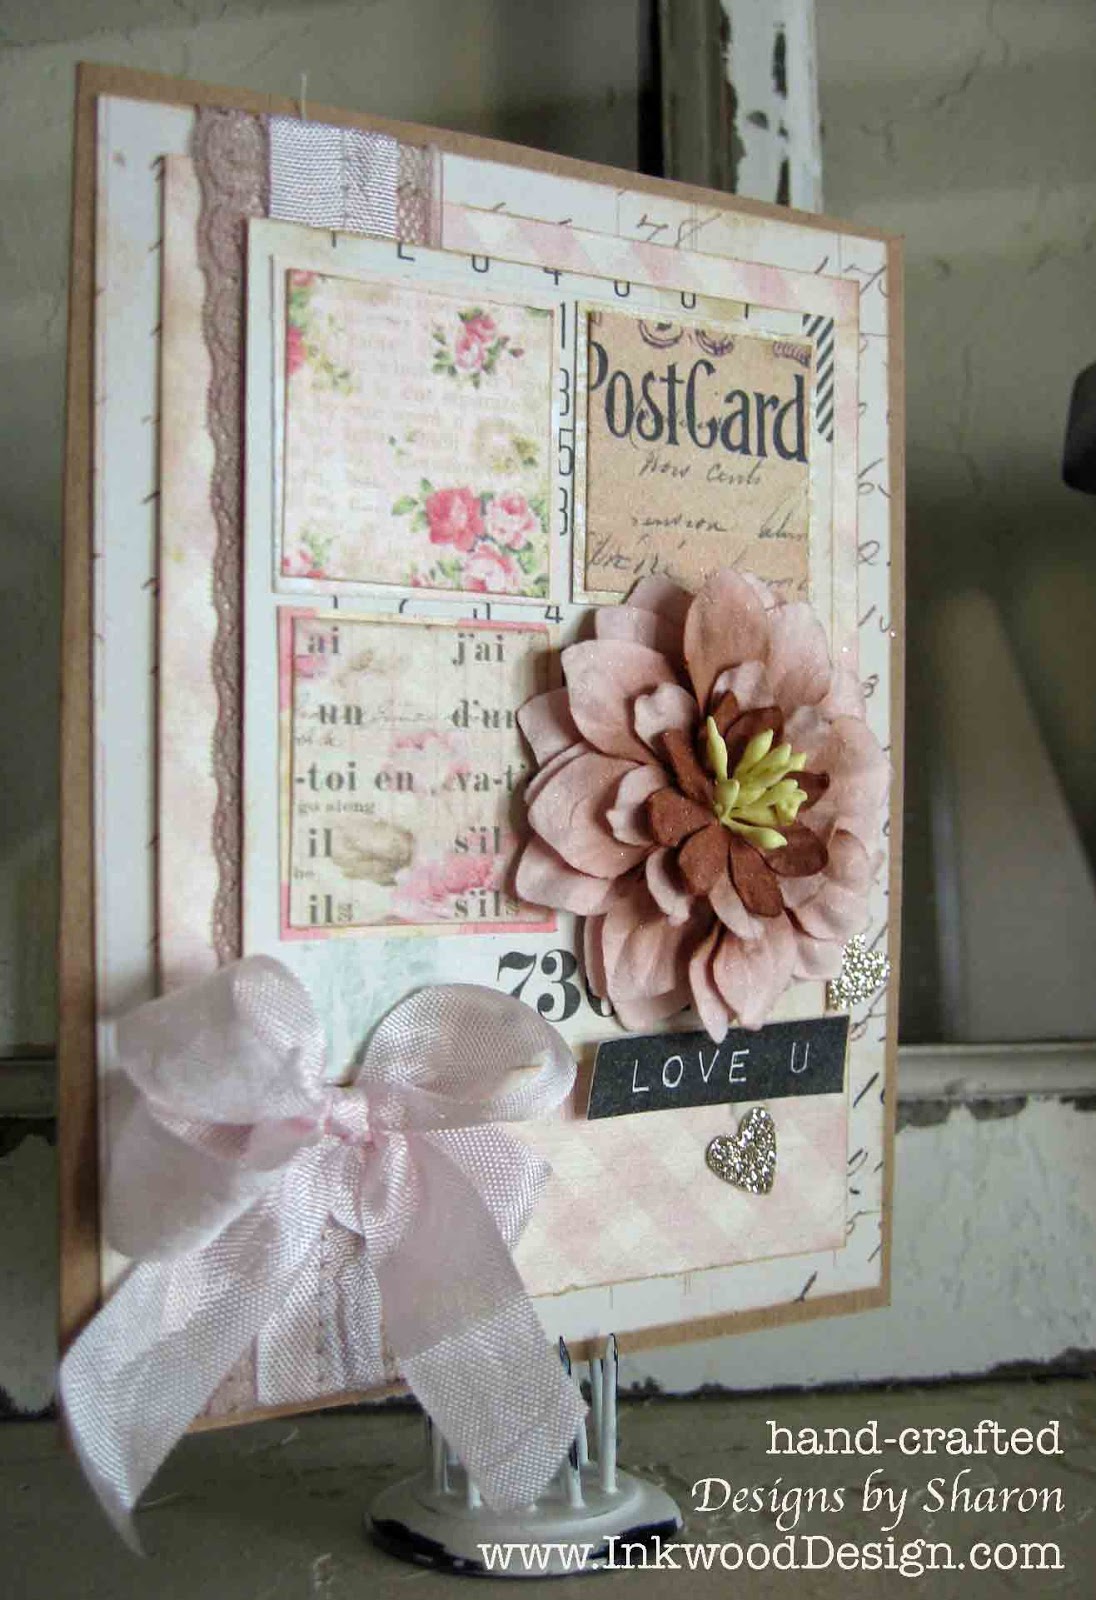
Howdy, I have been busy making a few different cards, getting my tasks organized, and getting some running done. {smile}  But, I want to share with you, the a card I made today {smile}.
I stopped by a favorite challenge site, for some direction: the Card Concept to see what their current challenge is: Vintage.  I have to say, I am a sucker for text pattern paper, and I just love hearts!


My next stop, is an Eastern European challenge site:  Art-Kladovaya.  These talented ladies have a unique and creative take on paper crafting, so please stop by to see what they have created.  Anyways, their current challenge is:  Shabby Chic.


I used their inspirational photo as my palette.  I love the blossoms, and the pink & white color scheme.
I also want to play along with the wonderful ladies over @ Word Art Wednesday.  Their current challenge is: Anything Goes & Family Friendly.  They include a scripture to include in your paper crafting.  And their post are always inspirational!
and here is what I created:


This is a typical A2 size card: 4 1/4" x 5 1/2".  I added layers of my favorite papers: text, gingham, calendar, and floral.  I inked all the edges of all my papers with a tea stain ink pad.  All of my digital papers were printed on whisper white card stock, by Stampin' Up!.  I love the weight of this card stock, and how beautiful it takes ink.
I started with kraft card stock for the card base.  I just love the color, and the weight.  My first matt, is a text pattern paper from Melissa Frances.  I really like the softness of the cream and deep brown color.  My pink gingham matt, is a digital pattern paper.  I just love this pattern.  I think it adds a softness and vintage look.  {smile}

I machine stitched a taupe swiss dot lace and pale pink seam binding to these layered pattern papers.  I also tied a double bow, with the pale pink seam binding.
I cut down a calendar card, to allow the pink gingham pattern paper to show.  I then cut three squares (1 1/2" square) from another digital pattern paper.  I matted each square with a different digital pattern paper.  I just love the mix of patterns & texts.
I added some sparkles to the pale pink & brown paper blossom from Prima.  I adhered the paper blossom to the area on the card, that the missing square should have been placed.
I hand-stamped my sentiment in basic black classic ink, onto whisper white card stock.  I adhered the sentiment with foam tape, to give it some height off my card.  I used a new stamp set: Label Love of Altenew.
I added the champagne glitter hearts to the card front with glue dots.  I felt that it added balance and visual interest to my card.  And finally, I adhered the bow with hot glue.
Thank you for stopping by!  I hope that you have been inspired to play along with any (or all) of these challenge sites.  Now, I'm off to get a few chores done before bed.  


Thursday, February 16, 2017

My Planner

Howdy, and good morning.  One of my new years resolutions, is to be more organized.  Can someone be 'more' organized? or is it simply 'organized'?  Well, I feel that I am pretty organized, per say.  But, I  also believe that there is always room for improvement.  So, I am working on being 'more' organized.  And to help me conquer this task, I purchased a planner to keep everything together at my finger tips.  {smile}
If you do a search for 'planner' on the internet, you will be bombarded with images, tutorials, and various manufacturers products.  A lot of eye candy!  So, during the last week of December, I headed to a local craft store, and picked up a few items.  And I finally did a little bit of crafting, and decorated the cover of my planner, and the inside cover of my planner.  {smile}


My planner is striped in a rose gold metallic and cream.  I really liked how these two colors looked together.  I started with a paper lace doily from Stampin' Up!.  I layered a scrap piece of cream and gold metallic lace, towards the bottom of the doily.  Then I added a piece of pink polka dot washi tape.  I purchased that big beautiful fabric blossom in the clearance isle of a craft store.  So, I hot glued the blossom, to the cover.  I die cut two leaf pieces and my initials from a scrap piece of glitter paper, that is pretty similar in 'gold' color on the cover.  I adhered the two leaf pieces to the upper left of the blossom, and adhered my initials to the right of the blossom.   I adhered the rose gold and rhinestone charm just under the blossom.  And the final touch was adding a trio of blush sequins, and a trio of flat-back 'pearls'.


I am pretty happy with how the cover is decorated.  I didn't want too much on the cover, as I use my planner daily.  It's kind of a ritual now a days.  I open it, and look at my various sections each morning, while I am drinking my coffee.  It helps me stay on track for projects, and I get to review my calendar, and make notes of different items of interest.  I am truly loving this whole process! {smile}  I also wanted to make a few additions for my planner, and to make the inside just as pretty!


I trimmed a Project Life card and re-rounded the corners to this beautiful metallic card:  'By being YOURSELF you put something WONDERFUL into the world that was not there before'.  I think all of us need reminders how special each of us are.  And that we should celebrate not being carbon copies of each other.  
I made 4 different but equally beautiful 'clips'.  I took large paper clips and simply added things I love!  Three are made out of paper, and one is another beautiful blossom.  {smile}  The sign, coffee cup, and mason jar are made from paper.  I added a little foam adhesive between the front and back piece of heavy card stock.  And hot glued the paper clip in place.  For the blossom, I simple tied a double bow to the paper clip and hot glued the pink paper blossom to the bow.  I backed it with a scrap piece of pink felt.  I added some small gold accent post-its, and two magnetic closures: a tiffany blue flag, and a gold metallic diamond shape.  I printed a calendar year onto heavy card stock and slipped that in the large pocket.  So, I can see the whole year in one view.  I also made a few notes for each month.  That is where I jot down large projects.  
Well, thank you for looking, and spending a little time with me, to see what I have been doing.  I hope you are still on track with your new years resolution(s), too.  Changing how you do things, and creating 'good' habits are hard.  It does take work, and discipline.  But, I know that I am happy with the changes I have made this year.  I am still exercising 3 times a week.  Running 2 days a week.  Making better, healthier choices of food.  And having time on my calendar to craft, really takes the stress away.  I don't fret about deadlines anymore, and I can get so many more things done in the day.  It makes me believe that my stress is reduced, which is good for my heart, and my family. {smile}  And I continue to work on my 'problem' areas each day.  So there are strides there.  And feeling like I am in control of those areas, is empowering!  Have a great day!


Sunday, January 29, 2017

Missing Mint

Howdy.  I hope your weekend was wonderful!  Productive!  Creative! and on track with your new year resolution.  Mine was.  {smile}
I am still loving my planner, and keeping my projects/tasks/chores organized.   I have also added my budget and menu, to my tasks.  It feels good to have those two chores organized.  {smile}
So, with my mind not on those items, I had some free time today to craft a little.  Gotta love that!
For starters, I stopped by Shabby Chic .  They have a color theme board.  The color theme is mint and their requirement is to craft in a shabby chic style.  And who doesn't love mint!  It is such a sweet, and refreshing color.  Mint pairs nicely with almost everything!

To help give me some direction, I stopped by a new-to-me challenge As You See It.  They have a sketch, as their current challenge.   I love working with sketches.  And this one is a good sketch.  easy to work with, and I did flip the sketch.

I stopped by my favorite challenge site:  Cupcake Inspiration.  This challenge site, always have some creative themes/inspirations.  Their current challenge is to use plaid.  Yep, plaid.  I just love their cupcake!  But, I wanted something a little more spring.  But those cupcakes look yummy!

And finally, I stopped by Brown Sugar Challenge.  Their current challenge is Anything Goes.  But please stop by to see what this creative design team has created!
All of these challenge sites, have very talented, creative folks on their design teams.  They will inspire you!
and here is what I created:


Recipe:  The card meausres 4 1/4" x 6 1/4".  The card base is made with a no name Kraft card stock.

The first matt is pool party card stock.  I matted the floral pattern paper with aqua mist card stock.  The mint & aqua plaid is actually a holiday pattern paper by My Mind's Eye.  Once these two pattern papers were adhered to the card front, I ran them thru my sewing machine to add a double border stitch, all the way around. I added a strip of mint lace, to cover the seam where the two pattern papers meet.  I machine stitched some aqua seam binding to the center of the lace.  I wrapped silver bakers twine around the middle.  I tied the seam binding into a double bow.  I also tied a simple bow with silver bakers twine. I added a trio of paper blossoms distressed with tea stain ink, and white acrylic paint.  They are adhered to the card front with my hot glue gun.  For the sentiment, I used a new-to-me stamp set by AlteNewLabel Love.  I stamped the sentiment in basic black classic ink,  and stamped on kraft card stock.  I used my scissors to cut out the sentiment piece, and adhered it to the card front with foam squares.  The final touch were these rain drops in mint.

Well, I hope you have a chance to play along with some (or all) of these challenge sites!