So, I have finished getting my stuff put away. The photo's were taken starting from the left to the right. The first photo is from the room to the left. The closed door is the closet door. The two doors in the last photo are the door to the bathroom and the room door. The Stampin' Up! stamp sets in the last photo are my retired stamp sets. I know, my husband has a bit more wood working and building to get the rest of my supplies off the floor. The two cadenzas with hutches are from Ballard Designs (home office furniture). Thank you for looking
Sunday, January 31, 2010
DCBD #162 & Stamping 411 #136
Good Morning! I wanted to enter a few challenges this weekend, so what better way than to combine them. Diva Coffee Break Design #162 is having a color challenge (chocolate chip, taken with teal, regal rose, and old olive). Stamping 411 #136 is having a lay out challenge. Both of these websites only use Stampin' Up! products. So, that is the reason that I combined these two challenges.
I used Chocolate Chip card stock as my card base. I used an old retired background stamp to give the card an illusion of texture: Aida Cloth. I inked the background stamp with chocolate chip classic ink. I inked the large image from fresh cuts stamp set in chocolate chip classic ink, stamping it onto very vanilla card stock. I then trimmed it super close, I didn't want any very vanilla border. I matted that stamped piece onto old olive card stock, and matted that piece onto taken with teal card stock. I wanted the completed matted piece to have some height off the card, so I achieved that with dimensionals. I had a scrap piece of regal rose 5/8" grosgrain ribbon that needed to be used. I wanted the ribbon to have a bit of character and not just lay on the paper. So, I gave it a fold, and used a large flower brad from the very vanilla hardware kit to hold the ribbon in place, and to give it a bit of pizazz! I stamped a greeting from the fresh cuts stamp set in chocolate chip classic ink, onto a scrap piece of very vanilla card stock and used the small oval punch to make my tag. I put dimensionals on the back of the tag. And thats my card!
Thank you for looking, and enjoy the rest of your weekend!
Saturday, January 30, 2010
My 100th Post!
Clean and Simple. Here are three of the cards you will make if you attend my note card class. You will make one of each of these cards, along with a Valentine's Day inspired card, and a holder for these note cards (envelopes included). The class is Saturday, Feb. 6th at the East Mountains Library in Tijeras, New Mexico. Please contact me for details.
As always, Thank you for looking, and please leave a comment-they sure do make my day!
Wednesday, January 27, 2010
MOJO Monday Challenge #123
Here is my entry to the MoJo Monday Challenge #123. I did my first ever circle card during the Christmas 2009 season. I fell in love with the whole concept. So, when I had an opportunity to create a circle card for a challenge I HAD to do it!
For those who know me, know that I can create a card/project with one product or one product line. I can also create a card/project with (feels like) 50 different companies! This is one of those cards! Ok, here are the companies I used: Paper Trey Ink, Basic Grey, Stampin' Up!, Fiskers, Bazzil, Paper Studio, and Yours Truly.
And, here we go! For the black scallop circle, I used the die, Big Shot, and Basic Black card stock from Stampin' Up!. For the solid card stock, I saw this beautiful texture Bazzil paper from one of those large crafting stores, and fell in love with it. I used that as my matt for the inner circle and for the rectangle scrap on the card front. The two different and contrasting pattern papers are from Paper Studio. I thought that they really complimented each other nicely. :) The ribbon I used is from Yours Truly, I believe the color is moss, but don't quote me. I threaded the ribbon through the button to tie the bow. I'm pleasantly pleased with the final product. The green and cream buttons are from the Vintage collection from Paper Trey Ink. The black button is from Basic Grey. The bird and swing stamps are from Basic Grey, also. I stamped the swing with Stampin' Up! Basic Black classic ink. I stamped the bird with a hybrid ink from Paper Trey Ink, Avocado. The sentiment is from a clear stamp set I purchased a few years ago from fiskars - yes, the paper cutting people.
I know, it seems like I used everything in my craft room. And guess what, I didn't. I have organized my craft room pretty well, so I'll take some photos this week. Now remember, its not 'clean' but it is used!
Thank you for looking, and sitting through the long list of suppliers. Please leave a comment if you can.
Tuesday, January 26, 2010
DCBD #161 & LPSC #52
Here is my entry to a combo of two challenges. I used the layout challenge from Diva Coffee Break Design #161, and the color challenge from Little Paper Shop #52. I only used Stampin' Up! products for this card entry. I used textured chocolate chip card stock for my card base. I ran a scrap piece of kraft card stock through my Big Shot machine, using the new Swiss Dot embossing folder. I used my new favorite DSP - Sending Love DSP. I matted a piece of the pattern paper onto a piece of real red card stock. I found a scrap piece of real red 1/4" grosgrain ribbon that worked perfectly on my card!
Thank you for looking, and as always, posting a comment sure does make my day!
Sunday, January 24, 2010
Nacho Average Stampers- challenge #4
Ok, here is my card. I have finally entered the challenge! I think that I have only entered 2 other times. That's pretty sad on my part. I have only been apart of this group for 10 months, and they post weekly challenges. I wanted a clean and simple card. I'm not too excited about this entry. Maybe I'll submit another entry tomorrow.
I am still organizing my craft room. I'm pretty sure you all will love what I have done with my space. Please be patient. Finding room for everything takes time. I don't want piles everywhere - like it use to be. :)
Thanks for looking. And if you like what you see, post a comment. If you love what you see, sign up to be a follower!
Saturday, January 23, 2010
Sasha week 11 1/2
Look at our little sweetie! She is 11 1/2 weeks old. She had her vet visit today, and so my husband and I each took a photo of her. She weighs 22.8 lbs. The top image is the one my husband took this morning before they headed out. The next image, I took once I got home. She is so sweet and lovable! Thanks for looking. I will be posting a card tomorrow. I want to enter the Nacho Average Stampers challenge. Enjoy your weekend!
Friday, January 22, 2010
MOJO Monday Challenge #122
Here is my entry to the MOJO122. I'm truly in love with this paper! fancy pants Vintage Valentine. The solid card stock is bazzil; two different shades of brown. The ribbon is from Martha Stewart. The stamp is a Stampabilities, inked with Bravo Burgundy from Stampin' Up! I used the I used the heart to heart punch from Stampin' Up! for the hearts.
Thanks for looking. Please leave a comment.
Embellish Magazine-Stripe Challenge
Ok, here is my second entry. I wasn't quite sure, if my 'stripe' ribbon would count as a stripe and lets face it, my photo wasn't so good. So, here is my new and improved version of the first entry. Most products used are from Stampin' Up!. The card base is Chocolate Chip card stock. The 1st mat is Elegant Eggplant ran through the Swiss dot embossing folder. I layered a strip piece of some scrap paper onto a lavender scrap piece. I dyed a foot of the retired white ribbon (SU) with Elegant Eggplant re-inker and some water. I heat embossed the chocolate bunny (new! Occasions catalog) with Chocolate Chip craft ink and clear embossing powder. I used some pop dots to give the bunny some lift off the paper. I stamped the greeting (new! Well Scripted) in Elegant Eggplant classic ink onto a scrap of Very Vanilla card stock I ran through the Big Shot, using a tag die (SU, also). [The only product not Stampin' Up!, is the stripe piece.]
Thank you so much for taking the time to see my new card. As always, please leave a comment. Have a safe and wonderful friday!
Vintage Valentine
My friend, Ronda (yes, I spelled her name correct) teaches a 'Heritage' class at Scraps Galore, in Albuquerque, New Mexico. She loves the 'shabby chic' papers and the 'old' look of materials and photos. So, she is not only talented, but has a great eye for these things, you know the type-simply amazing. Anyways, I started taking her class because I wanted to scrapbook my family's history, so to speak. She is a wonderful teacher; very knowledgeable, talented, great eye for design and color. Well, I finished that scrapbook album years ago, probably 3 years now. Through that time, I have made some friendships with some great women who take Ronda's 'Heritage' scrapbook class, too. Anyways, I finished my album and keep taking the class. Ronda has so much to teach, and lets face it, it is a chance for us ladies to get out of the house and spend some quality time with the girls.
So, back to my card. I used the papers not for a scrapbook layout, but for a card. I fell in love with the papers Ronda had chosen for the class. They are simply amazing! The company is fancy pants. The line is Vintage Valentine. The ribbon is from Martha Stewart. I purchased the ribbon by the yard at the scrapbook store, so I'm not sure of the color name. I loved how my card turned out. I love how the polka dots, stripes and flowers all go together! See, I told you Ronda has an eye for these things!
Thank you for taking a moment out of your busy schedule to take a peak at what I have been doing. As always, its nice to hear for you, so please leave a comment.
Tuesday, January 19, 2010
Embellish Magazine
Embellish Magazine is having a color challenge, too. The colors are chocolate, purple, and kraft. Here is my card (all products used are Stampin' Up!). The card layers are Chocolate Chip, Elegant Eggplant, Kraft card stock. I inked the jumbo wheel in Elegant Eggplant classic ink. I stamped 'Happy Easter' in Elegant Eggplant classic ink. I dyed my ribbon with Elegant Eggplant re-inker. I stamped the bunny in Chocolate Chip craft ink, and heat embossed the bunny with ultra detail clear. I used pop dots to 'lift' the bunny off the card, so the ribbon would lay flat on the card.
Just Us GirlS 16 - color challenge
I had so much fun with the last 'Just Us GirlS' challenge, that I decided to play along, again. This challenge is a color challenge. The colors are Burgundy, Blush, Vanilla, and Gray. SO, here is what I came up with. My card base is made with Bravo Burgundy card stock (Stampin' Up!). I inked my very vintage jumbo wheel (SU) with Bravo Burgundy classic ink (SU), and ran it along the left hand side of the card. I ran my Blush Blossom card stock (SU) with my top note die. I trimmed off about a third. I used the words from the Life's Creation clear stamp set, and Inked them with bravo burgundy classic ink. I stamped the words onto a piece of Very Vanilla card stock (SU) and matted it onto a piece of Basic Gray card stock (SU). I used pop-dots to give the matted word piece some lift off the card. I stamped this straight long 'flourish' (life's creation clear stamp set) with Bravo Burgundy classic ink. I used the two different flower sizes from the vintage vogue stamp set (SU). I inked the larger of the two in bravo burgundy classic ink. I inked the smaller of the two in blush blossom classic ink. I cut them out. I used the new very vanilla brads (SU) to give the flowers a center. I fiddled with the flower's petals to give them some 'shape'. I used a slot punch (SU) to create a pass threw for the ribbon's knot. I used very vanilla 5/8" grosgrain ribbon (SU).
Thanks so much for looking!
Sunday, January 17, 2010
JUGS Challenge #15- Honorable Mention
Shelves
Aren't they just gorgeous! My new shelves and cabinets came-in the day before we left for vacation, last week. Now that we are home and settled, my husband and his friend installed them last night! :)
For those who know me, this is a great accomplishment! My previous storage system, was the floor. I'm not kidding. My husband had this idea to build me shelves - 5 years ago. He has a good heart, but he's busy. I have the structure of the shelves, but no shelves. (skeleton shelves) SO this happy Sunday, I get to move my crafting supplies off the floor and into cabinets and shelves! Happy Me!!!
So, when I get everything organized and put away, I'll take another picture. I have a new puppy (Sasha), and my granddaughter is visiting this weekend; so we'll see how much I get done. (maybe I can finish while everyone is asleep?)
Wednesday, January 13, 2010
JUGS #15 (2 of 2) & Diva Coffee Break Designs
I am entering this card for two different challenges-Diva Coffee Break Designs & JUGS. (Here is another card I want to enter in the Just Us GirlS #15 Technique Challenge.) For this card, I did faux stitching all the way around the card. This photo isn't straight on, because I couldn't showcase the texture of the butterflies.
All supplies are from Stampin' Up!.I used blue bayou card stock for the card base and matt. The pattern paper is the new sweet pea DSP. The butterflies were created with the sixxlit die. I used barely banana and always artichoke, and bashful blue card stock. The white card stock is whisper white card stock. I stamped the words in not quite navy classic ink, and then I spritz the card stock with shimmer paint. I tied a scrap piece of kraft taffeta ribbon into a simple knot. I roughed the edges of the layered pattern paper and used a paper piercer tool to create the stitch holes. I used a white gel pen to create the 'thread'.
Thank you for looking. As always, please post a comment.
Just Us GirlS 15 - technique challenge (1 of 2)
Here is my entry to the 'Just Us GirlS' #15 Challenge (technique), "add stitching to your project". I have a little sewing machine that I purchased years ago just for paper crafting. Well, when I dug it out of the box, the thread wasn't in. I'm not so good doing that. I wanted to get this card out before work this morning, so I had to come up with some other 'stitching'. I'm not sure if french knots counts as stitching, but I did use needle and gold cord.
For this card, I got my inspiration from a gift bag I saw at Target. Crazy, huh? My husband has gotten use to me looking at random things when we are out and about. Gotta love those people in our lives whose support is unmeasurable! :)
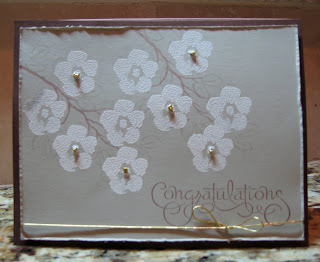
All supplies are from Stampin' Up!. The card base is chocolate chip card stock. For the stamped panel, I used sahara sand card stock. I off stamped the branch from 'bird on a branch' in close to cocoa classic ink. I didn't want the branch to be too prominent. I off stamped the leaves from 'flower fancy' in sahara sand classic ink, also. The flowers are from 'flower fancy' and they are stamped in whisper white craft ink, and heat embossed with clear embossing powder. The 'congratulations' is from 'well scripted' and stamped in close to cocoa classic ink. I used gold cord to make the french knots in the center of some of the flowers. I tied a scrap piece of the same gold cord around the bottom of this panel and made a little bow. I used my paper distressor to create the rough edges of the stamped panel. I used dimensionals to give the stamped panel lift from the card base.
As always, thank you for taking a moment to look at my entry into JUGS #15. Please leave a comment, as they always make me smile.
Tuesday, January 12, 2010
Well Scripted LOVE
Let me first say, that I love my Mr. Brown. He has taken great care of me in the past. I think he did so yesterday, too. I usually receive my packages by 4p the super latest. I ordered some Stampin' Up! supplies the day we left for vacation last week. (I didn't want a package to be sitting on my front door step while we were gone.) I was expecting my delivery later afternoon yesterday. Well, it started approaching 5p, and I had no new supplies and I needed to leave the house by 6p to attend a card swap. So, without my new stuff, I had to make 6 cards with what I had on hand. Well, here it is. Not too bad. After I posted my card to the group and we swapped cards, it was announced that we were voting. Voting? OMG! Well, I won. Out of the 8 of us who attended, I won! So maybe my Mr. Brown arriving late was destiny. :)
Recipe: close to cocoa, real red, and very vanilla card stock. Real red classic ink pad. Sending Love DSP. Real red grosgrain ribbon. Well Scripted clear stamp set. The trio heart punch.
Tomorrow, I will be working on my entry for the Just Us GirlS (JUGS) challenge. So, if you get a moment, please check back another day. I will also be posting a new photo of our little girl - Sasha.
Sunday, January 10, 2010
Sasha week 9 1/2
I'm a little (ok, alot) late posting my latest photo of my little girl. She went to the Vet on Saturday, January 02, 2010. She weighed 15.4 pounds at her visit. She is growing like a weed. We have been away on a little vacation this past week, so I need to upload a new and current photo of our little sweetie.
Thank you for looking. Check back later this week, I will (promise) to post a new photo of Sasha, and at least one card I am working on. 'Just Us Girls' challenge is to use stitching. I'm really looking forward to play with my stamps and paper to put something together. As always, comments make my day! I appreciate everyone who has taken the time to comment, and everyone else who has taken a moment to look.
Wednesday, January 6, 2010
Blessings - JUGS14 (1 of 2)
"Just Us Girls" Sketch Challenge! (One sketch and two cards.) Here is the card I submitted for the JUGS14 Sketch Challenge. I wanted to make a card that had no 'limits' or restrictions as to who's products I used. I think if your products are the best, everyone will use them, right? So, as you can see, most of the products are from Stampin' Up!
The card base is Blue Bayou (retired). The pattern paper matted on the card base is Baja Breeze DSP (retired). I ran the strip of Certainly Celery card stock through my Polk Dot embossing folder. I stamped the flower from Vintage Vogue, in Baja Breeze classic ink, and hand cut the flower out. I used a new Pretty in Pink Corduroy Button for the flower center. I used Dimensionals to lift the flower off the card. I used Shimmer White card stock for my rectangle. It is matted on a piece of Blue Bayou and I used dimensionals to lift this piece off the card. I used stamps from the With Sympathy (PTI) stamp set. I stamped the leaves in Certainly Celery classic ink. The rose buds are stamped in Baja Breeze classic ink. I stamped the butterflies in Pretty in Pink classic ink, and gave them 'flight' with my glue pen and Dazzling Diamonds glitter. The greeting 'Blessings' is from Fall Elegance (PTI). I stamped the greeting in Bravo Burgundy classic ink. (I thought that black would be too harsh, and brown would be too washed out.)
Thank you for looking.
Flowers of Kindness - JUGS14 " (2 of 2)
"Just Us Girls" Sketch Challenge! Here is my second card for this challenge. I wanted to make a card that only used Stampin' Up! products. The two stamp sets are both retired - sorry (Echoes of Kindness & Dream a Little). The stamp with the two birds is an incentive stamp. The card base is Close to Cocoa card stock. The brown polka-dot paper is from the Chocolate Chip DSP. The pink strip is actually Blush Blossom card stock, that I ran through my Perfect Polka Dot embossing sleeve. I used the scallop circle to punch that piece out of Very Vanilla card stock. I used the 1 1/4" circle punch to create the inside circle, and I used dimensionals to lift the circle off the scallop circle. I stamped 'dream' on a scrap piece of Very Vanilla card stock (I used the curly label punch to create that shape). I inked some of the edges with a sponge and close to cocoa classic ink, to help give the card stock some dimension. The matted flower piece is lifted off the card with dimensionals. I used my blender pen with Blush Blossom classic ink, Certainly Celery classic ink, and Pretty in Pink classic ink to color the flowers, leaves, and stem. I used my glue pen to outline the flowers and added Dazzling Diamonds.
Thank you for looking!
Sunday, January 3, 2010
love love card
I can say it is nice to get back into the swing of things. I am loving the new products from Stampin' Up!. I wanted to 'practice' the resist technique, so here it is! The 'love' panel was created using the new I {love} Love Jumbo Wheel. I matted the piece onto a scrap of chocolate chip card stock. The card is kraft card stock. The love stamp (stampabilities) on the bottom right corner was inked with bravo burgundy classic ink. I used a scrap piece of chocolate check ribbon. I tied a random button onto the knot. I had a scrap piece of flower print paper in my scrap book that matched perfectly. However, the name of the company and line of paper is missing. I'm not sure who made the paper, its a few years old. But, I think its beautiful.
As always, please post a comment - they make my day!
Saturday, January 2, 2010
Spring Stamp Camp
Wow! Only the second day of the new year, and my crafting hasn't stopped. I publish a newsletter to all my Stampin' Up! customers, so they have the latest SU news and can see projects that I am offering for the month. So, here is another card!
A wonderful group of SU demonstrators and I (there are 5 of us) get together 3-4 times a year, to come up with some great cards and projects for our customers. So, here is my submission. We are holding a Spring Stamp CAmp on Saturday January 30th 9a-12noon, in Albuquerque, New Mexico. You will make 3 each, of 3 different cards (envelopes included) and one project. The non-refundable fee is $25. Applications upon request. We will be handing out door prizes all morning. You are also eligible to enter for the Grand Prize drawing valued at over $40. You will make a Valentine's Day Card, and Easter Card, this card, and the project is Valentine's Day themed. We will be using some of the wonderful products from both the Occasions Mini & Sell-A-Bration catalogs.
Ok, so here is my card. The technique is called 'masking'. I thought the bright sunny colors and flower added something spring-like to the card. The card base is Crushed Curry. There is a strip of textured old olive and textured close to cocoa cardstock to give the card a little something. I thought regular cardstock made the card look 'flat'. I used a summer sun corduroy button, and a strip of the new satin ribbon in old olive. The two stamp sets I used are: Flower Fancy & En Francais. This card is quick and easy. It just looks intimidating. I used a photo corner at the top left of the card, it needed something there.
As always, thank you for looking. If you would be interested in receiving my monthly newsletter, please contact me. I export my documents into PDFs, so everyone is able to view them. If you would like to read descriptions of classes that I am hosting, please visit my website: www.inkwithsharon.stampinup.net
Have a wonderful saturday! Hope you stop-by again!
Friday, January 1, 2010
Hostess Appreciation Card
When I saw this stamp set in the New Occasions Mini Catalog, I just had to have it! :) So, for my Hostess Appreciation Event on Jan. 16th, my hostess's will get a chance to try this set, and make this card. The stamp set and the DSP are the only new 'items'. But, don't you just love it! There is a bit of cutting with detail scissors; her outfit, her bag and all the little stamp supplies.
I thought that my progressive scrapbook page was too plain. So, I took it apart and added some stamping. I posted a new photo on my gallery @ SCS.
Thank you for looking. I hope you are having a great start to your new year. Come back tomorrow for a new photo of our puppy. She has one more vet appt. so we will see how much she weighs now. There is a running bet in our household. :)
Open House
I am hosting an open house to show-case some of the new stuff Stampin' Up! is coming out with, and also to give my customers a chance to 'use' the products themselves.
This is the free card my customers will be making at my open house. This card allows the person to use the new style of stamps, new Designer Series Paper, new ribbon and the new border punch. However, due to a delay in shipping, I had to make the sample with what I had. (This is the only discrepancy for this event.) My customers will also have an opportunity to see some of the new products in person.
As an added bonus for attending this event, all orders placed during this event will have free shipping - regardless if it is for new products or products featured in the big catalog. For those attending this event, you will be using the new border punch for this card.
Thank you for looking, and as always, please post a comment-they make my day! :)
Progressive Scrapbook Page
I have had a few ladies from my card clubs ask me if I would do any scrapbook classes. So, this year, I have decided to do just that. The scrapbook class I will be doing is a progressive scrapbook class. What that means, is you start with a 6"x6" page, increase the layout to a 8 1/2" x 11" page, and then increase the layout to a 12"x12" page. That way, whatever size album the person is working on, the layout will fit. So, to jump start this endeavour, I will be teaching this at my Hostess Appreciation Event this month. If you have hosted a workshop, or you are a member of one of my card clubs, this event is open (and free) to you. So, here is my page. I also wanted to use some of the new stuff from Stampin' UP!, so my ladies can use the new products. One of which is their version of a 'clear' stamp. The stamp itself is not acrylic, but rather the traditional red rubber. You do however, need a clear block to stamp. (Like hero arts clings.)
Thank you for looking, and as always, a comment always makes my day! :)
The recipe: solid cardstock:chocolate chip, kraft, blush blossom, bermuda bay. pattern paper: sending love DSP. Ink: sahara sand, bermuda bay, close to cocoa. Stamp set: vintage vogue. embellishments: pretty in pink satin ribbon, pretty in pink corduroy buttons, curly label punch, and lots of tags sizzlit dies.
Subscribe to:
Posts (Atom)