Sunday, December 27, 2009

christmas Tags


Happy Holidays! Hope you are all enjoying the third day of Christmas. We spent our time with out of town family. We are a family that is joined by food and games. All of the women are wonderful cooks, so its always a feast. Our other favorite pass time, are card games and board games. I know that sounds weird. But, we love the friendly competition. It gives us a chance to let our hair down, and just be ourselves. Our two favorite games are tri-ominos, and pinnocle. And, now we are spending some quiet time at home enjoying each others company.
I wanted to share with you some of the tags that I made for the gifts we gave to family.
Thank you for taking the time to take a look. Enjoy the company of those you love.

Saturday, December 26, 2009

Sasha - A New Family Member

Here she is! Her name is Sasha. She is an English Mastiff. She is 7 1/2 weeks old. Isn't she just the cutest!
My husband has been wanting one of these dogs for a while now. (Our two little dogs passed away late spring this year.) But, I have been wanting cabinets and shelves for my craft room for awhile now, too. So, I made my husband a deal: You order my cabinets and shelves and I'll agree to get the dog. So, on the 23rd (Dec.) he ordered my cabinets and shelves, and so here is our new family member!
So, FYI, I will be posting photos of our girl from time to time. You see, these dogs are to be large dogs. Large, like people. She can weigh as much as 200lbs when full grown. She weighed 12 lbs at the vet. She goes back right after the new year, and I'll keep you updated as to her growth.
I hope everyone had a wonderful Christmas. We sure did. We got to spend time with our daughter, her boy friend, and granddaughter. We got to spend some time with some great friends who hold a very special spot in our hearts. We also delivered some home made Pumpkin Cranberry bread to some wonderful neighbors. My mom and dad are on their way to our home to spend some Christmas time with us today. So, it is off to clean the house and start working in the kitchen. I will be posting some Christmas photos tomorrow and the following week. On this second day of Christmas, may you find love and laughter with family and friends. Happy Holidays.

Friday, December 25, 2009

Merry Christmas

I want to take a moment to wish all my blog followers and guests a safe and joyous Christmas. It is important that we share our time with family and friends, because that is the best gift of all.
Thank-you to everyone who has supported me this past year with your encouragement and love. Also, Thank-you to everyone who has left a comment. Your words are important.
Merry Christmas.
hugs,
Sharon

Monday, December 21, 2009

Christmas Tags


Happy Holidays! Let me first apologize for taking such a long break between posts. But between holiday parties to attend, gifts to buy (and wrap), holiday baking, working 40 hours a week outside the home, cleaning house, doing laundry, making dinners, and taking care of both myself and my husband, my life is just as crazy as yours! Just in case I didn't have enough to keep me crazy busy, I decided that each gift needed a matching tag. Thank goodness I am only using four different wrapping papers. (Once I have created a tag, I do make several of them.) The tags are in order from the first to the last.
The first tag is going on my daughter's Christmas gift. The wrapping paper is vanilla with blue snowflakes. As her mom, I had this overwhelming sense to put a Santa on it. She's a young lady(24), so why not add some bling?
The second tag is on my friend Andra's gift. The wrapping paper is solid green with some brown and white stitched ribbon. I wanted something to reflect the paper, but be a bit grown-up.
The last tag is on my mother's gift. The paper is green with white flourishes. So, I only thought it fitting that the tag be white with green accents. My mother is over 60, and so it definitely needed to be a bit sophisticated. That is why I added the silver. I think that the bling adds a 'finished' touch.
Thank you for looking. As I get some more completed I'll share them with you.

Sunday, December 13, 2009

Christmas Wrap & Tags


Happy Weekend! I am off to start a little Christmas shopping. But, I wanted to share with you some crafting things I have been doing, before I run out the door.
I was at Hobby Lobby earlier this week, in search for some pretty, unique Christmas wrap and tags for a few special gifts. Hobby Lobby, was having a sale, so I figure why not. Who wants to pay full-price for anything. Well, they do have some nice stuff for the holidays. BUT... I saw this tag that I just fell in love with. $2.99 for 6 tags. WHAT? So, I took a picture with my cell phone. Came home and looked through my stamping supplies. Here is what I came up with-all supplies are from Stampin' Up!.
I wanted everything to match (and who doesn't). So, I have a big roll of kraft paper - from one of those home improvement stores, its for when you paint. I took the new fancy snowflake stamp set from the holiday mini (Serene Snowflakes). I inked the largest snowflake in Soft Suede classic ink. I inked the medium snowflake in Riding Hood Red classic ink. I inked the small snowflake in Old Olive classic ink. I stamped the snowflakes randomly onto the painters paper. Wrapped my presents and tied them with Alpine ribbon originals ribbon. Pretty cute, huh?
For the tag, and this was my whole driving force. I used four different stamp sets. I know it sounds like a lot, but look at the finished product. Why limit yourself to one stamp set? Let your creativity guide you. The tag is cut from a piece of Very Vanilla card stock and matted onto a piece of Riding Hood Red card stock. I stamped the bird (A Cardinal Christmas) in Riding Hood Red classic ink, toward the bottom right corner of the tag. I stamped the pine cone (Peaceful Wishes) in Riding Hood Red classic ink, toward the top left corner of the tag. I stamped the post mark (Santa Post) in Soft Suede classic ink, toward the top right corner of the tag. I used my stamp-a-ma-jig to align the words. I stamped the greeting (Heritage Holiday) in Old Olive classic ink, toward the bottom left corner of the tag. On the back of the tag, I stamped the 'to' and 'from' in Soft Suede classic ink. I tied the tag on with a piece of Red Taffeta Ribbon.
Thank you for looking! I hope this has given you some inspiration to create your own Holiday wrap and tags. Because anyone can purchase a card, or wrap. It takes time to create something unique, and doesn't that time 'show' your family and friends how dear they are to you? Because 'time' is the greatest gift of all. Happy Holidays and be safe.

Thursday, December 10, 2009

Friends


There is a small group of us ladies (5), who, have stuck together over time. We value each other's friendship, and cherish each others company. I don't know if age has anything to do with it [we are all over 30, some over 40 :)] but we each know that there is someone out there who we can count on. That is for everything. Unfortunately, it takes a little work, for all of us to get together. So, every December, we meet at this one particular restaurant and exchange gifts. Oh, did I mention that we are all talented paper crafters? We are. Its funny, no two of us has the same style. But we all ROCK! Well, with the economy in the toilet, I decided to shave a few dollars off my expenses and make each one of these very special ladies a little something. Its a little 'box' that holds little note cards (3" x 3") and envelopes. I made each box in the favorite colors of each lady. I also stamped each note card specific to what each lady likes. Well, need less to say, they were a hit. I took a few pictures of my finished project, which for some reason, I always seem to forget, and after viewing the photos, I should have taken more. Oh well. So here are a few (and I mean a few) photos.
I used products probably from every company out there: Stampin' Up!, Paper Trey Ink, Close to My Heart, Basic Grey, SEI, and more. If you would like the supply list for any specific card, please email your request. The box template (Keeping Tabs) I purchased from Paper Trey Ink. I just love them. I print them off onto copy paper, and copy them directly onto card stock. Pretty easy!
Thank you so much for taking the time to take a look. Remember, comments always make my day!

Sunday, December 6, 2009

Merry Christmas

I wanted to share with you our family's official Christmas card for this year. This is the prototype. The actual one will have the images moved up a bit. (Not more than 1/4"). I think it has turned out beautifully. Most of our family and friends will receive this card. We know a few people who prefer the store bought kind, so...
The weather out here has been bitter cold and snowy, and all the shades of white have crept into my life. For people who love color, this card can be a bit disappointing/overwhelming. But, I like how it turned out.
Recipe: the solid card stock is Sahara Sand and Shimmer white (Stampin' Up!), the textured card stock is Glass Slipper. The pattern paper is from the Christmas Mint collection. I used three different stamp sets for this card; Sleigh Ride, Poinsettia & Boxwood, & Signature Christmas. The reindeer was stamped in Sahara Sand classic ink, and the poinsettia and 'Noel' were stamped in Blush Blossom classic ink, both are from Stampin' Up! I adhered three tiny pearl halves onto the flower center, and a clear rhinestone for the reindeer's nose. The ribbon is from Paper Mart. I used two punches from Stampin' Up!. The 1 1/2" circle punch for the flower and the curly label punch for the 'Noel'.
Thank you for looking, and as always, comments really do make my day.
May the joy and love you feel this holiday season extend to every day throughout the year, Merry Christmas.

Thursday, December 3, 2009

Bunco

I saw this cute idea on the Stampin' Up! demonstrators pages. You create your own sleeve for chewing gum. I had made 11 of these to give to the ladies that I play Bunco with. However, when I got up this morning, (I took the day off from work) it was snowing. It hasn't stopped snowing! In fact, the snow is getting heavier. I turned my snow melt system on (heated driveway) in hopes that I could make it into town today. Well, the snow is falling so fast and hard, the driveway can't keep up with the snow accumulation. The gentleman who usually plows our roads hasn't been out today. So, I won't be going to Bunco tonight. But, I wanted to share with everyone the cute little gum holders I made. I hope everyone has a wonderful day, and please drive safely.

'Just Us Girls' challenge week 9

Here is my entry for this weeks challenge from 'Just Us Girls'. For their challenges they don't have any restrictions. So, here is my submission. The template is from Paper Trey Ink. I printed the template onto Riding Hood Red card stock from Stampin' Up!. The pattern paper is from eskimo kisses. I used a long piece of scrap red ribbon I had (I didn't keep it on a spool, so I can only guess that it is from a large craft store.) The button is from Paper Trey Ink. I used the silver cord from Stampin' Up! to tie the button to the ribbon. I had a small piece of shimmer white card stock (Stampin' Up!) so that is what I used to make my 'tag'. I stamped the tree in Old Olive and the greeting in Basic Brown. Both stamps came from the Happy Winter stamp set (Stampin' Up!). The contents of my gift bag, are a few of those chocolate covered peppermint sticks, a 'Fire-Cinnamon Vanilla' tea bag, and a StarBucks gift card in last years envelope.
Thank you for looking, and if you have a moment, or if you have a comment, please leave one. They always make my day! :)

diva Coffee Break Design Color Challenge #155

I wanted to submit this card for the challenge, but I was too late. When I went to upload my card, I had missed the deadline by mere hours yesterday. But, I liked the finished product so much, I thought what the heck, I'll share with my followers and anyone else who stumbles onto my blog. Diva Coffee Break Designs have a rule that most/all products used in submissions must be Stampin' Up! I used Barely Banana and Bordering Blue card stock, Bella Birds DSP, Eastern Influences stamp set, stamped in Basic Brown classic ink, and used the watercolor pencils to shade the image. I added some Dazzling Diamonds glitter to the flowers - don't know if you can tell by my photography skills.

Diva Coffee Break Design Color Challenge #142

Tuesday, December 1, 2009

Christmas Craft Fair

Here is one of the cards that you can purchase at the Holiday Craft Fair, this week. The Holiday Craft Fair runs from this Friday, Dec. 4th and Saturday, Dec. 5th, at the main Presbyterian Hospital in Albuquerque, New Mexico. All the vendors at this Holiday Craft Fair, are Presbyterian employees, and all the items for sell are suppose to be hand-made. If you are in the area, you should stop-by and have a look.
To help show-case the round card shape, I used a contrasting background color. This round, shaker card was actually fun to make. The pattern paper is from eskimo kisses. The solid card stock and ribbon are Paper Trey Ink products. The snowman rubber stamp is a random stamp I had in a box. I used Stampin' Up!s bashful blue and certainly celery markers to color the hat and scarf. I used the large scallop circle die from Stampin' Up!. The shaker cup is from paper cut. I used Stampin' Up! dazzling diamonds glitter and the white chunky glitter as my 'shaker mix'.

Friday, November 27, 2009

Mojo Monday Challenge #114


Its Black Friday, and I hope all of you are having fun shopping! Me, I'm not so big on crowds, so I have decided to stay home today, and 'play' with my paper craft supplies. Here is my entry to the Mojo Challenge #114. The thing I absolutely love about Mojo Challenges, is all you have to do is select one thing: a stamp set to use, a color of card stock, or an embellishment, and from the layout, everything falls into place. That is exactly how all of my Mojo Challenges occur.
I used eskimo kisses pattern paper. For the solid card stock I used Old Olive (SU!), Rain, & Glass Slipper. I only used two colors of ink (to match the cardstock) Old Olive (SU!) & Rain. I used the check ribbon in Rain. I tied the bow separately and adhered with a glue dot. (gotta love those glue dots!) The snowman is from a retired stamp set 'happy winter' from Stampin' Up!. I used my SU! blender pen to color the stripes in his scarf in Old Olive, and his buttons in Rain. I used my SU! glue pen to 'color' his body, and applied SU! Dazzling Diamonds. (I am a firm believer that most cards need bling! - and a ribbon, and a button!) For the scalloped edge, I tried something new. I didn't like how the scallops came out with either of my edge punches from SU!. So, I took the guard off of my SU! corner rounder and made the scallop edge. Not too bad for my first time. (I know, I should have practiced first, but what the heck.)
Thank you for looking. Happy shopping. And don't forget the important things this season: your Lord, and your family & friends!

Thursday, November 26, 2009

School Photo Holder

My granddaughter, (yes grand-daughter) just had her school photos done. My daughter had asked me to come-up with a way to send her school photos to family and friends. I had seen a wonderfully beautiful Christmas card on Lisa Johnson's blog earlier this month. So, that is where I received my inspiration. My granddaughter's favorite color is pink, so I wanted to use that color in the card. The pattern paper I used is from Basic Grey. The buttons are from Paper Trey Ink. The punches are from Stampin' Up!. I used silver cord from Stampin' Up! to tie the buttons and the mirrored snowflake onto the pink velvet ribbon.
The inside of this cute holiday card, holds the typical school photo in a pocket. The inside is stamped with 'Merry Christmas'.
I hope that my daughter likes this card, as much as me. Thank you for looking, and have a safe and filling Thanksgiving!

Sunday, November 22, 2009

Sunday Card Club Challenge Entries

Here are the entries to the challenge for Sunday's Card Club. There are 3 cards, one scrapbook page, and one photo layout. I think everyone did a wonderful job! All different, but all beautiful. That is the point of these challenges. It is to help my club members 'think out of the box'. It is to help them 'look' at layouts and see 'new' ideas. The second card on the left was the winner. Congratulations Patricia!
This is our last meeting for this year. We resume card club in Feb 2010. I live in the mountains, and the winters can be hard. The roads are closed by the State Police periodically due to ice and dangerous driving conditions. I feel that the holidays are busy enough without one more obligation, and our children are out of school.
I do have 2 stamping events on the books for January, just in case my club members need some paper crafting before we get back together.

Sunday Card Club Challenge

Here is one of the layouts for my Sunday Card Club Mojo Monday Challenge. Since this club meets on Sunday, I gave the ladies the choice of doing the current challenge (#109) or doing the following weeks challenge (#110). I chose the current challenge. (The premise is based on the date that we met, not the date the challenge is due.) All products used must be Stampin' Up!
My card base is Dusty Durango. The pattern paper is from the Thoroughly Modern Designer Series Paper. I used 'Compliments to the Chef' and 'Circle Circus' stamp sets. I used Dusty Durango and Soft Suede classic inks. My neutral card stock is Very Vanilla.
Thanks for stopping by to take a look. Check back later to see the entries and winner of my Sunday Card Club Challenge.

Saturday Card Club Winner

This was our Saturday Card Club winner! Great job Nichole! I encourage my card club members to 'think outside the box'. And that is what Nichole did. The Mojo Monday challenge is a card, but I think she did a wonderful job keeping the layout, and taking it a step further. Yahoo! (Nichole has her own blog, also: Straight from the office. blogspot.com) If you have a moment, you should check-out her stuff.

Saturday Card Club Entry

This is one of the entries of my Saturday Card Club Challenge. We all were given the Mojo Monday #108 challenge. This is Beth's entry. Love the color combination. She is very talented as you can see. Great Job! And she used one of my favorite stamp sets-Charming.

Saturday, November 21, 2009

Mojo Monday Challenge #108

Good Morning! Thank you for taking a few minutes out of your busy schedules to see what I have done.
I have 2 card clubs, and both are filled with wonderfully talented woman. OMG, these ladies keep you on your toes. They are quick learners, who have an eye for paper crafting. This weekend, both clubs will be meeting. This is also our Holiday Club Meeting. How fun!
So, today is the day that my Saturday card club meets. We have friendly challenges on a regular basis. So, for today's meeting, they had to create a card/scrapbook page using Mojo Mondays challenge #108 (that was the current challenge when we met in Oct.). This is what I came up with. I now regret not doing this sooner. I would have loved to submit my entry. Oh well. Live and learn, right?
I used all Stampin' Up! products. Here they are: Garden green card stock as the card base. I used a sheet of Kaleidoscope designer series paper for the pattern paper. (Same sheet of paper, I just flipped it over, to use another pattern.) I stamped the chandelier stamp from 'Grand Soiree' in Certainly Celery classic ink, randomly. Stamped the bird cage image from Chic Boutique in Night of Navy classic ink. I stamped the bird cage again in Tempting Turquoise classic ink on a scrap paper. Punched out the bird image with my 1/2" circle punch. Colored the bird with a Barely Banana marker. Adhered the colored bird to a pewter build-a-brad. Added the epoxy dome over it, and layered it over the original stamped image. I matted the stamped whisper white card stock onto Bashful Blue card stock, and them again on Garden Green card stock. I stamped the 'merci' from the Chic Boutique stamp set in Garden Green classic ink. I used the small oval punch to punch it out. I matted that onto a scrap of Garden Green card stock. (I hand cut this piece.) I used a scrap piece of ribbon I had from the Elementary Ribbon Originals.
Quick and easy. One thing I love about Mojo Monday layouts, is that, you can start with a color, and a stamp set, and it all works wonderfully well together!
Check back later today, I will post a picture of all the cards that were entered in our friendly challenge. I will also let you know who won!
Have a great Saturday! Oh, and don't forget to check back on Sunday. My Sunday Card Club has the same challenge this weekend, but with a different layout from Mojo Monday!

Thursday, November 19, 2009

sympathy

This has been a rough month. I know too many people who have lost a loved one this month. All of which are sudden losses. When I originally made this card for my dear friend Kathy, I could not image having to mass produce this card. :(
I used a simple floral yellow patterned cardstock from Cosmo Cricket. The paper is two-sided. One side is the main pattern paper on the card. The other side is matted with Soft Suede card stock from Stampin' Up! I used a leaf die and my Big Shot to cut out the leaves in Barely Banana card Stock and a textured Going Grey card stock, all from Stampin' Up! The sympathy stamp is a loose stamp I had in my stash. I stamped 'with deepest sympathy' in Going Grey, on whisper white card stock, matted that onto Barely Banana card stock, and then matted it again on Going Grey textured card stock. All these papers are from Stampin' Up! The ribbon is a dark grey from a 'big-box' craft store.
My heart goes out to these many families. These are sudden losses, and no one could prepare for their devastation.

Monday, November 16, 2009

Christmas Note

Here is another card I sold at the Tramway Community Church Christmas Craft Fair. It did surprisingly well. I don't know if it is the simplicity of the note card, or all the bling. This photo doesn't do the card justice. I used a stamp set called 'Tree Trimmings' from Stampin' Up!. I used dimensional glue to adhere the glitter everywhere I could. So, not only is it sparkly, but puffy. I added a half-pearl at the top of the Crushed Curry stamped ornament. I added a pink rhinestone to the top of the Melon Mambo stamped ornament. Yeah, I added some 'ribbon'. Its silver cord along the left side of the card.
Thanks again for looking. Please come back. I will be posting more this week. My hectic card making frenzy is over, for at least a week. :)
One of my dear friends lost her husband this past week. I am in the process of making her a sympathy card. But, those who know me, know I won't just throw something together. So, please come back and take a look at my creation. I promise not to disappointment you.

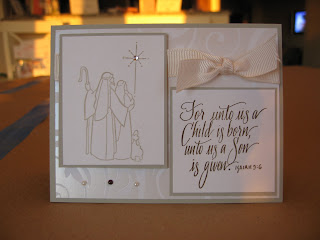
Goodwill towards Man

This holiday card, was one of my top sellers. I sold this card in a box set, (there are six cards with 7 envelopes). I think its elegant and simply beautiful. The colors are neutral, so there would not be any distractions, because I found the sentiment empowering.
I put a clear rhinestone at the center of the northern star. Who doesn't like a little bling? I lined 3 tiny half pearls at Joseph & Mary 's feet. The center half-pearl is brown, while the other two half-pearls, are cream. I felt that, that empty space needed something, but nothing too distracting.
The card base is Sahara Sand (from Stampin' Up!). The ribbon is Very Vanilla ribbon from Stampin' Up!, too. I love ribbon. (I'll add ribbon to everything.) But, I especially love my color choice and placement.
I want to thank you for taking a few minutes to look at my entry. Please leave a comment, they always make my day. Enjoy the rest of your week.

Saturday, November 14, 2009

Tramway Community Church Craft Fair

Hi everyone~ Just a quick note. I will be selling my hand-stamped holiday cards at this years craft fair at the Tramway Community Church. They are on the northeast side of town. Tramway and Manitoba, just north of Montgomery. The craft fair is from 9a-5p. So, if you are in the neighborhood, stop in and say 'howdy'. All the sellers their make their own products. I'll post some photos on Sunday. Thanks for stopping-by Shirley and Beth!

Monday, November 9, 2009

Paper Pretties Gallery Challenge

Here is my entry to another challenge. You can't see the background paper too well. But, it is a cream color with white circles on it. I thought this card was good enough to produce for a local craft fair. This will be a box set of six cards and 7 envelopes.
As always, thank you for looking, and please post a comment. Those little notes always make my day!

Sunday, November 1, 2009

Best Wishes, Chrisma


Good Morning everyone! Its November 01, so you know what that means...we turn our clocks back an hour, so we have an extra hour to paper craft! :)
I saw an 'Easel' card a few weeks ago, on a fellow paper crafters blog. Loved it so much, I have made quite a few.
I was asked by a special friend to make an engagement cake for a friend of hers. Because this lady is a special friend of mine, I decided to make a card to go with the cake. So, I looked through my 'wedding' themed paper crafting supplies, and here is what I came up with. A large portion of the products are from Stampin' Up!, but some are not. The stamped 'bride-to-be' is daintybella. The wordy paper is tying the knot, and the pearl brad is silver wedding pearl brads. I used Stampin' Up! textured Going Grey paper are my card base, along with their Bride specialty paper. SU! basic black, shimmer white, sahara sand, and whisper white card stock match beautifully. I had a scrap of retired beach front ribbon, that finishes the card. In the right upper corner of the card, I heat embossed the two birds from SU! Eastern Influences in very vanilla. I also stamped them on the envelope in going grey.
Thank you for looking, and enjoy the rest of your weekend. And, as always, take time out of your busy schedule, to do something wonderful for yourself-paper craft!

Wednesday, October 28, 2009

absent

Hi everyone. It has been a bit crazy at my house, so I apologize for being 'absent' from my blog. I have been busy creating holiday cards to sell at the upcoming craft fairs. I will share my creative results with you. I hope everyone is well and happy!
Real quick, I am having only one class next month (Nov.). It is on Sunday Nov 15, open-house style from 10a-2p. We will be making 16 gift tags and a holder for them. The cost is $12. So mark your calendars, and reserve your seat!

Saturday, October 17, 2009

W'ink Wnner Recycle Challenge

Falisha is our winner for the W'ink Card Club Recycle & Reuse Challenge! (The 'winner' gets to select any item out of the prize box.) This picture really doesn't do her workmanship justice! The blue ring at the top is her recycle piece. It is the bag holder in a diaper genie. Who would have guessed? She hand-stamped all the stars and cut them out individually. Wow! That's alot! Some of the stars are on the metal rimmed tags. She used the elastic gold cord to tie the stars and moons on the mobile. She also used the gold cord to suspend the mobil from the ceiling. I am always impressed with what my club members come up with :) They are all creative.
Thanks for looking, and as always,please post a comment-they always make my day :)

W'ink Runner-Up Recycle Challenge

The challenge this month is titled 'Recycle & Reuse'. You take a piece of 'trash' and decorate or alter it, to create something beautiful and functional. I like challenges, because it gives my club members a different use of their supplies. It also allows them to think outside of the box.
Our runner-up for the W'ink Card Club is Nichole. She altered a bottle holder and bottles. I think that she did a wonderful job. Each bottle is filled with goodies: nuts, chocolates, yogart covered raisins, ect. I love the color combinations. Great attention to detail :)

Thursday, October 15, 2009

Red Hatter Halloween Card

My mother is a Red Hatter. She really enjoys the other ladies, and they seem to have a wonderful time. I made a set of these cards for her to give her red hat friends. The paper used for this card is from Stampin' Up!. The pumpkins are from a stamp set 'Fall Elegance'. The buttons are from an 'Autumn Collection'. The black polka-dot ribbon is a random roll I picked up from a large chain store. The hat is from a stamp set 'Hat Boutique'. I hope that my mom likes these cards. They were completed very last minute-now.
Thank you for looking. If you have a moment, post a comment, those always make my day. Take time out of your busy schedule to craft something wonderful!

Wednesday, October 14, 2009

Thinking of You Card - Club

Sorry for taking so long in between posts. I spent last weekend in Las Vegas with girlfriends! That was alot of fun! It is always nice to get away and recharge your batteries.
So, I have finally completed the second card we are doing at club this month. I really needed to do a card that featured a bird. I have quite a few ladies who have a weakness for birds. So, here we go!
The technique we are learning is 'stamping with bleach'. The technique itself isn't difficult, however, I think finding the right color combination is. Bleach will change the color of different card stock differently. So, if you are looking for a specific color change, it can be trial and error. If you just want the technique, any color will do. For those who know me, there is no 'whatever color will do'. Here is the card. The stamp set is current. You won't find it in the catalog, its on the dornment list. (I hate that list) There are alot of wonderful stamp sets listed there, and they all have great potential.
Anyways, the card is done in Mellow Moss, Always Artichoke, and Soft Suede. However, I used like four different stamp sets. Sorry. Branch Out, Bird on a Branch, Fifth Avenue Floral, and Friends 24-7.
Thank you for looking, and as always, post a comment, they always make my day!

Monday, October 5, 2009

Happy Thanksgiving Card

If you are a member of either the W'ink Card Club or the Stampapalooza Card Club, you will make this card this month! The technique is 'stained glass'. (this card looks better in person) I used the new DSP paper(Autumn Meadows), and a new stamp set(Gifts of the Earth)! The other technique we will be learning this month is stamping with Bleach. Stay tuned. I am planning on posting that card by Wednesday evening.
It really makes my day when you post a comment. If you look on SplitCoastStampers (SCS) I have a gallery there. My name is 'swheet'.

Saturday, October 3, 2009

Thank-you Christmas card

Howdy! Welcome to the wonderful people who have come to our beautiful city of Albuquerque for the International Balloon Fiesta! Mass Ascension was ah inspiring.
I saw a card posted on Sandi Mac Iver's blog. A card she had done in 10 minutes. Well, I wanted to see it. A card completed in under 10 minutes! not two hours. The card she had done is beautiful. Its larger than an A2 card. It must have been a 5"x7" card. I don't make large cards, so I figured I could alter it a bit. Here is my version of Sandi's card.
I am teaching a 3-D card class tomorrow and I need a 'thank you' gift for the ladies who are attending. I thought that I could make them each a set of 3 different Christmas cards, to help get them inspired (this is one of their cards). I hope that they like them.
For this card, I used the stencil Vintage Ornaments 1, out of the 'definitely decorative' SU catalog. I used a stipple brush and mellow moss classic ink to 'color' the inside of the ornament. I used the Champagne' shimmer paint out of the 'Holiday Mini' SU catalog, to sponge the ornament decoration. I stamped 'Merry Christmas' in soft suede classic ink. I stamped the branch in Close to Cocoa classic ink. I matted the very vanilla card stock onto brushed gold card stock and the card base in soft suede card stock. I tied a simple knot of mellow moss taffeta ribbon and attached with a mini glue dot.
Thank you for looking. I also made them my version of a card that Anne Hayward had posted on a Yahoo group. Check back tomorrow for that image.

Friday, October 2, 2009

3-D Cards: Diorama Card


Well, I have finished the Diorama card. I finally got a chance to take the photos during the daylight. So, here is one of the card we will be making at the 3-D card technique class. For the Diorama Card I used Bermuda Bay, Cameo Coral, and Old Olive card stock. I used the Fresh Cuts, & For All You Do stamp sets. For the flowers, I used a 'rock-n-roll' technique with So Saffron and Cameo Coral classic inks. I used So Saffron brads for the flower centers. Some of the flowers were attached with dimensionals to get them off the card stock.
Thank you for looking, and check back tomorrow to see the Pop-up card. I'll give you a tease, the colors used for this card are Sahara Sand, Basic Black and Whisper White.

Wednesday, September 30, 2009

Christmas Stamp-a-Stack


Here are much better images of the cards you will make at the Christmas Stamp-a-Stack on Oct. 24th. You will make 5 of each of the 6 designs (envelopes included). The cost is $45 and that does include lunch, door prizes and lots of fun! If you are unable to attend this event but would like a kit, the cost is $40 (including delivery). Please contact me if you have any questions, or you would like me to hold a seat for you!