Showing posts with label Craft Fair. Show all posts

Monday, November 27, 2017

a Bright Pink Holiday

Howdy.  I hope you are well.  Me, I've been busy crafting.  I have a craft fair this weekend coming up, and so it's a 'craft-apolooza' here {smile}.  I have to stop myself, and take photos, or I'll just keep crafting.  Not, that that is a bad thing.  It just means I can't share what I've made.  {frown}
I came upon this bright pink and blue pattern paper.  Now, I'm not a bright any-color kind of person.  But the graphics in the patterns were just too sweet!  To me, it looked like something my oldest granddaughter would love.  So, yeah, I purchased the paper.  and I crafted a few things for the craft fair, too!
To help get my work out there, I am entering three different challenge sites: Get Creative Challenge, A Snowflakes Promise Challenge, and Word Art Wednesday.  My typical style is shabby chic.  But, this paper is just too sweet to pass up!
The folks over @ Get Creative Challenge, current challenge is: Holidays.  The design team will certainly get you inspired with their creative work.

The folks over @ A Snowflakes Promise, current challenge is: Anything Goes.  But don't let that stop you.  The design team has created some sassy paper crafts {smile}

And last, but certainly not least; the folks over @ Word Art Wednesday, current challenge is: Anything Goes - Family Friendly.  This group of super talented ladies will certainly inspire you.  They start each challenge with an explanation of a specific scripture.  And they provide you with a word document to add to your paper craft.  But it is not required.  

and here is what I made:


Let me first apologize for the photography.  It was getting late, and the lighting  in my house is awful for photographing, but wonderful for romantic evenings.  {smile}  The photo shop program I use, will lighten up the shadows, but washing out the bright hues of the colors.  So, this was a happy medium I found.
Recipe:  I used Mambo Pink & Tempting Turquoise card stocks from Stampin' Up!.  I used a die from Paper Trey Ink, to 'cut' the tote bag panels (front and back).  I used a snowflake die set by Paper Trey Ink to cut the snowflake pieces.  I used Dazzling Diamond glitter card stock from Stampin' Up! for the snowflakes.  Bermuda Blue ribbon from Amuse Studios.  The paper blossom is from a big box craft store.  The button is from the vintage aqua mist button collection, by Paper Trey Ink.  And finally, the silver snowflake charm and silver twine is from Stampin' Up!.
I just love the pink stripe pattern paper, so I used that as my main panel.  To introduce the bright blue, I added a strip of triangle pattern paper as the belly band piece.  I wrapped a piece of white cotton trim around the triangle pattern paper, to accent the softness & femininity of the collage pattern paper. 
I added some machine stitching to the main panel.  I just love how sweet it makes my paper crafts {smile}.   But, my heart just swoon over the holiday collage paper, so I made that my focal piece.  I matted the collage piece with Tempting Turquoise card stock, to help pop that blue!   And you know I just had to add some machine stitching to this piece, too!  I used foam tape to adhere this piece to the front of the 'tote'.  To add some sparkle, and tie into the theme, I cut out two snowflakes, using glitter paper.  I added a bright pink paper blossom to the larger snowflake, and an aqua button to the smaller snowflake.  I tied a silver snowflake charm to the vintage button, using silver twine (more sparkle).  I used hot glue to adhere the snowflakes and blossom/button, to the front panel.
And once I had the 'tote' put together, I wrapped the 'tote' in Bermuda blue satin ribbon.  This is a single sided satin ribbon.  That means that one side is shiny and the other matt.  I kept the ribbon shiny side up, to help add more sparkle.  (But, I just love the contrast of the matt side.)   Viola! that is my sweet bright pink holiday tote!
Now, don't forget to photograph your creations, or at least do it when the light is better, and then share what you made with all of us!  Have a great week!


Sunday, October 15, 2017

Mini Hand Sanitizer Holder

Wow, I didn't realize that it has been almost a whole month since I posted.  I guess time really does fly.  I have been busy crafting.  I'm working on several holiday craft fair items, and trying to make new things, too.  And here is a 'new' item: mini hand sanitizer holder.  My thought process is making the packaging pretty for the little things; to give the gift big impact.  
A popular store, to do some basic holiday shopping is Bath & Body Works.  Let's face it, they have some wonderfully smelling soaps, lotions, candles, and various air fresheners.  They have a scent for just about everyone.  They are even carrying a mens line of products.  I was surprised (but not really) that they started carrying air fresheners for your car.  
An item that my grandchildren and I carry with us, is their mini hand sanitizers.  They even have 'fun' clips to hold these little bottles to your back pack, gym bag, purse, etc.  But, I want to make a 'fun' holiday package for these little bottles, and make gift giving easier and pretty.

front
We all have office/work gifts to get during the holiday season.  But, with everything else we all need to buy, we can't really afford to spend another hundred dollars.  So, we all wrack our brains trying to find something 'good', but not too expensive.  I work at a hospital, so everyone there are germ-a-phobes, and they all love food.  So, usually I make some homebaked goody.  But, this year, I think I'll get them these cute mini hand sanitizers.  They are relatively inexpensive 5 for $6.  An useful gift, without breaking the bank and I won't have to spend an hour in the kitchen {smile}.  Now, I need a way to package them, other than throwing them in a little gift bag. . . and that is how I came upon this idea!

Left-side

Right-side
This is my first one.  So, it isn't perfect.  There is usually a learning curve to making anything out of paper.  I usually keep these for my samples.  I don't give away these first generations, because they usually have a 'mistake' in/on them.
The sentiment rectangle is actually the 'piece' that holds the flap down/the box closed.  Pretty easy to load with the hand sanitizer, just slide the bottle in.  Easy, Peasy, and Pretty!
I used Ocean Tide card stock for the base.  I matted the pattern papers and sentiment rectangle onto Early Espresso card stock.  I added a small strip of foam tape to the bottom of the sentiment rectangle, to lift it off the box.  I used a small snowflake die to cut out the snowflake, using glitter paper.  I added a trio of wood-grain sequins to continue the woods-y feel of the pattern paper.  I used some scraps of this holiday themed pattern paper from 2 years ago.
I am going to try and make a 'bag' holder for these little bottles, too.  I think 'bags' may be a nice option.  {smile}


Wednesday, November 2, 2016

Clear Box - Gift Bag

Howdy!  I wanted to share with you a new gift bag that I am making for my Craft Fairs this year.  Typically, I add a decorative panel to a brown paper bag.  But, I wanted to add a new dimension to my gift bags.  So, I have added my decorative panel to a clear box, and made it a tote.  


Recipe:  The solid red card stock is Riding Hood Red card stock from Stampin' Up!  It is retired for a few years now.  But I just love the vintage faded red color.  The pattern paper is 25th and Pine by Basic Grey.  I matted the floral pattern paper onto a scrap piece of mint macaroon card stock by Stampin' Up!.  I added a single border stitch with my sewing machine.  The sentiment 'label' is actually cut from a sheet of pattern paper.  I added some sweet blush stitched ribbon from Paper Trey Ink.  I liked how this color of pink complimented the pink in the pattern papers.  I attached the sentiment 'label' with a pair of antique pearl brads from recollections.  And to add a little sparkle, I added a retro silver star mini ornament.


The clear boxes are 5" x 5", and 2" deep.  I left the top flap in tack.  That way, there is a way to 'close' the bag/tote so items don't fall out {smile}.  At first, I was struggling a bit, with how to 'package' these clear box gift bags/totes.  The clear boxes unfold, to lay flat.  Ta Da!  Now, all I have to do is slide these gift totes into a clear bag.  I need to figure out a price.  Don't fret, I will still have my typical paper gift bags {smile}.   Thank you for stopping by, to see what I have been working on.  Now, it's time to bleach some bottle brush trees!

Sunday, October 9, 2016

Craft Fair Prep

Howdy.  I've been a bit busy behind the scenes.  But I haven't forgotten my loyal followers, and fans! I have shared a photo or two on InstaGram.  But, I want to share a special coupon for my Facebook followers.  Simply show or print this coupon, to receive your discount.


Then, I thought, hey, I should do something for my blog flowers.  So, please stay tuned.  I will create something special for you all.  I haven't decided if its a coupon, a special mailer, or a special sneak peak not posted anywhere else.  But let me hear from you!  Use the 'comment' to let me know what you want!


Sunday, December 6, 2015

Craft Fair

Howdy!  WOW!  The turn out and response to my booth yesterday was fabulous!  A huge Thank You to everyone who took a moment and stopped by to have a 'look-see' at what I created and had for sale yesterday!  And another huge Thank You to everyone who came out and made a purchase or two {wink}.  LOvEd the response and the many, many compliments!  My heart is over joyed!  


I stayed home last night to craft a few more items.  If you stopped by yesterday, you know that I 'ran out' of several items.  And I didn't want to open the craft show today empty handed.  So, if you didn't make it out yesterday, please come by today!

my 'small' gift bag, but don't forget about my fabric scrap large gift bags!

I have gift bags (small and large) and gift card holders (small and large) ready for sale!  So, take a moment to get all your gift 'wrapped up' and take a little stress out of the holiday giving!  These little paper gems, are sure to add that little bit of sparkle and homespun feeling to this joyous holiday!

a gift card holder

Need to add an unique gift under the tree?  Why not pick up (or special order) a magnetic monogram?  I have most letters, so stop by and have a peek.  These letters measure approximately 4 inches square.


Don't see what you are looking for? contact me (email, phone, or convo thur Etsy) and make a special order request.  There is no additional fee for special orders, so give the gift you really want to give!

I'm off to get a few more crafts done this morning before I head out the door to the last day of this craft fair!  Enjoy your Sunday! and hopefully I see you there!


Friday, October 16, 2015

Sweet, Vintage Christmas Gift Card Holder

Howdy my paper peeps!  I've been busy.  Busy like a little bee {smile}.  But, I did want to take a moment and share a new craft I am working on.  It's a gift card holder.  And I make a lot of these.  So the idea, or template that I use isn't 'new', but the holder is.  {smile}
I make many of these for the holiday craft fairs.  They are super sweet, and super easy to use during the busy holiday season.  They make perfect stocking stuffers, sweet little additions to gift bags, and boxes, great teacher gifts, or hostess gifts.  Purchase a gift card to your recipient's favorite store, and simply tuck it inside to a wonderfully beautiful holder.  Easy peasy!


I love adding machine stitching, it is so sweet, and home-y.  The round tag is hand-stamped with 'Merry Christmas'.  Simple and sweet.  And here is the inside:


The sentiment on the inside is always heat embossed.  I believe the raised lettering is a very elegant touch.  I tucked a gift card inside, from one of my favorite shops for the photo shoot.  I defaced their logo for legal reasons.  But, we all know I have a deep love for them.  {smile}  There is room on the panel where the gift card sits, to write a personal message for the recipient, too.  
Oh yeah, the pattern paper is from Tilda.  The card stock is a very old retired card stock from Stampin' Up! (bordering blue).  I used a very retired stamp set by Stampin' Up! to stamp the tag: Fancy Flexible Phrases in brocade blue classic ink.  And finally, for the inside, I used a stamp set  from Paper trey Ink: season's greetings.  I tuck the finished gift card holder in a clear cello bag, with a bag topper, so whoever purchases one of my gift card holders, the holder stays fresh and untouched.  {smile}
Thank you for stopping by.  I hope all is well, where you are.  I'm off to finish several more. {smile}


Tuesday, December 2, 2014

Roses & Reindeer

Well, the crafting hasn't stopped.  But, I am taking a small break to post a few pictures.  I love sharing what I create, but I always under-estimate the amount of time it takes to photograph, edit, and post images. {frown}
A wonderful lady who works at my Dentist office, came by my last craft fair (@ Tramway Community Church) and purchased all of the gift card holders I had created.  {smile}  It is very nice to 'sell out'.  And this gave me the push to create some new ones, using some different pattern papers, and embellishments.


These little cuties are a blast to create.  It really forces you to think differently.  The space to embellish is only 4" x 2 1/2", with a slope.  So, it needs to be minimalist, without looking bare.  It's always good to have a challenge, right?
I forgot to photograph these before I packaged them.  So sorry for the cello bag glare.  
Speaking of packaging.  What is stamped on the bag topper is what is heat embossed on the inside.  Also, there is a dot on the back of the bag topper, to show what color of embossing powder was used for the inside.
Recipe:  The top gift card holder:  I used the roses G45 Christmas paper for the outer flap.  The polka dot pattern paper is Aqua dots & stripes by Echo Park.  I used garden green card stock by Stampin' Up! for the base.  I also used the new real red cotton ribbon by Stampin' Up!.  It is soft and ties some beautiful bows.
The bottom gift card holder:  I used Eskimo Kisses by Basic Grey.  That paper is easily 3 yrs old.   I only had scraps, so the top panel piece wasn't wide enough to fit across the whole card.  So I made it into a panel.  I added a text pattern paper So Noted by Carta Bella.  The gift card base is made with Pool Party card stock by Stampin' Up!.  I also used the new cotton ribbon by Stampin' Up! in blushing bride.  
I tied on snowflake charms from Stampin' Up!.  Yeah, they are new this holiday season.
I created two different by equally perfect sentiment pieces.  I stamped both in real red classic ink onto whisper white cardstock; both from Stampin' Up!. 
Look for these and many more different styles of gift card holders at my next craft fair this Saturday @ La Cueva High School, in Albuquerque, New Mexico.

Thank you for stopping by.  I'm heading back into my craft room, to finish some more gift card holders.  And a few more cards, gift bags, and gift card/box combos. {smile}


Wednesday, November 19, 2014

Next Holiday Craft Fair

Howdy!  I hope this post finds you well.  
I am getting ready for another holiday arts and craft fair.  This one is at a local high school:  La Cueva High School, in Albuquerque, New Mexico.  It is on the first Saturday of December, so please mark your calendars and I hope to see you there!  


The craft fair is on Saturday, December 6th, 2014.  From 8a - 5p.  and I will be located @ B-34.


Wednesday, November 12, 2014

Love Pink

Howdy.  Yeah, busy crafting.  {smile} I have to admit it, I really love it!  I enjoy the whole creative process.  But, I did want to take a break and share with you what I made.  It's small, and very sweet.  It is a magnetic wallet-size photo holder.  Before you say anything, let me explain.  You know those very unique and memorable school photos you have of your children?   You probably have a hundred.  You order enough for grandparents, neighbors, friends, and your children's friends.  But some how you always have extras.  Right?  Well, why not display them with pizzazz!  Either on your locker at work, or your frig, or how about providing a way for your child to 'frame' her BBF's pic?
And look!  I made a few.  And the others I made,  aren't so shabby chic, feminine, girly.  But, I really love this one {smile}.


I used Camilla pattern paper by Anna Griffin.  I just love how beautiful and elegant this paper collection is.  I cut a scallop trim piece from Silver glitter paper.  (Love the sparkles.)  And I took some pale pink scrunched seam binding and machine stitched them together (seam binding and glitter paper).  I also made a multi-loop bow from the seam binding.  
I made a blossom out of white sparkle clay, and distressed it with white paint and dazzling diamond glitter.  I also did the same distressing on the two white pearl vintage buttons.  
I added a little hand-stamped sentiment piece.  I stamped the sentiment onto a scrap piece of digital pattern paper in basic black classic ink.  Matted the sentiment circle with the same pale pink cardstock as the photo matt.  The sentiment is sweet, and fancy {smile} 'Absolutely Fabulous'.  Basically to 'match' the design and feel of the pattern paper.
Oh, I almost forgot.  The finished size of these little gems is 4" x 4".  Small and very sweet.

Thank you for looking.  Just a heads up, tomorrow I will post a few photos of a few crafts I created using red and green.  Yep, no kidding.  Traditional Christmas colors.  Real red and garden green.  See you tomorrow.


Tuesday, November 4, 2014

Watercolor Wreath

~ photo heavy post ~
Howdy!  and welcome to my little piece of blog-land.  A place where I craft, cook, and share.  Ok, I share more crafts than baked goods here, but I do both!  (I post more food photos on Instagram.  Don't really know why, but I do.)
Anyways, I want to share with you a card I made.  It's a Christmas/Holiday card.  I know, you aren't really surprised, are you?  I wanted to try a technique I saw on Michelle Wooderson's blog: Mish Mash.  She calls it 'embossing + watercoloring'.  I think it's beautiful in a eclectic way.  It's basically emboss resist but instead of sponging color (ink) onto your paper, you use water colors.  Now, how gorgeous and fun does that sound?  So, I wanted to give it a try.  But first, I need a challenge to play along with.  So, I set out into the vast 'land' of the blog world and found TWO great challenges to play along with:  Just Us GirlS and Divas by Design .
So, the lovely ladies over @ JUGS, have a wonderful holiday theme challenge:  Wreaths!  Oh boy! right up my alley!  Here is there inspiration board:


For those of you who have not been to the JUGS site, they have changed their challenges.  So, this week, it is a word challenge.  I love the different format they have adopted.  It keeps their site fresh and new!  So, join them this week.  Make something with a wreath.  Have fun.  Craft.  and share!
The wonderful ladies over @ Divas by Design, have a fun and easy challenge: anything goes.  So, craft something that makes your heart happy! and share it with us!
Ok, here is what I made!


Recipe:  I used Aqua Mist cardstock for the card base.  I used the pattern papers from the Library Ledger paper pack, by Paper Trey Ink.  I used the Tasteful Trims die by Stampin' Up! to cut the scallop trim.  I did some machine stitching along the edges of the top panels.  I tied some gold bakers twine from Stampin' Up!, around the middle of the card.  I used a vintage button to add a little something to the bow.  (Aqua Mist button by Paper Trey Ink)
The ticket at the top is a digital download.  Love those little things: tickets and digital downloads. {smile}  The sentiment was hand stamped in Soft Suede classic ink by Stampin' Up!.  It paired very nicely with the rich chocolate browns in the ledger paper.
I stamped the wreath in versa mark ink onto the pattern paper.  I heat embossed antique gold embossing powder, for the wreath.  Love the subtle shine.  I used my aqua painter for the water coloring.  First, I just 'painted' plain water over the embossed areas.  It's like prepping your work surface.  This allows the paint to 'move' over the area.  For the 'paint' I used a few drops of the Pool Party classic re-inker by Stampin' Up!.  I dipped the tip of the brush into the 'color' and simply washed the embossed wreath with paint (aka: re-inker).  To add a little more depth, I splattered some more color onto the painted wreath.  I used crumb cake and pool party for the splattered colors.
I had some much fun making this card, I made some gift card holders with the same technique:


I had a lot of fun making these.  But as you can tell, once I start something it kinda becomes what I do.  And I want a variety of items at my craft fairs, so I stopped at 4 gift cards.  I don't want everything to look the same.  {smile}  Making these gift card holders really allows me to use my scraps in a fun, and festive way!  
Sidetone:  I had so much fun with this technique that I didn't (couldn't) stop to take a photo.  That's why these gift card holders are already packaged for sale.  Sorry for the glare of the clear bag.
Thank you for looking.  I hope I have inspired you to create something new, and challenging!  Why not try emboss resist but with watercolors!


Saturday, May 3, 2014

More Cones

Wow.  That's kind of a crazy title, huh?  But, as promised the other day, I wanted to share some more of these super cute paper cones Tussie Mussies.  
This photo doesn't show all of the ones I made.  And it doesn't depict my favorite.  I'll have a few photos of that in a solo soon {smile}.  Ok, before I get past this thought of my favorite, sometimes I create stuff for craft fairs that then just can't part with them.  Don't know if that ever happens to you.   So, my solution may not be original, or 'fair'.  I will either remove it from the 'to be sold' batch and keep it for personal use, or I simply make it my 'sample'.  That sounds kind of sneaky, huh?
Here is most of the ones I made the other day.


Ok, before you say anything, let me say, that photographing these little buggers was a nightmare.  I wanted to photograph a bunch of them, and not one at a time.  The clothes pins are there to keep them from rolling over.  
In this photo, I have 2 'Adore', 2 'Mom', 3 'Happy Mother's Day', and one with no sentiment.  At first the medallions were all looking the same.  Yuck!  So, I started switching it up a bit.  However, not due to lack of creativity, but maybe time, patience, or just the strong desire to get them done, they all have the same center medallion piece.  Oops.  Sorry.  
and here is how they will be displayed:


Today, I will be at the La Cueva High School, in Albuquerque, New Mexico, from 8a to 4p.  I really enjoyed myself creating these little cuties.  Don't forget your chance to win some blog Candy.  See  Thursday's post, here
I am off to load the car and get on the road.  Hope you have a great weekend, and get a chance to do whatever craft makes you happy {smile}.


Monday, November 16, 2009

Goodwill towards Man

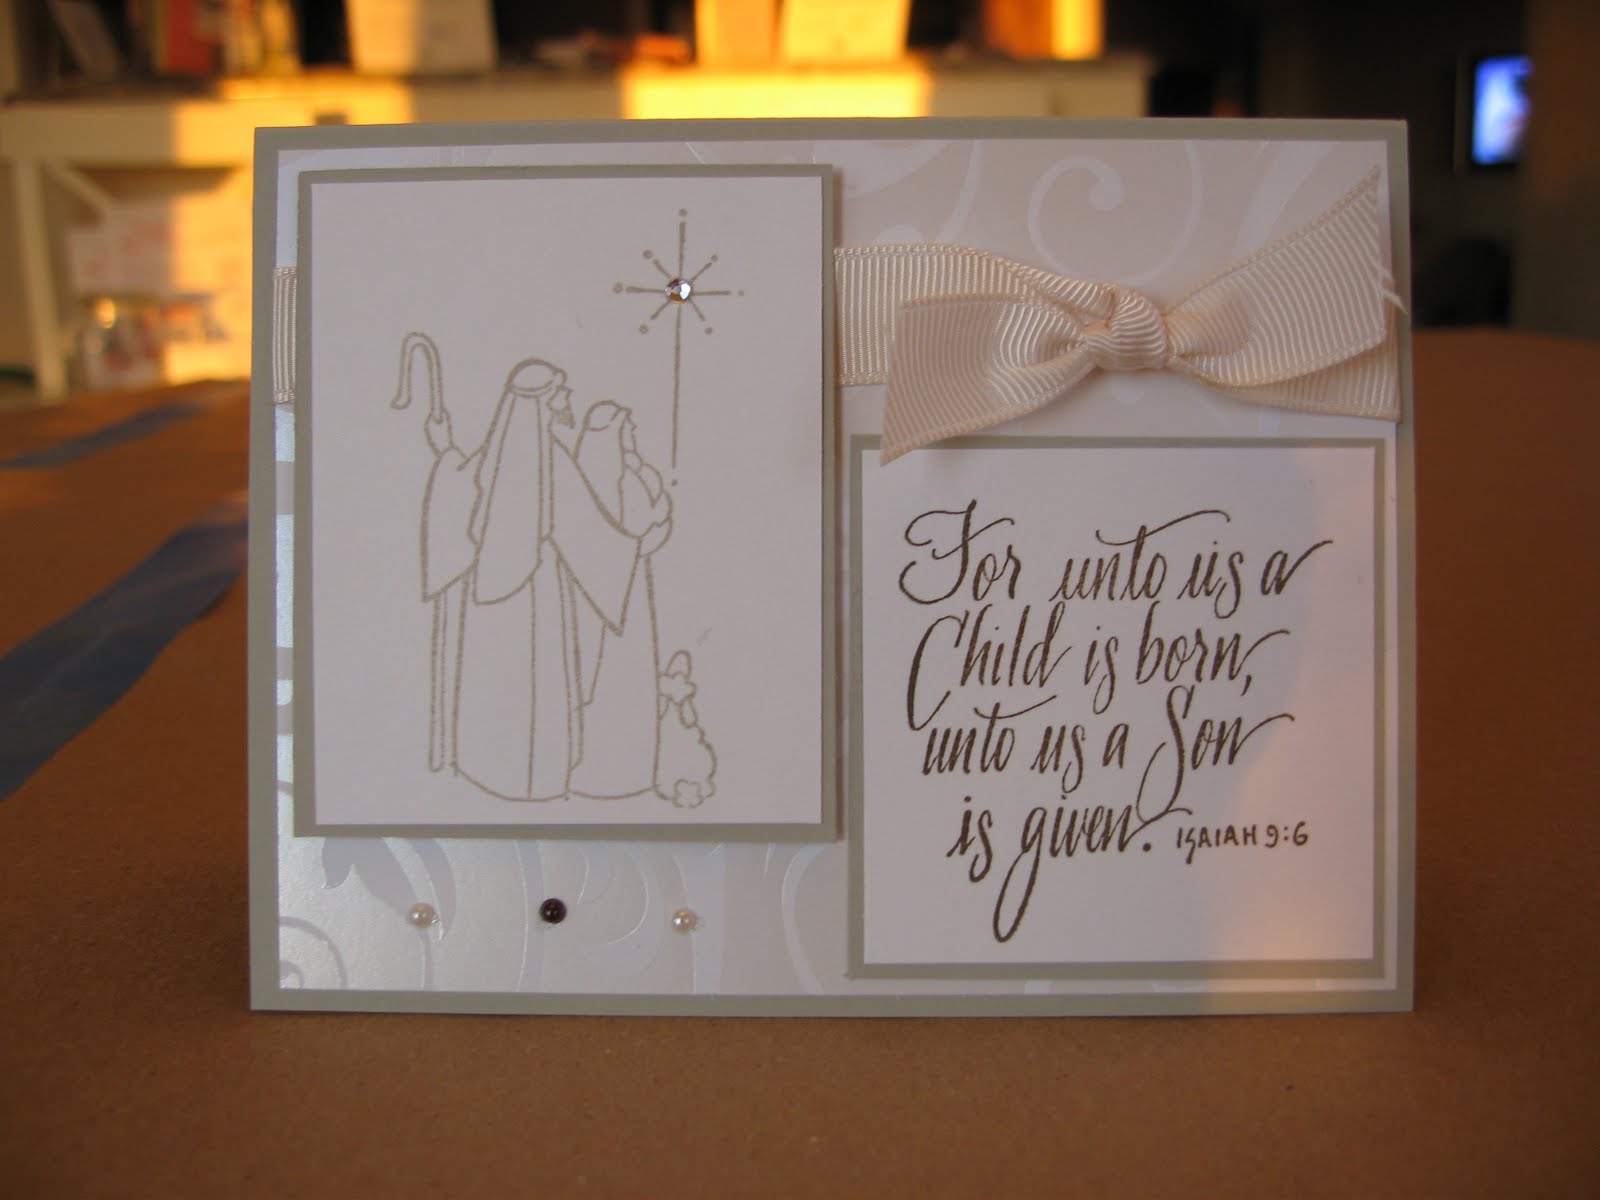
This holiday card, was one of my top sellers. I sold this card in a box set, (there are six cards with 7 envelopes). I think its elegant and simply beautiful. The colors are neutral, so there would not be any distractions, because I found the sentiment empowering.
I put a clear rhinestone at the center of the northern star. Who doesn't like a little bling? I lined 3 tiny half pearls at Joseph & Mary 's feet. The center half-pearl is brown, while the other two half-pearls, are cream. I felt that, that empty space needed something, but nothing too distracting.
The card base is Sahara Sand (from Stampin' Up!). The ribbon is Very Vanilla ribbon from Stampin' Up!, too. I love ribbon. (I'll add ribbon to everything.) But, I especially love my color choice and placement.
I want to thank you for taking a few minutes to look at my entry. Please leave a comment, they always make my day. Enjoy the rest of your week.