Tuesday, February 21, 2017

Pennant Birthday!

~ photo heavy ~

Howdy, and welcome to my little piece of blog-land.  I am having a good week!  Hope you are too!  One of the changes I have made this year, is to start each week writing down three things I am thankful for, from the previous week.  It is a way to reflect on my blessings.  By taking my life in smaller pieces, and reflecting, I am truly able to see the good.  And I am super happy with how this small step to 'count my blessings' is working for me!
I had a few moments, ok an hour, to create a card.  And I am sure you all can understand the drive to get your ideas made out of paper {smile}.  And I do know how truly blessed I am, to have a hoard stash I can craft from, when I can't get to a store.  {wink}
I am entering this card in four challenges.  I have to say, I typically don't enter this many, but I will relish in the oddity of this opportunity!
My firs stop is Mistress Owl.  This is an Eastern European challenge site.  They can a sketch for you to work with.  I strongly encourage you to pop on over to the their challenge site.  The design team will inspire you!  Their sketch was easy to work with, so that is always a huge plus in my book.


My next stop is Cupcake Inspiration.  I am always intrigued by their challenges.  This design team will knock your socks off!  Between the very user-friendly inspiration board, and the creativity of the design team, you will be crafting in no time!  I just love their photo this week!  Theme: Chalkboard!  And who doesn't love chalkboard.  It instantly reminds me of school days.  So retro, shabby, vintage.


Now, I just HAD to stop by another favorite challenge: Really Reasonable Ribbon.  This design team will certainly get you to add ribbon, twine, trim, and lace to everything!  The creations will inspire you to try a new technique, and put a bow on it!  Their current challenge is Celebrate!  So birthday, anniversary, new baby, new couple, etc.  You get the idea.

And finally, I stopped by Brown Sugar Challenge.  This challenge site encourage all crafting styles.  And the design team works with their sponsors, to showcase their products.  I think that's wonderful! Their current sponsor has digital images.  I just love digital paper.  And I am starting to embrace digital images/stamps.  Their current challenge is: Birthday!  And who doesn't need a birthday card in their stash?  So, please stop by and see what they have created.


now, roll all these challenges together, and here is what I created:


~ disclaimer: photographing a card with a flair button, is a bit of a challenge in itself!


my card was selected as a 'top 3' for the Really Reasonable Ribbon blog challenge!

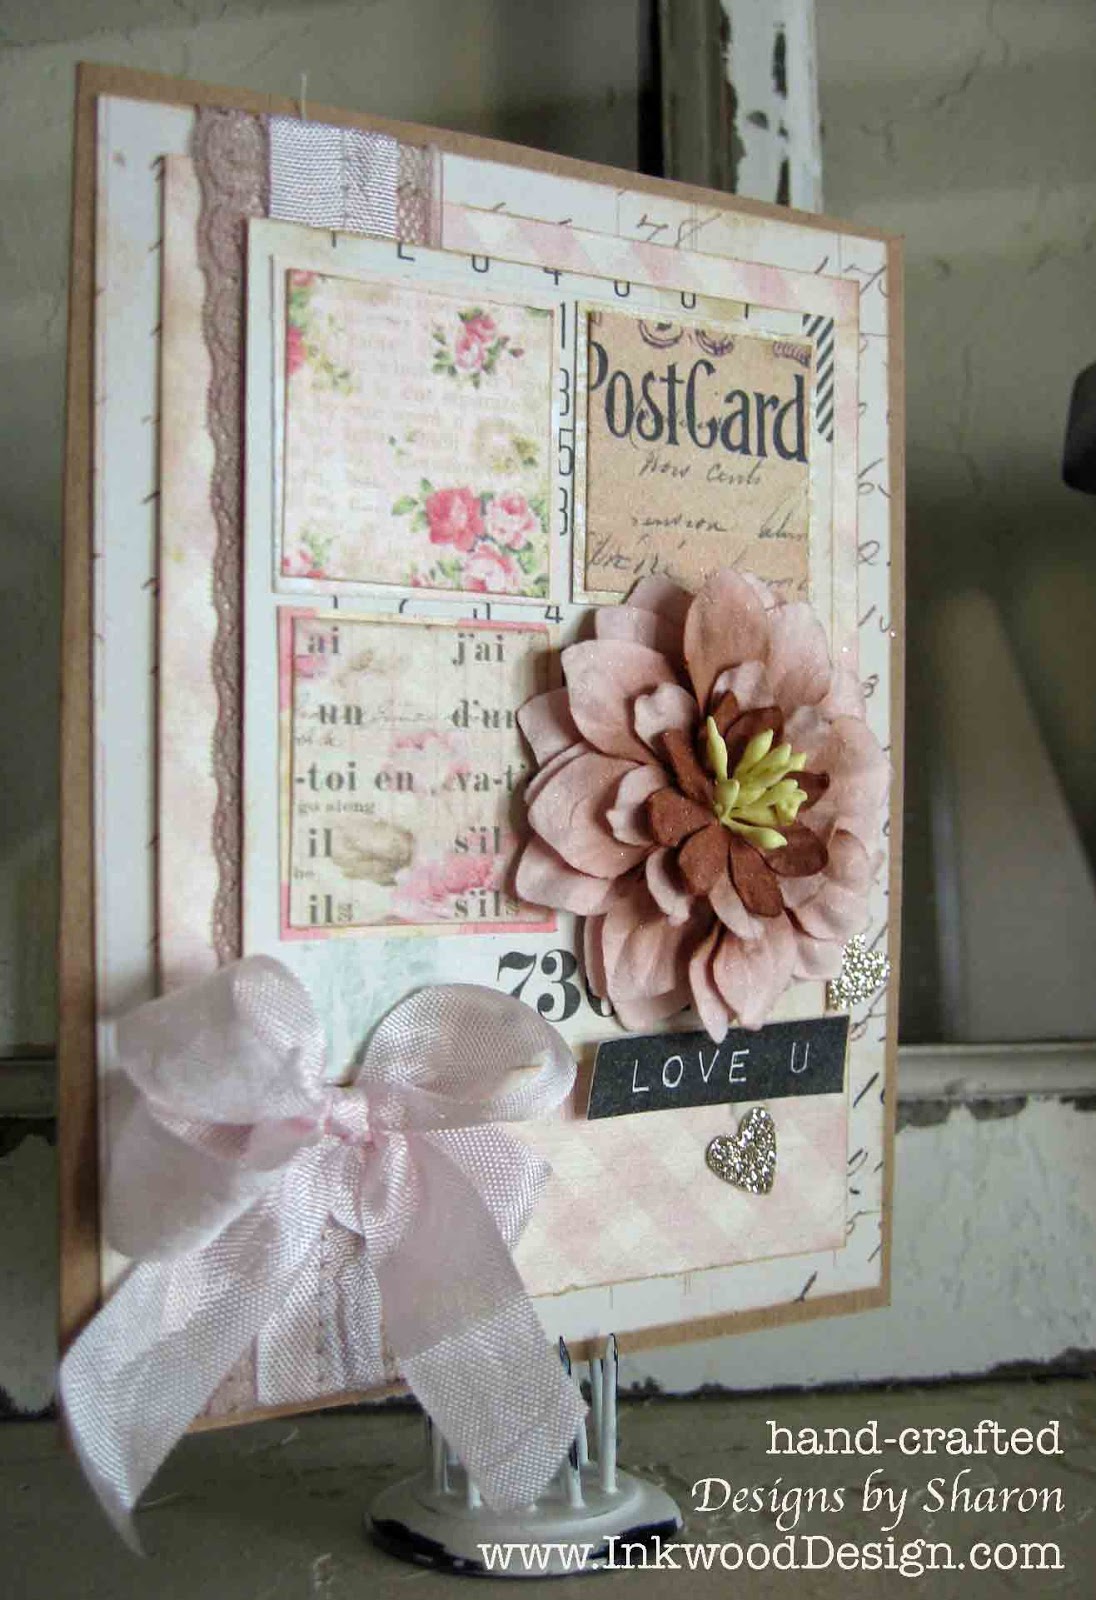
Recipe:  This card is a typical A2 size card: 4 1/4" x 5 1/2".  And yes, it fits inside its envelope.  The card base is kraft card stock.  I just love the color and weight of this paper.  It looks so 'old school'.  
I added this beautiful light blue and pink rose digital paper as my main layer.  I did dampen the edge of the paper (top right corner) and scrunch it a bit.  I also distressed the edges, and tore the bottom edge. I sponged a tea stain ink on all four edges.
I added a lace doily from Stampin' Up! to the top left corner.  I just love it peeking out from behind my journalling cards.  (I used two 'chalkboard' journalling cards for my Chalkboard element.)  I also inked the edges with the tea stain ink.
I stamped my sentiment onto the top journalling card in white craft ink, and then added clear embossing powder and used my heat gun to set the embossing powder.  
I fussy cut a digital tag and added it to the lower right of the journalling cards.  
I originally wanted to add my sentiment across the card, very similar to the sketch.  And place my bow to the left of the journalling cards, but I don't have anything that would have worked.  {frown}  I guess I need to go paper craft shopping! {wink}
And then, I layered trims!  Oh my!  My first layer is a cream cotton eyelet trim.  Then a white sparkle tulle box pleat trim.  Then a mint swiss dot lace.  And finally, a pale pink seam binding.  Who doesn't love seam binding?
I tied a double bow with the seam binding, and added a silver metal button to the bow.  Then I tucked in a cupcake flair button just above the bow.  Viola!

Thank you so much for stopping by!  I hope you have been inspired to play along with any/all of these creative challenge sites.  You will not be disappointed in both the talent and the inspiration!


Sunday, February 19, 2017

Love Pink

~ a few photos ~


Howdy, I have been busy making a few different cards, getting my tasks organized, and getting some running done. {smile}  But, I want to share with you, the a card I made today {smile}.
I stopped by a favorite challenge site, for some direction: the Card Concept to see what their current challenge is: Vintage.  I have to say, I am a sucker for text pattern paper, and I just love hearts!


My next stop, is an Eastern European challenge site:  Art-Kladovaya.  These talented ladies have a unique and creative take on paper crafting, so please stop by to see what they have created.  Anyways, their current challenge is:  Shabby Chic.


I used their inspirational photo as my palette.  I love the blossoms, and the pink & white color scheme.
I also want to play along with the wonderful ladies over @ Word Art Wednesday.  Their current challenge is: Anything Goes & Family Friendly.  They include a scripture to include in your paper crafting.  And their post are always inspirational!
and here is what I created:


This is a typical A2 size card: 4 1/4" x 5 1/2".  I added layers of my favorite papers: text, gingham, calendar, and floral.  I inked all the edges of all my papers with a tea stain ink pad.  All of my digital papers were printed on whisper white card stock, by Stampin' Up!.  I love the weight of this card stock, and how beautiful it takes ink.
I started with kraft card stock for the card base.  I just love the color, and the weight.  My first matt, is a text pattern paper from Melissa Frances.  I really like the softness of the cream and deep brown color.  My pink gingham matt, is a digital pattern paper.  I just love this pattern.  I think it adds a softness and vintage look.  {smile}

I machine stitched a taupe swiss dot lace and pale pink seam binding to these layered pattern papers.  I also tied a double bow, with the pale pink seam binding.
I cut down a calendar card, to allow the pink gingham pattern paper to show.  I then cut three squares (1 1/2" square) from another digital pattern paper.  I matted each square with a different digital pattern paper.  I just love the mix of patterns & texts.
I added some sparkles to the pale pink & brown paper blossom from Prima.  I adhered the paper blossom to the area on the card, that the missing square should have been placed.
I hand-stamped my sentiment in basic black classic ink, onto whisper white card stock.  I adhered the sentiment with foam tape, to give it some height off my card.  I used a new stamp set: Label Love of Altenew.
I added the champagne glitter hearts to the card front with glue dots.  I felt that it added balance and visual interest to my card.  And finally, I adhered the bow with hot glue.
Thank you for stopping by!  I hope that you have been inspired to play along with any (or all) of these challenge sites.  Now, I'm off to get a few chores done before bed.  


Thursday, February 16, 2017

My Planner

Howdy, and good morning.  One of my new years resolutions, is to be more organized.  Can someone be 'more' organized? or is it simply 'organized'?  Well, I feel that I am pretty organized, per say.  But, I  also believe that there is always room for improvement.  So, I am working on being 'more' organized.  And to help me conquer this task, I purchased a planner to keep everything together at my finger tips.  {smile}
If you do a search for 'planner' on the internet, you will be bombarded with images, tutorials, and various manufacturers products.  A lot of eye candy!  So, during the last week of December, I headed to a local craft store, and picked up a few items.  And I finally did a little bit of crafting, and decorated the cover of my planner, and the inside cover of my planner.  {smile}


My planner is striped in a rose gold metallic and cream.  I really liked how these two colors looked together.  I started with a paper lace doily from Stampin' Up!.  I layered a scrap piece of cream and gold metallic lace, towards the bottom of the doily.  Then I added a piece of pink polka dot washi tape.  I purchased that big beautiful fabric blossom in the clearance isle of a craft store.  So, I hot glued the blossom, to the cover.  I die cut two leaf pieces and my initials from a scrap piece of glitter paper, that is pretty similar in 'gold' color on the cover.  I adhered the two leaf pieces to the upper left of the blossom, and adhered my initials to the right of the blossom.   I adhered the rose gold and rhinestone charm just under the blossom.  And the final touch was adding a trio of blush sequins, and a trio of flat-back 'pearls'.


I am pretty happy with how the cover is decorated.  I didn't want too much on the cover, as I use my planner daily.  It's kind of a ritual now a days.  I open it, and look at my various sections each morning, while I am drinking my coffee.  It helps me stay on track for projects, and I get to review my calendar, and make notes of different items of interest.  I am truly loving this whole process! {smile}  I also wanted to make a few additions for my planner, and to make the inside just as pretty!


I trimmed a Project Life card and re-rounded the corners to this beautiful metallic card:  'By being YOURSELF you put something WONDERFUL into the world that was not there before'.  I think all of us need reminders how special each of us are.  And that we should celebrate not being carbon copies of each other.  
I made 4 different but equally beautiful 'clips'.  I took large paper clips and simply added things I love!  Three are made out of paper, and one is another beautiful blossom.  {smile}  The sign, coffee cup, and mason jar are made from paper.  I added a little foam adhesive between the front and back piece of heavy card stock.  And hot glued the paper clip in place.  For the blossom, I simple tied a double bow to the paper clip and hot glued the pink paper blossom to the bow.  I backed it with a scrap piece of pink felt.  I added some small gold accent post-its, and two magnetic closures: a tiffany blue flag, and a gold metallic diamond shape.  I printed a calendar year onto heavy card stock and slipped that in the large pocket.  So, I can see the whole year in one view.  I also made a few notes for each month.  That is where I jot down large projects.  
Well, thank you for looking, and spending a little time with me, to see what I have been doing.  I hope you are still on track with your new years resolution(s), too.  Changing how you do things, and creating 'good' habits are hard.  It does take work, and discipline.  But, I know that I am happy with the changes I have made this year.  I am still exercising 3 times a week.  Running 2 days a week.  Making better, healthier choices of food.  And having time on my calendar to craft, really takes the stress away.  I don't fret about deadlines anymore, and I can get so many more things done in the day.  It makes me believe that my stress is reduced, which is good for my heart, and my family. {smile}  And I continue to work on my 'problem' areas each day.  So there are strides there.  And feeling like I am in control of those areas, is empowering!  Have a great day!


Sunday, February 12, 2017

{heart} Thanks

~ a few photos ~


Welcome.  I wanted to share a sneak peak of my card for today.  Trying something different.  Want to shake things up, a bit!  Before we start, let me provide a few disclaimers:  There is NO hand-stamping on my card.  And I used a majority of products from the same collection & manufacturer: Prima.  
Now, with that out of the way, let's get to today's post!  Howdy!  I'm happy you are here.  I love participating in paper crafting challenges.  But, like most of you, I don't always have the time I want to craft.  And that is sad.  But, not today!  I carved out a few hours earlier today, to craft a much needed Thank You card.  Unfortunately, I am not participating in several challenges.  Just two.  But don't fret.  I am sure you will like what I made {smile} I know I am happy with how my card turned out.  
This week, is a contest challenge over @ Mojo Monday.  I try my hardest to always participate in these challenges.  I think the design team does some of their best work during these weeks.  And, they do inspire you to play along.  So, that is what I did.  And I will most likely play along this upcoming week, too {smile}

what a clever sketch.  I just love the circle element and the ribbon piece.  The layered rectangles will add so much visual interest and give me a chance to add different patterns/textures!
I am also entering Word Art Wednesday.  They have Anything Goes, Family Friendly challenge.  This group of lovely ladies, will certainly inspire you.  But, what keeps me playing, is their positive, hopeful, and just genuine love of life!  These ladies will raise your spirits, keep your hope strong, and encourage your creativity!
here is what I created:


Recipe:  My card measures a typical A2 size greeting card: 4 1/4" x 5 1/2".  
My card base is made from crumb cake card stock by Stampin' Up!.  I just love their heavy weight card stock, and the color is just dreamy!
The matts are Blush Blossom card stock by Stampin' Up!.  This beautifully sweet peachy/blush color has been retired for 10yrs.  It's a hoarded collected treasure.  {smile}
The pattern papers are all from Something Blue by Prima.  I wanted to use the neutral colors, and then add a soft, splash of color: blush.  Something sweet, to accompany Something Blue.
I matted all three pattern papers onto blush blossom, and added a simple machine stitching around each rectangle.  I thought it added a softness, a homespun look & feel, and gave it a little vintage-y look.  {smile}  I sponged all the edges of the pattern papers and matts with tea stain ink.

For my circle element, I added a new small lace doily by Stampin' Up! (#142793).  These beautifully delicate doilies are white on one side, and vanilla/cream on the other.  How super clever of Stampin' Up!.  I hot glued a Something Blue dark grey blossom to the card front where the polka dot and text pattern papers meet.    I love how the dark text pattern paper isn't black, but rather a dirty grey.  So I mimicked that color in my blossom.  I wanted to repeat the blush color, so I added a tiny brad with a blush heart, next to the blossom.                              I wrapped coconut seam binding around the card front.  I just love this neutral color.  It doesn't distract your eye, but rather allows your eye to move across the card.  I adhered a wooden sentiment banner to the card front.  I was already stamped with 'THANK YOU'.  So, I didn't have to add a sentiment.              
I tied a piece of coconut seam binding into a triple bow, and adhered it to the wooden sentiment banner piece.  I thought the bow looked beautifully there, instead of below the sentiment.                                  
To finish my card, I added a trio of blush sequins from Close To My Heart.  Just to add a little splash of color, and a little more femininity to my card.
Thank you for stopping by.  I hope your weekend is finishing strong!  We are getting ready for another winter storm to move-in.  We are expecting snow later today/evening.  Take care, and until next time, Happy Crafting!  It really does make your soul happy!


Tuesday, February 7, 2017

February Happiness

Hello.  I wanted to write a quick post.  I am still working on my 'happiness' challenge for myself, as one of my new year's resolutions.  In today's world, it is extremely easy to get mad, upset, and stay negative.  Well, I don't want to spend anymore time, energy, or health being negative.  So, I am looking for ways to remind myself to be happy! To stay positive.  To be grateful.  To count my blessings.  
I also started a planner, this year, to help me stay organized.  And Sundays are the start of each week in my planner, so on Sundays I write 3 things that I am thankful/grateful for, from the previous week.  I figure, why not start the week, acknowleging my blessings. {smile}
So, to keep me on track for the week, I give myself a challenge each week, to pass along the happiness, and stay focused.
  
And here is my February Happiness challenge:


Some of these require work, effort, and consciousness.  But, I think that is part of it.  We have to actively be happy, to stay happy.  To make an effort to change  the way we see our lives, our world, our neighbors, and our friends.  To actively choose to be happy, to smile, to find the good.  So, the last week of each month, I will create my own happiness challenge.  You are welcome to join, to participate, to create your own, to just be happy! 
Have a great day!  And help make our world a little happier! {smile}  Me, I'll be smiling, crafting, baking, sewing, and challenging myself to happiness!


Sunday, February 5, 2017

For the Love of Coffee and You

Howdy, well, I had a little free time this morning to craft, before I had to run.  Literally.  I ran my first race of the year, this morning.  10K.  I'm not a fast runner.  11 minute miles.  But, I also don't think that I'm slow.  Anyway, the group of folks who ran today's race, run faster than me.  But, I am happy with my time.   And it was a beautiful day, to hit the pavement.  {smile}
I made a sweet pink heart card yesterday, and wanted to make another.  But this time a little less shabby, but still all girl!  So, I am playing along with a few of my favorite challenges.
The wonderful folks over @ Verve Stamps, have a free digital stamp set they are giving away.  And, it is perfect for all you coffee lovers.  So, that's me {smile}!  So the challenge on their blog, is to use the free digital stamp set.  No other requirements.  Well, except to have fun!  Check.
I also stopped by the Really Reasonable Ribbon Blog to see what their current challenge is - Hearts and as always, use ribbon, trim, lace, or twine on your project.   Check.
I always love stopping by the wonderful Word Art Wednesday challenge blog.  These ladies are sure to inspire you!  Their current challenge is (as always): Anything Goes & Family Friendly.  Check.
And finally, a challenge site I visit often for inspiration: The Paper Players.  This group of super talented ladies, will certainly inspire you!  Their current challenge is: will you be my Valentine?  


and here is what I created:


I am pretty happy with how my card turned out.  {smile}  I was having coffee with a few girl friends on Saturday morning, and yes, we were at a Starbucks.  They had these pink heart gift cards, along with red heart gift cards.  I just couldn't pass these beauties by!  So, I picked up the pink one, and knew I wanted to make a Valentine's Day card with it on the front.  
Recipe:  The card measures the traditional A2 size: 4 1/4" x 5 1/2".  I used kraft card stock for the base.  The matt is Lavender Moon card stock by Paper Trey Ink.  The pattern paper is from 10 yrs ago, and I only had a 6" x 10" piece left, before I started.  I am not sure of the manufacturer or the name of the pattern.  The pattern paper has large, medium, and small blossoms, in various shades of pinks and purples, with a few orange blossoms.  The leaves and stems are all this beautiful deep, rich brown.  There are also some cream colored swirls and blossoms.  Just beautiful, and I hope you understand why I kept my scraps.  {smile}

I printed my digital stamp set, from Verve Stamps, onto white linen card stock, by Paper Trey Ink.  I just love printing on textured card stock.  It gives my projects a beautiful and rich touch.  I matted my sentiment rectangle onto a scrap piece of Lavender Moon and Kraft card stocks.  Those adorable coffee cups are included in the digital stamp set.  I used my markers to color the coffee cups.  I used Pumpkin Pie classic ink, and Regal Rose classic ink, by Stampin' Up! to give the hearts on the cups a coordinating color wash.  I used my Pink Pirouette classic ink marker to color the coffee cups.  For the coffee cuff, I used scrap pieces of the main panel.  This darker pink and orange circle pattern paper is actually the reverse side of the floral main panel.  I used foam squares to 'pop' the coffee cups off the card front.  
My beautiful pink heart, is actually a new gift card from Starbucks.  I just love how creative and inventive these folks are.  There was already a hole in the heart, so I simply tied some Chocolate Brown twill ribbon, by Paper Trey Ink into a simple bow.  I used a few foam squares to help 'pop' the heart gift card off the card front.
Now, I will need to swing by Starbucks tomorrow morning, on my way to work, and pick up a red one, to add to the front of a Valentine's Day card, too!
Thank you for looking.  I hope that you have been inspired to play along with any/all of these challenges.  


Saturday, February 4, 2017

You Have My Heart

Howdy! and welcome to my little piece of blog-land.  Here is where I craft, bake, sew, and share.  I love creating pretty things.  Umm, that sounded a bit odd.  Who wants to create ugly things?  Anyways, I love pink, seam binding, roses, pearls, crystals, distressed wood, and everything shabby chic!  I also love all things country! Barns, tractors, farm animals, aprons, and wooden screen doors.  What can I say, I am girl-y girl at heart and soul!  And that is where I find my inspiration, and put my soul into my creations.  Regardless, if its baking from scratch, or paper crafting.  {smile}
I visited a personal favorite challenge blog last week, and completely fell in love with their inspiration board: Scrap Therapy.  What I love about this challenge site, is their openness to just create!  Sometimes that have mandatory elements, and sometimes that want you to be inspired.  Either way, their boards are gorgeous! The design team is incredibly creative and talented.
from this Inspirational Board, I loved the pink & white color scheme.  The roses, and the tenderness.  
I also stopped by a new-to-me, challenge site:  Viva la Vista.  This challenge site, has some cleaver challenges, and the design team deserves a second look!  Their current challenge is to use a heart(s).

I also stumbled upon another new-to-me challenge site: Candy Floss.  This refreshing challenge site, has a super talented design team, and a beautiful inspiration boards.  Their current challenge is to give a gift: Gifts for beloved.  How sweet, and tender.

Now that I have some inspiration, a required element, and a theme, I set out to get some direction.  So, I stopped by one of my all-time favorite challenge sites: Mojo Monday.  They always have user-friendly sketches.  And this weeks, fits the bill perfectly!

and here is my card:


Recipe:  My card measures 4 3/4" x 4 3/4".  The card base is kraft card stock.  
I used a soft sky card stock for my matt.  I just love how this soft, sweet shade of blue matched the blue in the floral pattern paper.  The pink gingham and the floral pattern paper are the same paper.  The pink gingham is the reverse side.  This pattern paper is from My Mind's Eye.  It's several years old.  I only have one whole sheet left.  I matted the floral pattern paper onto the same soft sky card stock.  
For my circle piece, I used a 4" white paper doily.  I just love this soft, delicate, vintage doily.
Instead of adding two squares to my card front, I simply added a rectangle and tied seam binding around the middle, creating two 'pieces'.  {smile}  I tied a double bow to add a little more softness.


For the heart shape piece, I added a fabric heart ornament.  The pale floral print is a discontinued Rachel Ashwell cotton fabric.  I backed my heart ornament with sweet blush felt.  I machine stitched the two fabrics together, along with the pale pink ribbon.  The pale pink paper blossom is adhered to the middle of the heart with hot glue. 
For my small green 'round' element, I created a paper blossom with another doily, and button.  I wanted my card to still be 'pretty' if the ornament was removed, so I added a swirl of pearls.  My sentiment is simple: love.  And it is done with a charm.
Thank you for looking!  I hope you have been inspired to play along with any or all of these challenge sites.