Friday, November 30, 2012

Sweet Treat

Today's Arts & Craft Fair is @ Presbyterian Hospital from 8a - 5p.
Happy Friday to you all.  It's Friday, so that means another creative and fun challenge brought to you from Sketch Frenzy Friday.  They have some creative sketches, and today's sketch won't disappoint you.  Here is the sketch:


what I created:


This card was pretty fun to create.  I used baja breeze card stock for the card base.  I just love this pattern paper.  I thought I had used it all up, but then I found one lone sheet.  I tied some island indigo ruffled ribbon around the pattern paper.  I added a decorative layer to the strip and to the circle.
I stamped the cupcake image onto a piece of shimmer white card stock in jet black staz-on ink.  I used pretty in pink and baja breeze re-inkers and an aqua.  I used a 2 way glue pen, some dazzling diamond glitter, and a rhinestone to add some sparkle to the cupcake.
I stamped the sentiment in baja breeze classic ink, 
I hope that you join us in this week's sketch challenge.

Wednesday, November 28, 2012

Anything Vintage Christmas Box

Happy Wednesday.  I hope this post finds you well.  I have been busy this week, trying to complete a few more items for this week's Arts & Craft Fair @ Presbyterian Hospital, in Albuquerque, New Mexico.  While I was surfing the internet for some inspiration, I stumbled upon two different websites that are hosting vintage holiday challenges.  And so, I just HAD to create something for the challenges. I needed a break, and to recharge my mojo, so here we go!
Sugar Creek Hollow, has a #39 vintage Christmas challenge currently running.  They ask, 'We want you to make vintage or shabby chic Christmas cards or other paper-crafted projects that feature vintage Christmas images.'
Ok, I can do that.  I used a vintage tag that I purchased as a download.
Tuesday Alchemy, has a #42 anything goes challenge currently running.  They ask, 'Christmas will be arriving here very soon.  Since the season is a busy one, we are keeping it simply for you.  It's Anything Goes! You decided the challenge.  Create ANY handmade, new project you'd like and share it with us.'
Ok, I can do that.  I need to make a gift box for an upcoming holiday event.

here is what I created:


Here is what I used:
I made the box with Cherry Cobbler card stock from Stampin' Up!  Its the same box I made for my daughter's baby reveal baby shower, earlier this year (here)  I also made this box for a Valentine's Day gift (here).  I purchased the pdf for the directions and pattern for this box from My Time Made Easy.
I wanted to decorate the top of the box, so I used some pattern papers I already had on hand.  The Christmas pattern paper is Festive from Authentique.  The text paper is Twas the Night from Amuse Studio.    For my vintage image, I used a vintage tag that I had purchased earlier this month, I reduced their size before printing to 70%.  I purchased the holiday cheer tags from Iralamija Shop @ Etsy.  She does some very pretty, vintage-style, digital collage paper crafts.   I did stamp on the tag.  I wanted to put something in the open space, so I stamped, 'Merry & Bright' in basic black classic ink.  The stamp is from a set, Signature Christmas, from Paper Trey Ink.  
I also added two snowflake buttons at opposite corners of the box front.  I wrapped some crinkled seam binding I had purchased from Prairie Bird Boutique @ Etsy.  This pretty green is in the Old Fashioned Christmas bundle.  You will receive 15 yards.
You know me, I HAD to add a button.  And so I did.  On top of the bow.  The button is from Paper Trey Ink.  The tiny tag that is tied to the button, is actually part of a stamp. Pretty clever, huh?  The stamp set is Winter Post  from Stampin' Up!.  But hold on, this stamp set is retired.  Sorry.  I kept it because I just love the images and the sentiments.  The 'date' is actually from the post mark stamp in this set.  I punched the date out with the jewelry tag punch from Stampin' Up!.
I filled the box with some holiday peppermint pretzels.  What a cute little 'thank you' gift for our holiday party. 
I hope you have been inspired to continue creating your hand made Christmas items, or inspired to start.  Either way, I hope you have enjoyed the photos.  Let me know what you would put inside these little boxes.  Their dimensions are kind of small:  3 1/2" x 1 1/2" x 1 1/4".  Actually a gift card fits nicely in the bottom, and I could always add a chocolate truffle or two {smile}.

Happy Crafting! hugs, Sharon W.

Tuesday, November 27, 2012

Warmest Wishes on Your Birthday

I hope that all of you had a fabulous holiday week, and that you were able to spend time with family and friends.  I spent the week with both family and friends.  We had a lot of fun.  Good food, and a lot of laughs!  Oh, and we had pie {smile}.
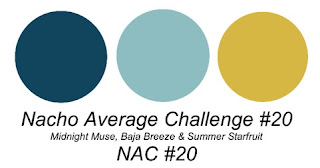
This week, the lovely ladies over @ Nacho Average Challenge, have a color challenge.  I kinda have a hard time with the color challenges.  I guess my brain doesn't work easily that way.  Here is the colors for this weeks challenge:


Here is what I came up with:


My cards don't typically have a lot of white space.  I find the emptiness non-fullfilling.  I know that can should a little strange.  But, I love pattern.  I love layers.  And I 'need' images/patterns in that white empty space.  But, like I said, this challenge was a bit of a struggle.  
I used the pennant parade and the pennant punch for the pennants.  I stamped the images in primrose petals classic ink, and I used raspberry ripple card stock.  The card base is raspberry ripple.  I stamped the sentiment in midnight muse classic ink.  This card was quick and easy, and I hope you have been inspired to play along with us @ NAC.
Happy Crafting!  Hugs, Sharon W.

Saturday, November 24, 2012

Festive ABC

Thank you for stopping by.  I know everyone is super busy during this time of year, and I appreciate the company.  Irena, is the hostess this week over @ Our Creative Corner.  And Irena has a super clever and holiday inspired challenge.  She would like for you to creative a paper craft item where you use the ABC's {smile}.  A is for angel, B is for button, and C is for chipboard.  Of course anything goes for this challenge, not just cards.

here is what I created:


I used pattern papers Festive, and some holiday stickers, from Authentique.  This card was actually really fun to create.  I knew that I wanted to use some of the holiday pattern papers that I have, you know, to help use from my stash.  The buttons, and the library card download, are from Paper Trey Ink.  I used chipboard snowflakes from Pink Paisley.  The sentiment stamp, 'Enjoy the Season' was stamped in basic black classic ink.  This stamp set, Christmas Love, is from CTMH.  It was a set I received from a friend last Christmas.  The angel is a single stamp from a big-box craft store.  I stamped the angel in Versa Mark and used a rich red embossing powder to give the angel some depth.
With the holiday season quickly approaching, maybe you should play along with us.  Getting your creative juices flowing, could possibly spark the idea of your holiday cards, or a fabulous holiday wrapping.  I hope we see your entry @ OCC!

Happy Crafting! hugs, Sharon W.

Friday, November 23, 2012

Wisteria Romance

I hope all of you had a wonderful Thanksgiving filled with great food, family and friends.  We sure did!  We ate too much and had a wonderful time visiting with family.  I generally don't venture out on Black Friday, as there really isn't anything I need so bad that I will be at a store @ 4a or battle an unruly crowd.  So, here I sit with a card to share.  The ladies over @ Sketch Frenzy Friday have a sketch that I am sure you will love.

Here is what I did with it:


For me this is not my typical card.  I love layers and embellishments and this and that.  So, here is a lot of white space.  The card is pretty simple.  My main panel is actually a piece of water color paper.  I stamped the floral image in Staz-On jet black.  I used the reindeers to water color the flowers with my aqua painter.  I created the large scallop from a scrap piece of silver glitter paper.  I tied a piece of the ruffle ribbon in Wisteria Wonder.  My sentiment is the tiny tag, that I attached to the simple knot with a tiny safety pin.   To jazz up the simple image, I added half pearls and rhinestones to the flower centers.
I hope you have an opportunity to play along with us @ SFF!  We would love to see what you create with this fabulous sketch!

happy crafting.  hugs, Sharon W.

Tuesday, November 20, 2012

Affection Friend + honorable mention

Last week was pretty busy.  But this week is even more busy!  Yes, it is possible.  And to help me tackle all the chores and little projects, I have a list, a time-line, and a game plan! Yahoo!
I created a vintage style Christmas card last week.  I found out that I was one of the honorable mentions {smile}.  I didn't 'win', but it was still totally fabulous to be an 'honorably mentioned cup of tea' #5 here
To start the week off with a bit of creativity and a step or two outside of my comfort zone, I have a bright and beautiful (I think) card.  This week, the ladies @ Nacho Average Challenge have a sketch for this week's challenge.
Here is this weeks sketch:


So here is what I did:


The card base is made from Real Red card stock.  The first matt is Pool Party card stock.  Ok, I know you are wondering about the floral pattern paper.  Well, it is actually an envelope.  I just cut off the flaps.  These beautiful pieces are sold in the holiday mini catalog @ Stampin' Up! on page 35, Sealed with Love Simply Sent.  For the 'friend' I used the Affection Collection stamp set.  The bird is from the Nature Walk stamp set.  This card was quick and easy to put together.  I hope you have been inspired to play along with us, and use our sketch!

Happy Crafting! hugs, Sharon W.

Sunday, November 18, 2012

Vintage Zone

Today is my second craft fair.  So this past week, i have been busy working on re-stocking my paper crafts for sale.  Yesterday morning, I started working on decorating some paper bags.  I don't know if I had the right music playing, the 'perfect' papers out, or I was just 'in the zone', but either way I just LOVE what I created.  I really enjoy creating vintage/shabby chic paper crafts, and yesterday was a perfect day for me. Here are some photos of what I created:

This is a food-safe bag.  I stamped the polka dots in white craft ink.  I love how the polka dots resemble falling snow.  Very pretty.  I used a wheel to stamp the lace.  I inked the wheel in basic black classic ink.  
For the tag, I used a decorative die to cut the kraft card stock.  
I printed the digital collage tags on white card stock, to keep the colors true.  I matted the vintage tags onto pink pirouette card stock.  I love how pretty this pink is.  It is a light color, not too much grey, not too much blue.  This color of pink is a soft, light, cool-color of pink.
I used a scallop punch to create the scallop edge in silver glitter paper. I added the scallop trim to the side of the matted tag.
I dyed some white seam binding with spun sugar distress ink.  I crinkled the seam binding, made a multi-loop bow and attached the bow to the matted tag with a rhinestone brad.
I cut a star from some corrugated cardboard.  I painted the edges of the star with picket fence distress ink and dunked the painted star into a tub of dazzling diamond glitter.  I threaded the pink button with thin silver cord and tied a bow.  I attached the button to the star.
To attach the tag to the food bag, I included a wooden clothes pin.  To jazz-up the clothes pin, I painted the top with mod podge and dipped it in silver glitter.
I am planning on giving these bags out filled with home-made cookies, during a cookie exchange I am participating in next month.

I needed a few more paper gift bags for tomorrow's Arts and Crafts Fair, and this is what I set out to make.
For the gift bags.  I covered small paper bags with kraft card stock.  For the pattern paper, I used Market Street by Lost and Found 2. 
I added a decorated tag stamped with 'warm wishes' to help express the feeling of the season. 
I stamped the silhouette of the sledder in black pigment ink and used clear embossing powder to heat set this image.
I used the same corrugated cardboard to cut the snowflake.  I also did the same distressing technique with paint and glitter.  I attached a button to the center of the snowflake.  
I wrapped a piece of crochet trim around the pattern paper, to hide the seam of the two different papers.   I added a TH ticket just below the crochet trim.  I cut a small tag shape from silver glitter paper and used a pink Basic Grey brad to attach the tag to the front of the bag.  I tied some vanilla seam binding into a multi-loop bow and tied a button to the ribbon piece, with some linen thread.
To help hold the bag closed, I tied some kraft twill ribbon at the top.  I added a narrow tag, stamped with a holiday sentiment.

Here is my little dilemma, I just love adore this little gift bag so much, I don't want to sell it.  Have you ever done that?  Created something for your 'shop' or a friend, and then just can't part with it?  To correct this problem, I mass produced some of these gift bags to sell at the Arts and Crafts Fair, and have kept this original one for myself.

Happy Crafting!  hugs, Sharon W.

Saturday, November 17, 2012

Foil + Alcohol

I think the title says it all!  The super talented Sue B. @ Our Creative Corner has a very fun challenge for us this week!  She wants you to try your hand at using alcohol inks and foil!  Ok, how fun does that sound!  Sue writes:  the technique of dripping alcohol inks onto foil has an amazing effect.  The item you make can be anything; a free standing decoration, or an element to place onto your project, experiment and have some fun, it is getting close to the silly season, so why not let go and free all those inhibitions and let rip with some color!  And she is right!  This technique is fun and unique!  It allows you to explore a different medium to paper crafting.  Here is what I did:


I made tags to go on the dinner table for Thanksgiving.  I thought these would be super chic at each place setting, in the middle of the dinner plates.
So, I'm pretty sure you can figure it out, but my foil and alcohol ink technique is the leaves.  I used 'terra cotta' and 'bottle' to 'color' my leaves.  I glued kitchen foil to a scrap piece of card stock.  Cut the leaves shapes with a die, and then let the ink drip!  I swiped the foil with some rubbing alcohol to help encourage the ink to spread.  I dipped the 'green' in the middle of the leaf and the 'orange' around the edges of the leaf.  I used my heat tool to speed up the drying time.  
I cut a tag from vanilla card stock.  I distressed it with a blank stamp and linen distress ink.  I stamped the text in crumb cake classic ink and the flourish in lucky limeade classic ink.  I edged the tag in corduroy distress ink.  I adhered the leaves, tied some beautifully dyed seam binding around the tag, and looped it through a brass button, and tied a tiny bow.  I stamped the sentiment in basic black craft ink and used clear embossing powder to help heat set the sentiment.  Viola!  easy peasy and a whole lot of fun!
I hope you can carve out a little time this crazy busy week, to play with your paper crafts! and I hope you play along with us @ Our Creative Corner.
Be safe this holiday season, and share this time with those who mean the most to you: family, friends, and neighbors.

Friday, November 16, 2012

Sparkle Christmas #140

Happy Friday!  I hope that you have gotten started on your grocery shopping for Thanksgiving.  It's right around the corner, and closer to Thursday it becomes, the larger the crowd at the grocery store.  I did my shopping last night.  And oh my, people's patience is running thin.  So, I needed some alone time.   A chance to sit in my craft room, and create something pretty.  Even though, that was not some folks attitude at the store.
Deb C. over @ Sketch Frenzy Friday has a wonderfully creative sketch for you to try.  Here it is:


Before I show you what I did with this sketch, lets look at its potential!  To start, lets look at the polka dot piece.  You could make this a shape, or you could stamp a background on a section of the card stock.  You could even stamp on a piece of clear card stock to add some visual interest to your card.
For the banner piece, you could make this out of card stock, or add a piece of ribbon.  For the oval piece, this could be your sentiment piece or a decorative piece.   There are a lot of different possibilities for this sketch.
For some color inspiration, I went to the Shabby Tea Room.  They have some of the most creative vintage style paper crafts.  This weeks inspiration photo is sparkle-y, vintage, soft, and simply gorgeous.  Here is their inspiration photo:


The ladies over @ the Shabby Tea Room asks that you use colors found in this photo and sparkle/glitter.  So, here is what I created:


The card base is crumb cake card stock.  The main panel is very vanilla card stock that was run through the vintage wallpaper embossing folder.  I used a scrap piece of dsp and the top note die to create the decorative panel.  I stamped the tree from Lovely As A Tree stamp set in soft suede classic ink, onto a scrap piece of very vanilla card stock.  I used a square punch to create the banner end.  I matted this piece onto a scrap piece of pink pirouette card stock.  I wrapped a piece of crumb cake seam binding around the decorative dsp and tied a multi-loop bow and added a faceted button with linen thread.  I used the silver glitter paper to cut a snowflake with a die.  I added a pink button, and tied a bow with linen thread.  I added various sizes of rhinestones and pearls to the tree.  For my sentiment, I stamped Merry Christmas in soft suede classic ink onto a scrap piece of pink pirouette card stock and the modern label punch.  I adhered the sentiment piece with foam tape to elevate this piece off the card front.

Thank you for looking.  I hope you have been inspired and are able to play along!

Thursday, November 15, 2012

craft fair sneak peak #2

Thank you for stopping by today.  I have a few photos of some of the other things that I am selling at the various arts & crafts fairs.

The letter, is an 'F'.  It's made from chipboard.  I painted it, and then adhered some beautiful pattern paper, London Market, by Pink Paisley.  I adhered various items to the letter; a metal medallion with a bird cameo, a strip of crochet trim.  I added a pink paper blossom.  I created the leaves from some text paper.  I added a loop of pearls, and a rhinestone button.
This is a magnetic letter.  So, you can stick it to your refrigerator, your locker at work/school, or any other metal surface.
I had to alter some more letters, because I sold out at my craft fair @ the Tramway Community Church.  So, I have altered the following letters: A, B, C, D, F, L, M, N, and S.
These letters were a blast altering, so I will be adding some to my Etsy shop.


This is a gift card holder.  You open the top flap, and I have a holiday greeting heat embossed in white.  And there is a pocket to tuck a gift card in.  Or, if you prefer, you can add cash or a personal check.  Just hold either of those options in half, and they will fit in the pocket.  These were a blast to make.  I could use my holiday scraps.
I used some Bo Bunny holiday pattern paper, that is probably 2-3 years old.  I created a 'fancy' square from a coffee cuff.  I distressed the edge with some picket fence paint and then dumped it in some glitter.  I added a mirror snowflake.  For the greeting, I stamped and punched 'Winter Frost' and then attached the modern label punch with some tiny silver brads.

These are two different size altered notepads that I have decorated.  I have two different styles and two different sizes.  I have Christmas/Holiday themed altered notepads, and girly/feminine themed altered notepads.  Each pad has 25 pages of lined paper.
The larger one, is 5" x 8", and the smaller one, is 2 1/2" x 8".
I used pattern paper that I had on hand.  The smaller pad uses pattern paper from City Sidewalks.  The larger pad used pattern paper, the Sweetest Thing by My Minds Eye.
Each of the altered notepads that I have created, have an altered silver clip.  The clip holds the notepad closed.  You know, just in case you throw the pad in a bag.  But, if you have a message board, put the clip at the top, and hold the legs back.  This will allow the notepad to hang from a push pin.


Thank you for looking.  Remember, if you want to shift through the best selection, shop early @ my booth/table.  And after these shopping opportunities, I will have the 'left overs' on sale at my Etsy shop.
I hope I have inspired you to play along, or if nothing else, to hand-craft a holiday gift or two {smile}.

Wednesday, November 14, 2012

Craft Fair Sneak Peak

I wanted to share a few things I have made for the various arts and crafts fairs, that I am selling at.  I am selling a variety of different items that I create.  I have a 'Pantry' section at my booth.  This is where I have home-made Vanilla extract.  I made some with Mexican vanilla beans, Madagascar vanilla beans, and Uganda vanilla beans.  There has been a large interest in this. 

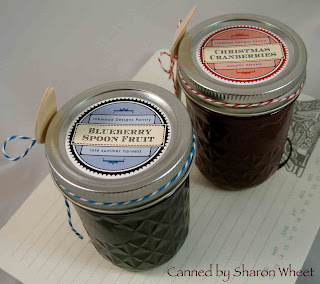
I also have canned Maple Blueberry spoon fruit.  When I cooked the blueberries, I kept them whole, so they would retain their shape, and so there is whole fruit with minimal syrup.  It is perfect on pancakes, cheese cake, or ice cream.  I also have some Christmas Cranberries.  When I cooked the cranberries, I added orange peel, and a splash of bourbon.  I have a few customers who use this as their base for making their own cranberries. You just add one to two cans of cranberry sauce, and a jar of my Christmas Cranberries.

I have made some small gift bags.  These little bags have a small paper bag on the inside.  I am selling these various gift bags at the Arts & Craft Fairs for $3.00 each.  I used various pattern papers to decorate the card stock. This particular bag was made with pattern paper from Basic Grey Holiday collection.  To see an earlier version of this bag, I had made these bags for a girlfriends baby shower, as their 'thank you' gift bag.  (that post is here.)


I have also sewn some fabric coasters.  You can purchase them individually for $2.00 each, or I have 'gift set's available for $8.00.  
The fabric coasters are sewn with an insulator material inside, to reflect the heat from your hot drink back to your cup.
The fabric coasters are in feminine fabrics, and holiday fabrics.  
The 'gift set's have a fabric coaster, various coffee packages, and a white mug.  The white mug is decorated with a hand-applied decal, so you will need to hand-wash these.  I tied the package with coordinating ribbon.


Thank you for stopping by today.  I will be posting a few more photos tomorrow.  I have altered some notebooks, covered notepads, and magnetic letters.

Tuesday, November 13, 2012

Create in Blue

It's Tuesday, and so that means its time for another challenge from the Nacho Average Challenge.  This week, is a color challenge.  So, lets see what you create with this color palate.


and here is what I created with these colors:


When creating this card, I used things that I love.  The large background doily stamp, the four frames polka dot frame, some seam binding, a vintage faceted button, and a banner piece.
This card was fun to create.  I hope that we have inspired you, and that you can play along with us @ NAC.  

I know that I said I would post some photos from my first craft fair, and well, I should have something tomorrow.  Hope you can stop by.  I'd love to read what you think.

Sunday, November 11, 2012

Thanks Tag

Thank you, for taking the time to check back with me.  If I were to say, that this weekend was a challenge, I think I would be sugar coating it.  I created a tag for the challenge over @ Our Creative Corner.  Susan, wants you to create your own background on your paper craft, and absolutely NO pattern paper.  And don't cover up your background.  Sounds like a fun challenge, huh?  Well, I have been making paper crafts for the Arts & Crafts Fairs that I am selling at, and well, my focus has been on Holiday themed items.  I needed a little inspiration, so I headed over to Tim Holtz blog, to see what he has done for the November Tag.  And so, I basically did what he did.  I did a stamp resist technique and a color wash for my background color.  I used minimal embellishments, which was a struggle for me.  So, here is the tag that I created.  It is not my typically style, but I do like it.


Let me first apologize for the photo quality.  I took the photo of this tag earlier with my camera.  But then I lost my camera.  I know that sounds odd, but, I can't' find it anywhere.  So, I had to use my cell phone.  Then I had to email the photo to myself.  Then our modem crashed.  Replaced the modem.  (yes, we had to drive into town to do that.)  Then our internet went out.  Not sure if it is from the snow (yes, we got snow), or our mountain location (elevation 7500ft), or my luck.  Either way, I really had to work at this post.
Here is how I created this tag:
I cut a tag from Shimmer white card stock, 4 1/4" x 2 1/4".  I stamped the two leaves from the French Foliage stamp set, in Versa Mark, sprinkled on some ultra detail clear embossing powder, and then heat set it.  I sprayed the tag with water, and used my aqua painter to 'water-color' the tag with So Saffron, Pumpkin Pie, and Old Olive re-inkers.  I did spray the tag with a spritz or two of more water, to help blend the colors.  I used my heat gun to speed up the drying time.  I stamped the sentiment in Jet Black Staz-On.  The stamp is a little off set.  I did that on purpose.  I used some crumb cake seam binding to tie the bow at the top of the tag.  I stamped the small thanks onto a vintage tag in soft suede, and used a tiny clothes pin to attach the vintage tag to the seam binding.  For the butterfly, I used a die to cut the shape from some beautiful pattern paper (city sidewalk from Pink Paislee).  I used picket fence distressed paint to edge the butterfly, and then dunked the painted butterfly into my tub of dazzling diamond glitter.  I had a beautiful black crystal brad left over from my MME lost and found 2 collection.  And viola!
Thank you for stopping by.  I hope that you have a chance to play along with us this week @ Our Creative Corner.  I know you will have fun!  And if nothing else, it gives you an excuse to 'play' in your craft space {smile}.

Friday, November 9, 2012

always

Happy Friday!  Today, I am at my first Arts & Craft Fair this holiday season @ the Tramway Community Church in Albuquerque, New Mexico.  So, if I tell you that I have been a bit busy, that would be an understatement.  If you are in the area, please drop by and say 'hello'.  I'd love to see you!
As always, on Fridays, the talented ladies over @ Sketch Frenzy Friday have a new sketch for you to try this week.  Tammy is our sketch designer this week.  She always makes the most usable sketches. 
Here is this weeks sketch:


Ok, for those who know me, I tend to turn, rotate, or mirror the sketch.  Not that it isn't perfect.  I just like to change things up.  Here is what I created:


I wanted to use bright colors for this one.  I know, NOT my typical color choice.  But, sometimes you just have to step out of the box and create something a little daring.  I decided not to use strips of DSP, but rather strips of ribbon.  Yep, two different stamp sets for this one.  Holy moly, do I love to use everything.
I hope you have been inspired and are able to play along with us this week over @ Sketch Frenzy Friday.

Tuesday, November 6, 2012

Circles

On this crisp Tuesday morning, the talented ladies over @ Nacho Average Challenge have another great sketch.


I didn't play along with this weeks sketch.  sorry.  But this sketch has a lot of potential!  I hope that you can play along this week.

Saturday, November 3, 2012

Silhouette Challenge

Happy Saturday.  So glad you could pop-in.  This week, I actually struggled with the challenge @ Our Creative Corner.  The super talented Marcy, is our hostess, again this week.  Marcy, would like you to use either a silhouette stamp or a cut-out on your paper craft project.   I know what you're thinking, 'that sounds pretty easy and exciting!' and well, I think any other week it may have been.  But my focus these past few weeks, have been towards creating Halloween gifts, Thanksgiving tags, Christmas packaging and other paper crafts for the upcoming Arts & Crafts Fairs, that I am attending this holiday season.
So, without any further ado, here is what I made:


I had a few scraps from a fabulous shabby chic paper pack.  I layered the aqua text paper, with the pink polka dot paper.  I covered the seam with a scrap piece of crochet trim.  To distress the edges of the various papers, I sponged the edges with crumb cake classic ink.  Then, I used my sewing machine to run a simple stitch along each side.    I wrapped a piece of spun sugar dyed seam binding around the main panel, tied a multi-loop bow and secured the bow to the card front with a Basic Grey brad.  I used a Spell-binder die to create the small 'top-note' shaped  piece.  I stamped the mannequin and heat embossed the shape on the decorative panel piece.  I also heat embossed the same stamp shape onto basic black card stock and fussy-cut it out.  I used small pieces of foam tape to lift the mannequin piece off the card front.  The heart is punched from a discarded coffee cuff.  I painted the edges with picket fence distress paint and dunked the heart into a tub of glitter.  I tied cream twine through each of the buttons.  I created my own little banner piece.  I cut a thin piece of card stock, stamped the sentiment, and then curled the banner piece.  I tucked the tiny banner behind the corrugated cardboard heart.
Thank you for looking.  I hope that you get a chance to play along with us @ Our Creative Corner.  This card will be available for purchase at my booth during my craft fairs.


Friday, November 2, 2012

Neutral Christmas

Wow, can you believe that it is already November?  Where has this year gone?  I have been busy making different paper crafts for the craft fairs that I am attending this holiday season.  You would think that I still have a week.  But, I am having a medical procedure on Monday, and I'm trying to get everything done by Sunday.  That way, if I'm not feeling well, I can rest and not worry about what I have left to create, embellish, or finish.
On this day, the talented ladies over @ Sketch Frenzy Friday have a great sketch for you to work with.  If you have stopped by SFF before, you will notice a change.  We no longer do the blog hop.  All of our cards are posted right there on the main blog.  So, I hope that we inspire you!
Here is this week's sketch:


Here is what I created:


This card was a lot of fun to create.  I wanted to use 'stuff' that anyone would have on hand, so you can use what you already own.  I used two neutral colors and a few different embellishments.  I used early espresso card stock for the card base.  I used a scrap piece of very vanilla card stock for the main panel. I had a strip of pattern paper that had the same colors, so I added it, to tie the colors together.
Instead of a rectangle piece, I added a multi loop bow and tag.
I hope that you get a chance to play along with us @ Sketch Frenzy Friday!