Tuesday, June 30, 2015

Garage Sale

I am participating in a Stampin' Up! garage sale on Saturday, July 18th, 2015.  I will be selling retired (no longer available) stamp sets, pattern paper, ribbon, embellishments, and a few card boxes.


Come out and see in person the quality of these paper crafting supplies!
My Etsy shop will be closed during this weekend, but will re-open once I have finished inventory. 


Sunday, June 28, 2015

Sweet Lilac; Card

Welcome.  If you don't know, I am training to run a half marathon later this summer.  And, boy does running take a lot of my time.  {grimace}  But, I have learned a few things about running:
1) you have to do it for yourself!  It has to be something you want.
2) encouragement from family and friends is intoxicating.
3) you should learn to love it, because it is just you and the road.  
I am running three days a week; Tuesdays, Thursdays and Saturdays. And that eats up a lot of my time.   Tuesdays and Thursdays have specific miles for those days.  And Saturdays, those are my 'long' days.  So, yesterday, I got up at 5am, and went running @ 6am.  I need time to drink coffee, take Sasha (my dog) out for her walk, make her breakfast, and get motivated to put in the time and distance.  Yesterday's distance: 8.2 miles.  My time was ok.  But that activity alone, just running, took up 2 hours of my morning.  Then, I still needed to eat breakfast, take a shower, and get ready to head out the door, for other commitments.   But, I imagine soccer (or another sport) moms, or dance moms have the same time commitments.  
So, today, after I had time to drink coffee and take care of Sasha, I set out to my craft room.  I really miss crafting!  I kept my focus, and crafted a card for someone specific.  I used the inspiration from two different craft challenges:  a sketch and an inspiration photo.
My first stop was Kafe Scrapo Mama.  This challenge has only one requirement: a lilac flower.  It can be stamped, photo, or an actual flower.  Easy enough.  Here is their board:


This challenge is open from 9 June to 9 July 2015.  So, I do encourage you to play along.  The design team has created some beautiful pieces to share! and these colors are so soft, and sweet!
For the sketch challenge, I am using a sketch from a past challenge.  This challenge closed yesterday. Just my luck, right!  But, I love it, so I am using it.  The sketch comes from Retro Sketches.
*

*Please be aware, that this challenge has already closed.  But, I just love this sketch!  I will most likely use it in the future for other items.
and here is what I created:


I was really inspired by the white elements in the Lilac inspiration photo.  Along with the books and the vase holding all those beautiful lilacs.  So I really wanted to use those elements where I could.

Recipe:  I used kraft card stock for the card base.  I just love this as an anchoring element.  I used a Teresa Collins white and light grey floral pattern paper as the largest pattern piece.  I thought this mimic the window/mirror in the photo.  I matted that pattern piece with a scrap of lilac colored textured card stock.  
I added two different but supporting pattern pieces for the 'tore' piece in the sketch.  One is a text pattern paper from Stampin' Up! that is retired, and no longer available.  I also added an 'old' Melissa Frances pattern paper to the 'stack'.  I distressed the edges and layered them crooked.
I wrapped a piece of pale purple seam binding around them, and added a scrap piece of white crochet trim.  I added a pale purple dangle to a multi-loop bow, and adhered it to the side of the lilac card.
The lilac card is actually a digital image that I printed from my computer.
I added two trios of sequins to opposite corners, and added a banner  tag.  I hand-stamped the sentiment onto white card stock.  I used my scissors and hand-cut the banner end.  I matted this piece onto a scrap piece of the lilac textured card stock.  I added a scrap piece of the white crochet trim to the top of the banner, and stapled the banner to the card front.
Well, I now need to run into town to purchase a gift card to go inside this card, and get it out in the mail.  Thank you for stopping by!  I hope this weekend is enjoyable!


Sunday, June 21, 2015

Charming Neutrals; Card

Welcome.  I have another card to share, that I created.  I most likely won't share any holiday crafts, until it becomes a little cooler.  I think folks would rather enjoy the warm weather, bbq's, and other relaxing patio activities before I start bombarding them with jingle bells, and 'baby it's cold outside' projects {smile}.
I wanted to get a start on crafting a variety of greeting cards, before my minds turns to snow.  So, I set out to find some inspiration and a few challenges to enter.  And here is what I came upon:
My first stop: Cardabilities.  These folks always have some great, user-friendly sketches.  And here is the current sketch challenge:
My first thought when I saw this sketch, was another birthday card.  Or a 'thinking of you' card.
Then I stopped by the Mistress Owl Craft, to see what these ladies were crafting.  And they have an challenge set around an inspirational photo.  Very beautiful and all neutral colors.


This challenge does not require you to create a wedding themed project.  I love the lace, the pearl clusters, and the sparkle from the rhinestones.  Very beautiful and very feminine.  A little shabby, too!
here is what I crafted:


As you can see I did not make a Birthday card.  Instead, I ended up going with the wedding theme.  I am super happy with how my card turned out.  I used materials in the inspirational photo, as well as pearls, rhinestones, and other sparkly items.  
Recipe:  I started with Soft Suede card stock by Stampin' Up!  I just love this heavy weight card stock.  
The main panel is from Melissa Frances.  I used a thread cutter to rough up the edges, and then sponged brown ink.  There were a few places I had a heavy hand when distressing, and the paper tore.  So, I simply added a scrap piece of white lace trim, and kept going.  I heat embossed the sentiment in early espresso powder, by Stampin' Up! in the right upper corner.

The long lace piece I machine stitched to the card front.  I added about 5 random pleats.  I also added a piece of white lace trim over that.  And finally, machine stitched a thin piece of cream crochet trim over the white lace trim piece.  
I used scraps of neutral pattern paper for my banner pieces.  The black and white floral pattern paper is from Authentique.  The script pattern paper is from Paper Studio (HL).  And the cream and white decorative pattern paper is from Recollections (M).  I matted each of these pattern papers onto a scrap pieces of soft suede card stock.  I sponged the edges of the pattern papers.  I also machine stitched a cream pom pom trim to the top of the largest banner piece.
I tucked a bow to the right of my trio of banners, that I tied my hand.  It's a triple bow with cream colored crinkled seam binding.  I tied a kraft bakers twine to the seam binding bow, and added a tiny tag, that was sponged and stamped with 'Joy'.

My focal piece is this beautiful white resin frame.  I added a Prima zipper pull, that has this beautiful crystal dangle.  I then added a brown paper blossom and an off white paper blossom.  Both blossoms were sprayed with shimmer paint, to give them a bit of sparkle {smile}.  I then tucked in a pearl and crystal stick pin, and a few rhinestones and half pearls.  Finally, I tucked in a brown shimmer leaf stick pin to the left of the frame.  I thought this helped pull the browns forward.

I wanted to add something more; so I added faucet dots to the right upper corner and the left lower corner.  And finally a trio of marshmallow sequins near the seam binding bow.
Thank you for stopping by, and I hope you have been inspired to either play along with these challenges, or simply craft something special.


Saturday, June 20, 2015

Cottage Chic Shaker Card

~ photo heavy post ~
Howdy!  It's 100 degrees here in the southwest region of the United States of America.  However, up in the mountains, its about 10 degrees cooler.  I know 90 degrees doesn't sound 'cooler', however, here in the desert, it is {smile}.  I did get a few Craft Fair applications out this week, so I am starting on my holiday craft fair materials.  Yes, Christmas in hot June!

I love old stuff (vintage), and anything farmland.  That includes mason jars, lace, seam binding, buttons, twine, and paper blossoms.  And so I set out to make something pretty, and feminine.  I did stop by a few international challenge sites, and oh my, there is a lot of inspiration out there!
I am using the current sketch from Vintage Cafe Card Challenge.  The ladies on this design team love vintage, shabby chic, and provence style crafting.


Look at this beautiful sketch.  I love the layers.  The circle element will be easy to work with.  And the sentiment label, adds the finishing touch.  Love it! and check out the crafts from the design team.

I also stopped by SaratovScrap to see what their current inspirational board looks like.  And oh my, you would think it was made just for me!


I love the sparkle, the hay bales covered in lace, the translucent balloons, the pearl and glass dangles, and all the flowers.  Very pretty, very country chic!

And finally, I stopped by Paper Ladybirds, to use their current color challenge, again.  


A pale pink, a spring green, and a warm toffee/kraft color.  Take a look at what the design team made!  Very pretty, and inspirational!

and here is what I made:


and a different view:


Recipe:  I used a warm, soft, beautiful kraft cardstock; Paper Studio.   [The card measures 4 1/4" x 6".] I used a pink, wood-grain pattern paper with pink blossom clusters on it.  I love pink, have I mentioned that? {smile}  I did a simple, double-border, machine stitch along the sides.  I then added a scrap piece of white cotton trim, and a scrap piece of vanilla lace trim.  I machine stitched them to the  card front, too.  
I cut-down a birthday cake recipe, collage paper to 3 1/4" x 5".  I did another double border machine stitch on it, too.  I added a kraft paper doily to the top 2/3 of the recipe paper.  
I created a 'shaker' mason jar from my Friendship Jar stamp and die set by Paper Trey Ink.  I added sequins from Pretty Pink Posh, and Stampin' Up!  I decorated the jar with a pale pink material that has a scallop edge.  I layered a white crochet scalp trim on top of the pink material.  I tied a light kraft bakers twine around the mouth of the jar, and tied it into a simple bow.  I made a tiny tag and hand-stamped 'wish' onto it.  I added a trio of tiny paper blossoms I purchased from LemonCraft.  I also inserted a white star decorative stick pin.  I added a paper blossom to the bottom right corner of the jar.
For my sentiment, I hand-stamped my greeting, and hand-scissor the banner end.  I did a double machine stitch to the right side of the banner.
I added clear sequins and half pearls to both the upper right and lower left of the shaker jar.

I haven't made a shaker card before, and so I know a few things to do differently.  I would have used a thicker foam tape, and added a little glitter.  I am happy with how this card turned out.  But, I think I would like to do another shaker card, with the trim having a random pleat, and possibly a seam binding bow.  

Thank you for stopping by!  I hope you have been inspired! and have an opportunity to play along with any (or all) of these challenge sites.


Tuesday, June 16, 2015

Kitten & Buttons Notebook

Howdy!  I had an urge to make a few more altered notebooks last night.  I don't know if it the fact that I had a few hours alone at home (aka: craft room) or that I got to work with a wonderful lady yesterday {smile}!  Either way, no matter the spark, I took advantage of the creative push!
I noticed that the wonderful ladies over @ Paper Ladybirds have a beautiful color challenge.  This challenge site is from Russia, but don't let that stop you!  This design team is very talented and inspirational!  Here is the color challenge board:


and here is what I made:


Beautiful, right?!  So, I selected papers from Tilda: Happiness is Homemade.  This pattern paper collection is just so gorgeous!  It reminds me of vintage wallpaper, and fabrics prints.  Just so calming, pretty, and very easy to use!  The button card is from Tilda, also.  The buttons are from Paper Trey Ink: vintage buttons: ripe avecado and sweet blush.   The buttons are actually stitched to the cover of the mini notebook.  I just love their button collections.  You get 150 buttons of a particular color in various sizes.  The saddle stitch ribbon is from Paper Trey Ink: sweet blush.  I just love the pale, sweet pink color, with the contrasting white stitching.  Just so sweet!  I also added a scrap of the pattern paper to the inside of the pen barrel, so that the pen 'belongs'.  
I added a neutral paper doily from Recollections under the button card.  I thought the open loop design added a feminine touch to the cover.  I also added a Junk Bow to the top of the button card.  I used some scrap pieces of lace, fabric, seam binding, and crochet trim to create the junk bow.  I added a single mini paper blossom to the top of the junk bow, to add a little more sweetness.  {smile}
Thank you for looking.  I hope you get a chance to play along with this current color challenge.  It's quite beautiful!


Sunday, June 14, 2015

Cute Baby; Card

Howdy!  I had a few custom orders to get completed and out in the mail.  Whew.  Love being busy.  It keeps me focused.  And on a personal note, I am up to 7 miles.  Running.  I am working on my time, and distance.  [If  you didn't know, I am training for a half marathon.  check out my InstaGram page.]
The easiest paper crafting style I can create, is shabby chic, with a bit of vintage thrown in for good measure.  I am a sucker for pink, vanilla, text, seam binding, lace, and paper blossoms.  And thanks to the world wide web, I can see what folks from a round the world create.  And so, for today's card, I am participating in two Russian challenges.  
To give me some inspiration, I chose to work with the inspiration board provided by Scrap Magic.


They have requirements.  Colors: Sand, & Pink.  Mandatory elements: rose, ribbon, metal, and wear.
What a beautiful collage.  I love the soft, sweet colors, and the little additions of gold.  Very pretty. This challenge closes on July 1st.  So, I may be submitting another paper craft {smile}.

Now, to give me some direction, I chose to work with art-kladovaya.  I love this sketch!  


I love the circle elements and the pattern piece at the top right of the sketch.  This challenge is almost closed.  this challenge site closed minutes before I could add my entry.  {frown}

And here is what I created:


Recipe:  I used a kraft yardstick from a big box store.  I love the softness of the kraft brown.  For the pink bottle pattern paper, I used Carta Bella latest baby girl pattern paper.  For the pink & brown polka dot  pattern paper, its a scrap from Impressions (at least 8 yrs old).
I did  a double simple border stitch.  I added a little distressing to the edges of the papers, including sponging.  I tore the paper and added a scrap piece of cotton trim in the tear, and then added some stitching along the bottom of the tear.
I added three different ribbon scraps under the heart brad for my sentiment.  I added a trio of paper blossoms (two pink, and one brown)  I thought the colors would go nicely with the card.  I added leaves cut from text paper, to give some contrast.  I added two kraft vintage buttons by Paper Trey Ink.  I added a 'cute' lightbulb and a scrap piece of cream tule.

Thank you for stopping by!  I'll get back in my craft room.  I have a few special orders to get out in the next few weeks.  {smile}  A little sneak peak, I ordered some beautiful holiday elements to add to my Christmas crafts for this years craft fair.  I'm super excited to see them in person!

Saturday, June 6, 2015

Pretty Pink Roses

Howdy! and welcome.  If you have come to take a look at my Friendship High Tea Party, you need to be a bit more patient.  My DH took the photographs with his camera, and he hasn't uploaded them to my computer.  {frown}  He started taking pics with my point and shoot camera, and after 10 min of fiddling with it, he proclaimed that he needed a real camera, and went and got his.
But, I didn't want to leave you hanging with no images.  So, I did manage to get him to take a photo, with my point and shoot camera, of the floral arrangements before I had placed them throughout the entertaining area.


The pink roses I purchased at the grocery store, believe it or not.  These are spray roses.  So there are 3-4 blossoms on each stem.  So, it was very easy to make each bunching.  The tea cups were purchased at a big box home decor store, at a reasonable price.  The over-all color scheme was pink, of course!  {smile}    And here is the menu:


the Menu

Savory:
Crustless Quiche Lorraine  (gluten-free)
Bacon Dip & Sweet Potato Canape  (gluten-free)
Spring Salad with Warm Goat Cheese Medallions  (gluten-free)

Tea Sandwich:
Cucumber & Chive Sandwich

Scones & Biscuits:
Cream Cheese Scone
Strawberry & White Chocolate Scone  (gluten-free)
Apricot-Almond Blondie

Jam/Creme
Lemon Curd
Spiced Creme
Honey Creme Fraiche

Sweets:
Pink Lemonade Cake with Lemon Glaze
Lavender Cupcakes with Honey Frosting  (gluten-free)
Apple Rose Tarts

Most of the recipes used for this Friendship High Tea, were taken from Tea Time magazine.  Yes, I have a subscription.  The recipes were easy to follow, and the results were wonderful!  
I did post some photos on InstaGram.  So, you can take a look at some of those.  But, I will get some photos up of my party.  
Thank You for stopping by.  Now, I am working on 2 children birthday parties:  Brave and Frozen.  So, I need to get brain storming, and collecting ideas.  Have a great weekend!  I'll post more photos soon!


Monday, June 1, 2015

Fabric Scrap Wreath

~ photo heavy tutorial ~


Howdy!  I made a wreath from fabric strips, and a few ribbon pieces.  I was so happy with the final result, that I want to share with you all, on how I did it.  Now, if you search the internet, you will find a lot, (and I do mean ALOT of tutorials).  
Supplies:
3 fat quarters (I washed the fabric before I tore the strips)
3 ribbons
1 lace trim
wire wreath
scissors
(you could very simply use 4 fabrics and 2 ribbons and a lace trim)
I used european size fat quarters, and had some fabric left over.  The ribbons I used, were neutrals, and one pink.  I also used some lace trim.  The wire wreath I used is an eight inch round.

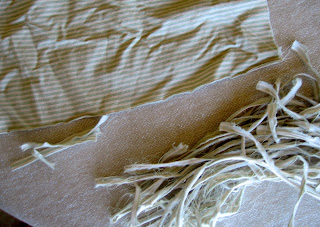
The pattern on this stripe fabric is simple, so I tore 1/2" strips, and then cut the strips into quarters.

This pattern is a bit more busier, so I tore 3/4" strips, and then cut the strips into quarters.

The largest pattern, I tore 1" strips, and then cut the strips into quarters.

I measured out a foot, from each fabric, then made little snips with my scissors, and then tore the strips.  I cut each strip into quarters, so that each scrap measures approximately 5" long.


I cut a variety of ribbons and trims into 5" lengths.  I also cut several strips of pink satin ribbon with white polka dots.  
I then decided on a pattern for my scraps to go on to the wreath.  I wanted a random look, but I don't really do 'random'.  I do structured 'random'.  {smile}
I started on the inside wire, and then progressed to the next wire, and the next, and finally the outer wire.  I attached the fabric strips to the wire frame in a loop like fashion.  [several tutorials say to tie the fabric strips, but i didn't like the idea.  {frown}]

not the sequence, just an image to show the looping
Once I finished looping the fabric strips around the wires, I went through to ensure that each wire segment had the same fullness.  So, there was some adding, and a few changing of ribbons and fabrics.  

Until, ta-da!


Thank you for looking!  I hope this tutorial was informative.  And that you create a fabric strip wreath, too! {smile}