Showing posts with label tulle. Show all posts

Thursday, January 28, 2016

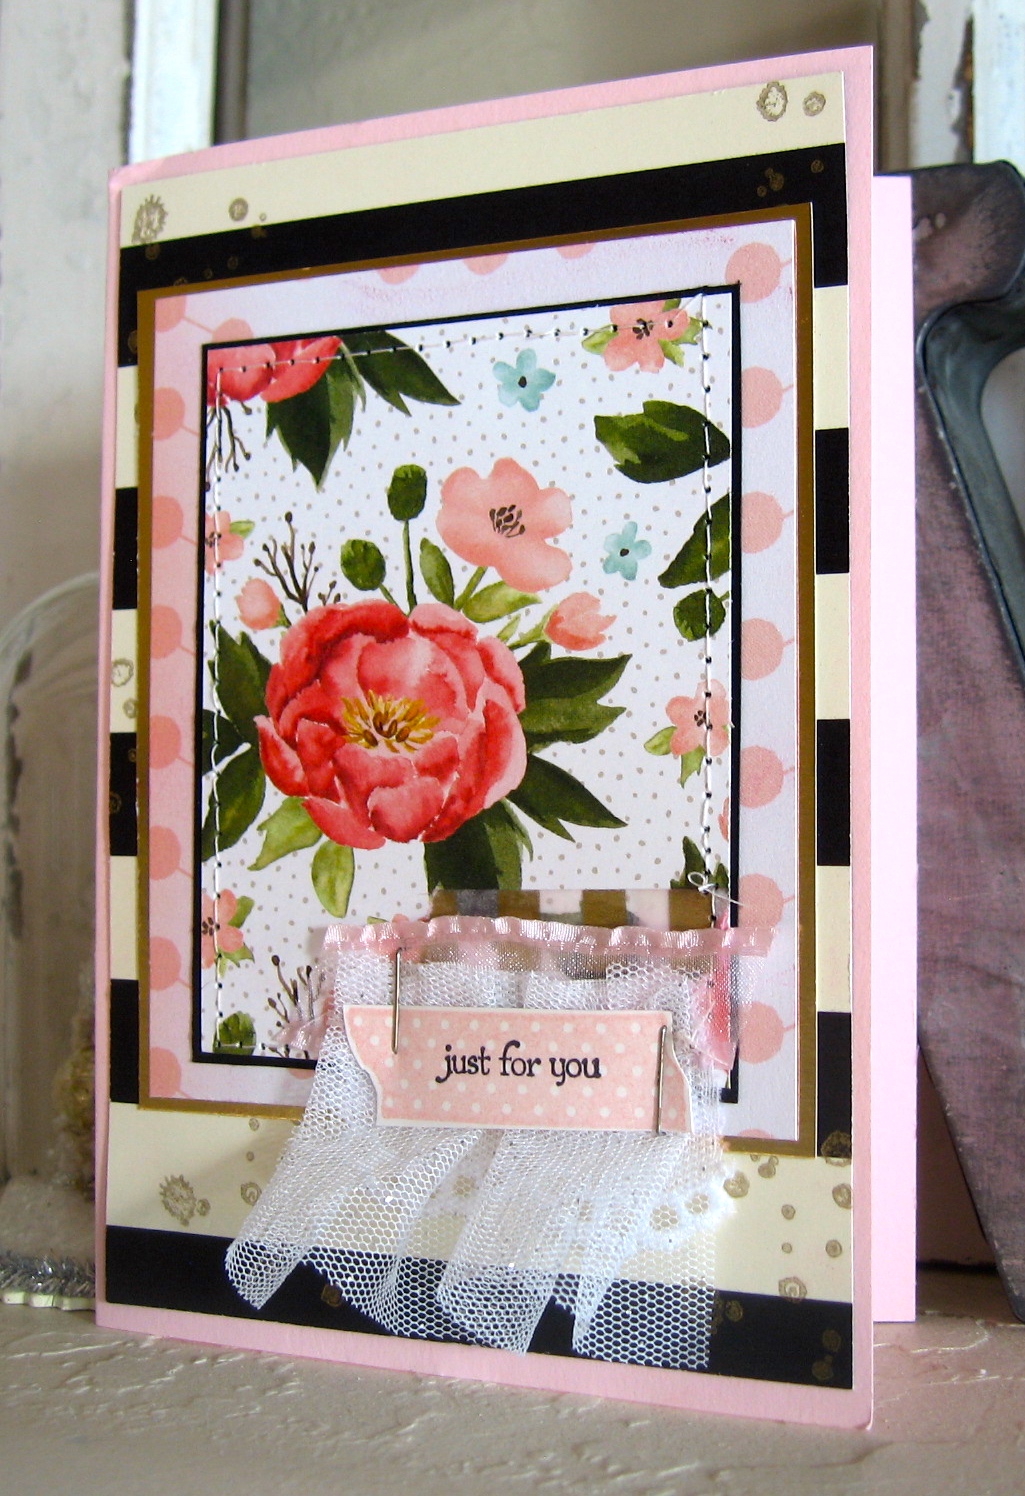
Modern Chic Card

Howdy!  I forgot to post this greeting card over the weekend.  {frown}  And the challenge has already closed.  Oh well.  I need to get a bit more organized.  But I still want to share it with you! {smile}


and a different view


I couldn't really decide which angle I liked best.  So, I'm sharing both with you!  This card is a bit 'flat' for my usual style, but I just thing it's perfect!
Recipe:  The card base is pink pirouette card stock, by Stampin' Up!  I just love this shade of soft pretty pink.  
The black and cream layer is a pattern paper from Stampin' Up! Timeless Elegance DSP.   I did add some gold stamping to this pattern paper.  I used a retired splatter stamp, randomly.
The pink polka dot pattern paper is a scrap piece I had left over from an earlier project.  So I don't remember who makes it.  I matted this pattern paper with gold foil card stock by Stampin' Up! as well.  
Next, I added a scrap piece of Birthday Bouquet DSP, by Stampin' Up!  Isn't this floral pattern paper just gorgeous!  I love it!  It is matted with basic black card stock, by Stampin' Up!  I added a simple border stitch with my sewing machine.  It holds all the layers together.  {smile}

Then, I added layers of embellishments!  First I added a piece of gold and white striped washi tape from Stampin' Up!.  A scrap piece of pink sheer ribbon, a piece of cotton eyelet trim, and a scrap piece of pleated tulle.  
I stamped the 'washi' tape in blushing bride classic ink, using another stamp set by Stampin' Up!  I stamped the sentiment from teeny tiny wishes stamp set, in basic black classic ink and fussy cut it out.  I stapled the sentiment right on top of the trim collection.  I used a gold sharpie to color the staples.  And Viola!
Thank you for stopping by!  I hope you have been inspired to create something pretty, even if it's just for yourself! {smile}


Sunday, June 14, 2015

Cute Baby; Card

Howdy!  I had a few custom orders to get completed and out in the mail.  Whew.  Love being busy.  It keeps me focused.  And on a personal note, I am up to 7 miles.  Running.  I am working on my time, and distance.  [If  you didn't know, I am training for a half marathon.  check out my InstaGram page.]
The easiest paper crafting style I can create, is shabby chic, with a bit of vintage thrown in for good measure.  I am a sucker for pink, vanilla, text, seam binding, lace, and paper blossoms.  And thanks to the world wide web, I can see what folks from a round the world create.  And so, for today's card, I am participating in two Russian challenges.  
To give me some inspiration, I chose to work with the inspiration board provided by Scrap Magic.


They have requirements.  Colors: Sand, & Pink.  Mandatory elements: rose, ribbon, metal, and wear.
What a beautiful collage.  I love the soft, sweet colors, and the little additions of gold.  Very pretty. This challenge closes on July 1st.  So, I may be submitting another paper craft {smile}.

Now, to give me some direction, I chose to work with art-kladovaya.  I love this sketch!  


I love the circle elements and the pattern piece at the top right of the sketch.  This challenge is almost closed.  this challenge site closed minutes before I could add my entry.  {frown}

And here is what I created:


Recipe:  I used a kraft yardstick from a big box store.  I love the softness of the kraft brown.  For the pink bottle pattern paper, I used Carta Bella latest baby girl pattern paper.  For the pink & brown polka dot  pattern paper, its a scrap from Impressions (at least 8 yrs old).
I did  a double simple border stitch.  I added a little distressing to the edges of the papers, including sponging.  I tore the paper and added a scrap piece of cotton trim in the tear, and then added some stitching along the bottom of the tear.
I added three different ribbon scraps under the heart brad for my sentiment.  I added a trio of paper blossoms (two pink, and one brown)  I thought the colors would go nicely with the card.  I added leaves cut from text paper, to give some contrast.  I added two kraft vintage buttons by Paper Trey Ink.  I added a 'cute' lightbulb and a scrap piece of cream tule.

Thank you for stopping by!  I'll get back in my craft room.  I have a few special orders to get out in the next few weeks.  {smile}  A little sneak peak, I ordered some beautiful holiday elements to add to my Christmas crafts for this years craft fair.  I'm super excited to see them in person!

Friday, May 8, 2015

'O' What A Magnetic Monogram!

Howdy!  I'm glad that you stopped by.  I have been busy getting things done post craft fair.  It always takes a bit of work to get things organized and set up for the start of the craft fair.  But it takes a lot of work once you have everything packed up and ready to head home.
You see, products that I don't sell at the craft fair,  need to make sure everything is wrapped correctly. Everything is photographed.  And organized so that I can not put it in my virtual shop over @ Etsy.

I want to share a magnetic monogram that I created.


and here is another view


The magnetic monograms that I sell are a big hit.  The letters measure roughly 4" square.  I paint the letter first.  Then I glue the pattern paper to the letter.  A bit of filing, sanding, inking, and tender care, these letters look wonderfully aged.
I add strips of lace, trim, or multi-loop bows of seam binding.  Or a collection of it all {smile}
I try to make a large variety of letters.  However, I can not find a 'Z'.  So that is about the only letter I don't have.  I'll be busy making more of these gems this weekend.  
I also do custom orders.  So let me know the letter, and then things you love and hate.  An example:  'T', florals, polka dots, buttons and vintage.
Thank you for looking.  I have added this letter and a 'T' to my Etsy shop.  Let me know what you want!


Thursday, January 29, 2015

Love, Miss You Card

~ photo heavy post ~
This post is  l o n g  and has several images.  So, grab a latte, tea, or any other beverage of choice. {smile}  Lately, I have been surfing the internet.  Love the internet! and Pinterest!  With this 'free' time, I wanted to create something pretty.  Only because I don't feel so 'pretty' today {frown}.  Ugh.  So, let the crafting begin!  I stopped by a favorite sketch challenge site:  Mojo Monday: #382 - tall & skinny.  If you aren't a fan of 'tall & skinny', you are free to adapt the sketch to whatever length/width that fits your fancy*.

I also stopped by a favorite color challenge: Creative Color Challenge: #28 - photo inspiration

use pink, green, pattern papers and laces
And then, finally, I went to a challenge site I frequently visit: Craft Hoarders Challenge:  choose your challenge.  For this month's challenge, there is a grid of different crafting elements, and you are to select at least one option from the list in each category (coloring medium, fiber, technique, texture, and embellishments).


ok, so that you have an idea as what I need to craft, let's just get to it!  
Here is my card:


So. let me explain my card, and how it fits these challenges.   Let's start with the sketch - I turned it upside down!  How clever, right?  For my circle element, I used a large fabric blossom.  The green polka dot pattern piece is the 'grey' rectangle piece. The 'green' rectangle is actually a layered element.  I used a wide, silk ribbon.  Then sewn a piece of layered, ruffled tulle, and sewn a piece of crochet trim on top of the tulle.  And finally, the thin banner piece was created with two elements to create a line: the 'love' bulb, and the green seam binding bow.
The creative color - I used two pattern papers.  The largest pattern paper has pink blossoms, and pink stripes over a sheet of music.  The large blossom and large sequin are both pink.  The small, green pattern paper has green polka dots.  There is a green seam binding bow, and a pair of green sequins.   The lace portion, is a bit of a stretch.  I have a piece of layered, ruffled tulle, along with a piece of crochet trim.
And finally, the craft hoarders challenge -  the coloring medium: ink and paint.  The 'miss you' sentiment is stamped, and the edges of pattern papers are sponged.  I painted the edge of the pink button and white resin frame, with white paint before dunking them in glitter.  The fiber choice: twine, ribbon, and seam binding.  The twine was tied through the distressed button.  Pink silk ribbon, cram tulle, and crochet trim across the card front.  Green seam binding tied into a bow.  The technique I used was stamping.  I stamped the sentiment.  The texture I selected was distressing tool.  I distressed the edges of the pattern papers with a thread cutter.  The embellishments I selected were flower, button, and bling.  Bling was defined as glitter, pearls, and sequins.


Ok, now for the recipe:  Whew!  Never thought that we would get to this part!  The card base is blushing bride by Stampin' Up!.  Love their heavy weight card stock.  Just wonderful to work with.  The two pattern papers I used are both digital papers, and from the same collection.  I used a thread cutter to distress the edges, and sponged crumb cake classic ink.  I ran a simple stitch along the edges of the pattern papers.  I also did a little zig zag stitching to add some pizzazz!  
I wrapped a wide strip of pale pink silk ribbon around the card front.  I did some sewing to hold the layered, ruffled tulle to the silk ribbon, and then one more layer of sewing - the crochet trim on top of that!  I think it adds a sweet, soft, delicate, shabby chic-ness to the card {smile}.
For the blossom, it's a Prima pink, felt-like flower.  I painted the edges of the petals with glue and then sprinkled some fine gold glitter from Martha Stewart, onto the blossom.  I just love how pretty gold and pink are together!  I used my hot glue gun to adhere it to the card front.
I tucked in a Prima treasure 'love' light bulb.  I just adore these little treasures {smile}.  To give my blossom some foliage, I added a light green multi-loop bow, made with 'Ocean Front' colored seam binding.  I tucked in a white distressed, tiny pink button tied with cream twine, just below the seam binding bow.
I stamped my sentiment with baked brown sugar classic ink, from the Mixed Messages stamp set by Paper Trey Ink.  I adhered a tiny white resin frame, from Melissa Frances, around the sentiment piece.  I painted some glue on the edges of the tiny frame, and added more fine, gold glitter. I also tucked this piece in between the blossom and green bow.
To add a little bling, and continue with my shabby-chic look, I added two faux pearl swirls, and a pair of faux pearls at the bottom right corner.  And finally, I added a trio of sequins: a pair of small green sequins near the top right corner, and a lone large pink sequin above the bulb.  I thought these little touches help create a home-made, shabby chic card {smile}.
Whew! a lengthly write-up.  But, I like to give you info on what I used, so you have the information.    And as always, if you have any questions, please let me know {smile}.  Thank you so much for stopping by!  I sure do love the company.  I also hope that I have inspired you to participate in any or all of these challenges!  And remember, whatever you do, do it from the heart {love}.


Thursday, January 1, 2015

Pink Birthday

following my crafting frenzy
Welcome!  I hope this new year is finding you well, happy, and starting something new!  {smile}  I have finished cleaning my craft room, from my holiday crafting frenzy! and wanted to craft something sweet in my clean space. {smile}  Now what could be better?  Maybe a cupcake. {wink}

holiday supplies packed
Ok, so I stopped by a frequently visited challenge site, to see what new challenge they are hosting:  Fusion Card Challenge.  If  you know me, you know this inspirational photo speaks volumes to me! Oh my goodness!  Pink, chalkboard, jars, cake, banner.  Awww, heaven.  OK, and the sketch is pretty, too!
The wonderful ladies at the Fusion Card Challenge have some wonderful creations, and said that you can use any/all of the items in the inspirational photo: chalkboard elements, pink, tan, gold, frames, Birthday, jars, and cake.  LOVE IT!
here is what I made:

original photo

photo taken 1/315

* the sun came out this morning, so I was able to re-photograph this card in natural light.

Recipe:  The card base is made from cream card stock from Paper Trey Ink.  I used kraft card stock from Recollections as the anchoring matt.  The pink polka dot pattern paper is the reverse side of a pretty red/pink floral pattern from Carte Bella.  The pink/white ledger pattern paper is from Teresa Collins.  I did a simple machine stitch all the way around the card.
I wanted to add a hint of gold.  So, I added a 1" scallop trim gold glitter paper by Stampin' Up! as my belly band.  I then machine stitched a cream tulle sloppy pleat.  I then added a strip of tea stained fabric rosettes.
For the my added shape, I tied a multi-loop bow with some light pink seam binding.  I added a double loop of pearl strings behind the bow.  
For my oval shape, I cut a oval-ish shape from a floral ledger digital paper.  I wasn't sure how/where to add a birthday sentiment, so I simply stamped it on the digital pattern paper.  I did a repeating sentiment to help fill the space.
And, as a final touch, I added a trio of pink rain drops and a trio of sequins (2 coral, and 1 white).
Thank you for stopping by and having a look.  I hope you were inspired to participate in the One Year Anniversary Celebration over @ Fusion Card Challenge.  I will be posting this card in my Etsy shop soon.  {smile}


Sunday, February 16, 2014

Assemblage Clock

Ok.  I think I'm getting the hang of posting on my personal blog and social media.  Thank you for sticking with me, and having patience in my creative process. {smile}
I started altering a Tim Holtz Assemblage Clock, gosh, probably about 2 weeks ago.  I know, that sounds pretty pathetic.  But, I stopped after each step to photograph the process, and to jot down some notes.  I am working on writing a tutorial to sell on Amazon for Kindle.  I also had a few set backs, and various other obligations, that caused this clock to sit for days at a time with no work or progress going on.
I did finish it this morning.  But, again, I needed to take several photos of the final process, and get those loaded and edited.

full, front view

lower, right angled view

top, left angled view

Ok, I will give you the quick and dirty version of the 'how-to'.  For specific details, directions, instructions, tips and tricks, I will need to send you to the published tutorial @ Amazon.
I painted the shiny metal clock, added some paint, stamping, and used hot glue to add my embellishments.  I made sure that all sides are finished.
When I started this project, I wanted to use things I love.  So, I added all my favorite things: flowers, seam binding, butterflies, clay embellishments, pearls, rhinestones, and a variety of metal finishings.

Thank you for looking.  I hope this project has inspired you to create something, too!  I will add a link to my side bar, to purchase this tutorial, as soon as I get it done.  I'm looking at having this done this week, hopefully, fingers crossed.