Showing posts with label vintage button. Show all posts

Saturday, April 15, 2017

Printed Flowers in My Garden

Howdy.  I hope you are well.  I have been working on my 'month of happiness' goals.  I hope you have, too.  Or at least journalling what you are grateful/thankful for each week.   I have.   I think that, recognizing what has brought me joy, or what has lead me down the road to joy, makes my heart feel rejuvenated.  {smile}
I needed to make a card for a girl friend.  You see, I mailed her one a few weeks back, and it never made it to her house.  Super sad.  It was a 'Thank You' card, for her support on a fund raiser.  So, I set out to find some inspiration on the internet, to get me started.  I stopped by a few favorite challenge sites:  Crafting by Designs, Really Reasonable Ribbon, and Mojo Monday.
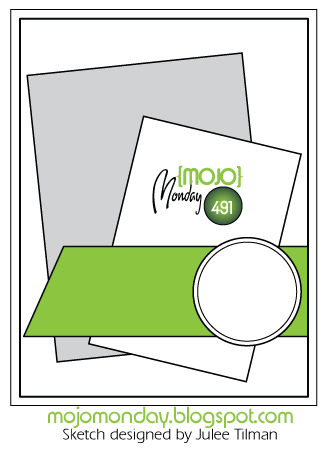
I stopped by Mojo Monday, first, to get the sketch!  I thought that their current sketch, looked easy to work with.  And, as always, it's 'user friendly'.

My next stop, was Crafting by Designs.  I wanted to see what their current challenge is:  Girls or Flowers.  How super sweet, and I can do flowers!

My last stop, was Really Reasonable Ribbon, and they have a Flower theme challenge.  But, remember, you need to include ribbon, lace, or trim on your paper craft!

and here is what I crafted:


Recipe:  this is a typical A2 size card (4 1/4" x 5 1/2").  The two pattern papers, is actually the same paper.  I used both sides {smile}.
I cut the pink pattern paper too short, (as illustrated in the sketch).  But, to me, it looked 'too short'.  So, I added a strip of champagne glitter paper, and used a lace edge hand-held punch, to create the decorative border.  I love how it looks.  The glitter paper adds the right amount of interest and sparkle.
I used my sewing machine to add a simple border around the pink pattern paper.  I then adhered the floral pattern paper.  I added a simple machine sewn border to that paper, as well.  
I sewn the seam binding to the card front, to secure it.  I just love how the sewing machine adds so much character and homespun look and feel, to a card.  {swoon}
I cut a rectangle of very vanilla card stock, and stamped my sentiment using soft suede classic ink.  I used a favorite stamp set from Paper Trey Ink; Choose Joy.  I adhered the sentiment piece onto a scrap piece of the champagne glitter paper, and adhered the sentiment to the card front with foam tape.  
I tied a double loop bow with the seam binding, and tied a vintage button to the bow with kraft twine.  To finish the card, I added a cluster of clear sequins to the right side of the card.
I hope that my friend likes the card I made her.  Unfortunately, if I don't purchase tracking, I can't count on the United States Postal Service to deliver my cards.  I have had bad luck, when it comes to mailing my hand made cards.  My cards require extra postage, and require hand canceling, and they seem to get 'lost' at the post office.  How frustrating, and annoying.  So, I won't focus on the lack of professionalism, or providing the service that I have paid for.  Instead, I will look at this as an opportunity to hand deliver my card to my friend {smile}!
  

Monday, April 10, 2017

Shabby Blue Bingo

I loved the pink and green version of this card, so much so, that I decided to make a blue version.  How wonderful! right?
Well, it is too late to enter this card in the Mojo Monday card challenge like the previous cards, so I am entering this card in two different challenges:  Brown Sugar Challenge and Crafting by Designs. The wonderful folks over @ Brown Sugar Challenge, have an Anything Goes challenge.  So, create something beautiful and enter!
The creative folks over @ Crafting by Designs, have a Spring Edition Anything Goes challenge.  Super fun! and why not make something 'spring-like' and enter!

and here is what I made:


Recipe:  I used my favorite kraft card stock for the card base.  I just love this card stock.  The color, the feel, the ease of work.  Everything of it!  I added a matt of very vanilla card stock, by Stampin' Up! to give my main piece some contrast.  
I used digital papers, for all of my pattern papers.   I distressed the edges of all the papers with tea stain ink.  I adhered the pink floral paper onto the very vanilla card stock, and then added a machine stitch border.
I layered a floral tag and a bingo card off center, and angled in two different orientations.
I hand stamped the sentiment for my horizontal piece.  I used a very old stamp set by Technique Tuesday.  I added a banner edge to give the sentiment some visual interest.  
I replaced the circle element with a multi-loop bow.  I tied a vintage kraft button, using kraft twine to the bow.
Thank you for looking!  I'm off to make some cupcakes for a meeting tomorrow.


Sunday, April 9, 2017

Shabby Green Bingo

~ second post today ~

Howdy!  I shared my pink version of this card, in an earlier post today.  But, now I want to share the green version with you!
As I said earlier, I need to make 16 cards, to say 'Thank You' to various folks who help support the North Valley Academy PTO, and variety is the spice of life.  Right?
I stopped by Mojo Monday to see their current sketch.  And I have to say, it's pretty exciting!  The possibilities are truly endless.  You can use either rectangles to showcase pattern papers, embossed papers, text papers, emphoria, and so much more.

and here is what I made:


I am also entering this card in another card challenge:  Word Art Wednesday.  Their challenges are: Anything Goes & Family Friendly.  So, how can you say no to that?  The design team will certainly inspire you!

Recipe:  I used my favorite kraft card stock for the card base.  I just love this card stock.  The color, the feel, the ease of work.  Everything of it!  I added a matt of very vanilla card stock, by Stampin' Up! to give my main piece some contrast.  
I used digital papers, for all of my pattern papers.   I distressed the edges of all the papers with tea stain ink.  I adhered the pink floral paper onto the very vanilla card stock, and then added a machine stitch border.
I layered a floral tag and a bingo card off center, and angled in two different orientations.
I hand stamped the sentiment for my horizontal piece.  I used a very old stamp set by Technique Tuesday.  I added a banner edge to give the sentiment some visual interest.  
I replaced the circle element with a multi-loop bow.  I tied a vintage kraft button, using kraft twine to the bow.
Viola!  Not a 10 minute card, but not too incredibly daunting to make over a dozen cards.   And yes, I made a green version and a blue version.  Variety is the spice of life, right?

Thank you for looking!


Shabby Pink Bingo

Howdy!  I've been busy training for a few races, but you know me, I can always carve time into my day for a little crafting and baking {smile}!
Today, I did some paper crafting!  I need to make 16 cards, to say 'Thank You' to various folks who help support the North Valley Academy PTO.  So, I set out to get some inspiration.
I stopped by Mojo Monday to see their current sketch.  And I have to say, it's pretty exciting!  The possibilities are truly endless.  You can use either rectangles to showcase pattern papers, embossed papers, text papers, emphoria, and so much more.

here is what I made:


I am also entering this card in another card challenge:  Word Art Wednesday.  Their challenges are: Anything Goes & Family Friendly.  So, how can you say no to that?  The design team will certainly inspire you!

Recipe:  I used my favorite kraft card stock for the card base.  I just love this card stock.  The color, the feel, the ease of work.  Everything of it!  I added a matt of very vanilla card stock, by Stampin' Up! to give my main piece some contrast.  
I used digital papers, for all of my pattern papers.   I distressed the edges of all the papers with tea stain ink.  I adhered the pink floral paper onto the very vanilla card stock, and then added a machine stitch border.
I layered a floral tag and a bingo card off center, and angled in two different orientations.
I hand stamped the sentiment for my horizontal piece.  I used a very old stamp set by Technique Tuesday.  I added a banner edge to give the sentiment some visual interest.  
I replaced the circle element with a multi-loop bow.  I tied a vintage kraft button, using kraft twine to the bow.
Viola!  Not a 10 minute card, but not too incredibly daunting to make over a dozen cards.   And yes, I made a green version and a blue version.  Variety is the spice of life, right?
Thank you for looking!


Tuesday, April 5, 2016

On the {Shabby} Farm

Howdy! and welcome to my little slice of blog-land.  I have missed quite a few posts and been a bit absent.  Life has really gotten busy, and I have struggled to find time to do the things that make my soul happy.  {frown}  Things like paper crafting, baking, sewing, and sitting in the {mountain} quiet.  But, I can see the 'light' at the end of this busy tunnel {smile}.  I am working on scheduling time to do those things that make me the happiest!  Have patience and you will be delighted!
Last week, was 'Antique Week' in Round Top, Texas.  And yes, I hopped on a plane, and traveled over 700 miles, to hunt, peck, and look for antique, rustic, shabby treasures.  Oh my!  Was it splendid!  A wonderfully adventurous girlfriend accompanied me.  And, yes, we did have a blast!  We stayed at this super cute, super country, incredibly nostalgic farm-style cottage @ Olle Hotel, in Flatonia, Texas.  LOVE IT!
Anyways, I wanted to make the B & B owner a hand-made card, thanking her for the hospitality and great attention to detail.  I am entering this card in a few challenges, too!
The wonderful talented folks over @ Brown Sugar Challenge Blog, have an Anything Goes challenge.  
The creative & whimsical folks over @ Crafty Sentiments Designs, want you to use Lace & Pearls on your entry.
here is what I created:


Recipe:  I used kraft card stock for the base of the card.  I used card stock from paper trey ink.  I just love the heavy weight of their card stock.  I added two strips of pattern papers from two different manufacturers.  The pink gingham is the reverse side of a pink floral pattern paper from Lost & Found.  The pink, yellow, and grey floral pattern paper is from My Mind's Eye (My Sweetest Things).
I sewn a simple border with my sewing machine to help convey a homespun look.  I added three trims: white lace trim, white cotton trim, and a pale pink seam binding.  All of which were machine sewn to attach them to the card front.

I created a multi-loop bow with the same seam binding.  I tied a vintage pink button with cream twine to the seam binding bow.  I also added a double large loop bow with the cream twine.  I stuck a large perl stick pin in just behind the bow.
I added a square of dark grey polka dot pattern paper as the matt for the yellow stamped distressed square.  I stamped the distressed square, onto a scrap piece of very vanilla card stock, in so saffron classic ink.  I fussy cut the square and inked the edges with crumb cake classic ink.  I stamped two images in going grey classic ink.  The 'post mark' was masked not to go beyond the edges, and the farm silhouette.  
I stamped the sentiment in basic black classic ink onto a scrap piece of very vanilla card stock.  I used a photo corner punch to create the flag ends.  I sponged the edges of the card stock with crumb cake classic ink.  I adhered the sentiment banner with foam tape to 'lift' it off the card front.
I added a single white paper blossom.  I painted the petal tips with white paint and added glitter before allowing the paper blossom to dry.  
The final touch was a single white/clear vintage button tied with cream twine.  And you know me, I could add sequins, and white paint to the edges of the card.  But, I showed restraint.  I wanted something simple, sweet, country, and shabby.  Not too over done.
Thank you for looking!  Oh, I only used one stamp set: On The Farm, by paper trey ink.

Sunday, March 6, 2016

Floral Friend; Card


Howdy!  I needed to get a few cards in the mail, and so I set out to find some inspiration.  Along the way, I stumbled upon a new (to me) challenge site, and visited two favorite challenge sites.  The inspiration was infectious!  I hope you agree!
Let's start with the new challenge site, that I 'found'.  This is an east European challenge site.  They don't have a 'translate' button, but google translator works pretty well.  [Just copy and paste the text.]  Shabby Scrap.  Their current challenge is to use rose(s) on your project.  And your project can be just about anything! A card, a page, an altered item, a tag, a book, etc.  (I'm sure you get the idea) You will be amazed at the creativity of their design team.  This challenge runs from Feb 25 - March 24.  And here is their photo:

Ok, so now on with another of my favorite challenge sites.  {smile}  This next one, is another challenge site from eastern Europe - Shabby Chic.  This challenge site does have a 'translate' button.  So it's super easy to play along with {smile}!  Their current challenge  is to use butterflies.  Or simply one butterfly.  A very creative and feminine work by their design team.  Their challenge runs through March 25.


And for the finally challenge, it's one that is truly dear to me:  Just Us GirlS #333.  I started playing along with their challenges when I first started blogging.  Their current challenge for 'Word Week' is Flowers!  How wonderful!  I love adding flowers to my cards and projects!  You will certainly be inspired by their design team!

So, I have combined the challenges, not too hard really,
and created a card for a very dear friend!


Recipe:  I created another A6 size card.  To create the card base, I used a heavy weight card stock: Soft Sky by Stampin' Up!.  I just love the soft, pale blue color.   
I added three different digital papers.  I printed my digital papers onto whisper white card stock by Stampin' Up!.  I just love how clean the images come out, and how true to color they print.  
Anyways, I used a pale blue, pink floral pattern paper for the main paper.  I just love how pretty this digital paper is, and the way the pale blue background really makes the pink roses pop!  I cut the paper down to 4 1/8" x 5 3/4".  I sponged crumb cake classic ink along the edges.
I printed a library card, digital paper and cut it down a bit.  I used my corner rounder punch on two of the corners, and sponged the edges.  I adhered these two papers together, and then added my machine stitching.  I wanted the butterfly on the library card to 'pop', so I added dimensional glaze to it.
For the tag, yes, it's another digital paper.  I used my tag punch to create the top piece.   I added some aqua blue crinkled seam binding and tied a simple bow with some thin blue tinsel.  (I just love how soft this tinsel is!)  I added some foam tape to the back of the 'tag' before adhering it.  
I tied some twine through the trio of aqua mist vintage buttons before adhering them to the card front with my glue gun.  I also adhered the trio of blossoms with my glue gun.  

For the sentiment, I used the Signature Greetings stamp set by Amuse Studios.  I stamped the words in versa mark onto some card stock vellum, and used an antique gold embossing powder and heated the embossing powder with my heat gun.   I hand cut the banner ends, and added adhesive where the words are, so you wouldn't see the adhesive through the vellum.
I stamped two butterflies onto a scrap piece of the same vellum with Archival Black ink by Stampin' Up! and used markers to color the backs of the butterflies.  I folded the wings together to give them a 3 dimensional look.  I adhered them to the card front with dimensional glaze.  
Thank you for looking!  I hope you have been inspired to play along with any (or all) of these great challenge sites!

Monday, July 27, 2015

Shabby Girl's Life; Book

Howdy, and welcome.  I set back into my craft room, to create another spiral bound book.  I wanted to make something girly, shabby-chic, and a pretty place to jot down what makes you happy!  To help give me a direction, and a bit of inspiration, I headed over to a favorite sketch challenge site @ Cardabilities .  The design team, will certainly give you some inspiration and the sketches are so easy to work with.  
Here is the current challenge (soon to close)
I found this sketch a breeze to work with.  The simplicity of it, allows you to do a little or a lot.  And the layers!  Who doesn't love layers?  I do!  And what about that sweet banner hanging across the top!  You know I had to use this sketch!  {smile}
and here is what I created:


I haven't bound my book yet, with the spirals.  Only because I haven't finished the covers.  And this challenge is closing soon!  I also haven't decided if I want to put the spirals at the ends, or add them to the center.  hmmm.  But, without the spirals, let me give you the recipe.
Recipe:  I used chip board for the cover.  I adhered pool party cardstock to the chipboard.  I just love this color of aqua blue.
The text pattern paper, is Melissa Frances.  I just love this paper!  Love it so much I bought a whole package of it!  Yep! 25 sheets of this one pattern paper.  I did a simple machine stitching along the border, and added a trio of zig zag stitches at the bottom right and upper left.  You know, to add some spice {smile}!
I layered the text pattern paper with a scrap piece of Bazzil pattern paper,  the Vintage Marketplace collection.  Love this collection of shady chic sweetness!  I did a double border with my sewing machine.  I added a half pink paper doily to the lower third of this pattern paper.  Then I wrapped a piece of mint lace trim, from Stampin' Up! to cover the doily seam.
I stamped my sentiment in basic black classic ink, on very vanilla card stock, both by Stampin' Up!.  I used a favorite stamp set; Favorite Memories by Technique Tuesday.  I cut the banner end with scissors.  I adhered this piece over the top of the lace trim.
I wanted to add a little something else, so I cut out a 1" circle of a thread label and tucked it behind the sentiment, but purposefully left the 'Handmade' visible.  I just love the aqua blue color with the typewriter font!
I hot glued the paper blossom, to the left of the sentiment.  I tied a kraft vintage button by Paper Trey Ink, to a multi-loop bow made of pale pink seam binding.  I hot glued this ribbon 'bundle' and tucked it in close to the paper blossom.
For the banner swag, I die cut a row of hearts, using the reverse side of the Bazzill pattern paper.  I also machine stitched this banner to the front of the cover.
I used a thread cutter to distress the edges of the pattern papers.  I also sponged kraft ink on all of the edges.  I haven't decided if I want to add some white paint and glitter to the paper blossom petal tips.
I haven't quite decided if I will be filling this spiral notebook with blank pages only, or adding a few pockets.  And, I'm not too sure how the spirals may 'alter' the cover.
Stay tuned, I might be able to finish this spiral notebook this week.  And yeah, it will be for sale in my Etsy shop once it is done.   Thank you for looking!


Tuesday, April 21, 2015

Vintage Butterfly

Welcome.  I opened a pattern paper purchase, I have been saving.  Yes, saving.  I imagine all of us who have a passion for paper crafting, we save special, pretty pattern paper for just the right project.  And, I really need to use what I have.  {smile}.  
This pattern paper is Maja Design, and Pion Design, both companies are from Sweden.  Yes, I ordered paper from a cross the pond.  And yes, paper is heavy.  But, I am truly happy with my purchase from almost 2 years ago.  {smile}  Vintage Spring (butterfly pattern paper), Vintage Summer (floral pattern paper), pattern papers from Maja Design.  The text paper is from Pion Design.
Ok, so back to my crafting.  I wanted to make several items with these papers, but needed a little inspiration.  So, I stopped by Cardabilites to get a peek at their current challenge.  The design team really craft some gorgeous paper crafts.  You should check out their creations.  {smile}


here is the card I made using this sketch:


I am also entering the challenge over @ Just Add Ink.  Their current challenge is to use sequins.  I love adding these little sparkly gems {smile}.

I also covered and decorated a mini composition notebook.  The notebook is also lined with this beautiful blue floral pattern paper.  The text paper was added to the barrel of the pen. {smile}


I used a  thread cutter to rough the edges of this heavy weight pattern paper.  I sponged all the edges with corduroy distress ink.  I did machine stitch these pattern papers together.  I just love how home-y machine stitching gives a craft.
The fancy oval frame I stamped onto vellum card stock and used pewter (card) and antique gold (notebook) embossing powders.
I used a pale pink seam binding to make my double loop bows.  The greeting card also has a pale cream seam binding bow tied around the pink bow.  I tied a button to each multi-loop bow.  I also added these faceted pearls.  On the greeting card, I added pink and marshmallow sequins to the card front.
The butterflies are actually cut with an embossing die.  I used some retired wood sheets from Stampin' Up! for the added rustic charm.
Thank you for looking.  I will try to get some beautiful photos of the gift card holders I crafted, using these pattern papers.  And yeah,  these items will be for sale at my Spring Craft Fair Saturday, May 2, 2015, in Albuquerque, NM, @ La Cueva High School.  My booth assignment is M-31.  Main concourse.  Hope to see you there!


Tuesday, April 14, 2015

Appreciation : Card

Welcome.  If you are stopping by for the first time, please take a look around.  I love paper crafting, but mostly I make cards.  Not always.  My style is typically vintage country chic.  Its a mixture of shabby chic, vintage, and country charm.  You would almost think I live (and work) on a farm.  I don't.  I'd love to have some chickens and tend to my own bee hive.  But, maybe in another life, or when I retire {fingers crossed}.
I have a craft fair coming up, so I am spending my day in my craft room.  I want to make some gift card holders.  But, wasn't sure on the format.  So, I stuck with a card.
The super creative and talented DT over @ Brown Sugar Challenge have a wonderful current challenge:  distress.  I think I can do that {smile}.
here is what I created:


Let me start by saying, I just couldn't make up my mind on the sentiment.  So, I have added several.  Each sentiment has double sided tape on the backs, so you simply remove the protective strip and adhere the sentiment across the white bar on the decorative piece on the little goodie bag.  Super clever, huh?
Recipe:  I started with my favorite kraft card stock from Paper Studio.  I added two different pattern papers for the main panel.  Love the mix of texture and text.  I sponged the edges of the paper with a brown ink.
I added a strip of cream crochet trim and a strip of soft sky seam binding by Stampin' Up!.  Yeah, they are machine stitched.  I also stitched around the text paper.   I made a multi-loop bow out of the seam binding, and added it to the top of the card.  
I found these super cute tiny bags at a major discount store; I purchased them about 6 weeks ago.  I printed these beautiful digital image seed packet covers onto whisper white card stock by Stampin' Up!.  Cut them out, distressed the edges with my thread cutter, sponged brown ink on the edges, and adhered them to the bags.  

I tied a vintage button with kraft twine and hot glued it to the bottom of the bag.  
I purchased a box of these decorative small paper clips (regal clips) from a big box office supply store about 12 years ago.  (yeah, how ridiculous is that?  Anyways, I think you get 100 of them in a box, and I have a few left.)  I tied some soft brown bakers twine that I picked up in the dollar bin at a big box craft store.  Made a tiny tag, and tied this together onto the Regal clip.  

The digital paper I have, has 6 of these seed packet covers, so I am making 6 of these cards.  Each card will have a different color scheme that coordinates with the seed packet cover.  Each card will come with 4 of the sentiments below: happy birthday, thinking of you, thank you, and happy mothers day.  And then at least one other sentiment that goes with the word at the top of the seed packet.  

These little gems will be for sale at my booth at the craft fair at the beginning of May.  Stay tuned.  I will post photos of each card on my Facebook page, when I finish them.
Thank you for stopping by, and I hope you get a chance to play along with the ladies over @ Brown Sugar Challenge.


Monday, April 13, 2015

Glacier Painted Tin

Howdy!  I want to share a craft I am making for my upcoming Arts & Craft Fair in a few weeks.  For those who follow me, I love vintage country chic.  And I love sharing what I create.  So, this craft fair is the perfect venue just for that {smile}.
Let me warn you now.  This craft takes a few days.  But, I believe it is well worth it {smile}.  I think if it can be crafted in 10 mins or less, it doesn't really have any heart.  [Let me apologize for those of you, who love 10m in challenges.]
To begin, I took a plain, hinged lid tin.  Its the size of an Altoid tin, but without the metal embossing. I used my chalk paints to give this plain tin some dimension.  I first painted Burlap chalk paint.  Let it dry for 8 hours*.  Then I painted Cotton chalk paint over that.  Let it dry 8 hours.  Then I painted Glacier chalk paint.  Let it dry 8hrs.  Then, I let the whole tin cure for 24hours**.  
[*I live in the desert, so my drying time is shorter than those living in another part of the country.  Typically chalk paint needs to dry for up to 24hrs.]  
[**curing time allows to the paint to bond to the surface.]
Now comes the fun part - distressing!  I took a sanding block and sanded the whole tin.  I allowed the sanding block to dictate where I would distress more.  It felt more random and natural for me to do it this way.  For the dry distressing, I used two different grits of sand paper to distress smaller areas.  I also did a wet distressing for finer paint removal.


You will have to look close.  But look close.  The larger patches on the top are NOT sanded down to the metal.  Thats Burlap chalk paint peeking through.  Also, there are some small patches were the (white) Cotton chalk paint is peeking through.  There are a few places were I distressed down to the metal.
Ok, now I need to seal what I did in the distressing.  So, I sponged on the sealant.  Let it sit for  20 mins, and then took a cloth and buffed it.  Now it needs to sit for 24hours to cure.  This project will test your patience.  But all good things take time.  Also, if you start on Friday after work, you should be able to complete one by Sunday evening. {smile}

Because I couldn't wait for my curing time, or to take a photo, the top is not actually complete.  The paper and embellishments are just placed on top of the tin for photographing.  I will actually adhere them later today, after the sealant has cured.
I took a scrap piece of stacked pattern paper, and tore all the way around the piece I wanted.  I sponged the edges with Corduroy distress ink by Ranger.  I added a scrap piece of aqua crochet trim.  Tied a vintage vanilla button with kraft twine.  I love how vintage, aged, and sweet this tin turned out.  It looks like something you would find on your grandma's farm.  Tucked away in the attic, or lost in the barn. {smile}
The inside is a little prettier.  I used Corner Shop pattern paper collection by Tilda.  I love the aqua pattern paper in that collection.  Some of these pattern papers look like vintage wall paper, while others are just sweet and gorgeous!  Let's take a look:


I used my 1/2" corner rounder to make the corners fit a little better.  I left the bottom empty.  So, no matter what you place inside, it will fit {smile}.  I used pattern papers that have this glacier/aqua color in them, to coordinate with the outside color.  
For the inside of the lid, I took a scrap piece of pool party seam binding and some white crochet trim and machine stitched them to the pattern paper stack.  Then I tied a trio of buttons with cream twine.  The buttons are adhered to the lid with hot glue, so they will lay as flat as possible, and hopefully don't get pulled off {fingers crossed}.
Thank you for looking.  So far, I have three Glacier painted tins and two Shell (a pale, soft pink) painted tins.  I haven't quite decided if I am going to paint more, or simply decorate them with pattern paper.  If I paint them, I need to start painting very soon.  Hmmmm.  But I will post a few photos of them once I have them completed. Look for these little cuties for sale at my next craft show @ La Cueva High School, in Albuquerque, NM, on Saturday May 2, 2015.


Sunday, March 8, 2015

Sweet Vintage, Card

Howdy! and welcome to my little slice of blog-land.  Grab yourself a cup of joe, tea, or any other thirst quenching beverage, sit a spell, and have a look around.  I hope I inspire you, and give you something pretty to look at {smile}.  Life here in the country is good.  
As I said earlier, I really want to get some crafting done to participate in a few challenges.  I find it easier to double a few of my favorite challenge sites together.  More bang for my preverbal buck.

Our first stop is a recent favorite of mine:  the Card Concept.  One of my favorite things about this challenge site is that they give you some of the most beautiful inspirational photos to work from, and the other is that they welcome all crafting styles!  Me, I'm mostly shabby chic, with a touch of vintage.  So, it's always nice to feel welcome.  And don't let me forget about the design team samples.  Holy smokes, can these ladies craft.  Beautiful work in various styles, using various products.  
here is the current inspirational photo:
The instant I saw this photo, I thought, 'Mother's Day'.  The texture in the pitcher and the various blossoms really shine in this inspirational photo.
My second stop, is a staple of my crafting sketches:  Mojo Monday.  The number one reason why I love this sketch challenge site, is their user friendly sketches.  They have very workable sketches, that just about everyone can play along with.  {love it}
here is the current sketch:

The hanging piece to me looks like a tag.  And the band at the bottom looks like trim!  So, without further ado, here is what I crafted:


Before we start, I just wanted to say, 'thank you' to my family, friends, and my followers for all of your support in my endeavor to find happiness in playing with paper.  I am truly grateful that you have embraced this passion of mine, and don't give me grief over the purchase of one more sheet of pattern paper, or the idea that just one type of trim is not enough to own.  I know I am blessed.  And I thank the Lord every chance I get.  But it is this true acceptance from all of YOU, who keep this drive, this willingness to craft, this love of sharing going.  THANK YOU!
The recipe:  I started my card, just like every other card I make with Stampin' Up! card stock.  This card stock is heavy weight, smooth, and just gorgeous!  Crumb cake is the kraft color I am working with today.  Lovely stuff!
The main panel is whisper white card stock.  I ran it through my vintage wall paper embossing folder.    (love the design on the pitcher in the inspirational photo)  Matted it onto a scrap piece of blossom blush card stock (retired).  I cut a strip of floral pattern paper from the Grace collection by Authentique.  I hand cut a flag end.  Then I ran it through my sewing machine to give it several passes of a simple border.  (I selected this pattern paper, because of the various blossom in the inspirational photo.)
Now, the focal piece.  I started with a canvas tag.  I had a few different trim pieces sitting on my crafting table (aka left overs).  So, I gave the two bottom pieces a quick sew and ruffle.  The top piece I used to help hide stitching of the other two.  For my center blossom, I had this paper blossom left over from a stacked piece that I took apart.  I added a thick rhinestone to the center, and then set the blossom in a bed of ruffled cream tulle.  I hot glued this piece to the canvas tag.  I put an ice pink pearl brad from Kaiser Craft toward the bottom right of the blossom.  I added a vintage brad to the top left of the blossom.  I felt that the repeat of the circles help ground the center blossom piece.  I covered the eyelet hole on the canvas tag, with a multi-loop bow/button combo I made myself.  I started with a pale pink crinkled seam binding, and created a multi-loop bow.  I tied on a white/clear tiny vintage button to the center of the bow with cream twine, and created a bow just under the button.  I adhered this piece with hot glue in the eyelet hole, on the canvas tag.  
For my sentiment, I stamped and heat embossed in silver this beautiful font: Thinking of you, onto a scrap piece of vellum card stock.  I created the same flag end to this banner.  I weaved it thru the ends of the pattern paper piece.  And finally, I added a simple staple to the right end of it.  I didn't want this card to be too specific.  And wouldn't it be wonderful to receive a hand-made card in your snail mail box?  To finish the card, I add a pair of marshmallow sequins to the top left of the banner piece, and a trio of the marshmallow sequins to the lower right of the banner piece.
Thank you for stopping by!  I hope I have inspired you or at least directed you to a challenge site to participate in!  And as always, happy crafting!


Tuesday, February 24, 2015

Simply Thank You

Busy, busy, busy.  But I imagine you are too!  So, this post will be a bit short, and to the point.  I will have more to share soon.  {smile}
For those who have been waiting on my Explosion Box Card, ugh.  That project has been push to the back burner.   Not that I don't want to make this project.  I am just second guessing my products for this year's Spring Craft fair.  Sorry.  I hope to either finish it, or make more.  {smile}
I need to make a few more items for my Etsy shop, here.  So, I broke out some beautiful pattern paper from Poland: Lemon Craft: Forget Me Not.  I used the current sketch from Mojo Monday.
sketch:

and here is what I made:


here is the recipe:  I used Lagoon card stock by Stampin' Up! for the card base.  Love this color of blue, and I think it really works well with the blue blossoms on the pattern paper.  I adhered the pattern paper of forget me not blossoms and white music scores to the same size whisper white card stock, by Stampin' Up!.  I then added a simple machine stitch border to this paper.  I wrapped a strip of gold satin ribbon around this panel and adhered it to the front of the card.
The smaller/focal panel was created with a different pattern paper.  I matted this paper onto a pool party card stock, by Stampin' Up!.  I added a simple machine stitch border to this panel, also.  
I had a left over canvas tag on my craft table, and a scrap piece of a thin cream crochet trim, so I sewn them together. {smile}
For the blossom, it is actually made from Very Vanilla satin ribbon, by Stampin' Up!  It is twisted and tucked.  I added two card stock leaves to this blossom.  I hot glued the blossom to the canvas tag.  I tied a multi-loop bow with pool party seam binding, by Stampin' Up!.  I added a short length of crochet trim behind the bow and tied to the tag with a thin piece of white tulle.  I used the tulle to tie the white vintage button, from Paper Trey Ink.
The banner piece was made with a 1/2" short piece of shimmer white card stock, by Stampin' Up!.  I used the Teeny Tiny Wishes stamp set, and inked with Soft Suede classic ink, both by Stampin' Up!.
And to give my card its finishing touch, I added a trio of marshmallow white faucet sequins.
Thank you for looking.  I am heading back into my craft room, to work with some beautiful pattern paper from American Crafts.  It's not a company I work with, a lot.  But they have this gorgeous pattern paper I am anxious to work with.  {smile}