Showing posts with label Shabby Scrap challenge. Show all posts

Sunday, April 17, 2016

Be{e} Sweet

Welcome.   I set out in to my craft room this morning.  I have a few cards to make, so I decided to get started before my deadline.  It's snowing again at my house, so I don't really want to adventure outdoors.  (yes, snowing in the middle of April.)
I stopped by a few favorite challenge sites to get my creative juices flowing, and found these two challenges to participate in: Scrap Magic & Shabby Scrap.  (Both of these challenge sites are in Russian, so please be aware.)
My first stop is Scrap Magic.  They always have the most beautiful inspiration boards I have seen.  They typically have a mandatory element and a few embellishment requirements.  But not this challenge.  Here is their inspiration board:
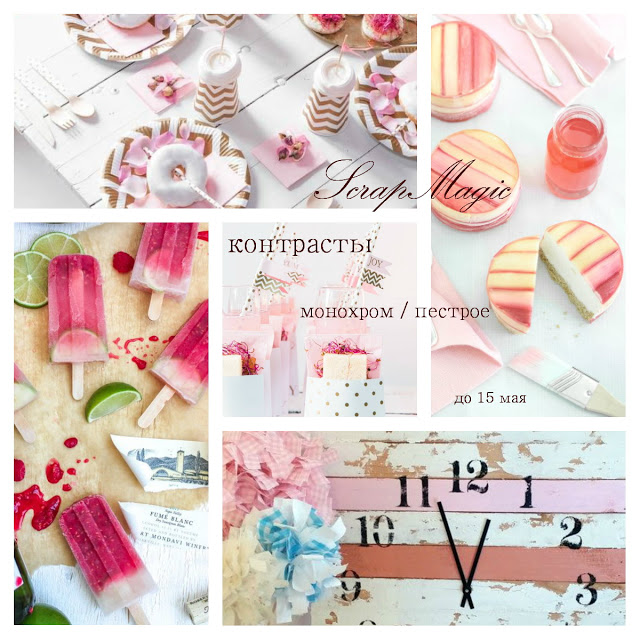
(You need to do a monochromatic color scheme with a contrast color. ) 
My next stop is this beautifully shabby chic challenge site Shabby Scrap.  They have some very talented ladies on their design team, who will certainly inspire you.  
(their current challenge is this sketch)

and here is what I made:
my monochromatic is yellow and my contrast is green

Recipe:  My card is an A6 size (4 1/4" x 6").  I used some scrap pieces from my scrap box.  I really need to get this scrap stash dwindled down.  {smile}
The bee print and floral pattern paper are from the same collection.  But, I only had these two strips, so I am not sure who the manufacturer is.  {sorry}.  The yellow polka dot glitter paper is from My Mind's Eye.  
I started to do a simple border stitch with my sewing machine, but I ran out of thread before I could get all the way around the card.  But I love the 'un-finished' look it gave my card front.
The black script text pattern paper is from Teresa Collins.  And yeah, that is all I had left of that piece.   
I stamped my sentiment onto whisper white card stock by Stampin' Up!.  I used the You're Cherished stamp set.  (It is easily 5years retired.)
I wrapped some medium green crinkled seam binding around the middle-ish of the card.
I added a bee resin medallion by Melissa Frances, to the sentiment & text stack, then adhered this piece to the card front.  I made sure to leave room for my multi-loop bow.  
I really love the sparkle of the gold glitter outline to the text circle/polka dot pattern paper, so I made sure to add some gold accents.  I tied a double loop bow with thin gold cord from Stampin' Up!  It was in the holiday mini catalog for 2015, and I simply fell in love with it!  I added my multi-loop seam binding bow over the gold cord and adhered it to the card front with my glue gun.  I cut off the legs to this nostalgic brad, and simply adhered the 'button' part to the center of the layered bow.
I wanted a bit more gold, so I added a trio of gold sequins to the card front.

My card is off to the mail box, as I am sending this to a very special friend.  She has been by my side cheering me on, as I conquer new challenges in my life.  So, I want to make sure she knows how blessed I am to have her by my side.  {smile}


Monday, March 7, 2016

Sweet Blush Thank You; Card


Howdy! and welcome to my little piece of blog-land.  Here, is where I share my passion for card making, and sometimes cupcakes {smile}.  I really do find joy, and peace when I am creating.  And it doesn't matter if it is baking or paper crafting.  The joy is the same.  
I wanted to make another card to add to my Etsy shop, located HERE.  But I needed some inspiration, so I set out to a favorite challenge site, and stumbled upon a new (to me) challenge site {smile}.  
One of my favorite challenge site I visited, Just Us GirlS #333.  It's their 'word week', and this week's word is FLOWERS! On my! I love adding flowers to my paper crafts, so I am playing along with these beautifully creative ladies!

The last challenge I am entering is a 'new' challenge site for me.  I stumbled upon this challenge from visiting a fellow blogger that I follow.  This challenge site is eastern European.  They do not have a 'translate' button, so copy and paste the text into Google Translator.  Shabby Scrap - use rose(s). 


here is what I made:


Recipe:  I used Cream card stock by Paper Trey Ink for the card base.  This card stock is a heavy weight, and wonderful as a card base.   The card size is A6 (4 1/4" x 6").
The three pattern papers are digital papers.  I just fell in love with the pale pink, and blush colors!  I sponged the floral digital paper with crumb cake classic ink.  I trimmed and sponged the library card digital paper.  I rounded two of the corners for a different look, other than a right angle.  I adhered these two digital papers together before I added the machine stitching.  I also added dimensional glaze to the 'front' blue bird.  I loved the pop of color!

I added cream twine to the trio of blush vintage buttons, and adhered them to the card front with my glue gun.  
I used a leaf punch and some shimmer green textured card stock to create the leaves.  I tucked the leaves under the two pale pink paper blossoms.  The larger pink blossom is from Prima Marketing.  The smaller pink blossom is a 'carnation' from an on-line shop.
I trimmed the journalling piece into a tag.  I sponged the edges, and added a hole for the seam binding.  I did a simple loop of pale pink seam binding and tied a simple bow with a pale pink/blush colored thin tinsel.  I added a pale blush paper blossom to the bow.  The tag was adhered to the card front with foam tape.
I stamped the sentiment onto vellum card stock and adhered to the front of the tag.  (I added my adhesive where the lettering is, so that the adhesive wouldn't show through.) 
I used the Signature Greetings, by Amuse Studios.  I heat embossed the sentiment with antique gold embossing powder.

Thank you for looking!  I hope you have been inspired to play along with any or all of these challenges!  I will be adding this card to my Etsy shop in the next few days.  {smile}


Sunday, March 6, 2016

Floral Friend; Card


Howdy!  I needed to get a few cards in the mail, and so I set out to find some inspiration.  Along the way, I stumbled upon a new (to me) challenge site, and visited two favorite challenge sites.  The inspiration was infectious!  I hope you agree!
Let's start with the new challenge site, that I 'found'.  This is an east European challenge site.  They don't have a 'translate' button, but google translator works pretty well.  [Just copy and paste the text.]  Shabby Scrap.  Their current challenge is to use rose(s) on your project.  And your project can be just about anything! A card, a page, an altered item, a tag, a book, etc.  (I'm sure you get the idea) You will be amazed at the creativity of their design team.  This challenge runs from Feb 25 - March 24.  And here is their photo:

Ok, so now on with another of my favorite challenge sites.  {smile}  This next one, is another challenge site from eastern Europe - Shabby Chic.  This challenge site does have a 'translate' button.  So it's super easy to play along with {smile}!  Their current challenge  is to use butterflies.  Or simply one butterfly.  A very creative and feminine work by their design team.  Their challenge runs through March 25.


And for the finally challenge, it's one that is truly dear to me:  Just Us GirlS #333.  I started playing along with their challenges when I first started blogging.  Their current challenge for 'Word Week' is Flowers!  How wonderful!  I love adding flowers to my cards and projects!  You will certainly be inspired by their design team!

So, I have combined the challenges, not too hard really,
and created a card for a very dear friend!


Recipe:  I created another A6 size card.  To create the card base, I used a heavy weight card stock: Soft Sky by Stampin' Up!.  I just love the soft, pale blue color.   
I added three different digital papers.  I printed my digital papers onto whisper white card stock by Stampin' Up!.  I just love how clean the images come out, and how true to color they print.  
Anyways, I used a pale blue, pink floral pattern paper for the main paper.  I just love how pretty this digital paper is, and the way the pale blue background really makes the pink roses pop!  I cut the paper down to 4 1/8" x 5 3/4".  I sponged crumb cake classic ink along the edges.
I printed a library card, digital paper and cut it down a bit.  I used my corner rounder punch on two of the corners, and sponged the edges.  I adhered these two papers together, and then added my machine stitching.  I wanted the butterfly on the library card to 'pop', so I added dimensional glaze to it.
For the tag, yes, it's another digital paper.  I used my tag punch to create the top piece.   I added some aqua blue crinkled seam binding and tied a simple bow with some thin blue tinsel.  (I just love how soft this tinsel is!)  I added some foam tape to the back of the 'tag' before adhering it.  
I tied some twine through the trio of aqua mist vintage buttons before adhering them to the card front with my glue gun.  I also adhered the trio of blossoms with my glue gun.  

For the sentiment, I used the Signature Greetings stamp set by Amuse Studios.  I stamped the words in versa mark onto some card stock vellum, and used an antique gold embossing powder and heated the embossing powder with my heat gun.   I hand cut the banner ends, and added adhesive where the words are, so you wouldn't see the adhesive through the vellum.
I stamped two butterflies onto a scrap piece of the same vellum with Archival Black ink by Stampin' Up! and used markers to color the backs of the butterflies.  I folded the wings together to give them a 3 dimensional look.  I adhered them to the card front with dimensional glaze.  
Thank you for looking!  I hope you have been inspired to play along with any (or all) of these great challenge sites!