Friday, August 31, 2012

Warmest Wishes

Yahoo!  The start of the holiday weekend is upon us!  A long weekend translates to a lot of stuff to get done! (smile).  Our son-in-law is a professional race car driver, and he races this weekend.  So, we will be out at the track to cheer him on, and we always BBQ.  It's a nice way to share a good meal with family and friends.  YOu start a good quality of meat on the smoker, and then by late afternoon, its time to chow down on some home-made delicious food.
But, before we head out to the track, it's time for another Blog Hop from Sketch Frenzy Friday.  It's pretty simple.  You start at the Sketch Frenzy Friday blog, to get a look at the sketch for this week.  But, to give you some inspiration, the design team has linked our blogs.  So, you start at one blog, and there is a link, to keep you hopping to everyone's blog!

Here is this week's sketch by Tammy F. :


Here is what I created:


When I first saw this sketch, the first thing I thought of was a Christmas card.  Super simple, I thought.  But, sometimes I don't want to create the obvious.  So, I went a totally different direction.  I knew that I wanted to use pattern paper from the Comfort Cafe DSP collection.  I matted the pattern paper on solid card stock.  I thought the squares looked out of place on a blank card front.  So, I added a piece of First Edition DSP.  (you aren't really surprised, are you?)  I used the petal cone die to cut the banner piece.  I stamped the sentiment in early espresso classic ink.  Yeah, I only inked half the stamp.  Under the "warmest wishes", says, 'on your birthday'.  I used my stamp a ma jig to get the words where I wanted them.  I added some dimensionals to the back of the banner piece, so it would be lifted off the face for the card.
Now, to continue on this blog hop, head on over to Tammy F.'s blog.  Thank you for stopping by.  Hope you were inspired to play along with us this week {smile}!

Tuesday, August 28, 2012

NAC #9

This week is off to a fast and busy start!  My husband is celebrating a birthday this week.  I'm picking up his gift today.  I'm pretty sure that he will love it!  But, I have to admit, I love the look of excitement and happiness, when it's a great gift they open {smile}.  
Ok, enough of that.  The lovely ladies over @ Nacho Average Challenge have a clever sketch for you to try.  The thing that originally jumped out at me, was how easy it would be to embellish the sketch, or how pretty to leave it CAS.
Here is this week's sketch:
Here is what I created:

Now, don't forget to stop by the other design team member's blogs to see what they created!  You won't be disappointed.  I hope you find some inspiration, and play along with us!
Sharon - here

For this challenge, I wanted something not CAS.  If you haven't looked through the new Big Idea and Catalog, you are missing out on some very beautiful paper crafts made with this color combo:  Pool Party and Summer Starfruit.  So, that is where I came up with this color combo.  The inspiration was found in this new catalog!  The possibilities are over-whelming.  Just some gorgeous work!
Ok, my card base and main panel is pool party card stock.  I ran the panel through the big shot inside the vintage wall paper embossing folder.  To high light the texture, I swiped the panel with my white craft ink pad.  I added some pattern paper in Summer Star fruit.  And yes, I had to use my all time favorite DSP: First Edition.  I stamped the large blossom in Summer Starfruit classic ink.  Instead of the sentiment banner, I wrapped some new ribbon and added a tiny tag for my sentiment.
This is about as Clean and Simple as I get.  {smile}.  We were very excited last week over @ Nacho Average Challenge, to see all the folks who played along with us in our weekly challenge.  

Sunday, August 26, 2012

Retro Inspiration #26

I had a free spot of time this Sunday, so I decided to make a card.  The creative ladies over @ Just us GirlS, have an inspiration photo that is right up my alley.  The ladies over @ Retro Sketches, have a great user-friendly sketch this week.  So, I combined the two!
Here is the inspirational photo from Just Us GirlS:

Here is the sketch from Retro Sketches:

And here is what I created:

My card base is kraft card stock.  Not very shocking, if you are a follower of mine.  I used pale blue pattern paper from Authentique and Lost & Found.  I stamped the sentiment in white craft ink and dusted it with Glacier White detail embossing powder.  I distressed the tiny polka dot pattern paper with kraft classic ink, and white craft ink.
This piece was made with a small music sheet piece.  I distressed the edges with kraft classic ink and white craft ink.  I wanted the dry embossed edge to be seen, and I also wanted to blur the edges.
I hand-cut a heart from some cream felted wool and stitched it down the center.  I made a tiny tag and added a vintage faucet button with a pearl center.  
For the ribbon, I used a piece of cream satin ribbon and cream crochet trim.  I thought it added a little softness to the card.
I hope you have time to play in these different challenges.  

Saturday, August 25, 2012

Recycle, Repurpose, & Green

On this  Saturday, I have a busy day!  But then again, what's new? {smile}  My grandson's birthday is today.  So yesterday, I made 40 deviled eggs, half a gallon of green chili salsa, decorated 5 dozen cupcakes, and decorated my grandson's own cake {smile}.  This morning, I'm attending a stamp camp, to create 6 holiday projects.  I'm leaving stamp camp early, so I can get to my grandson's party before the guest arrive, to help set-up and decorate, and then we are celebrating!  
But, before I get caught up in all the birthday hoopla, let's look at what the fabulously talented ladies are doing over @ Our Creative Corner.  Kim is our hostess this week.  And she has a creative and wonderfully 'green' challenge!  Here is the inspiration board:


I just LOVE this challenge.  I think it's a clever, creative challenge to use something you would typically through away.  Add some green.  And be pleasantly surprised with what you make!
Here is what I created:


I used crumb cake card stock as my card base.  I added a whole panel of Lost & Found pattern paper.  I just love this light blue color and the circles of silver glimmer.  I added a strip of Nostalgic pattern paper across the middle of the card.  I wrapped a generous length of crochet trim to the green pattern paper.  I created a large scallop of text paper.  What can I say, I really LOVE text paper.  It gives my cards a shabby chic look.  
I used two different stamp sets:  Affection Collection (Stampin' Up!) and Signature Series (Paper Trey Ink).  I stamped the banner tag in Pear Pizzazz classic ink.  I stamped the sentiment in Soft Suede classic ink onto the petite polka dot pattern paper by Authentic.
I took a piece of a card board box, and die cut a butterfly from it.  Then painted it with Picket Fence distress paint by Tim Holtz.  I created a blossom from 'natural' coffee filters and a scallop circle die.  To hold the coffee filter blossom together, I inserted a green polka dot brad.
I added a row of buttons, that I took off a card I hated once I finished it.  It didn't look 'right'.  
Thank you for looking.  I hope that you got some inspiration here! and it motivates you to play along with us @ Our Creative Corner's weekly challenge!

Friday, August 24, 2012

Postage Due

Happy Friday!  I'm happy its Friday, but I have a busy weekend, so I don't get a break yet!  But for this Friday, we have another blog hop over @ Sketch Frenzy Friday.  Tina, is our hostess this week.  And she has a clever and very user-friendly sketch for you to work with.  We hope you get some inspiration from the blog hop, but don't let us limit you!

Here is Tina's sketch:

here is what I did:


I just love working with sketches that have a lot of potential!  and by potential, I mean super easy to work with, and with a bit of wiggle room.  I don't want a cookie cutter sketch.  Let me get creative!  We want to see you get creative!  And Tina, pretty much has done that, with this sketch.  Love the empty space for me to fill, or leave blank.  Let me select the receptive image!  May it be flowers, tickets, buttons.  The possibilities are endless.  So let me decide what I want to work with.  Or use what I have.
I started with a crumb cake card stock.  I took a scrap piece of textured pool party card stock and used my vintage wall paper embossing folder with it, to give it a design on top of the texture.  I distressed the edges with my white craft pad.  I had a scrap piece of the real red polka dot DSP (summer smooches dsp), so I used the scallop edge punch to create a little flair to that piece.  For my 'row of multiple objects' I used postage stamps.  I inked the stamps with soft suede classic ink and stamped on to very vanilla card stock.  I used the postage stamp punch to create the decorative edge.  I applied foam tape to the back of the postage stamps to give them a little lift off the front of the card.  But, this card was missing something.  A flower, a button, something with pizzazz.  So, why not a multi-loop bow?  Using pool party seam binding.  But, it needed something else.  So, I tied on a real red button with some linen thread and created a bow with the thread.  I used a glue dot to attach the bow to the card front.  My sentiment is stamped in soft suede classic ink, towards the bottom of the card.
Hope this has inspired you!  And, continue on our blog hop and see what Tammy F. has created!

Thursday, August 23, 2012

Altered Onesie Set

I finished these oneses over the weekend, but I haven't had a chance to share them with you, until today.  This project was fun and relatively easy.  And since it involves sewing, easy is about my speed {smile}.  


I went to a large discount store and purchased a package of plain white onesies.  Then I went to a large fabric store and picked up some remnant fabric (a super good price).  And set out to make these cute little onesies for my newest grand baby.
I took basic shapes of animals.  Nothing too fancy, or fussy.  I ironed some fabric adhesive to the wrong side of the fabric.  I then cut-out the basic animal shapes.  I placed the shapes where I wanted them on the front of the onesies, and ironed them into place.   I then used my sewing machine to sew a basic stitch around the shape.  Basically outlining the animal.  I did a few hand-stitching of the initial 'L', due to its tiny size.  I also hand-stitched a button onto the animal in place of an eye.  For the bird and the elephant, I do have two pieces of fabric.  But both pieces are sewn on.  I did the main body first, and then sewn on the wing/ear.
The only thing I would do differently, is on the elephant, I would give her trunk an upward turn.  Because without it, it almost makes the elephant look like an ant eater.  Also, if you have some felted wool, maybe use that for the wing/ear and don't stitch all the way around that shape.  So that the wing/ear has some play.  
Thank you for looking!  Hope this week is a good one for you!

Wednesday, August 22, 2012

Cake Walk

On this Wednesday, in Albuquerque, New Mexico, the main Presbyterian Hospital, is holding carnival days, to help raise money for the United Way charity.  And I made the cakes, cupcakes, and breads for this event.  
Here is what I made:
 2 Vegan white cakes, with a Vegan cream & fresh fruit filling, and a Vegan soft Frosting.  
 2 boxes of the same cupcakes.
1 Yellow Butter Cake, with a Chocolate Bavarian filling, and a Chocolate Frosting.
1 box of the same cupcakes.
1 Chocolate Fudge Cake, with a Chocolate Bavarian filling, and a Chocolate Frosting.
1 box of the same cupcakes.
1 German Chocolate Cake, with a Coconut-Pecan filling & Frosting.
1 box of the same cupcakes.
2 Lemon Pound Cake, with a simple Lemon Glaze
1 Pumpkin-Cranberry Bread.
1 Banana-Walnut Bread.
1 Banana Bread.
Here are some photos:

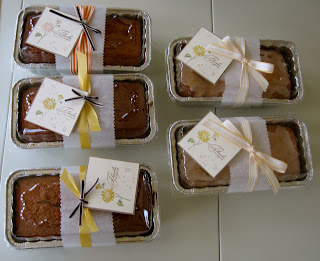
Three loaves of bread (Pumpkin-Cranberry, Banana-Walnut, and Banana breads), and two loaves of Lemon Pound Cake, with a simple Lemon Glaze.  These loaves have been wrapped with a strip of parchment paper, and tied with a ribbon.  I have included a 'Thank You' tag with each food item, that has my contact info on the back, incase the 'winner' would like to purchase another baked item.


2 boxes of Vegan white cupcakes, with a Vegan cream filling.  The cupcakes are topped with a Vegan soft Frosting, and a sugared berry. 
2 Vegan white cakes, with a Vegan cream & fresh berry filling.  Those cakes were frosted with a Vegan soft Frosting.  I also added some sugared fresh berries, and then sprinkled the cakes with edible glitter.
The chocolate square cake is a yellow Butter cake with a chocolate Bavarian filling, and a Chocolate Frosting.
The chocolate round cake is a Chocolate-Fudge cake, with a chocolate Bavarian filling, and a Chocolate Frosting.


I haven't taken photos of the German Chocolate cake or cupcakes, as well as the two other Chocolate Frosted cupcakes.  But, don't let that stop you from participating in our Cake Walk @ Carnival Days at Presbyterian Hospital on Central & I-25.

Tuesday, August 21, 2012

Red Flyer

This has been a silly week!  This is my third post in a row with the word RED in it.  How crazy.  Oh well.  Sometimes that is just how it happens.  {smile}

Well, this week is off to a fast pace again.  Sometimes I think I need to take a day off to catch-up with chores or just have an afternoon to rest and take a breath.  But, lets be honest.  Who would just sit there, and do nothing?  Not me.  Come on, life will pass you by! And I could always use an extra few hours in any day!
If you live in or around the Albuquerque, New Mexico area, and are in need to help out a charity or just want to 'win' a fabulous cake, stop by the main Presbyterian Hospital @ Central & I-25.  We are putting together a carnival to help raise $ for the United Way charity.  And, one of the carnival 'games' is a Cake Walk.  You remember cake walks, right?  You purchase a ticket to play, and if your number is selected, you win a cake!  Today, I am baking all the cakes, cupcakes, and breads for this event!  Sounds pretty yummy, huh?  (I'll post pictures of the cakes on tomorrows post.)  Understand now, why I need a few extra hours in a day?

Ok, so back to card making... The wonderfully talented ladies over @ Nacho Average Challenge have a color challenge this week.  Ok, I have to admit, this color combo was a real bear for me.  I hope you find some inspiration and play along with us!
Here is the color combo:


Here is what I created:

I used Tempting Turguoise card stock for the card base.  I had to add a strip of First Edition DSP.  {my favorite DSP}.  I added a strip of DSP from the Summer Smooches DSP.  The real red polka dot pattern paper just seemed elementary.  And I love polka dots.
I used a new stamp, Life Shared.  I stamped the image in Jet Black Staz-On and used Real Red, Tempting Turquoise, and Pumpkin Pie re-inkers to water color the image.  I matted this onto a scrap piece of Pumpkin Pie card stock.  This main panel was adhered to the card front with dimensionals, to lift it off the card front.   I felt the card was missing something, so I added a banner piece of Tempting Turquoise DSP to the upper edge.  I stamped 'friend' and stapled it.  
Now, don't forget to stop by the rest of the Design Team's blogs to see what they have created!  I know that you won't be disappointed!
Sharon - here
Hope you get a chance to play along with us @ Nacho Average Challenge!  We would love to see what you create!

Sunday, August 19, 2012

Altered Onesie

Good Morning All!  I hope you are able to spend some time this weekend crafting!  I know that it is always a good day when I can spend time crafting something!  It's a hobby passion of mine.  But, I'm not generally too picky.  paper crafts, altered art, sewing.
My fifth grandchild was born last weekend.  So, I was super happy to help deliver her instead of being in my craft room.  But, this weekend I got to make her something!  Yesterday, I let you in on my idea of altering an onesie for her.
Here is the first one:


and a close-up of that cute little birdie:

I was searching the internet for a 'quick and easy' tutorial on sewing 'patches'.  I just wanted a basic design, nothing too elaborate or difficult.  I'm a beginner sewer.  Is that a word? sewer?  I know I'm not a seamstress.  And, I did a pair of sleeves once.  but that was with major supervision and help.
So, anyway.  I found this lovely lady who did some wonderfully creative appliqué designs.  Sarah @ Daffodil Designs, has this great tutorial found here.  If you are looking for something fairly simple, this is your spot.  Sometimes, simple is just beautiful!  
I went to a discount store and purchased a package of onesies sized 3-6 months.  I figured that she can grow into them.  So, I will be altered the other two today.  But, I just loved how the first one turned out, so I just had to stop and share it with you!  Stop by later this week, to get a peek at the other two.  I'm so excited and super happy with how this project is turning out!
Enjoy the rest of your weekend, and craft something!  I am!

Saturday, August 18, 2012

Red Office Supplies

Yahoo, the weekend is here!  I hope you have a chance to do something that brings you happiness and a few minutes for yourself.   I'm a big-time crafter, so for me, I'm planning on altering some one-sies for my new granddaughter.  Sewing.  For me, its therapeutic and a chance to do something alone.  That sounds pretty selfish.  But, after working all week, its going to be nice to take an hour for me, and create!  I also plan on going to the movies with my husband, to see the new Jason Bourne movie: Bourne Legacy.
Ok, you most likely came here to see some paper crafting inspiration.  The creative Kim P. over @ Our Creative Corner, have a wonderful challenge for us this week.
Here is the inspiration/recipe board:


Kim, has a creative way of looking at things, and really gets us motivated to participate in her clever challenges.  This week, Kim would like us to use office supplies on our paper craft item, but with a twist: use lots of RED.  How unique!
Here is what I created:


First, let me say, that I really had a fabulous time working with this challenge.  It gave me the perfect opportunity to use this new pattern paper collection Carefree by Authentique.  I just really love the colors in this paper collection: red, black, grey, brown, cream.  So, I cut one pattern paper for the card front.  I selected the large floral image, because I wanted an abstract pattern, so the card would look uniform and not distracting.  I selected this other mostly red pattern paper to cut a Rol-a-dex file.  I thought the shape was just so classic and fun.  I added some various sticker pieces from the Carefree collection to my card.  The 'always' banner piece is a sticker.  Along with the 'Just living..' tag, and the large notebook paper piece.
As for the Rol-a-dex card, I added a metal tag holder to give the card a rustic look.  Now, the large notebook paper piece, I stamped the sentiment, 'Plant a seed, grow a dream' in basic black classic ink, next to the bumble bee.  I wrapped some red striped bakers twine around the top of this sticker.  Then tied a metal rim key tag.  I stapled the bakers twine.  I also stamped, 'smile' on the metal rim key tag.  
If you love red as much as I do, I strongly encourage you to play along with us this week.  I know that you will have fun working with a favorite color and creating something beautiful!
Please stop by Our Creative Corner to get some inspiration from our super talented design team, and share your paper craft item with us!  You never know, you could be our next Top Talent!

Friday, August 17, 2012

Red Christmas

I don't know about you, but this week is screaming by!  Or is it the extra chores and the new grand baby {smile}.  And, I'm sure that I am like the rest of you, when the weekend rolls around, you don't necessarily have more time, just different chores and different focuses.
But, before we get to the weekend, it's Friday! And it's time for Sketch Frenzy Friday's blog hop.  If you aren't sure what this is, its pretty simple.  You start at our home page, and go to each design team member's blog to get some inspiration for this week's sketch.  Sounds easy.  And it's fun!  But, before we get started, lets see this week's sketch:


Tammy F. is the designer of this week's sketch.  It's beautiful, huh?  And here is what I made:


The card base is crumb cake card stock (my favorite).  I layered a piece of First Edition DSP (my favorite).  I then took three scrap pieces of this new beautiful holiday DSP and tore the edges and layered them.  I stamped the sentiment in real red classic ink.  For the snowmen, I stamped them in basic brown classic ink and used markers to color various parts of the image.  I outlined the snowmen with a 2-way glue pen and then added dazzling diamond glitter.  I really like how it turned out.  Something a little different.  
Now, to continue with our blog hop, your next stop is Tammy F's blog.  I'm sure you won't be disappointed!  Now, when you are done, take a little time to craft something you love, and join us this week, in our sketch challenge @ Sketch Frenzy Friday.  Can't wait to see what you create!

Wednesday, August 15, 2012

PCCC #3

The talented ladies over @ Paper Craft Crew Challenge have another creative and fun sketch for you to try.  Here is the sketch:

How fun is this?  There are so many different themes you can use this sketch for: holiday, birthday, floral, invite, etc.  The list just goes on and on.
And now, on a sour note, I want to say that I have had a wonderful time, being on this DT.  These ladies have been warm and welcoming to me from the start.  However, I have had some more health issues, that I need to take care.  So, I am stepping down from the DT.  At this point in time, I need to take care of me, and be available to work as much as possible at my paying job.  I hope you all understand.  I have really enjoyed working with these sketches and reading all of your warm and supportive comments.  But, I can't devote the time and attention to this endeavor as I would need to.
I will keep blogging about paper crafts and cakes, and the occasional post about my dog, Sasha.  So, I am not saying farewell to my followers.   I just can't devote the time and attention I need to, to be an active member of this DT.
Thank you for your understanding and support.

Tuesday, August 14, 2012

NAC #7

Good morning. I guess I'm loosing this battle with blogger. :(
But, on the bright side, I did help deliver my 5 th grand child this weekend!  Lily arrived Saturday afternoon. Weighed in at 7 lbs 7 oz and 19.5 inches. And yes, she is as beautiful as her mom!
Ok, back to business. Over @ Nacho Average Challenge, there is a clever and creative challenge.  
Here is the sketch:

Here is what I did:


I used a 1 1/4 inch circle punch to create my circles. I used the same package of DSP; Comfort Cafe.  I added a few embellishments and stamped a sentiment in white craft ink, and added white embossing powder.  I really wanted my word to pop!
Now, take a look at what the rest of the design team created!
Rose
Sharon ( here)

Thank you for stopping by!

Saturday, August 11, 2012

Ruffled Denim

First, sorry for the late posting.  I had a little hiccup in my scheduled post, for some reason it didn't change from a draft.  So, hopefully all is well now.
Ok, I had to change my card too, because I didn't follow the recipe!  

Paula is our hostess over @ Our Creative Corner.  And she has some of the most creative challenges!  This week she has a recipe challenge.  You need to use denim, 3 ribbons/twines, and 3 buttons or brads on your paper craft item.  Sounds pretty fun, huh?  Paula, also gave us a photo and a little explanation:


I'm an Arkansan.  We wear jeans all the time... work, church, play, even weddings. You name it, we can make the denim work.  So dress it up or dress it down but use 3 ribbons or twine, 3 buttons or brads, and some denim on a project.
So, here is what I made:

I used some pretty pattern papers from Teresa Collins.  I have to admit, that I just love her designs.  She makes some very pretty pattern papers and embellishments.
I found this denim ruffled ribbon at a local shop and thought how pretty!  I used some seam binding, a bit of baker's twine and a scrap piece of stitched ribbon.  I used a favorite buttons: Paper Trey Ink Vintage.  Love 'em!  I wanted a blossom of some kind, but couldn't get anything to look appropriate, so I punched some floral shapes from pattern papers and used two white brads to hold them together.  I also used a die to cut some white leaves to complete the blossoms.
I used one of my 'go to' label stamps: Four Frames by Stampin' Up!  The sentiment is from another stamp set.  You know me; mix, match, and the kitchen sink!
I hope that you get a chance to play along with us this week.  Add some denim to your paper craft item, along with 3 ribbons/twine and 3 buttons/brads, and you never know, you could be our next Top Talent! over @ Our Creative Corner!

Friday, August 10, 2012

Just Because

It's Friday, and so that means that we are having a blog hop over @ Sketch Frenzy Friday.  And, to help get things started,  I am the designer of this weeks sketch!  How cool is that?  Here is the sketch I created for this week over @ Sketch Frenzy Friday.


and here is what I created with this sketch:


Now, head on over to Tammy F.'s blog to see what she has created!  And join us this week!

Wednesday, August 8, 2012

Monochromatic PCCC

Happy 'Hump' Day to you! {smile}  This is a busy day.   Between work, crafting and appointments, it will be good to get home and sit on the couch.  I know that sounds super lazy.  Sorry.  
Stampin' Queens Sketch Challenge has a new name and location:  the Paper Craft Crew Challenge.  (that is why the sketch still bears the initials SQSC.)
The creative ladies over @ Paper Craft Crew Challenge have a very user-friendly sketch for you to work with this week.  The only thing we ask, is that you use Stampin' Up! products.
Here is the sketch:

This sketch has a lot of potential.  You could easily showcase pattern papers, or embossed papers.  The burgundy panel could easily showcase a stamped image (florals, background, etc) and the white square could easily be a specific shape (flower, star, heart, postage stamp, etc.).  The white rectangle on the lower right corner could easily be a sentiment label.  See, totally workable! Just grad your favorite stamps, colors, and create!
Here is what I did:

I just love soft suede.  I love the soft brown color.  With richness and depth.  It's a brown without being black (early espresso) or without being too brown (chocolate chip).    But with depth, and a creamy color, unlike crumb cake.  So, I selected my favorite brown: soft suede.  I used two different DSP in soft suede.  Instead of the white square, I added a soft suede taffeta bow and a brown glimmer brad.  The little tag I made was stamped and edged in soft suede classic ink.
Thank you for looking.  I hope you have found some inspiration to play along with us @ Paper Craft Crew Challenge.

Tuesday, August 7, 2012

NAC #6

I hope this week finds all of you in good spirits and in good health.  The ladies over @ Nacho Average Challenge, have a color challenge this week.  I have to admit, this color combo was a bit of a struggle for me.  These are not my 'go-to' colors.  But hey, it's a challenge, right?

This graphic didn't copy too well.  The colors are Rich Razzleberry, Lucky Limeade and Not Quite Navy.  And here is what I created:


The card base is Not Quite Navy.  I used a panel of textured very vanilla card stock.  I made my mini envelope from a floral note envelope.  I stamped a flourish in NQN and the random splatters in LL classic inks.  The 'get well wishes' banner is from Teeny Tiny Wishes.  I stamped it in Early Espresso classic ink and hand cut the strip.  The floral image is colored with markers and I used an oval punch to create the center of the polka dot label.  I tied some linen thread around the main panel piece.  Added some butterflies, and stamped the post mark in basic black classic ink.  
Thank you for stopping by.  Now, lets see what you create!  Don't forget to stop by the rest of the design team blogs to see what they have created.  I hope you find some inspiration, and play along with us.
Jenni Hogan - Stampin' in the Son
Leilani McGranahan - Lani Stamps
Rose Alexa - RMA stamps 4 U
Sharon Wheet - Designs by Sharon (you are here)
Tammy Fite - Stamp with Tammy

I will be mailing this card off to a friend.  I hope she likes it.  Take care, and thank you for stopping by!