Showing posts with label Lost and Found. Show all posts

Sunday, January 26, 2014

Altered Paper Mache Book Box Complete

~ photo heavy post ~

Whew.  A finished project!   I finished my paper mache book box this morning.  Took quite a few photos and now I'm ready to share with you, this labor of love.  I purchased a paper mache book box from one of those big box craft stores.  So, they should be relatively easy for you to find one.  You can always order one off the internet, but I'm not a fan of shipping costs.  (Frugal, one might say)  The book box measures 4" wide by 6" tall and 1 1/2" deep.  So, it's not huge, but the measurements are perfect when using 12" x 12" pattern paper.   I used a sketch from Cardabilities #91 for my inspiration to create the cover.

Let's start with the cover:  

I first painted the box with gesso.  Then a light sand color paint.  I spritz the box with an alcohol mist, and rubbed some of the sand color paint off, to give it a worn look.  I also used fine linen distress ink on the edges.  I used pattern paper from Lost & Found - Market Street.  I machine stitched the main panel to a crumb cake card stock.  The chicken wire images are stamped from Distressed Background by CTMH.  The sentiment is stamped from On the Grown by Stampin' Up!.  The lilies and white rose are made from clay.  The butterfly is a resist chipboard piece from Heidi Swap.  The pale green paper blossom is from Kaiser Krafts.  The cream button is from Paper Trey Ink, and the gold sequins are from Stampin' Up!.  (If you saw yesterday's post, I hadn't added the button yet, its tucked-in, between the pink seam binding and the pale green paper blossom.)

a close-up:

Let's open the box.  Here is the inside cover:

I used the same pattern paper threw out this alteration.  To keep everything looking like it belongs.    I did however, use a tag from Prima - Almanac.  Love the chicken.  I did a little stamping:  some more chicken wire, and a country phrase along the left side of the tag from Country Born by CTMH.  I also  created a tiny tag using a stamp from Friendship Jar by Paper Trey Ink.  I added a pool party polka dot brad by Stampin' Up!  I created a banner with the same pattern paper; Market Street.  I added some sweet tiny cream buttons from Paper Trey Ink, that I tied with some cream twine. (if you saw yesterday's post, I had not finished the banner.)  I added a white resin key by Melissa Frances, to help balance the page, and to add a sweet little surprise.  (If you saw yesterday's post, I had to flip the key around, so that the box would close shut.)

the inside of the box:

I just love this floral pattern paper by Market Street.  It adds so much sweetness without giving you a cavity (haha).  I wanted to add a little surprise, so I placed a small white crochet doily and a pale pink paper blossom to the bottom right corner.  I also added a little bit of sparkle by including a link from a Melissa Frances dangle.
here is the close-up:

here is the back of the box:

I wanted the back to have a bit of charm, too.  But, I also wanted to keep it flat, incase the owner wants to lay the book box down.  I used the same pattern paper - Market Street.  But I used a part of a pattern text paper that had this open area.  So, I used a stamp from The Sweet Life by Paper Trey Ink.  I thought is was fitting for a memory box.  I also added my signature stamp along the bottom.  

here is the spine:

I stamped the 'title' with a stamp from Loving Thoughts by Stampin' Up! onto a scrap piece of the Market Street pattern paper.  I also added a white resin lock by Melissa Frances.
I used a scrap piece of some beautiful peach colored silk ribbon by Martha Stewart.  I purchased the ribbon probably 5 years ago from a local scrapbooking store.  I thought the ribbon matched perfectly.
All the edges of the pattern papers were distressed with ink or ink and scissors.  I used scor tape to adhere the papers to the box.  I used my glue gun to hold the various embellishments to the box.

oops! I forgot to show you the bow!


Thank you so much for stopping by and taking a look.  I am off to my craft room once again to finish my desk top calendars.  Yep, I still have 2 more to make.  And January is almost over!


Saturday, January 25, 2014

Book Box

One of the things that I have realized, is that, without deadlines, I just sit and create.  Create most things for me, or gifts.  But not so much for challenges.  Wow, that sounds kind of stuck up.  But that's not the intension.  I was on several Stampin' Up! only challenge design teams.  They were a lot of fun, and really made me be creative with my SU! supplies.  But, I secretly wanted to just craft.  Craft with what I had, no rules, no restrictions, no limits.  I used the excuse that I didn't make other things/different crafts because I alway had a deadline for my design teams.  Well, now, I don't have that excuse.  And, I still haven't crafted everything I want.  But, I do want to share with you a few (ok, two) pieces of a craft I am currently working on.


This piece is a 'cover' piece.  I am altering a paper mache book that opens into a box.  I wanted to create a shabby chic altered piece.  So, I used pattern paper from Lost & Found - Market Street.  Using what I have at home, and not spending more $ on supplies.  I machine stitched the floral pattern paper onto some crumb cake card stock. I stamped some chicken wire onto the floral paper.  I added some decorative shapes of different pattern papers, to help add some visual interest. The lilies are made of clay, as well as the rose on the seam binding.  The sage colored paper blossom is from Kaiser Crafts.  I added a Heidi Swap resist butterfly.  And a few gold sequins.  The sentiment 'everyday is the perfect adventure', comes from a retired Stampin' Up! stamp set.  I stamped the words onto a scrap piece of pattern paper and cut out the words.


This piece is going on the inside cover of the book box.  I'm not done yet.  But I still wanted to share with you.  I used a text paper from the same pattern paper collection (Market Street).  I added a decorative shape piece of a coordinating pattern paper.  I added a Melissa Frances resin key.  The main piece is actually a tag from Prima Marketing - Almanac.  Love the rooster.  I stamped the same chicken wire in flannel ink.  I also stamped a quote, 'I was born country and that's what I'll always be, like the rivers and the woodlands wild and free. ~ Alabama', in Baked Brown Sugar classic ink, along the left side of the tag.  I made a tiny tag from crumb cake card stock.  I stamped 'Celebrate today' from a Paper Trey Ink stamp set, in basic black classic ink.  I added a pool party polka dot brad to the top of the tag.  
Currently, I am working on the banner strung across the top.  I used a different pattern paper from Market Street, and a distressed polka dot pattern paper from Melissa Frances.  I used some brown bakers twine to string the banner pieces.
So, as you can see, I have been doing some crafting.  Just not very fast.  I'm not making this book box for anyone specific.  I'm getting a jump start on some crafts that I am selling at my next Craft Fair.
Thank you for stopping by {smile}.  I'm hoping to get this book box done this weekend.  I'll share photos once I'm done.  I still haven't decided on the ribbon to tie the book closed.  So, please stay tuned!


Saturday, March 9, 2013

Twilight Metal

Happy Saturday.  This has been a rough week at work.  After weeks like this, I really have second thoughts about continuing to work.  There are alot of other things I would rather be doing, than doing time.  The stress at work mounts and crafting is really an escape for me.
The lovely and talented Meihsia, from Our Creative Corner, has a wonderful challenge for you to try.  She has included an inspiration photo, and has asked that you use the colors in the photo and include a metal embellishment.
here is the photo

ok, when I first saw this photo, the first thing I thought of was the beautiful blue and white, with splashes of copper.
here is what I created:


This card was alot of fun to create.  I just love the colors and the challenge of this.  I really, really wanted to pair a light pink with this shade of green/blue. {smile}
The card base is more mustard card stock.  The color panel is twilight, from CTMH.  The main panel paper is from Echo Park.  I added bits and pieces from my scrap box.  The gold glitter polka dot pattern paper is from Lost and Found, Sunshine collection.  The mustard houndstooth pattern paper, I'm not sure who.  The yellow pattern paper used for the leaves of the paper blossom are from Teresa Collins.  The white cardstock doily is a die cut from Paper Trey Ink.  I did add a circle of the houndstooth pattern paper to the paper doily.  I thought that it needed a splash of color.  The white seam binding is an online purchase.  
For my metal embellishment, I used a pearl center brad and a metal button brad.  I just love the look of this distressed metal.  (A little goes a long way.) 
The stamp is from the Puns from the Past, stamp set.  The frame is from Four Frames stamp set.  I added two pearl trios at opposite corners.
I hope you get a chance to play along with us @ OCC.


Saturday, October 13, 2012

Circle of Autumn

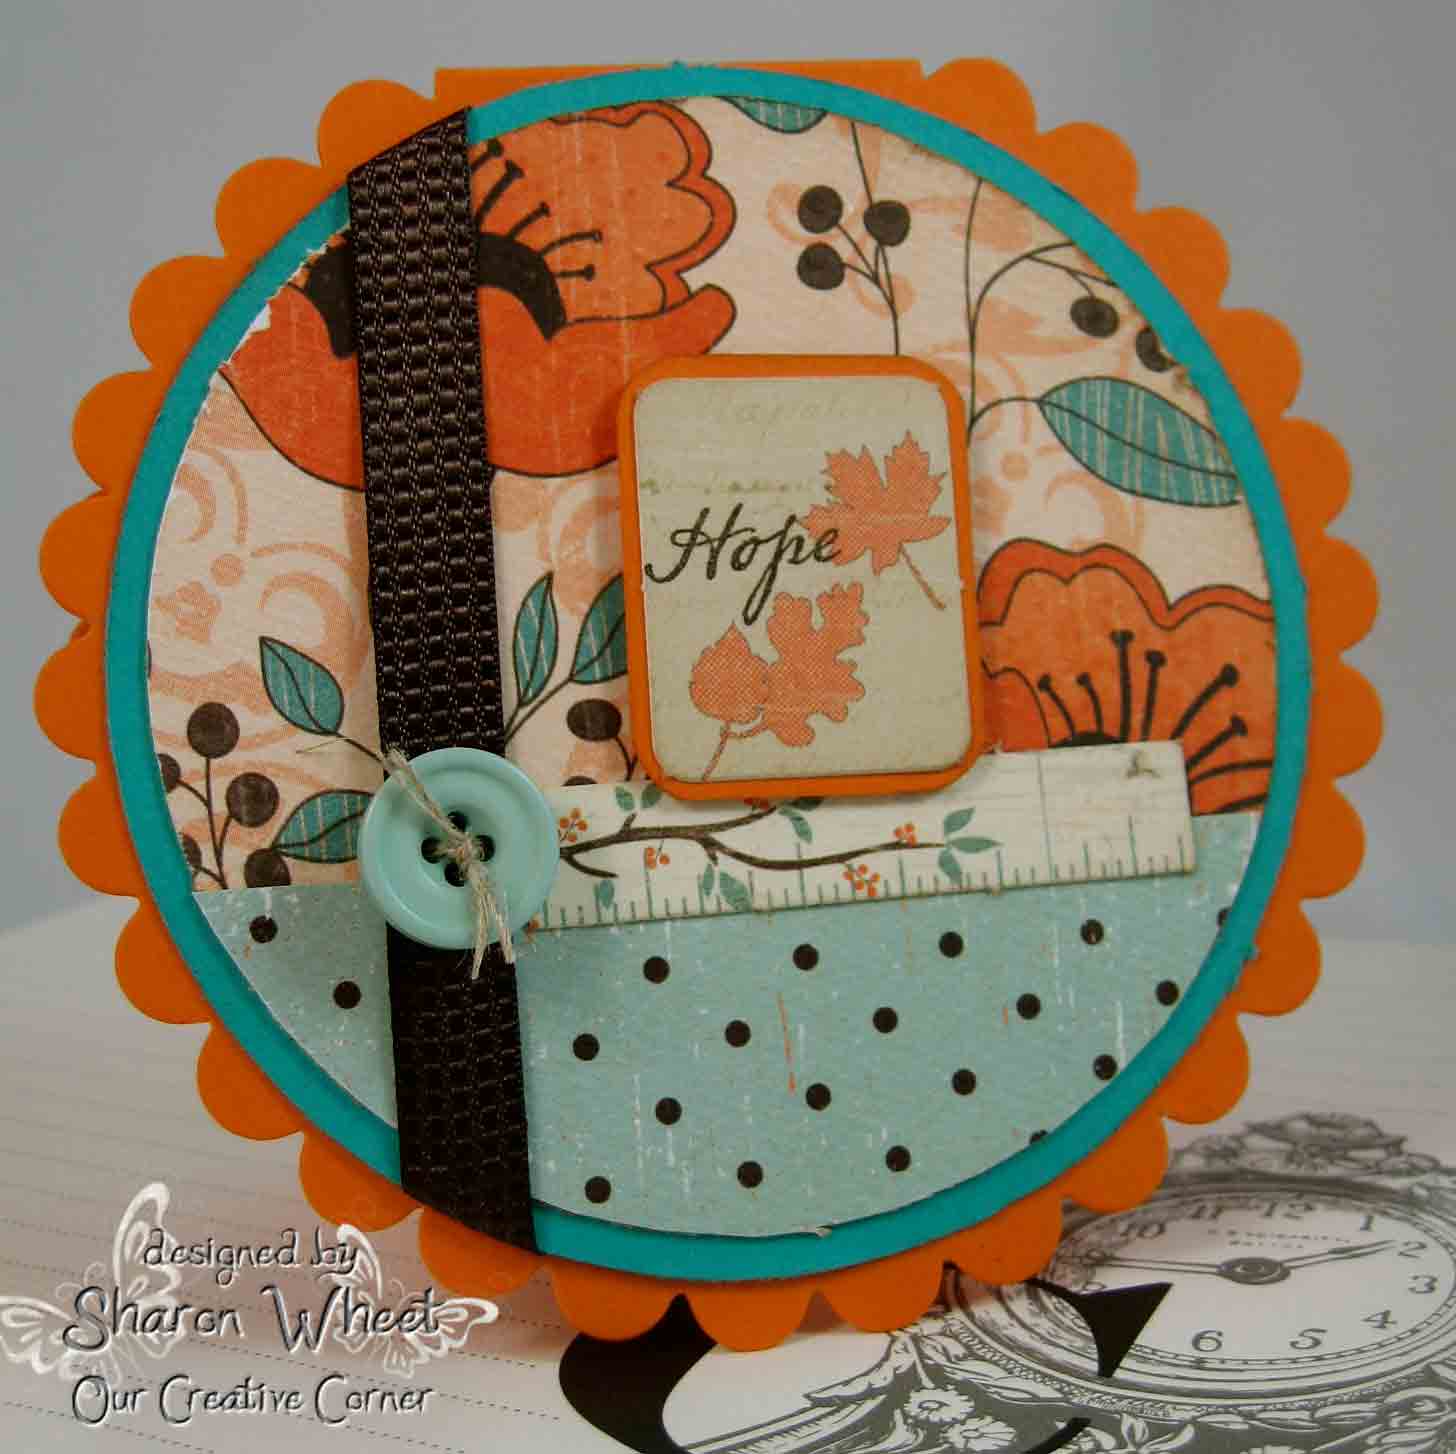
Happy Saturday.  I have been creating various paper crafting items for my upcoming craft fairs.  I'll be posting photos later this month.  So, I have been focused on Christmas for over a week now.  You know, Christmas trees, Santa Claus, Peace and Joy.  And  so for todays challenge, I really had to change gears.  I needed to transition from red and green, to the colors of Autumn.  The super talented Meihsia, is our hostess this week over @ Our Creative Corner.  She has titled her challenge as, Fall in the Circle.  Meihsia, wants you to create a circle card/project, with fall theme colors or objects.  Sounds very clever, and I know that the creative wheels are already turning in your head.
Here is what I created:


The card base is pumpkin pie card stock.  I just love the shade of orange.  The first circle is tempting turquoise card stock.   I love the way these two non-Authentique card stock colors match this pattern paper.  I used the same pattern paper for the floral image and polka dots.  One is the front and the other is the back.  How sweet and economical.  I used a scrap piece of early espresso quilted ribbon.  I love the texture.  I tied on a button from Lost & Found.  The sentiment piece is actually a die cut from the same Authentique line.  I stamped the 'Hope' in early espresso classic ink.  The ruler piece is also a die cut piece.  This card was relatively quick to put together.  And I believe that it looks quite 'home-y'.
Thank you for looking.  And, I invite you to play along with us @ OCC.  We have a few new restrictions;  you need to turn off 'word verification' and you are limited to entering your card/project to 3 other challenges.  We would love to see what you create!

Saturday, September 8, 2012

Shabby XOXO

I'm so happy that you stopped by on your weekend, to have a look see at what I have been creating.  On this Saturday, the lovely Lisa Minckler, has given us a creative challenge over @ Our Creative Corner.  Lisa, has requested that you create a paper craft item using the 'Kissing' technique.  And she would also like you to include the letters: X, and O.  How fun does that sound?


Here is my take on Lisa's challenge.  I am a big fan of shabby chic.  And since I didn't have any product restrictions, I decided to use about everything in my craft room.  Please take a moment to get a good look.  There is a lot going on with this card!
 For the card base, I used Aqua mist card stock for PTI.  The pattern papers are: Glitz (pretty in pink), Lost & Found (blush, and buddies).  
To create the flowers, I used the kissing technique to create pattern paper, and then the birds & blooms die.  I inked the harlequin pattern (Print Pattern) stamp from Stampin' Up! and then kissed it with the music stamp (Composer's Dream) by Stampabilities.  I inked the edges and crumpled the blossoms.  After I stacked them, I edged the petals with picket fence crackle paint, and then dunked into a tub of dazzling diamond glitter.
The frame is from Tattered Angels.  I believe it was discontinued 3yrs ago.  I edged the frame in picket fence crackle paint and then dipped into dazzling diamond glitter.
I used white seam binding (trimmings, from Tim Holtz) and used my spun sugar distress stain.  I tied a wooden button and tied it on with some cream twine.
To get my XO requirement, I added a 'ticket' from 'Love Mail' by Crafty Secrets.  I also added a rub-on from Karen Russell's Narratives Swatch Book.  I also added a tiny silver glitter butterfly to the 'ticket' to give the card a 'surprise'!
I hope that you get a chance to play along with us @ Our Creative Corner.

Sunday, August 26, 2012

Retro Inspiration #26

I had a free spot of time this Sunday, so I decided to make a card.  The creative ladies over @ Just us GirlS, have an inspiration photo that is right up my alley.  The ladies over @ Retro Sketches, have a great user-friendly sketch this week.  So, I combined the two!
Here is the inspirational photo from Just Us GirlS:

Here is the sketch from Retro Sketches:

And here is what I created:

My card base is kraft card stock.  Not very shocking, if you are a follower of mine.  I used pale blue pattern paper from Authentique and Lost & Found.  I stamped the sentiment in white craft ink and dusted it with Glacier White detail embossing powder.  I distressed the tiny polka dot pattern paper with kraft classic ink, and white craft ink.
This piece was made with a small music sheet piece.  I distressed the edges with kraft classic ink and white craft ink.  I wanted the dry embossed edge to be seen, and I also wanted to blur the edges.
I hand-cut a heart from some cream felted wool and stitched it down the center.  I made a tiny tag and added a vintage faucet button with a pearl center.  
For the ribbon, I used a piece of cream satin ribbon and cream crochet trim.  I thought it added a little softness to the card.
I hope you have time to play in these different challenges.  

Saturday, August 25, 2012

Recycle, Repurpose, & Green

On this  Saturday, I have a busy day!  But then again, what's new? {smile}  My grandson's birthday is today.  So yesterday, I made 40 deviled eggs, half a gallon of green chili salsa, decorated 5 dozen cupcakes, and decorated my grandson's own cake {smile}.  This morning, I'm attending a stamp camp, to create 6 holiday projects.  I'm leaving stamp camp early, so I can get to my grandson's party before the guest arrive, to help set-up and decorate, and then we are celebrating!  
But, before I get caught up in all the birthday hoopla, let's look at what the fabulously talented ladies are doing over @ Our Creative Corner.  Kim is our hostess this week.  And she has a creative and wonderfully 'green' challenge!  Here is the inspiration board:


I just LOVE this challenge.  I think it's a clever, creative challenge to use something you would typically through away.  Add some green.  And be pleasantly surprised with what you make!
Here is what I created:


I used crumb cake card stock as my card base.  I added a whole panel of Lost & Found pattern paper.  I just love this light blue color and the circles of silver glimmer.  I added a strip of Nostalgic pattern paper across the middle of the card.  I wrapped a generous length of crochet trim to the green pattern paper.  I created a large scallop of text paper.  What can I say, I really LOVE text paper.  It gives my cards a shabby chic look.  
I used two different stamp sets:  Affection Collection (Stampin' Up!) and Signature Series (Paper Trey Ink).  I stamped the banner tag in Pear Pizzazz classic ink.  I stamped the sentiment in Soft Suede classic ink onto the petite polka dot pattern paper by Authentic.
I took a piece of a card board box, and die cut a butterfly from it.  Then painted it with Picket Fence distress paint by Tim Holtz.  I created a blossom from 'natural' coffee filters and a scallop circle die.  To hold the coffee filter blossom together, I inserted a green polka dot brad.
I added a row of buttons, that I took off a card I hated once I finished it.  It didn't look 'right'.  
Thank you for looking.  I hope that you got some inspiration here! and it motivates you to play along with us @ Our Creative Corner's weekly challenge!