Wednesday, December 25, 2013

Merry Christmas

Now, before we head-off to our third holiday celebration today, I wanted to share with you, an ornament that my oldest granddaughter (H) made for her family.  H, is a caring, compassionate little girl.  She always thinks of others and I believe truly grateful for what she has.  H, saw an ornament that I made, and wanted to make one for her family.  I didn't have any more ball shaped glass globes, so we selected a bell-shaped glass globe.  H, selected the tree, we trimmed it down to fit, and then H, went to select all the embellishments and begin the assembly.  The bottle brush tree was hand-painted with white crackle paint to replicate snow.  The tiny pearls were glued on individually.  There are a few different buttons in front of the tree, as presents {smile}.  H, created her own winter scene.  Finally, we added mica flakes for snow.  We hot glued the tiny pom-pom trim and seam binding bow with clay blossom.  


I think H, did a great job!  I hope you like it too!  Before we head out the door, I want to wish everyone a wonderful holiday filled with love, laughter, and those who mean the most to you.  

I know that this holiday can be crazy busy, a bit hectic, and maybe a little overwhelming.  But, take time out to truly enjoy those around you.   Take a moment to talk with an aunt, and really listen to how she is doing.  Find the joy in a little one's smile.  Hold the hand of your grandmother, and truly be present when she speaks to you.  It's these little things that bind us together.  Family.  
We have all traveled miles and endured hardship.  So relish this time together, and  remember the warmth, the laughter, the hugs, and the good cheer in the these times.

Merry Christmas


Tuesday, December 24, 2013

Glass Globe

Whew, the holidays are upon us!  I hope you had a wonderful weekend!  Our weekend was spent sharing Christmas with out-of-town family.  Our daughter and her family, hosted both days, Saturday and Sunday.  My mom came up to Albuquerque on Saturday.  My husband cooked a prime rib roast on the smoker, and I made cheesecake.  No holiday flavor of cheesecake, just plain vanilla bean cheesecake.


I took a jar of my home-made Blueberry Spoon Fruit, to add for a topping {smile}.  We had a wonderful meal, opened presents, and played several rounds of tri-ominos.  It was really good to share some time with family, and not be rushing with  stuff.

I also hope that you have all your shopping done.  I have 3 gifts to get today.  And the whole thought of heading out to the shopping center is dreadful.  But, I will make the trek, and have some holiday cheer in my heart.  {smile}  We were invited to share Christmas Eve with my daughters in-laws tonight.  So, I need to get a few things baked and packaged.  But, before I head out the door,  I wanted to share a gift I made.  My daughter asked me to make a glass ornament for her mother-in-law for Christmas.  I just love making these little guys.  Her only request was that it had to have an angel.  That's easy peasy!


I just love making these little scenes.  But I hate photographing them.  I need to figure something out.  Because currently, I hold the ornament with one hand and the camera with another.  So, between the globe swinging, and my hand(s) shaking, it takes several (and I do mean several) clicks of the shutter until I have one decent photo.  
But, I have to say, I am very happy with how it turned out.  My oldest granddaughter loved it!,and she is in my craft room, putting one together for her family.  So, anyways, I used a bottle brush tree from Melissa Frances, I hand glued those tiny faux peals for ornaments, and disassembled a link on a rhinestone bracelet for the tree topper.  I also used an angel punch out, and the glass dome are from Melissa Frances.  I added a Tim Holtz button, in front of the tree, to give the scene some vintage love, and to add a feminine touch.  Finally, I added a bingo piece '25' for the date.  I used mica for the 'snow'.  I tied some crinkled pale aqua blue seam binding to the top, and added a clay rose I made.  I also added some tiny cream pom-pom trim to the bottom of the globe.  I hope she likes it {smile}.  
I'll post a photo of the glass dome my granddaughter is making tomorrow or the next day.  It all depends on how much I need to get done.  Well, until then, have a wonderful day! and carve out sometime for someone special {smile}.


Sunday, December 22, 2013

Yummy Hot Cocoa

~ several photos ~

I'm so proud of myself!  I actually remembered to photograph my projects yesterday!   Todays post will have the hot cocoa and nuts.  I'll post the cheesecake and ornament tomorrow.  That way, this post isn't loaded with too many photographs.  Let's get started {smile}
I started with the marshmallows.  These take about 3 1/4 hours to complete, so I started with these.  While they were setting up, I made the cheesecake.  While the cheesecake was baking, I made the nuts and hot cocoa mix.  (cheesecake photos tomorrow.)
I have tried my hand at crafting home-made marshmallows several times.  I'm pretty good in the kitchen, but mine never turned out right.  So, when I found, yet another recipe, my husband gasp.  This was my last attempt.  And if these didn't turn out right, I vowed never to try them again.  I first used this recipe earlier this month with great success, so here it goes, another round!
I cut the marshmallows into squares and rectangles.  Nothing fancy.  Just a sweet square of fluffy heaven {smile}.


I just love how rustic-looking they turned out.  I think the rough edges give them a 'hand-crafted' look, that is comforting, and cozy - so to speak {smile}.
The cocoa mix I made, uses three different chocolates: dark, milk, and white.  ok, for all of those chocolate experts out there, I know, white chocolate isn't really chocolate.  But, it is marketed as 'chocolate'.  So, I'm a copy cat.  I listed it as a 'chocolate'.  I added a little sugar to the mix to help off set the bitterness of the dark chocolate.  I roasted a few vanilla beans to help give it a rich, complex flavor.  
Now, for those who know me, I love packaging.  I think the packaging should match the product.  I think my 'stuff' is phenomenal , and so my packaging needs to convey that.
I measured out the cocoa mix, and scooped it into a pint canning jar.  (yes, I always have several sizes on hand.)  I cut a piece of brown packing paper into a large scallop circle and put it under the ring of the jar and screwed it closed.  I added a piece of red yarn around the lid of the jar, and added a 'directions' tag.


I put a lot of marshmallows into the white treat bag.  I added a white tea doily to the top of the bag, then I used my sewing machine to 'seal' the bag.  I gave it two passes, of a simple stitch.  I added a piece of red houndstooth pattern paper, cut in the shape of a banner, a little vintage christmas postcard matted with always artichoke card stock, and finally stuck a silver glitter snowflake with a vintage angel on it, as my bag topper.  I cut out a little tag and hand wrote the contents.  To hold it all together, I painted a little clothes pin white, and added some glitter to give it a bit of a sparkle, and clipped the decorative piece to the top of the bag.


I created a label for the set, and gave it a 'chalk board' look.  Used some super strong adhesive, and applied it to the front of the bag.  So, the chalkboard labeled bag holds the hand-ground triple chocolate hot cocoa mix, and the home-made vanilla-bean marshmallows.  A simple sweet treat, that is home-made and filled with love {smile}.  Now doesn't that scream 'Christmas'?


Now, onto the nuts!  Family and friends have been requesting my Cinnamon-Spice Nuts for the past few months.  So, I figured, that I would make another batch and package those up super cute, too.


This is actually a double recipe.  I use a strong cinnamon, along with cloves, all spice, ginger, nutmeg, and ground dried orange peel, to give these nuts a complex, yet home-y taste.
Ok, the packaging HAS to match.  I want the whole gift to look like they belong together.  So, I used a large coffee style bag (1# capacity), stamped a little, and created another chalk board style tag.  I used my super strong adhesive to hold the 'label' to the bag, and used a sweet artichoke green twill ribbon to add a pop of color to the bag, and to help bring out the green in the label.


The nuts and hot cocoa collection were packaged together in a larger brown paper handled bag.  And I didn't take a photograph of that {frown}.  These little collections are our family gift to folks who are really close to our hearts - 'family'.  We have another Christmas celebration today, Christmas eve, and two on Christmas day.  So, I need to get back into the kitchen a whip up a few more batches.  

I know the holidays can be crazy busy, hectic, and full of dead-lines.  Please take a moment to cherish those who do mean the most to you.  Even if it is spent chatting over a cup of hot cocoa, or sharing a 'special' cupcake.  Time moves fast, and before you know it, too much time has pasted.  Use this Christmas as your chance to spend time with those who do brighten your life, make you smile, give you hope, someone who loves you back, listens, and genuinely cares about you.  {smile}

Saturday, December 21, 2013

Calendar

Howdy!  Did ya' think I fell off planet Earth?  I have been MIA for a few weeks, and I apologize.  I wish I had an excuse other than ~ life.  But I don't.  For some reason the holidays sent me into a whirl wind of deadlines, and I'm drowning in them.  I don't even have my Christmas tree up.  The lights aren't hung, no wreath on the door, and I haven't even started wrapping presents.  ugh!
Today, I am wrapping a few presents, making a rich, creamy cheesecake, home-made marshmallows, hand-ground cocoa (for hot chocolate), and finishing a Christmas glass ornament.  All before 1p.  Because, we have to load up the truck with all of these goodies, and drive into town for a holiday luncheon @ 2p.  
But, before I get started in the kitchen, I wanted to share a flip-top calendar I made for a super special gal pal - Sue.  I used a collection of products from different companies: Maya Road, Fancy Pants, the Twinery, and Paper Trey Ink.  So, without further ado, here are a few photos:

January, February, March, and April

May, June, July, and August

September, October, November, and December

My little secret to creating a cohesive-looking project made with products from several different companies, is simple: use the products throughout the whole project - repeat!  I know that sounds easy, but just keep repeating the same products.  For example, I used one package of the kraft doilies.  I used a doily as the matt for each month circle.  I used a whole package of these beautiful little blue glass-like flowers - one on each page.  When I used the twine and fabric flower, I used the same color regardless of the month.  I used pattern paper from the same collection, so each page coordinates. I used almost a whole package of these decorative kraft journaling tags.  I used almost a whole page of stickers, that coordinates with the pattern paper collection. I used two coordinating strips of dyed burlap trim.  I used half a package of chipboard accent pieces.  My only random pieces are white clay embellishments that I made, fabric banners (3), decorative stick pins, two resin birds, an arrow clip, a chip board butterfly, a small ruler, and a house bingo piece.
Ok, I need to get in the kitchen.  I am hopeful that I will remember to photograph my cheesecake, marshmallows, hand-ground cocoa, and the glass ornament.  But, as you know, sometimes I don't always remember to do these things.  Keep your fingers crossed.  And stop by tomorrow.  Because if I remember to use the camera, I will post photos tomorrow {smile}.

Saturday, December 14, 2013

Last Chance Craft Fair


Whew, what a crazy busy week!  I hope you have gotten a chance to start some of your holiday shopping.  I know with Thanksgiving so late in November, it has basically shortened your holiday shopping by a week.  And for some of us, thats precious time {smile}.
But, I have a ray of sunshine and a bit of hope for you!  I am selling my paper crafts at the last Arts and Craft Show today! @ Eisenhower Middle School, here in Albuquerque, NM.  
Eisenhower Middle School is located @ 11001 Camero Ave NE, Abq, NM.  The school is located on the east side of Juan Tabo, just north of Spain.  Turn onto Camero Ave, and take the last school entry driveway, and drive to the back of the school, ending at the new gym.  
This 5 Star Craft Show is from 9a to 4p.  Hopefully the weather stays nice enough for folks to get out and do some shopping!  Remember, if you received a postcard announcing my craft show schedule, please stop by my booth, and pick up your exclusive holiday craft show gift!

Tuesday, December 10, 2013

Coffee and Friends

I hope you have gotten a head start on your holiday shopping.  I have, and I have most of it done.  However, I still feel 'behind'.  I don't know why.  Maybe its because I saved the hardest few people for last, and I don't have any idea what to get them.  It's a struggle.
Today, over @ Nacho Average Challenge they have a creative sketch challenge for you to try.  I love the simple lines and the large degree of potential.


here is what I created


I used soft suede card stock as my card base.  I like the soft, creamy brown color.  I used soft sky card stock for the main panel.  I used the Postcard stamp set to create the postcard, and inked it in soft suede classic ink.  I used Sweater Weather DSP for the trio of banners, and for the coffee cuff.  I just love the soft cozy colors and patterns in this collection {smile}.  I did a quick and not straight machine stitch along the left end of the banners.  I added a few pearl jewels, to help soften the whole look.
I used the Perfect Blend stamp set, for the main focus of the card.  I am a huge fan addict of coffee, so it only seems fitting to have coffee with and for everything.  I stamped the to go coffee cup in soft suede classic ink onto very vanilla card stock and then used my detail scissors to fussy cut it out.
I created a button for the coffee cuff out of clay and the button & blossom mold.  I stamped the sentiment in chocolate chip classic ink, where the address goes.   I created my postage stamp with daffodil delight classic ink, and the Postage Due stamp set.
Thank you for stopping by.  Now, it's your chance to create something wonderful using our sketch @ NAC.  Can't wait to see what you create!


Friday, December 6, 2013

Trio of Blossoms

Happy Friday!  Well, it's time for another sketch from Sketch Frenzy Friday.  Tammy, is the designer of this weeks sketch.  I have to admit, I welcome a clean and simple sketch.  This cold is really kicking my butt.  I can't seem to focus, or concentrate too long.


I copied the sketch literally.


I used Pool Party DSP for the main panel.  I just love polka dots!  Instead of a top note shape, I used half a doily.  I stamped the blossoms from the Fabulous Florets stamp set, in Versa Mark ink, and heat embossed with white embossing powder on shimmer white card stock.  I used my aqua painter and pool party re-inker to water color the blossoms.  I used my detail scissors and fussy cut them out.  
I used silver glitter paper and the leaf die to create the foliage.  
I wrapped Pool Party seam binding around the card front and tied a simple bow.  I wanted to jazz up the bow, but nothing I had or thought of, worked.  So, its left plain.
I wanted to add a sentiment, so I made a thin banner.  For the sentiment, I stamped some words from the Gifts of Kindness stamp set.
I did add a single pearl jewel to the center of each blossom.
Thank you for stopping by.  I hope that you have been inspired to play along with us @ SFF.  We would love to see what you create with our sketch, this week!


Thursday, December 5, 2013

Christmas Ball Dome

~ photo heavy post ~

Howdy.  Welcome to my little piece of blog-land.  I have been sick for a few days now.  I think its just a cold.  But, I have to admit, I feel horrible.  At times I'm freezing, and then I'm dripping with sweat.  My nose won't quit running, and my throat feels like its on fire.  
I don't have time to be sick.  I have obligations, chores, and deadlines to get to.  My children are grown, so I don't have to watch children.  But, my dog Sasha, needs to go out.  She loves her walks, and she needs play time.
I took a bunch of medicine this afternoon.  I had to get some things together for a holiday celebration this evening.  I won't have time to jet home before the party, so I had to get everything together this morning, before I left for work.

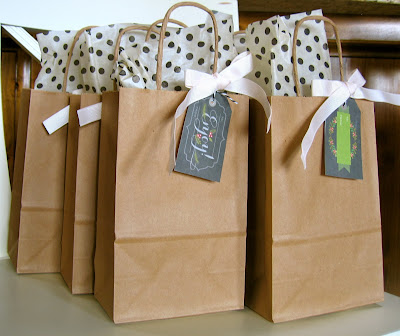
A wonderfully charming lady makes lotion and soap from her goat's milk.  The lotion is fabulous.  It's silky smooth, without a greasy feeling/residue on your hands.  The soap is just as great.  Rebecca makes two scents.  One has a subtle spice, the other a subtle almond scent.  So, I purchased 12 lotions, and 12 soaps (6 of each scent) for my Bunco ladies.  I plan on letting them select their own preference.  To keep the two scents separated and so I don't mix them up, I packed each scent differently.  
I'm a big believer in reuse and up cycle.  So, I made the packaging simply, for a non specific holiday, and no gender.  I didn't sign the tag, incase the recipient needs to use that too.

Moroccan Spice
Almond Biscotti
 We are also celebrating our Christmas party, tonight.  We select a name, and then you provide a gift.  A secret Santa, so to speak.  Well, since I have been ill, I haven't had a chance to go shopping.  So, I made my gift.  I created a Christmas ornament.  I used a glass ball dome by Melissa Frances.


close-up of glass ball dome ornament
For the gift bag, I added a multi-ribbon bow with two painted and glittered jingle bells tied with white bakers twine.  I added a blue sparkle tissue paper, to provide the ornament with some cushioning.


close-up of the multi-ribbon bow
Well, thank you for stopping by.  I hope that you have been inspired to create something wonderful, for someone wonderful in your life {smile}.


Wednesday, December 4, 2013

Simple Christmas

Welcome.  I haven't been feeling too well this week.  So, this will be short.  
I am playing this week with Mojo Monday.  They have a simple sketch this week, and I just don't' have the energy to add to many extra pieces.
the sketch


here is what I made


I turned the sketch 90 degrees.  I didn't do any stamping.  I used pattern paper from Authentique.  I used their new holiday collection: Glistening.  I love the kraft and cream snowflake pattern paper, and the aqua circle/star pattern paper.  I used pool party card stock and soft suede card stock for this card.  I wrapped some aqua mist satin ribbon around the card front and tied it into a simple bow.  I added some crackle paint to the rim of a kraft button and dunked the button in dazzling diamond glitter, while the paint was wet.  I tied the painted button to the center of the bow with cream twine.
The sentiment piece, is actually a digital piece.  I used foam tape to adhere the sentiment piece to the front of the card.
Easy peasy.  No fuss.  Thank you for looking.  I hope you get a chance to play along with their challenge.  It's the first one of the month, so it is a prize challenge.  Good luck.


Tuesday, December 3, 2013

Sew Creative

Welcome back, for another look at a card I have created.  The lovely ladies over @ Nacho Average Challenge have a beautiful color challenge for you to work with, this week.  I always struggle with color challenge.  But, as you can see, the colors for this challenge are more my style, so it was a bit easier.


here is what I created


I started with a card base in Island Indigo card stock.  I used the same sheet of pattern paper from the Etc DSP collection.  One side, as those beautiful calypso coral polka dots, and the other side, pool party seamstress-ledger pattern.  I added a quarter of a tea doily to the side of the banner piece.
I used Creative Elements stamp set to create the 'label' and sentiment stamped cluster on the lower left side of the card.  I stamped the label in island indigo classic ink.   I stamped the sentiment in basic black classic ink.
I used Notable Notions stamp set, to create the buttons and button card.  I stamped the button card in island indigo classic ink, onto very vanilla card stock.  I used my detail scissors to fussy cut this piece.  I stamped the large button in calypso coral classic ink, and the tiny button in island indigo classic ink.  


To create my 'buttons', I stamped the image onto card stock.  Then I used a 1/2" circle punch and a 1" circle punch, to punch 3 circles out of the chipboard that accompanies each DSP packet.  Stacking the circles, I used my tape runner to 'hold' the circles together.   I adhered my punched, stamped image to the top of each stack. 
I also used dimensionals to pop up the button card.  I didn't want my card to look too 'flat'.  Finally, I tied a piece of pool party seam binding into a simple bow, at the top of the button card.
Now, it's your turn!  Let's see what you create with our colors this week @ NAC!


Monday, December 2, 2013

fluffy bites of heaven

I love to cook bake.  I really mean it.  I'll find a recipe that just sounds wonderful and head straight for my kitchen and make it.  My husband loves it, too.  His waist band, not so much.  (We won't discuss my waist band.)  Now, not to toot my own horn, but I'm pretty good at it, too!  My friends always ask me to take pictures of what I cook, and sometimes most times I forget.  Well, not necessarily forget, I just get too excited to taste my creation, that I don't reach for a camera, but rather a fork.  I'm working hard at trying to correct this habit.
Anyways, the reason I'm rambling about baking, is, I see this commercial on TV, asking, 'if you could do anything, and someone would pay you, what would you do?'  Folks answer, 'open a book store', 'pie maker', 'gardener', 'architect', yada yada yada.  You get the picture, right?  Well, this guy goes on to tell you that, that is what retirement is for.  Ok, not to be a negative Nancy, but that's not realistic.  Who do YOU know, who is retirement age (65/+) who is able to start a new career, or 'work' their dream?  Me, I don't know anyone at that age, who can physically do their dream job.  My mother, for example, is in her late 60's.  Recently retired.  Her dream job was to have a dog grooming business.  My mother, is in no physical condition to be on her feet 12 hours a day, hunched over a tub washing dogs.  I don't want to wait another 20 years, to pursue my dreams.  I hate that commercial.
Ok, I guess I'm rambling.  I have a dream, and yes, it is fueled by my passion to bake.  I want to have a food truck.  Crazy, huh?  But no.  I'm serious.  I don't want any food truck.  I want a vintage-style food truck.  You know, that soft bluish-green, with white trim.  Totally cute.  A cute little awning over the service window to provide shade, when you are placing your order.  But, I don't want to serve lunch.  Oh no!  I want to sell you a cupcake. And not just any cupcake.  But an original cupcake.   I want to sell cupcakes and frostings/icings separate.  So, YOU can select what icing you want on your cake.  I'll provide daily specials, like Chocolate birthday cake, with double-chocolate buttercream icing.  A red velvet cake with cream cheese frosting.  But, it will also give you the freedom to mix and match.  Why not have carrot cake with a vanilla-bean buttercream icing, instead of the traditional cream cheese icing? 
My passion for baking has fueled a dream.  I even have a name for my little business.  (It's a secret, until I can 'purchase'/license the name).  I know I want to package my custom cupcakes in pink pastry boxes, with my logo embossed in silver.  

So all this talk about baking, has lead me to grab my camera, (instead of a folk), to share with you what I made.  


I found another recipe for home-made marshmallows.  I say 'another' recipe, because I have made these before, a few times, with horrible results.  I almost gave up on this treat.  But, I'm pretty stubborn.  And, I am super happy to have found a recipe that is workable, and comes out as planned.
All I have to say, is, 'these are delicious!'  So, if you are a regular recipient of my home-made goodies at Christmas time, keep an eye out for a package of these fluffy bites of heaven, to be in your 'goodie-box' along with some blended double-chocolate cocoa.  Because what is better, than a mug of deep, dark, rich cocoa topped with a home-made vanilla-bean marshmallow?  Not too much.
Thank you for stopping by.  I know that this is a crazy, busy time of the year, and I'm glad that you stopped by.  Be safe.  Until next time, happy crafting, whatever that 'craft' may be: sewing, baking, paper crafts, wood-working, canning, cake decorating, etc.  {smile}


Sunday, December 1, 2013

Countdown Begins

December first!  WOW!  If you haven't started your holiday shopping, you better get a move on!  Black Friday is behind us, and Cyber Monday is quickly approaching!  Ugh, tomorrow!  So, this will obviously be short.
If you are new to my little space in blog-land, then let me start by saying, 'I love paper.'  All paper.  Pattern, solid, printed, digital, water colored: all of it!  I love to make things from paper, with paper, and add paper embellishments.  
I also love creating for holidays.  Christmas is my number one holiday, that I craft for.  Valentines Day is second.  But lets stick with Christmas.
A very sweet, and wonderfully talented lady teaches paper crafting at a local craft store, in Albuquerque, NM.  We have been friends for over 4 years now.  And I love her like a sister.  She is super funny, a great listener, very crafty, super easy to talk to, and we always have a blast together.  Anyways, she taught a class last month on creating a 'countdown calendar' of sorts.  I took the class to  support her, spend time with her, and to make a countdown calendar.    Everyone in the class was able to select their paper and ribbon, to create our own beautiful 'count down' calendar.  
Anyways, I want to share what I made, basically because I love how wonderful it turned out.  But also, because I need a bit of motivation to finish my holiday shopping {smile}.

the numbers flip to countdown the days

Now, for those who know me, I have an infinity for pink.  So, they will be shocked that I created something so 'dark' and totally LOVE it!  But, it is my 'style':  a bit shabby, a bit sweet, and a bit girl-y.  Just no pink {frown}.  It lives on our mantel in the living room.  So the colors work wonderfully with our space, and I have to say, I really do love it, even though it's not pink.  I am really happy with how the green and grey work so well together.  Anyways I digress.  No advent calendar.  But, a super creative way to countdown till Christmas!   
Let me know how you 'countdown' to Christmas.  I'd love to hear about you {smile}.