Showing posts with label postage due. Show all posts

Tuesday, December 10, 2013

Coffee and Friends

I hope you have gotten a head start on your holiday shopping.  I have, and I have most of it done.  However, I still feel 'behind'.  I don't know why.  Maybe its because I saved the hardest few people for last, and I don't have any idea what to get them.  It's a struggle.
Today, over @ Nacho Average Challenge they have a creative sketch challenge for you to try.  I love the simple lines and the large degree of potential.


here is what I created


I used soft suede card stock as my card base.  I like the soft, creamy brown color.  I used soft sky card stock for the main panel.  I used the Postcard stamp set to create the postcard, and inked it in soft suede classic ink.  I used Sweater Weather DSP for the trio of banners, and for the coffee cuff.  I just love the soft cozy colors and patterns in this collection {smile}.  I did a quick and not straight machine stitch along the left end of the banners.  I added a few pearl jewels, to help soften the whole look.
I used the Perfect Blend stamp set, for the main focus of the card.  I am a huge fan addict of coffee, so it only seems fitting to have coffee with and for everything.  I stamped the to go coffee cup in soft suede classic ink onto very vanilla card stock and then used my detail scissors to fussy cut it out.
I created a button for the coffee cuff out of clay and the button & blossom mold.  I stamped the sentiment in chocolate chip classic ink, where the address goes.   I created my postage stamp with daffodil delight classic ink, and the Postage Due stamp set.
Thank you for stopping by.  Now, it's your chance to create something wonderful using our sketch @ NAC.  Can't wait to see what you create!


Sunday, November 24, 2013

Black and Tan

First let me thank all of those who have sent warm wishes to a speedy recovery. Thank you! your thoughtfulness has really touched my heart {smile}.  
I did get a chance to finish my card for uhm, last week's color challenge over @ Nacho Average Challenge.   Basic Black, Crumb Cake, and Soft Suede.


If nothing else, that mishap in my life has really made me thankful for what I have: family, friends, and a desire to get back on my feet, as well as a well stocked craft room.  So, without further ado, here is last weeks card.  My apologizes for the tardiness.


I finished my card yesterday.  But, I can't get my photoshop program to open, so I can't add a water mark.  So, this image is 'naked'. heehee.
I hope everyone has been inspired by the super talented team @ NAC.

And on another note, my Etsy shop is now open!  I have added several clear mount and wood mount stamp sets!  If ordering between 11/24 and 12/24, and you purchase $25/+ in products, use coupon code: BLACKFRIDAY, to receive free shipping!


Friday, October 18, 2013

Whew, it's Friday!  and I can now take a breath and focus on just crafting!  It's a true fun filled weekend for me.  It's the first day of the fall rubber stamp retreat.  Yep, three days of non stop crafting.  Your choice of what you craft, you bring what you want to work on.  Un-interupted crafting time, no chores to get done, no meals to make, no dishes to wash, and no children to take care.  
But, before I get my craft supplies loaded into my car, and start a weekend filled with girl time, laughs,  no sleep, and crafting, 
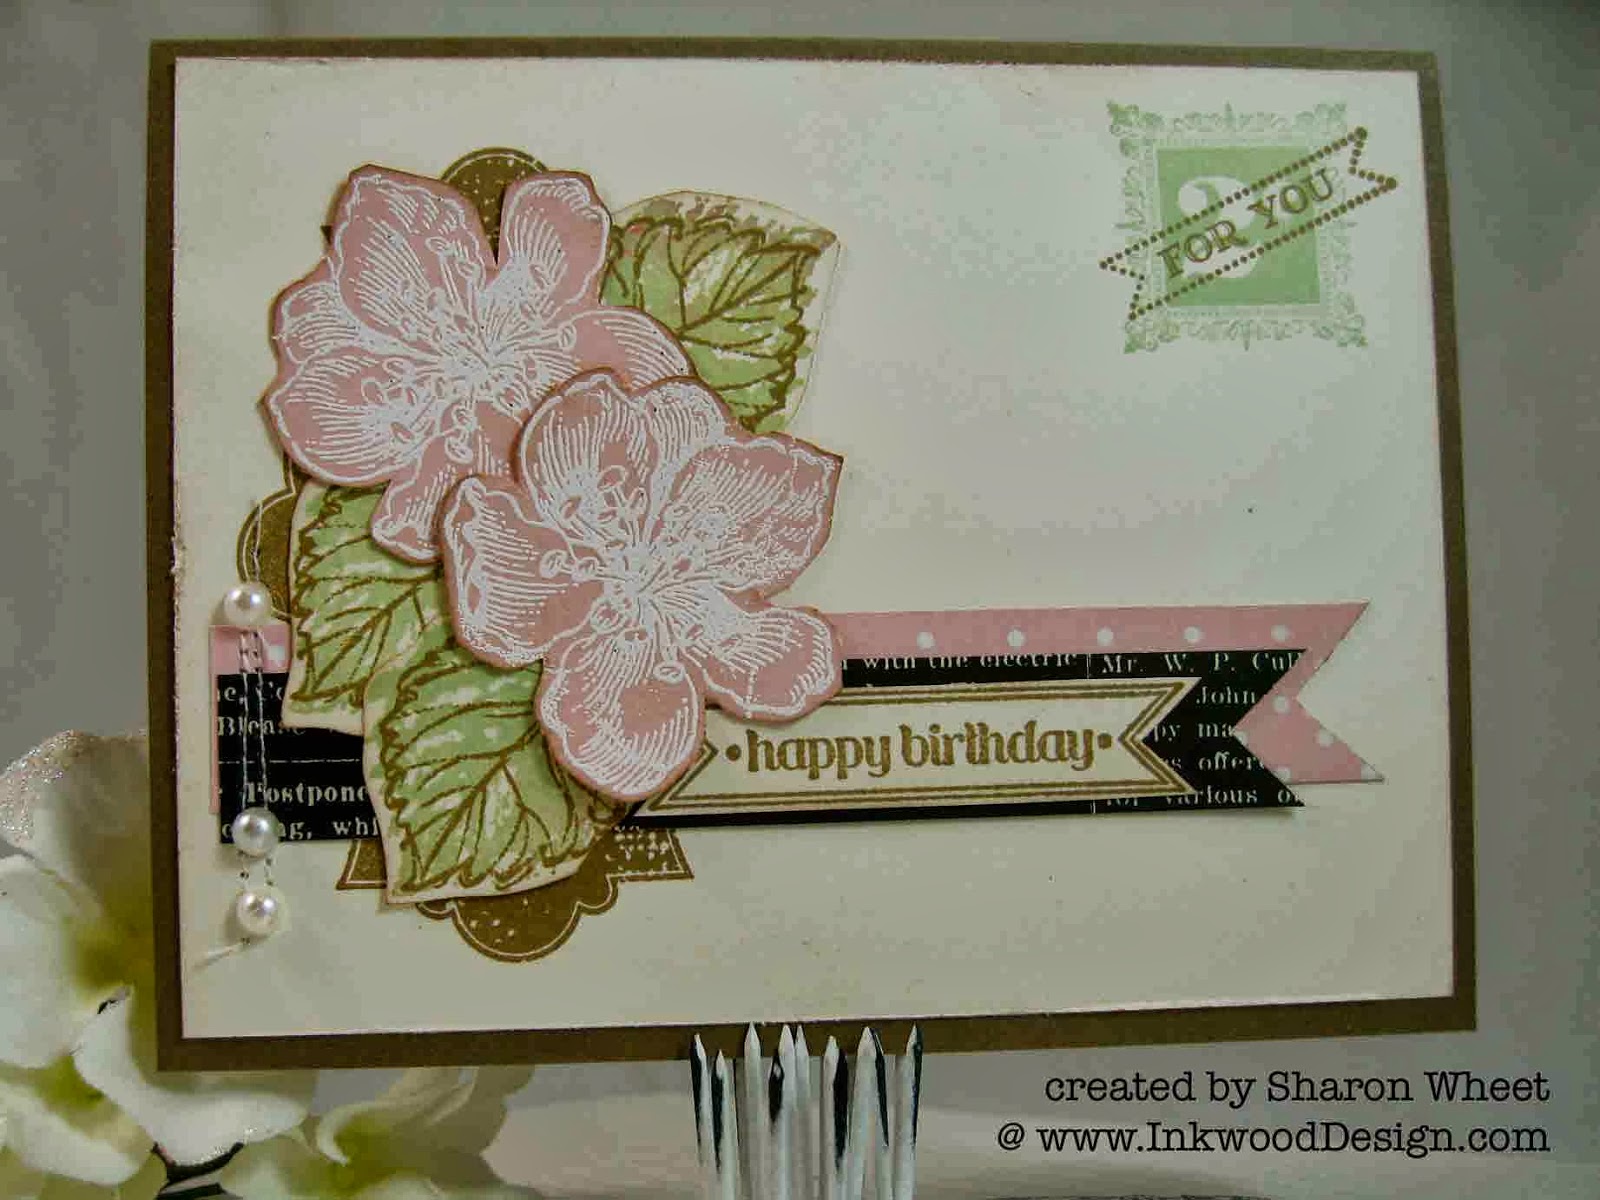
I wanted to share a card I created for the latest sketch @ Sketch Frenzy Friday.  Kim is this week's designer of the sketch, and I have to say, Kim did a fabulous job creating a very user friendly sketch.


and here is what I created


For this card, I tried to keep it pretty flat.  So, it could be mailed easily!  I used a few different stamp sets to create this card.  I stamped the label piece, from Everything Eleanor in baked brown sugar.  I then stamped two blossoms with versa mark ink, onto pink pirouette cardstock, and then added white embossing powder.  I heat embossed the blossoms, and fussy cut them with scissors.  For the leaves, I used the Gently Falling stamp set.  The leaf outlines were stamped with baked brown sugar, and the body of the leaf was stamped with pistachio ink.
I cut two banner pieces out of a few scrap pieces of patten paper.  I added a few lines of machine stitches to add a little home-y touch.  and then a few pearls.  
For the sentiment, I stamped a postage stamp and a itty bity banner piece.
I hope that you get some inspiration from the design team.  We really have quite a few different crafting styles.  I hope that you get a chance to play along with us this week @ SFF!

Tuesday, September 10, 2013

#54 notes

Welcome.  The lovely ladies over @ Nacho Average Challenge have a color challenge this week.  And, I really struggle with color challenges.  Don't really know why, but they always throw me for a loop.  I first look at the colors.  Then decide what I think of when I see the colors.  Try to figure out what Stampin' Up! products I have to create what I think of.  And then try to put it all together without looking blah.
here are this week's colors:


and here is what I created:


When I saw the colors, the first things I thought of were green foliage, blue blossoms and using soft suede for the sentiment and distressing.  (I also used my distressing tool to all the edges.)
Island Indigo is not a widely used color for me.  And so, I have very limited card stock.  But, I do love the soft gentle green color of pear pizzazz.
I used the postcard background stamp and soft suede classic ink to create the main panel.  And that led me to the idea of creating an old mail correspondence.  Something you would find in your grandmothers attic.  vintage, pretty, and delicate.  (I hope I succeeded in that.)
I wanted to add some type of writing, so I inked the text stamp from the background builders stamp set and masked the borders of the post card.
I made a postage stamp with the postage due stamp set, and pear pizzazz classic ink.  I used the postage stamp punch to create the 'torn' edge.  I adhered the stamp the to postcard front with a dimensional.
I matted the postcard to my last scrap of island indigo cardstock.   I adhered a doily half to the postcard.  I used very vanilla seam binding and dyed it with pear pizzazz re-inker.  I wrapped the dyed seam binding around the center of the postcard and did a zig zag stitch with my sewing machine.  I tied a multi-loop bow with some of the dyed seam binding.
To create the blossoms, I stamped the floral images in island indigo classic ink onto very vanilla cardstock.  I used the flower shop punch to create the blossom images.  I wanted to add some interest to the blossom centers, so I made some buttons out of clay and used the blossom and button mold.  I adhered the clay buttons to the paper blossom centers.  I adhered the blossoms to the front of the post card.
I was thinking about tucking a sentiment label within the seam binding/blossom clusters, on the front of the post card.  But, I couldn't think of what to stamp, or where exactly to add the label.
Well, thanks for taking the time to see what I have been creating.  I hope this new design team has inspired you to play along with us @ NAC.  I'd love to see what you create with this week's colors!


Tuesday, May 21, 2013

Thoughts of Pink

Busy, busy, busy.  But who isn't these days.  I know I'm busy, so I can only assume you are too.  We all have families, work, chores around the house, errands to run, and well, it's hard to carve out some free time to do what you love.  Me, paper craft.  So, let's get some inspiration moving!
The ladies over @ Nacho Average Challenge have a wonderfully creative sketch for you to try this week.  And here it is:


when I first saw this sketch, I was at a lost.  But then, I really 'looked' at it.
here is what I came up with:


I hope that you recognize the paper blossom that I made.  It is a 'Dream' blossom.  I made quite a few of them in the last week.  And they are super fun to create.  I made several different ones and are available for purchase in my Etsy shop, here.  I am also working on an E-book for Amazon Kindle.  
The card base is soft suede cardstock.  The main panel is pink pirouette.  I used the very vintage wheel inked in pink pirouette classic ink, and ran the wheel across the front of the card.  I'm not a fan of 'white' space and 'flat' cards drive me crazy.  I knew that I wanted some text embossed on the front of the card.  but my background stamp in vertical. This card is horizontal.  UGH!
I inked half the stamp with versa mark ink and stamped half the card front.  I did the 'finger tap' technique, so the words would be random.  Then I inked the stamp again with versa mark ink and stamped the other half of the card front.  repeated the same technique.  I used white embossing powder and my heat gun to emboss this panel.
I wrapped a piece of first edition dsp around the center of the card front.  I made my sentiment piece a banner and used foam tape to elevate the sentiment off the front of the card.
For my two half circles, I did round clusters.  The left side is actually a paper 'Dream' blossom and a postage stamp.  The right side is two multi-loop bows and a ticket.  For the multi-loop bow bundle, I created two multi-loop bows, one very vanilla, and one dyed with calypso coral re-inker.  I threaded some white bakers twine through a facet button and tied the two bows together.
I just love this color combination together.  Now, lets see what you create!  Join us @ NAC!


Saturday, May 11, 2013

Remember this . . .

time well spent.  
That is a wonderful memory that makes you feel warm, loved, and truly happy.  The kind of happy that evokes a smile inside out.  Few things in life give me this.  My children/grandchildren are the first things that come to mind.  I believe that it is their innocence.  Their thirst to experience life.  My dog, Sasha, is a running second.  I have to admit, its this 'unconditional love', that feeds my soul.  It gives me a feeling of calm and the courage to 'spread my wings'.  It's from this passion that motivates and inspires me to create. 
With Mother's Day right around the corner, ok, tomorrow.  I'm sure you have a memory that makes you happy, proud to be a parent.  Whether its the first time your child rode their bike without training wheels, their first ballet recital, their first time in a T-ball uniform, their first 'A' on a spelling test, or any other wonderfully sweet exhibit of their independence.  These milestones are actually stepping stone in parenthood.  Because your love started when their first breath took yours away!  Now, you need to nurture their desires, their interests, their passions, their independence.  Help them become responsible, loving, mature people, who have a passion, an interest, a goal.

The talented ladies over @ the Shabby Tea Room have a beautiful challenge this week.  The inspirational photo has a collection of stacked soft, neutral blankets in a wicker basket.  They ask that you also use some dry embossing and stitching to help add some texture.
Here is their inspirational photo:


This inspirational photo, stirred these parental feelings in me.  The different textures, the ruffles, the stripes, the crispness of the wicker, the contrast of the white numbers.  A collection of 'life', so to speak. 
This photo brought memories of my daughter.  I know that just sounds crazy.  But, this stack of blankets are 'her'.  She is a warm and compassionate woman to her friends.  A loving and patient mother to her children (she has 3, with one on the way).  A best friend and partner to her husband.  And a wonderfully warm, kind, and funny person to everyone who interacts with her.  She values her family, and is grateful for her blessings.  So, her Mother's Day card was made with this inspirational photo.  
here is what I made:


This collage is the result of the inspiration photo.  All the different elements make me think of her, my daughter.  The dry embossing comes from the Vintage Wallpaper embossing folder by Stampin' Up!.  I sewn a border around the card front with my sewing machine.  I find the hum of the machine soothing.

I used two different neutral floral pattern papers: the rectangle with the glitter photo corner, and the matt behind the black pattern paper on the doily.  The floral pattern paper shows how she isn't exactly a girly-girl, but still very much a woman.  
The mini post card is actually a digital download, from Ephemera's Vintage Garden: little blackbirds, found here.  It represents her love for keeping in touch with family and friends.
The clock image, is hand-stamped onto a piece of a balsa wood sheet.  The stamp comes from Hero Arts: Keeping Time.  The clock represents how time flys!
The 2 cent stamp and the ticket stub, are stamps from Stampin' Up!: Postage Due and That's the Ticket.  These two pieces represent the memorabilia from different family vacations.
The white shabby resin lock, is from Melissa Frances.  The lock with bow represents home.  My daughter does everything that she can to keep a clean, comfortable, and loving home for her family.  
The white paper doily is from Martha Stewart: Doily Tags.  This soft, sweet addition, reminds me of the softer side of this  adventurist mom.
The black and white text paper, is from Prima: Printery Collection.  This is the contrast to the doily.  My daughter is a strict but fair parent.
The butterfly is made with a grey puffy fabric.  The center of the butterfly is made with a floral shape of glimmer paper and a fabric blossom; both by Stampin' Up!  I love the butterfly.  To me, it represents 'change'.  Life is full of change.  So embrace it.  Or it'll run you over.  The fabric blossom represents growth.  My daughter's growth as a young woman, wife, and mother.  This collection is for the sweeter side of her.  She is a strong person, but also tender-hearted.

The two trims across the card front were selected because of the inspiration photo. The mix of textures, fabrics, and neutrals. I added the trio of buttons to represent the way a mother 'holds her family together' with love, praise, and support.
Also, I just love this grey-ish polka dot distressed pattern paper by Glitz.  It looks like fabric, to me.  I thought it paired nicely with the over-all look of the card.
Finally, the sentiment says it all!  This sentiment comes from the Everyday Moments stamp set by Teresa Collins.  'I want to always Remember...'.  I believe that this sentiment is very personal to each person who reads it.  And I didn't want to add a generic sentiment. But rather an unique sentiment to go with an unique, special card, to celebrate Mother's Day!  

Thank you for looking.  I hope I have inspired you to play along with the latest challenge over @ the Shabby Tea Room.  Let the photo help you create something wonderfully beautiful and personal {smile}.
Happy Mother's Day, to all of you who have 'children', whether they are human, canine, bovine, etc.  When we nurture, love and support another, we in turn help ourselves grow.  


~stop-by tomorrow, for a chance to win some blog candy~

Friday, May 10, 2013

Hello Baby

On this Friday, Jennifer is our sketch design artist for the sketch challenge over @ Sketch Frenzy Friday.  Jennifer has created a wonderful sketch.  I think it works for a large variety of paper crafters.  This sketch is very workable if you're a CAS type of gal, or a layering fool (like me) {smile}.
the sketch:

When I saw the sketch this week, the first thing I thought of was to stamp flowers in the opposite corners.  But then, that just didn't seem like 'me'.  The other thing that came to mind, was to use some products that I just love, but are retiring from Stampin' Up! this month.  A way to use things I like before I can't.  
here is what I created:


The card base is made from River Rock card stock.  I love this shade.  It's a neutral that has some green in it.  It looks like a linen shade, to me.  And then I decided to use some pretty soft colors, to help showcase this shade.                                            
The large panel is made from pool party card stock.  I used the distressed polka dot background stamp.  (Another retiring product.)  I stamped the polka dots in whisper white craft ink and white embossing powder.  I heat set the embossing powder.  I sponged some pool party classic ink on the all the edges, and randomly over the embossed polka dots.  I used a kleenex to wipe any ink off the embossed polka dots.    
   
The card base is made from River Rock card stock.  I love this shade.  It's a neutral that has some green in it.  It looks like a linen shade, to me.  And then I decided to use some pretty soft colors, to help showcase this shade.                                            
The large panel is made from pool party card stock.  I used the distressed polka dot background stamp.  (Another retiring product.)  I stamped the polka dots in whisper white craft ink and white embossing powder.  I heat set the embossing powder.  I sponged some pool party classic ink on the all the edges, and randomly over the embossed polka dots.  I used a kleenex to wipe any ink off the embossed polka dots. 
The upper corner has a strip of crochet trim and burlap ribbon stapled to the corner.  I layered a fabric blossom on top of a silver glimmer paper flower.  I stamped the baby ticket and adhered it on top of the ribbon tails.  The pink panel is made from pink pirouette card stock.  I stamped the doily in whisper white craft ink and used white embossing powder.  Heat set the doilies, swiped pink pirouette classic ink across the raised doilies.


As with the sketch, there are two embellishments at opposite corners.  I wanted to make a soft, pretty, sweet card for a baby shower.  So, I didn't want to specify a girl or boy baby.  That's another reason for the pink and blue.  I also selected neutral vanilla-colored embellishments.  I did all the stamping with basic grey classic ink.
The bottom corner has a postage stamp and a ticket.  Both pieces were stamped in basic grey clasic ink onto very vanilla cardstock.  I layered them, and added the button to hide the text.  I tied some white bakers twine through the button.
The sentiment is from the Teeny Tiny Wishes stamp set, in basic black classic ink.  This is my version of a clean and simple card.  It isn't one layer, or 'flat'.  But, it is a pretty basic card for me {smile}.
I hope that we have inspired you to play along with us @ SFF.  We would love to see what you create with our sketch!


~stop by Sunday, May 12th, for your chance to win some blog candy~

Friday, January 25, 2013

thinking of you friend

Another week cruising by at a quick pace.  I really need to figure out how to sleep less, so I can get more done in one day!  EEK!  But, if nothing else, I did carve out a few minutes to give my blog a face lift, so to speak.  I added a new header and the a new post break.  I wanted something with a splash of color, and since red is one of my favorites, I thought, why not!  I think it brightens up this space. {smile}
Today is Friday, and that means another beautiful sketch challenge!  This week, Kim is our sketch designer, @ Sketch Frenzy Friday.  Kim has a way of making interesting and user-friendly sketches. 
Here is the sketch:

Here is what I did:


I started with a piece of Summer Starfruit card stock.  This yellow, is a deep rich color.  
I used some of the new DSP from Stampin' Up!  This pattern paper is from the Sale-A-Bration catalog.  (When you purchase $50 in products, you can select any item from the SAB catalog, FREE!)  I used two different pattern papers from this package of Sycamore Street DSP.  The Rich Razzleberry chevron stripe paper is matted on a piece of rich razzleberry card stock.  
I used two different stamp sets for this card.  The postage stamps are in the Big Catalog,  'Postage Due' stamp set.  The ticket pieces are from the 'That's the Ticket' stamp set.  The images are stamped and then punched with cordinating hand-held punches.
The sentiment is actually two stamps from the 'Teeny Tiny Wishes' stamp set.  One stamp says, 'thinking of you' while the other stamps says, '{friend to friend}'.  So, to create the custom sentiment, I used my basic grey classic ink marker, and 'colored' each word before stamping. I will let you in on a little secret: to get the words lined up, just so, I used a Stamp-a-ma-jig.  This amazing positioning tool allows you to stamp just where you want to, without second guessing.
I lightly sponged the edges of the postage stamps and tickets with basic grey classic ink.  I wanted the borders of the tickets and stamps to have some definition.
To add a little eye candy, I tied some white bakers twine thru a Sycamore Button and used a glue dot to secure it to the front of the card, at the top, with the cluster of stamps and a ticket.
Thank you so much for stopping by!  I hope that you have been inspired to play along with us @ SFF.
This card will not be for sale in my Etsy shop.  Rather, it is going in the mail for a very dear friend.  I missed an important date with her, and I really need to make it up to her.  So, I am sending her a hand-made card done in bright, cheery colors to brighten her day, and to say 'I'm sorry'.

Friday, August 24, 2012

Postage Due

Happy Friday!  I'm happy its Friday, but I have a busy weekend, so I don't get a break yet!  But for this Friday, we have another blog hop over @ Sketch Frenzy Friday.  Tina, is our hostess this week.  And she has a clever and very user-friendly sketch for you to work with.  We hope you get some inspiration from the blog hop, but don't let us limit you!

Here is Tina's sketch:

here is what I did:


I just love working with sketches that have a lot of potential!  and by potential, I mean super easy to work with, and with a bit of wiggle room.  I don't want a cookie cutter sketch.  Let me get creative!  We want to see you get creative!  And Tina, pretty much has done that, with this sketch.  Love the empty space for me to fill, or leave blank.  Let me select the receptive image!  May it be flowers, tickets, buttons.  The possibilities are endless.  So let me decide what I want to work with.  Or use what I have.
I started with a crumb cake card stock.  I took a scrap piece of textured pool party card stock and used my vintage wall paper embossing folder with it, to give it a design on top of the texture.  I distressed the edges with my white craft pad.  I had a scrap piece of the real red polka dot DSP (summer smooches dsp), so I used the scallop edge punch to create a little flair to that piece.  For my 'row of multiple objects' I used postage stamps.  I inked the stamps with soft suede classic ink and stamped on to very vanilla card stock.  I used the postage stamp punch to create the decorative edge.  I applied foam tape to the back of the postage stamps to give them a little lift off the front of the card.  But, this card was missing something.  A flower, a button, something with pizzazz.  So, why not a multi-loop bow?  Using pool party seam binding.  But, it needed something else.  So, I tied on a real red button with some linen thread and created a bow with the thread.  I used a glue dot to attach the bow to the card front.  My sentiment is stamped in soft suede classic ink, towards the bottom of the card.
Hope this has inspired you!  And, continue on our blog hop and see what Tammy F. has created!

Wednesday, June 20, 2012

Kraft Postage

The creative ladies over @ Stampin' Queens Sketch Challenge have a wonderful sketch this week.  You are free to flip, rotate, or mirror the sketch.  What I found funny interesting, is that at least three of us used the same stamp set, just differently!  We aren't promoting you to purchase this stamp set, or doing a feature on this stamp set.  Think of it, as more options, if you ever considered purchasing it.  :)
Here is the sketch:


And here is what I created:


The card base is made of crumb cake (kraft) cardstock.  The main panel is very vanilla cs.  I stamped the collage stamp in crumb cake classic ink on the bottom 2/3 of the vanilla panel.  I used the postage stamp punch to cut the first edition dsp.  I cut 1" x 1" square very vanilla cs and stamped various objects and text using crumb cake and early espresso classic inks.  I made my own little collages, to keep with the theme of the larger stamp.  I crinkled some very vanilla seam binding and tied it around the top third of the card.  I tied a clear vintage faceted button onto the seam binding knot with some twine.  
Here is a close-up of the vintage faceted button & tiny tag:


Hope you get a chance to play along with us @ Stampin' Queens Sketch Challenge.  We'd love to see what you create with this fabulous sketch!