Showing posts with label Teeny Tiny Wishes. Show all posts

Tuesday, March 15, 2016

Happy Birthday Mom; Card

Hello, and Happy Birthday Mom!  I made a birthday card a few weeks ago, and have kept it under wraps.  My mom reads my blog.  {smile}  The birthday card I made, is, yeah, for my mom.  Her birthday is actually today.  So, I can 'share' my creation with you today.  My mom's Birthday card will be in her snail mail box today!  Sure happy and sure excited for her!  Because who doesn't love snail mail that isn't a bill or some junk mail [that doesn't even make it in the house]. {smile}


Ok, this card is an A2 size card: 4 1/4" x 5 1/2".  Love this size!  So, let's get right to business, so you know how I made it, and you can use some of these techniques yourself.
For the card base, I used Wisteria Wonder card stock by Stampin' Up!  It's a beautifully heavy weight card stock.  I used a light weight card stock by Amuse Studios in Taupe for the matt.  I used three different, but coordinating pattern papers from Tilda for the card.  I added a pale grey blue floral pattern paper for the main panel.  I added a darker blue tiny floral pattern paper and a pink leaf pattern paper.  [I matched the pinks in the blossoms when selecting the pattern papers.]

I used the edge of my scissors to rough-up the edges of the paper panels.  I did sponge some kraft ink onto the edges to help convey the 'time' or 'age' of the card.  I also used the edge of the scissors to create the 'rip'.  I added a polka dot pattern paper in that area.  I wanted something contrasting, but coordinating.  {smile}
I added a purposefully sloppy double border with my sewing machine.  [I love this look.]  I added some sponging on top of the stitching, to help them 'pop'.  
I had a scrap piece of white cotton trim that was tea dyed, so I stitched that piece onto the front of the card too.  
I strung kraft twine through a trio of lavender moon vintage buttons by PaperTrey Ink and adhered them to the pink leaf pattern paper.  I kept the twine long on purpose.  
The TAG:  this is the focal piece, and one that I'm super happy with {smile}.  I used a scrap piece of taupe card stock for the tag base.  I tied a small piece of wisteria wonder seam binding through the hole, but wanted something more.  so I added a bow tied with lavender thin tinsel.  I love how it adds some sparkle and softness to the over-all whole look of the card. {smile}

My sentiment was created with heat embossing and simple stamping.  I stamped the sentiment in versa mark onto vellum card stock and added silver embossing powder and heat embossed.  I just love how soft and elegant the silver embossing looks.  I used the hand script stamp set by PaperTrey Ink.  I added my adhesive to the back of the vellum piece where the sentiment is to help 'hide' the adhesive, which can be seen through this semi-translucent card stock.  I stamped the 'happy birthday' onto whisper white card stock in basic black classic ink, using Teeny Tiny wishes stamp set by Stampin' Up!.  Then I fussy cut the sentiment and adhered it to the vellum piece.  
I added a gift card to the inside of the card.  That way, my mom can celebrate HER day, anyway she wants: shopping, dining, relaxing at the spa, or simply going to afternoon tea with girlfriends.
Happy Birthday MOM!  I hope your day is fabulous and you get a chance to do what your heart desires.  Love you!
Thank you for stopping by and taking a moment to look at what I have been creating!  Enjoy your day! and come back soon.  I'll be sharing more.


Sunday, February 7, 2016

This & That, Photo, and Valentine; Card

Howdy.  I am sharing with you a card I made last night.  And I didn't get a chance to photograph it, until this morning.  I am using some new pattern paper from Echo Park.  These pattern papers are not Valentine Day themed, but I thought they worked very well for this card.  {smile}
I am entering three different creative challenges with this card.  Please check out the challenge host sites for a ton of inspiration!
My first stop was Really Reasonable Ribbon Challenge #134 - anything goes.  These lovely ladies use ribbon on everything!  How fabulous is that!  And I am a sucker for some beautiful ribbon, and it is one of my 'standards' on a paper craft.  
My next stop was Just Us GirlS Challenge - WORD week: Valentine.  They ask that you keep it nice and simple.  I love this challenge blog, because the design team has so much inspiration, that they will entice all crafters to play along.  Now, if you know me, I don't really do 'simple'.  But this card is pretty 'simple' for me {smile}.   this card was selected as the winner,  for their word week challenge #329.

And finally, my last stop was Mojo Monday Sketch Challenge #433 - Contest Week.  Because lets just face it, they have some very user friendly sketches!


Ok, without further ado, here is my entry:


Recipe:  I used Basic Grey card stock by Stampin' Up! for the card base.  As you know, they make some wonderfully sturdy card stock for this type of project. {smile}
I used a solid paper from Echo Park for the main matt.  I wanted a color that matched perfectly, and didn't want to spend time trying to match or getting close to a match, so I purchased the solid color.
The two floral pattern papers are from the same collection 'Photo' from Jenni Bowlin Studio @ Echo Park.  I just love the blossoms, and polka dots, the pinks, and reds, and dark grey.  Beautiful.  
The ruler pattern paper is from the collection 'This & That' from Lori Whitlock designs @ Echo Park.  I just love the mix of fonts and colors of the rulers.  I matted this piece onto a light weight pale pink card stock by Amuse Studios.  
I added a simple machine stitch border.  I just love the look of hand made cards with a bit of machine sewing on them.  
I wrapped this country red gingham ribbon around the front of the card  and added some machine stitching to help hold it in place.  Then I tied the ribbon into a simple bow.
I took at journal card from the Photo collection and cut it down to 2-inch square and matted it with basic grey card stock.  I adhered this piece to the front of the card.  I then used the same reddish solid paper from Echo Park and cut a scalloped edge heart.  I then used a different journalling card from the Photo collection and punched a heart shape.  I adhered the heart to the scallop heart with foam tape.  To help give it some dimension.
I added a deep red paper blossom at the bow, and tied a silver tone key to the bow with some beautiful cream, charcoal, and silver bakers twine.  
My sentiment I hand stamped onto a scrap piece of very vanilla card stock, in Basic Grey classic ink, using the Teeny Tiny Wishes stamp set by Stampin' Up!.  I used a small square punch to create the banner ends, and adhered it to the heart, off center.  
Thank you for looking!  I hope you have been inspired to play along with these challenges!


Thursday, January 28, 2016

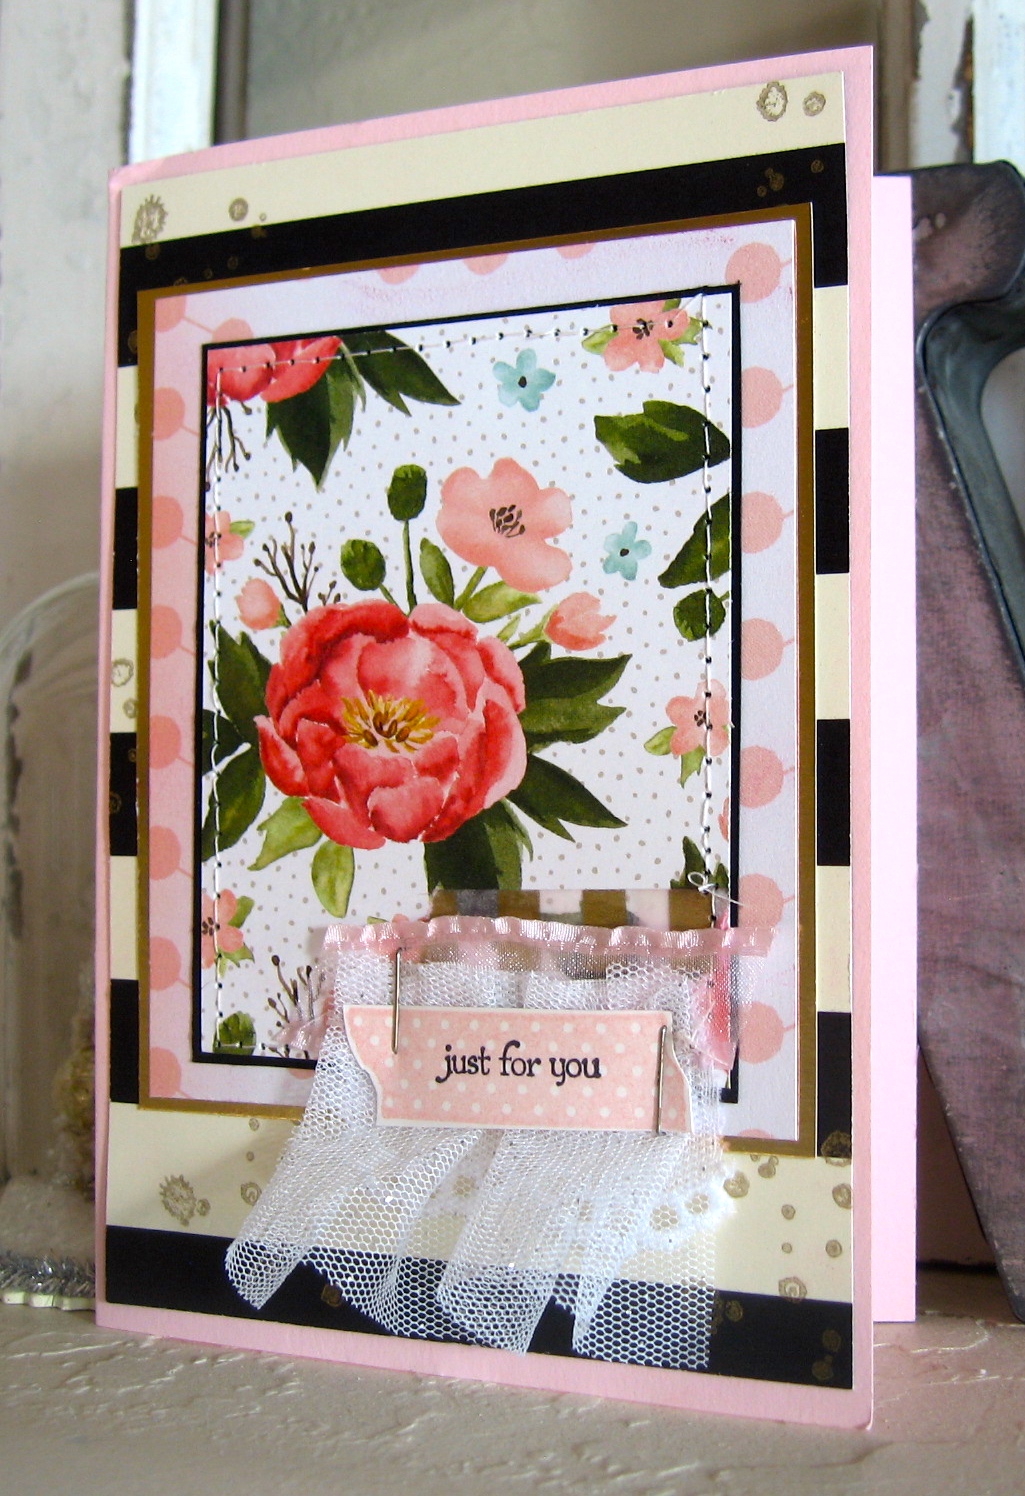
Modern Chic Card

Howdy!  I forgot to post this greeting card over the weekend.  {frown}  And the challenge has already closed.  Oh well.  I need to get a bit more organized.  But I still want to share it with you! {smile}


and a different view


I couldn't really decide which angle I liked best.  So, I'm sharing both with you!  This card is a bit 'flat' for my usual style, but I just thing it's perfect!
Recipe:  The card base is pink pirouette card stock, by Stampin' Up!  I just love this shade of soft pretty pink.  
The black and cream layer is a pattern paper from Stampin' Up! Timeless Elegance DSP.   I did add some gold stamping to this pattern paper.  I used a retired splatter stamp, randomly.
The pink polka dot pattern paper is a scrap piece I had left over from an earlier project.  So I don't remember who makes it.  I matted this pattern paper with gold foil card stock by Stampin' Up! as well.  
Next, I added a scrap piece of Birthday Bouquet DSP, by Stampin' Up!  Isn't this floral pattern paper just gorgeous!  I love it!  It is matted with basic black card stock, by Stampin' Up!  I added a simple border stitch with my sewing machine.  It holds all the layers together.  {smile}

Then, I added layers of embellishments!  First I added a piece of gold and white striped washi tape from Stampin' Up!.  A scrap piece of pink sheer ribbon, a piece of cotton eyelet trim, and a scrap piece of pleated tulle.  
I stamped the 'washi' tape in blushing bride classic ink, using another stamp set by Stampin' Up!  I stamped the sentiment from teeny tiny wishes stamp set, in basic black classic ink and fussy cut it out.  I stapled the sentiment right on top of the trim collection.  I used a gold sharpie to color the staples.  And Viola!
Thank you for stopping by!  I hope you have been inspired to create something pretty, even if it's just for yourself! {smile}


Thursday, April 23, 2015

Roses and Butterflies: Card

Howdy!  I am still working with my vintage spring pattern papers by Maja Design.  {smile}  This pattern paper I selected today, doesn't have pink or aqua colors in it.  Surprised?  It actually has purples, blues, and yellows in it.  The front side of this pattern paper has a faded calendar with yellow birds and April written in blue.  The other side of this pattern paper is paisley print.  
To help me get a direction on the construction of this card, I stopped by the Crazy 4 Challenges, to get a peek at their sketch.  And boy, am I in love with the sketch!  So many possibilities, and the design team did an awesome job with their inspiration.  {smile}


When I first saw this sketch, the circles look like the flowers, buttons, and pleated rosettes.  The white rectangle at the top looks like the perfect shape for a sentiment banner.  And here is what I made:


I made this card for my sweet daughter.  She loves blue.  It's her favorite color.  So, I was a little nervous about the faded color accents of blue, yellow, and purple.  But, I think she will love it {smile}
Recipe:  I started this card with my favorite kraft card stock by Paper Studio.  I just love the color and texture of this card stock.  I used one piece of pattern paper.  I just used both sides of the paper (not too clever, just resourceful).
My design allows me to showcase all three circles.  The large yellow paper blossom occupies the white circle shape.  And then I used a pair of yellow paper roses with leaves to occupy the small upper circle.  Then I added a multi-loop bow of pale lavender seam binding, and a white resin button to occupy the space of the small circle on the right.

I added a wide cotton trim to the left side of the top panel.  I however must confess that I cut my panel too short.  {grimace}
I machine stitched a double border around the center panel, and distressing to help the card look vintage.  I added some brown ink sponging along all the edges, along with a thread cutter and my finger nail to rough the paper edges.
The blossoms and seam binding were very 'clean'.  So, to help distress, I added some white acrylic paint to the blossom petal tips, and randomly on the top pieces of the seam binding.
I cut leaves with two different hand held punches.  I sponged the edges of the leaves with more brown ink.  I added a white butterfly stick pin I easily purchased 8 years ago at a local scrapbook store.

For the sentiment I stamped the greeting in Baked Brown Sugar classic ink, onto very vanilla card stock.  Then I matted the sentiment onto a scrap piece of heather card stock by Amuse Studio.  I adhered the sentiment to the card front, but also added a staple to help add in the overall look.
To add a little sparkle, I added two sets of sequin trios.  Both trios consist of one 6mm marshmallow sequins, and two 4mm lemon meringue sequins, by Pretty Pink Posh.

Thank you for looking at my creation.  I hope you have been inspired to craft a beautiful card using this current sketch, and paper crafting supplies you already have on hand.  {smile}

Sunday, April 12, 2015

Love: card-gfit box

If this is your first visit for this day (04/12/2015) Welcome!  I have an earlier post (today) that kinda helps explain my crafting.  If you stop by that post you can read my rantings here.  Now, lets get started with this post! {smile}
I created a few of these little gems.  I call them 'card gift combo boxes'.  Here is why:  You open them like a book, but there is a box inside to hold a gift (3" x 5 1/4" x 3/4").  Super sweet, right!  So the inside flap of the 'book' holds your hand-written message, just like a card.  The ribbon holds the 'book' closed.  Pretty sweet.
I needed some direction for the cover, so I stopped by a favorite sketch challenge site:  Mojo Monday.  For 2 reasons; 1) there sketches are easy to work with, 2) the design team is very inspirational!  These ladies are very talented, so if you need to get those creative juices flowing, just take a sneak peak at their work.  
here is the current sketch:

and here is what I made:

Now, before you say a word, I know that this is not my typical vintage country chic style, per say.  Sometimes its good to change things up.  And, I have the whole collection of this pattern paper and embellishments.  And I need to start using what I have.  But, lets take a closer look!
Recipe:  I used Real Red card stock by Stampin' Up! for the base.  LOVE their card stock.  The blue solid card stock is Taken with Teal (retired) by Stampin' Up!, too.
The pattern papers are from the Heart Strings collection by CTMH.
The embellishments, oh my there are lots, and from everyone.  The teal blue brad at the spine is from MME, the Nostalgia collection.  The white doily is from Martha Stewart.  The red fabric blossom is from a big box craft store (J).  The teal blue heart stick pin is from a big box store (J).  The teal blue velvet ribbon is from Stampin' Up! (retired, probably 10yrs).  The blue polka dot paper blossom is from a big box store, dollar bin (M), I also added silver super fine glitter on the petals.  The super fine glitter is from Martha Stewart.  The ticket is actually a painted wood ticket, from the dollar bin, at a big box store (M).  I added the letters, they are rub-ons from a different big box store (HL). I painted some mod podge over the rub-ons to help seal them to the wooden ticket.  The heart is Heidi Swap, I used silver metallic ink on this resist chipboard piece.   
The sentiment is stamped in basic black classic ink right onto the text pattern paper, using the Teeny Tiny Wishes stamp set by Stampin' Up!.  I also used the fancy label punch to create the decorative piece.
The grosgrain ribbon to hold this little gem closed is Real Red ribbon (retired), by Stampin' Up!.
My little card-box combo was selected as a 'winner' @ Mojo Monday sketch challenge.

different view

This will be for sale at the Spring Craft Fair @ La Cueva High School, in Albuquerque, NM, on Saturday May 2, 2015.  If you are in the area, please stop by my booth.  I'd love to meet you,  and show you what I have crafted!  


Sunday, February 22, 2015

Love Birds, Card

I love to paper craft {smile}.  And I sometimes love a challenge.  A very dear, and special lady had asked me to make her a Black & White & Blue wedding card.  But she didn't have any other requests.  Wow, creative freedom!  She must know a few artists {smile}  
I like choices.  And I assume everyone else does too.  So, I made her a few cards to choice from.  I posted one yesterday, and I have one more today.  So, lets get started!
To help me focus on the task at hand, I stopped by a new favorite challenge site:  Friday Mashup.  This week's challenge over @ Friday Mashup, they have both a sketch, and a theme (Up and Away).  I didn't get that creative and incorporate a hot air balloon.  {frown}  In my defense, I was looking for a sketch and not a theme.  I have a theme wedding.  And now, I am kicking myself, I think I could have done a wedding hot air balloon.  And this is New Mexico, we host the world's largest hot air balloon mass ascension.  Hind sight, right?  Let's see the sketch:


and here is what I made:


This special occasion greeting card is a large card for me {smile}.  The finished card size is 4 1/2" x 6 1/2", and has an accompanying envelope for a 5" x 7" card.  I wanted to make sure that my embellished card would fit inside, without mashing any of the embellishments.  
Recipe:  The card base is Pure Black by Paper Trey Ink.  Love their heavy weight card stock.  
The blue matt is Island Indigo card stock by Stampin' Up!.  I used Authentique pattern papers, Classique and Spirited.  I used the tone on tone blue pattern paper.  I wanted blue, but not a specific pattern.  The black doily pattern gives interest without competing with the focal piece.  To help convey a home-made touch, I added a simple machine stitch border.
I used a wide white crochet trim and a pale blue velvet ribbon.  I just love how soft and classy these two trims looked together.   This main panel is adhered to the card front with foam tape to allow space for the crochet trim and velvet trim room to wrap around the card front.
The focal image is actually one of those journalling blocks from the Classique collection.  I selected one with no quote or busy graphics.  I hand stamped my sentiment, in Jet Black StazOn.  I used two different stamp sets, but love how the fonts really work together.  For the journal block: Fancy Flexible Phrases.  For the sentiment banner piece: Teeny Tiny Wishes.  Both of these stamp sets are from Stampin' Up!
Focal Piece:  I cut down a 3" x 4" journal block.  Rounded the corners and adhered to a scrap piece of pure black card stock.  I stamped my sentiment, with my fingers crossed.  I adhered a bird cage metal embellishment from Spare Parts.  I added a large blue blossom above and just left to the top of the bird cage.  I added a scrap piece of cream lace trim to the 'bare' side of this blossom.
For the two white and two blue blossoms flanking the large blue blossom, I first added some white acrylic paint to the petal tips, and then immediately dunked them into a tub of dazzling diamond glitter.  I added several leaf sprays cut from black tone on tone pattern paper from the Classique collection.  I adhered this piece with foam tape to help lift it off the card front, and to allow for the height of the trims.
Finishing touches:  I wanted to add some classic and sparkling touches.  So, to finish the focal piece, I added two pearl string loops.  And then to continue with the classic pearl touch, I added a spare black pearl flourish piece to opposite corners of the card.  And finally, for the sparkling touch, I added a collection of blue faceted sequins in the same opposite corners.
This card is also finished on the inside.  I have a white panel matted with a piece of the Island Indigo card stock.
Thank you for stopping by!  Hopefully I have more time to craft this week!


Saturday, February 21, 2015

Teal Newlyweds

Wow, this past week was crazy at work.  And I was unable to craft this week.  When the week is like this it really makes my heart sad.  I love crafting.  I actually love to 'craft' all kinds of things.  I made some cream puffs this week, but didn't remember to take a photo {frown}.
Anyway, back to paper crafting {smile}.  A lady placed a special order for a Black & White, with Blue wedding card.  She didn't care about the layout or any specific embellishment.  So, I had free rein.  Yeah!
I went to Cardabilities for the current sketch.  I pulled out this beautiful black and white/cream pattern paper from Authentique.  And some coordinating embellishments, and (hopefully) crafted a beautiful card.  
Here is the current sketch:


my card:


Recipe:  Ok, this is NOT an A2 size card.  I wanted a large card, to provide me with a large enough 'canvas' to create something beautiful.  My card is 6 1/4" x 4 1/4".  The envelope is for a 5" x 7" card.
The card base is pure black card stock by Paper Trey Ink.  The 'blue' matt is cabana by Stampin' Up!.   The black and cream pattern paper is from the Classique collection, by Authentique.  I used a thread cutter to 'rough' the edges.  I tore a small slit in the pattern paper and used a bamboo skewer to roll the torn paper.  
To add a delicate piece, I added a cream trim just under the tear.  I wrapped a wide piece of cream lace around the card front.  Then I added a simple border with my sewing machine.  I love to add machine stitching to my cards.  I think it helps convey a 'home-made' feel {smile}.  
I added a scallop trimmed piece of of aqua mist polka dot pattern paper, to keep the color on this black and white card.
The only black lace I have is a 1/2" Raven Lace Trim.  But, I wanted something a little thicker.  So, I just added two strips, back to back.
I added a large single blossom to the card front.  This is an old Prima blossom: Cherise Taos.  The bottom and top petals are velvet.  There is a layer of sheer fabric petals between.  And topped with white feathers.  For the center, there is a beautiful cluster of rhinestones and pearls.  I just love these blossoms, and hoard them {smile}.


I added an 'US' light bulb towards the left upper corner.  To help 'hide' the bottom of the bulb, I added multi-loop bow made with black seam binding.  I added an aqua blue pearl brad to the center of the bow.  To help balance that end of the card, I added a clear crystal dangle tied to the bow with thin silver cord.
I added two black pearl swirls to opposite sides of the large teal blossom.  I made sure I stayed inside the machine stitching.
For my sentiment, I used the Teeny Tiny Wishes stamp set, by Stampin' Up!.  I stamped with Jet Black StazOn ink, onto shimmer white card stock.  I used my scissors to create the banner end.
The inside of the card is also finished.  I matted a piece of shimmer white card stock onto Cabana card stock, both by Stampin' Up!.

Tuesday, January 20, 2015

Sweet Floral Card

Howdy!  I needed to make a card for a Stampin' Up! customer, to simply say 'thank you'.  I wanted to use only Stampin' Up! supplies, so I went browsing the internet for some inspiration, and well . . .
I went to the Friday Mashup Challenge to see what they have this week, and well, look at this impistaional board:

these lovely ladies ask you to make a project using the triple layer technique, or floral, or both.
(I made the Friday Mashup Glamette list with this floral inspired card!  Yahoo!)
I really had a fabulous time with this weeks sketch over @ retro sketches.  So, I decided to play again.   (I received a retro shout out list with this floral card, using this sketch!  Yahoo!)
this week's sketch:

and here is what I made:


I really liked the cascading roses in the Friday Mashup inspiration photo.  So, I decided to create cascading roses for my corner embellishment.  I used the masking technique for the roses and leaves.
Recipe:  I used the pink pirouette card stock for the card base.  I used whisper white card stock as the main panel, and matted it on strawberry card stock.
I used the Stippled Blossoms stamp set to create the 2-step blossoms and leaves.  
To create the random dry embossed dots with the swiss dot embossing folder and a stylus.  I added a trio of bright pink sequins to the card front to add some sparkle.
For my sentiment rectangle, I stamped my sentiment from the Hello There stamp set, in baked brown sugar classic ink.  I matted this piece onto a scrap piece of brushed gold card stock.  I cut a scallop rectangle out of pink pirouette card stock and adhered it to the card front with foam tape.  I stamped the 'thank you' in basic black classic ink onto whisper white card stock.  Then cut it out with my scissors and adhered to the sentiment rectangle.
I tied a simple bow with gold bakers twine, and added it the side of the sentiment rectangle.

Thank you for stopping by!  I just realized that I used the same sentiment for the other card I submitted.  And I also did the same simple bow on the side of the sentiment rectangle.  {ugh}  oh well, I guess I really liked the sentiment and the bow {smile}


Sunday, August 17, 2014

Sweet Retirement


Hello.  and welcome to my little slice of blog-land,  I hope you are having a good weekend.  Me, Oh Yeah!  School is back in session, and the weather is a bit cooler.  So, that translates to more crafting!  It is that time of year when I get revved up and start crafting for Holiday Arts and Craft Shows. I probably should start earlier, but when it's 100 degrees out, I just can't even begin to think of Halloween, Thanksgiving, or Christmas.
I don't have a Holiday craft to share with you today, but, behind the scenes I am crafting more monogram magnets, flip-flop books, and other crafts.  I did take a quick break from that, and sat at my craft desk and whipped up this super special card.  {smile}  I don't have anyone in mind to send it to, so it will be in my Etsy shop, (HERE) for sale.
I am entering this card is three different challenges.  For those who know me, entering three challenges is a rarity for me.  Typically I only enter one or two.  So, here we go!
I am entering my card in a sketch challenge over @ Cardabilities.  They always have some creative and easy to use sketches.  And their design team is super talented, so there is always some inspiration.


I needed a bit of direction, so I stopped by Sugar Creek Hollow for a little more inspiration.  This week, they have a theme challenge:  Let's Celebrate.  Who wouldn't love to create something for that!

And finally, I needed a bit more direction, so I headed over to Crafting by Designs to see what this creative challenge has planned this week, and I think I found heaven.  Their theme this week, is to use PolkaDots!  AHHHH!  polka dots?  My absolutely favorite pattern!

and here is what I created:


the recipe:  The card base and matt are Baked Brown Sugar card stock from Stampin' Up!.  The two pattern papers are from the White Fern collection by DCWV.  I created my own paper blossoms with the stamp set and die; Vintage Floret by Heartfelt Creations.  I stamped the blossoms in River Rock classic ink by Stampin' Up! onto whisper white card stock.  I sponged the edges of the blossoms with the River Rock classic ink, also.  The ribbon is swiss dot satin in Fine Linen by Paper Trey Ink.  The sentiment stamp is Teeny Tiny Wishes by Stampin' Up!
I machine stitched on both pattern papers.  I wrapped the ribbon around the center panel and adhered this piece to the card front with foam tape.  I wanted a little height on the card front.
I brushed some white ink onto the die cut leaves, and added glitter to the petal tips.  I added light grey pearls to the blossom centers and a dash of silver german fine glass glitter.
Challenge requirements:
Sketch:  two blossoms, with a banner sentiment tag.  sponsors: heartfelt creations.
Polka Dots:  the background pattern paper and the ribbon.
Let's Celebration:  happy retirement

Thank you for looking!  I am off to my craft room, to get busy on more items for the craft sales!  I hope you have been inspired to play along in any of these challenges.  Enjoy!


Friday, November 8, 2013

As I am preparing for this weekends upcoming arts and craft fair, I stopped for a bit, to create a card for the current sketch challenge @ Sketch Frenzy Challenge.  The talented Kim, is the designer of this week's sketch.


This sketch has a lot of potential.  I think the rectangle on the left side of the main square, could easily be an object.  A star.  A snowflake.  A multi-loop bow.  A sentiment square/circle.  The multi-colored banners along the bottom main square could be scallop border.  Be creative, and lets see what you craft!


I used the ledger paper from the Etc DSP collection.  I wanted a subtle pattern, but not too distracting.  I added a scallop trim border, in place of my banner edge.  Another piece of pattern paper from the Ets DSP collection.  
I just love the blossom and font with this stamp set.  So, I included these two items, and added another sentiment from the Teeny Tiny Wishes stamp set.  I kept the card front clean and simple, but while I was creating, I almost started over.   While crafting I started to see the abundance of possibilities of this sketch.
Well, I'm back into my craft room, trying to get a few more altered notebooks done before Saturday.  And I also need to get started on my baked goods: cupcakes, brownies, and bread.  Craft Baazar @ Cleveland Middle School, Saturday Nov. 9th.


Friday, November 1, 2013

Dots and Dots

Wow, can you believe that it is Friday, already?  Me, if I were to be completely honest, I'd like to have one more day before the weekend starts.  (and I don't want to count this day, as my 'one more day'.)  I have been busy getting some paper craft items created, and made for this holiday season's upcoming Arts and Craft Fairs.  My first fair is tomorrow - Saturday!
I am planning on using this day, to get all my crafts packaged, priced, and labeled.  I'm hoping that I will have some time to do a mock set-up of my tables and see what works for product placement.  But, we'll see.  
Then early this evening, I'm making a trip into town, to get my tables delivered and set up.  That way, all I have to do tomorrow morning, is put my product out.  And I figure that will take about 30 minutes, but I'll give myself an hour.  Just in case.  Know what I mean?  
But, before I get busy getting all of that together, I want to share a card I made, for Sketch Frenzy Friday.  The lovely Jennifer @ Sketch Frenzy Friday, has a very user friendly sketch for you to try.


here is what i created


I have been Christmas crafting my little heart out, and trying to change my gears, is a bit difficult.  I used a piece of Sweater Weather DSP (blue polka dot) as my main panel.  I wanted to accentuate the polka dots, so I matted this pattern paper onto a piece of very vanilla card stock.  
I also wanted my belly band to be in contrast to the card.  So, I used a piece of black and vanilla polka dot paper (Modern Medley DSP).  I wrapped a piece of pool party seam binding across the belly band.  But I wanted to add a homemade touch to it, so I added a machine stitch to it.  
I dry embossed the oval frame  and then tore around the shape.  I stamped the 'friends forever' button in crumb cake classic ink.  I used dimensionals to lift the button off the card front.
I created a sentiment banner using a scrap piece of very vanilla card stock.  I stamped the sentiment in basic black classic ink, and flagged the ends.
For the bow, I tied a multi-loop bow and then tied a vintage faceted button to the center of the bow with some thin silver ribbon.  I wanted to give the card a little sparkle.
I hope that you have been inspired to play along with us @ SFF.
Thank you for stopping by, and I hope that you have been inspired to create something beautiful of your own (smile).


Friday, October 25, 2013

Simple Kraft

Welcome.  I had to switch my day off from work this week, and it has really messed-up my week.  I keep getting my days mixed-up, to say the least.  Anyways, enough about me {smile}.
This week over @ Sketch Frenzy Friday, a new sketch is up and ready for you to play along.  But, before we get to that, I hope you find a bit of inspiration from what the design team has created!


here is what I did:


I made this card with a special girl friend in mind, Nichole B.  She, is a great person, and makes me laugh!  Nichole, paper crafts, too, and has an unique style of card making.  She is a 'clean and simple' type of gal.  And her favorite color combo is black and yellow.  
I used a build a background text stamp across the top.  I also added a flourish stamped in black to give her card a little pizzazz.  I added a strip of modern medley dsp to give the card a color scheme.  I also banner ended a strip of yellow pattern paper to give the card a pop of color.  I added a frame stamped in basic black classic ink, added a sprig of black leaves, a yellow flower and a vellum butterfly. 
Let's see what you create! and post your card on the SFF challenge site!

Friday, September 20, 2013

Black Bird

Happy Friday.  As I write this, I am working on 'cleaning-up' my blog.  To me, it looks a bit cluttered, overwhelming, and a bit disorganized.  Or, Maybe, I'm just feeling a need to get things cleaned up {smile}.  Either way, please stay tuned for a more stream lined look.
Now, back to the real reason you may have stopped by... a new creation!  The ladies that I design with over @ Sketch Frenzy Friday, create some of the most creative and lovely sketches.  If you have not played along wit us before, I encourage you to do so.  These sketches are so versatile and fun!  Take this week's sketch:


So, this week, we have a wonderfully pretty sketch to work with.  I always start by 'taking the sketch apart', so to speak.  The main panel has a pattern on it, a bit of sewing above and below the ribbon, and a cluster of shapes for the sentiment.  
here is what I created:


Before we start with the card, I do have to admit, I am not a big Halloween card maker.  If you have visited my blog recently, you probably notice that's about all I have made : black and orange cards, or cards with 'happy halloween' on them.  I know that it is the season to start crafting this celebration, and well, I didn't want to be left out.  
My favorite color is pink.  I know, I really use pink.  But, I am a sucker for that soft, cuddly shade of innocence and femininity.  I also love the contrast between pink and brown, or black for this card.  I used just a smiggin of pattern paper.  I used the houndstooth pattern from Modern Medley DSP for my lollie. 

I used one of my all time favorite background stamps Ex Libris.  I inked the stamp with crumb cake classic ink, and then did the 'finger tap' technique, to get a 'worn/weathered' look.  I inked my background builder text stamp with basic black classic ink, and randomly stamped on the card stock.  I used my distressing tool, to rough up the edges and adhered this panel to a piece of pink pirouette card stock.  I did a simple border with my sewing machine.  I machine sewn the ribbon onto the card front next, leaving me a piece to make my bow.
I inked the 'label' stamp from Everything Eleanor in soft suede classic ink, and fussy cut it out.  I sponged all the edges with crumb cake classic ink, to help camouflage any mis cuts.
I made a 'lollie' out of some pattern paper.  I punched a 1 3/8" circle from champagne glimmer paper.  I stamped the bird in basic black classic ink, onto the text pattern paper, and I used my 1 1/4" circle punch.
For my sentiment, I simply stamped 'happy halloween' from the Teeny Tiny Wishes stamp set.  I stamped the sentiment onto a scrap piece of very vanilla cardstock, and used scissors to trim around the words.  I sponged the edges with crumb cake classic ink.
I added two pearl jewels to the 'label' piece, to help add a feminine touch.  But, as I look at my card, to me, there seems to be something 'missing'.  Or maybe it is just me.  I sometimes add alot of stuff to my cards.  If you don't know, I am not a fan of 'white space' either {smile}.  Wow, I kinda have some issues, huh? {smile}.
I hope we have inspired you, and you get a chance to sit down with your craft supplies, and create something beautiful, something 'you', and join us this week @ SFF!