Showing posts with label retro sketches. Show all posts

Sunday, November 27, 2016

Vintage Chic Cards & Bag

Howdy!  My crafting frenzy continues.  I needed a little inspiration and guidance, so I stopped by a few of my favorite challenges.  Ok, three {smile}.
I stopped by the Cupcake Inspirations to see their inspirational photo.  And their color combo, is perfect for this new-to-me Vintage Chic collection by Heidi Swap.  I know, it's not holiday themed, and I should be crafting for my last craft fair.  But these colors, are just perfect!
*my card was selected as a 'Sweet Six' winner!


To help with my 'direction' in crafting, I stopped by the ever easy-to-work-with sketch @ Retro Sketch Challenge.  These ladies have very adaptable sketches that will work with almost any style of paper crafting you create.  Here is their current sketch (they are having some issues with Link)

My final stop, was @ Brown Sugar Challenge.  This creative design team, has a current challenge: anything goes.  So, super easy to play along {smile}.

and here is my card:


Recipe:  I used kraft card stock by Paper Trey Ink for the card base.  I just love the heavy weight of this card stock.  I used mint macaroon card stock by Stampin' Up! for the matt.  I just love this color, and it helps highlight the mint color on the Vintage Chic collection, by Heidi Swap.
I used the steel polka dots on cream pattern paper as my 'band'.  I matted this pattern paper onto steel texture solid card stock.  I sponged all the edges with crumb cake classic ink.   
I added a quick and simple border stitch with my sewing machine.  When I reached the 'band' piece, I did a zig zag stitch.  I wanted to add some visual interest {smile}.
I wrapped my last remaining piece of steel gray silk ribbon around the card 'band'.  I tied it into a simple bow.  I added a rhinestone brad to the bottom of the bow.  I added a pale blue-mint paper blossom to the top of the bow.
I added a digital Bingo card in place of the tag.  I added a rhinestone 'blossom' to the lower right corner of the bingo card.  
I hand-stamped my sentiment in early espresso classic ink, by Stampin' Up!.  I stamped the sentiment on cream linen card stock, by Paper Trey Ink.  I hand-cut the banner ends, and sponged the edges with crumb cake classic ink.  I matted the sentiment banner with early espresso card stock by Stampin' Up!.
I had so much fun and creativity flowing when I was creating this card, I made another.  But I turned it 90 degrees. 


and I also made a gift tote:


I really enjoyed working with this paper collection: Vintage Chic.  The soft neutrals gave my projects a soft feminine look.  The extra card and gift tote, have gold satin ribbon.  I added little pieces of mint toned embellishments to help pull it all together.  I used a 'gift tangle' on the tote.  It's the crystal-like dangle from the taupe dot lace trim.  {smile}
I hope you have been inspired to play along with any of these challenges.   I am off to the grocery store.  I am making a pumpkin pie, and need a few baking items.  And then the crafting will continue!


Tuesday, November 1, 2016

Sweet, Soft, and Smile

Howdy!  Yeah, I am still crafting!  But today, I wanted to share with you a card I made that isn't Christmas themed.  {frown}  But, it will be for sale at my holiday craft fair, along with a matching paper tote bag.  (it is super cute too!)
I am entering my card into two different but favorite challenge sites of mine.  The first challenge site is a sketch challenge.  The wonderfully talented ladies over @ Retro Sketches always have fun, creative, and easy-to-use sketches.  This current challenge won't disappoint you.


I just love the layers of the sketch.  And the banner piece is just too sweet.  I also love the sprinkle of dots.  I'm sure this could easily be made into a holiday card.  I'm thinking winter sequins for the dots and a snowflake for the button.  
The other challenge site I am entering my card into is a special challenge site: Word Art Wednesday. I just love this site.  It has a super talented design team.  This challenge site is faith based.  You do not have to use the scripture that is provided.  But I'm sure you will print it and use it in your crafting!  Their current challenge is Anything Goes, but please keep your entry family friendly.
here is what I made:


Recipe:  I used Aqua Mist card stock from Paper Trey Ink.  I just love the heavy weight card stock.  My cards stand up even with multiple layers.  {smile}
I used two pattern papers from Julie Nutting - Paper Dolls collection:  Cuteness and Time to Play.  I layered the clock butterfly pattern paper (Time to Play) on kraft card stock.  I layered this piece on top of that beautiful text pattern paper (Cuteness).  I added some machine stitching.  It just helps add the right amount of sweetness {smile}.  I sponged all the edges of the pattern papers with crumb cake classic ink by Stampin' Up!.
I didn't add a banner piece, instead, I added two strips of fabric: cotton trim and seam binding.  The cream cotton trim has these cute bows embroidered on them.  The seam binding is a super pale pink color.  I used my sewing machine to 'attach' these two trims.
I stamped my sentiment onto white linen card stock by Paper Trey Ink.  The sentiment is stamped in Baked Brown Sugar classic ink.  I just love this soft kraft colored ink!  I matted my sentiment piece onto a scrap piece of Aqua Mist card stock.  
I added a pale pink button tied with kraft twine to my sentiment piece.  I also tied a multi-loop bow with some of the seam binding.  I added this bow at the bottom left corner with my hot glue gun.  My final touch was a collection of champagne mix of sequins.  
This card remains blank on the inside.   Thank you for looking!


Wednesday, June 15, 2016

Happy Birthday Charlotte

Howdy, and welcome.  I've been a bit busy.  I have three parties in the planning: an afternoon Friendship Tea in just over a week,  a Dinner @ my house in 3 weeks, and a huge surprise birthday party for 100 guests in August.  So, if I say, that I feel that I am being pulled in a hundred directions, that's true!  Between invites, floor plans, menus, and party favors, my head feels like its swimming and I'm not making any ground.  Oh, and 4 birthday parties for grandchildren.  Whew!  I'm still working full time, taking care of a husband an ex-large dog (159#), cleaning house, cooking dinner every night, laundry, taking call at the hospital, oh yeah, working out at the gym and running.  Prioritizing tasks have now become my homework for the next day.  The cupcakes and cake I made for a friends daughter's wedding over the past weekend were a hit!  So much so, I have a new customer who would like to place an order for a party in July!  Yahoo!  All this hard work is paying off!
But don't fret, I am still here, making beautiful things out of paper!  You know me, a die hard crafter.  {smile}
A special girl friend is having a birthday today, so I decided to make her a card.  (It was mailed yesterday, so it should arrive in her mailbox today!)  I don't care what marketing says, hand made sweetness that arrives in your snail-mail, mail-box is happy mail!  And I still believe that folks LOVE it!
I stopped my a few different favorite challenge sites and decided to play along with the super talented ladies over @ Retro Sketches, with their sketch challenge.  Typically, these ladies do CAS (Clean And Simple) cards, and so my style typically doesn't go with their themes.  But today, I hope I have nailed it.  Maybe it's because I didn't have 2hours to make a card, or maybe I just wanted to do something a bit different.  Anyways, my card isn't my typical shabby chic, vintage-style, extra layers and embellishments.  But, I still like it {smile}!


here is what I made:


Recipe:  I used a Crisp Cantaloupe (retired) card stock by Stampin' Up! for the base.  I love the softer color version of Calypso Coral.  The pattern paper is Charlotte by Close To My Heart.  I love the colors and the different patterns.  It was very easy to work with.  And that's a huge plus in my book.
The black pattern paper is cut to fit the front of the card (4" x 5 1/4").  I simply cut a white floral pattern paper 3" x 5 1/4" and adhered it right on top of the black pattern paper.  I used my Tasteful Trims die (retired) from Stampin' Up! to cut the rick rack piece of silver glitter paper by Stampin' Up!.  I adhered the rick rack to the left side of the card.   For the scallop shaped piece at the top, I used the Tasteful Trims die to cut that piece as well, from a creamy taupe pattern paper.  I adhered that piece to the top, and wrapped some grey seam binding around the top piece.  I tied the seam binding into a simple bow.  
For my sentiment piece, I stamped the greeting in basic black classic ink, onto a scrap piece of shimmer white card stock, all my Stampin' Up! and matted it with a scrap piece of Crisp Cantaloupe card stock.  I cut this piece the same measurements as the floral pattern paper.  It is tucked under the rick rack.  I thought it looked more 'finished' that way.
I did sew my trio of buttons to the card front.  The black button is retired from Stampin' Up!.  The coral color button is from Amuse Studios.  And finally, the grey button is from an old paper collection by My Mind's Eye.
My card didn't look 'done' to me, so I added a flair button to the top of the card, just under the bow.  Its a light grayish blue flourish pattern, that I thought looked very similar to the over all look of the card.  
Well, I hope my friend loves her card.  And I hope you have been inspired to play along with this current sketch challenge.  I'm off to work my day job.  Have a great day, and make something beautiful for someone, even if that someone is YOU!


Tuesday, February 23, 2016

Spring Macaroon: Card

Howdy/Welcome.  I created a card earlier today, to show how to add machine stitching to your card, without the stitches seen on the inside of card, HERE.  Anyways, I stopped by some favorite (new and old) challenge sites, to give me a starting point, and I have to say, I'm pretty happy with how my card turned out!  
The first challenge site I visited was, Scrap Magic [No.16 Spring].  This is an old favorite.  I don't always play along in their challenges, but I just love looking at what the design team creates.  Very inspirational, and very creative!   This challenge site, creates a mood board, they give you primary colors and mandatory elements.

The primary colors: Turquoise and Pink.  Mandatory elements: rose/dessert, and delicate work.  Please be aware that this challenge site is in Russian.  They do provide a translate button.
The second challenge site that I visited was Retro Sketch Challenge [#203].  This is another 'old' favorite.  I just love their sketches!  They are super easy to work with, and the design team is sure to inspire you to play along.
My card was selected as the Retro Sketch Challenge Rock Star!  Super happy and excited!  I'll be posting my 'award' on my Awards page {smile}  I just can't stop smiling!

And finally, a 'new' favorite challenge site: Really Reasonable Ribbon Challenge [#135 - Celebrate]. I had stumbled upon this challenge site while visiting a blog.  And I was intrigued as to what this site was about.  And well, I think you can figure it out too - Ribbon.  And I love ribbon! so I played along in one of their past recent challenges, and stopped by again, yesterday.  You will be inspired by their design team, and their wonderfully creative challenges.  Their current challenge: Celebrate!  Create a paper craft or project showcasing this theme (birthday, anniversary, wedding, baby, etc) and make sure you use ribbon or trim on your craft!
here is what I made:


Recipe:  I used Lagoon card stock by Stampin' Up! for the card base.  And this card is a bit 'large'.  It measures 4 1/4" x 6".  I believe it is considered a A6 size card.  I am really loving this larger size.  The first matt is Mint Macaroon card stock by Stampin' Up!.  I just love how those two colors match the two shades of turquoise macaroons on the pattern paper!  
I took a piece (3 3/4" x 5 1/2") of whisper white card stock by Stampin' Up! to use as my 'base' for the focal piece.  I cut two strips (1" x 12") of different pattern paper by Authentique, Infused.  I selected the floral pattern paper and the macaron pattern paper.  I tore the ends of the pattern paper strips to add 'interest'.   
I hand stamped the sentiment in Soft Suede classic ink by Stampin' Up!.  I used a new stamp set: Birthday Blossoms.  I just love the simple, cursive font of this sentiment.
I added a bright pink seam binding, and fancy, white crochet trim.  I did a simple machine stitch to attach the seam binding and crochet trim to the front of the card.  And then, I added a simple border stitch around the top of the card.  
I added a journalling card to a different piece of pattern paper (mint stripe) from the Infused collection by Authentique.  I added foam tape to the back of this journalling card.
I tied a triple loop bow with the bright pink seam binding, and adhered it to the front of the card with hot glue.
I added a collection of marshmallow sequins to the bottom of the card.  I didn't want to distract the eye from the beauty of this card, celebrating a birthday!


Wednesday, December 2, 2015

Teal Poinsettia Card

Howdy.  I hope you are staying warm.  The weather out here is cold.  No snow yet, just bone chilling cold.  So, I stayed indoors and created a card.  I wanted to make something sweet, Christmas-y, and not red and green.  I used an old holiday stamp set from Flourish, and went to work.  {smile}
I saw the sketch over @ retro sketches and just fell in love with their current sketch challenge.

Look how fabulous this sketch is!  The part that I love is the overhang of the blossoms.  But you can easily change those out with snowflakes, or a different floral piece, or bells, or stars, or any other object.  Now, I did rotate the sketch 90 degrees to the right.  And here is what I made:


Recipe:  The card base is crumb cake card stock by Stampin' Up!.  The main panel itself is matted with a teal card stock.  I added the music pattern paper from Stampin' Up! to fill up the white space.  I added a decorative teal plaid pattern paper to the bottom portion of the card.  I did tie that beautifully sheer teal ribbon to the card front.  And embossed that tiny tag with 'Happy holidays'.
For the large Poinsettia I stamped and embossed in silver on shimmer white card stock by Stampin' Up!.  And then I simply water colored the blossom with a light teal and light green inks.   I adhered my large blossom to the card front with foam tape and added liquid pearls to the center.  I finished off the card with a trio of teal sequins.
Now, I need to get this little beauty in the mail to a lovely lady who requested a special order desk top calendar (NG).  I hope that she loves it, and can use the extra holiday card on hand.  {smile}
I've been a little busy getting a few more items created for my next holiday arts and craft fair, in Albuquerque, New Mexico.  I'll be @ La Cueva High School's arts & craft fair this weekend.  Yes! the whole weekend!  2 days! Saturday and Sunday!  I'm in the B-hall (booth B-34).  If you shop here during the holidays, please stop by my booth and say 'hello'.  It will be good to see you {smile}!

Thank you for stopping by, and now I must head out the door and get to work.  Take care, and stop by soon.  You'll never know what I'll make next! {smile}


Tuesday, November 24, 2015

a Rosewood Vintage Christmas Card

Howdy.  Welcome.  yeah, I've been busy making holiday stuff; cards, bags, boxes, jar toppers, and altered salt shakers.  {smile}  I tend to do a lot of shabby chic holiday projects.  But today, I have a vintage holiday card.  {smile}
and while I was looking around on the internet, I found some very interesting challenge sites.  There are a few that are 'new' to me, so I really wanted to play along.  {smile}
My first stop was Retro Sketches.  They have wonderful sketches that are easy to work with and the design team is pretty talented.  So I am sure you will find some inspiration.  {smile}  
Here is their current sketch challenge (#189):


I stumbled upon Shopping Our Stash weekly challenge.  Their current challenge (#229) is to use items from your stash, but no stamping.  So, you can use all those little pieces and bits that you have collected over the years, and create something handmade but without adding ink.  Sounds fun!


I also stumbled upon Unicorn Challenge Blog challenge site.  Their current challenge (#3) is: Christmas is Coming.  Sounds perfect, right!  You should check out what their design team has created, very beautiful!


and here is what I made:

I turned the sketch 90 degrees to the right
A sweet, rosewood colored, vintage Christmas card.  I used what I had on hand.  No purchase necessary.  So, that made me happy!  My card base is kraft card stock from Paper Studio.  I just love the color.  I added pattern paper I had on hand from Maja Road - Vintage Frost Basics pattern paper.  The paper pad also has three sentiment/design cards, a trio of postage stamp size images and a pair of tags.  {smile}
I did a purposefully sloppy double border machine stitch around the matt.  I just love the homespun look it gives cards.  I added a scrap piece of white cotton trim to the snowflake pattern paper.  (the sketch has a row of xxx's there).  Instead of a button (in the sketch) I added a 'winter' blossom.  It is actually a trio of pink fabric blossoms that I added white paint, glitter, and flocking to, before adding the rhinestone brad.  
There are two 'ribbon loops' on the sketch, that I wanted to add.  But, I settled for a collection of pretty trims.  I first machine stitched a trio of white crochet scallops, and then a pair of pink pom poms.  I think they add a little bit of whimsey and fun to the card.  And why not?  The girls are throwing snowballs for their dog to chase!
As always, my card remains blank on the inside, to provide you with room to add either your own hand-stamped sentiment, or a hand-written message.  {smile}
The photo doesn't really show it, but the card with the sentiment is adhered to the kraft matt with foam tape to 'lift' that piece higher.  I thought it would look 'cleaner' than plastering it down on top of the two decorate trims, and having bumps.
Well, I'm off to my craft room to finish up some desk top calendars.  {smile} I hope you get an opportunity to create something beautiful, too!


Saturday, November 21, 2015

Vintage Frost Christmas

Howdy.  Yeah, crafting, crafting, and bit more crafting for my next holiday craft fair.   I found some wonderful pattern papers that I had in my holiday stash, and super happy to create with them {smile}.  I had 'won' a 6" x 6" pack of Vintage Frost Basics pattern paper by Maya Design (from Sweden).  And I just love it!  This paper pack has vintage winter pattern papers in pink, blues, and brown, with images of angels, ice skates sleds, mittens, snowflakes, stars, and Santa {smile}!  Super special.  
The biggest draw back of crafting during this time of year, is that it is dark when I leave for work and dark when I return home.  So photography is difficult.  {frown}
One of my favorite European challenge sites is ScrapMagic.  I just love their inspiration boards.  Very inspiring, and really gets your crafting mojo running.  Here is their latest inspiration board:
No. 13 : Beige & Blue
Color requirements:  blue and beige
Mandatory elements: rhinestones, pearls, and lace
challenge closes November 30th.

I am using a sketch from Retro Sketches:

this sketch challenge is now closed.  I missed the deadline.

I am also entering A Snowflake Promise challenge:
theme: Christmas/Winter

and here is what I created:


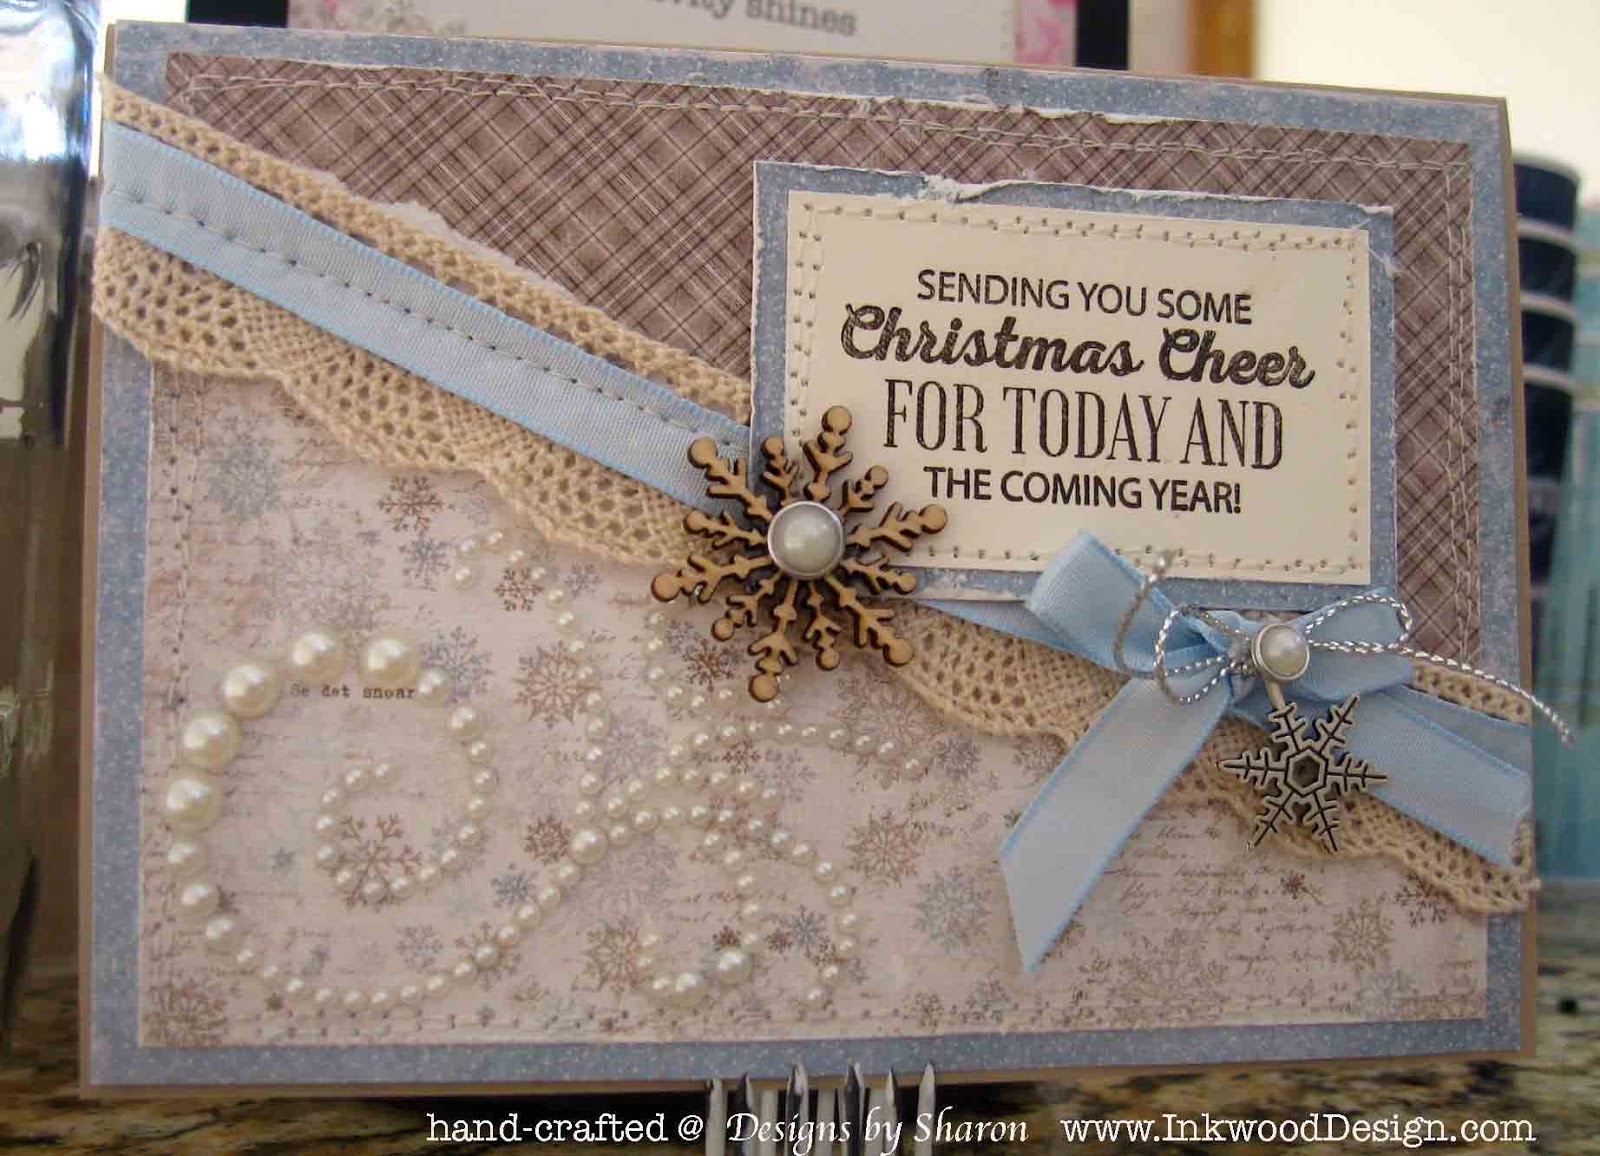
I took two sheets of the pattern paper (one blue and brown snowflake, and brown check) and torn each in half diagonally.  I didn't want to waste any of the patten papers, so I made two cards with my two torn papers.


Each card was made the same way, just changed the sequence of the papers, the snowflake embellishments, and the sentiment.  I made two 6" x 4 1/4" blank greetings cards.  I adhered the two torn pieces to the blue distressed pattern paper, and did a double border stitch with my sewing machine.  
I then stacked the crochet trim and light blue taffeta ribbon, and machine stitched the trims to the card front.   I tied the blue taffeta ribbon into a simple bow.  I tied a snowflake to the bow with thin silver cord, and added a silver rimmed pearl to the silver cord bow.
I stamped my sentiment in Early Espresso classic ink, onto very vanilla card stock, both by Stampin' Up!.  I matted the sentiment block onto the same distressed blue pattern paper as the main card.  I also added a double border stitch.  I adhered the sentiment block to the card front with foam adhesive.  I added a pearl swirl diagonally below the sentiment block.  I also added a wooden snowflake and rimmed pearl to the sentiment block.  


Thank you for looking.  I hope that I have been inspired you to create something beautiful.  {smile}


Sunday, June 28, 2015

Sweet Lilac; Card

Welcome.  If you don't know, I am training to run a half marathon later this summer.  And, boy does running take a lot of my time.  {grimace}  But, I have learned a few things about running:
1) you have to do it for yourself!  It has to be something you want.
2) encouragement from family and friends is intoxicating.
3) you should learn to love it, because it is just you and the road.  
I am running three days a week; Tuesdays, Thursdays and Saturdays. And that eats up a lot of my time.   Tuesdays and Thursdays have specific miles for those days.  And Saturdays, those are my 'long' days.  So, yesterday, I got up at 5am, and went running @ 6am.  I need time to drink coffee, take Sasha (my dog) out for her walk, make her breakfast, and get motivated to put in the time and distance.  Yesterday's distance: 8.2 miles.  My time was ok.  But that activity alone, just running, took up 2 hours of my morning.  Then, I still needed to eat breakfast, take a shower, and get ready to head out the door, for other commitments.   But, I imagine soccer (or another sport) moms, or dance moms have the same time commitments.  
So, today, after I had time to drink coffee and take care of Sasha, I set out to my craft room.  I really miss crafting!  I kept my focus, and crafted a card for someone specific.  I used the inspiration from two different craft challenges:  a sketch and an inspiration photo.
My first stop was Kafe Scrapo Mama.  This challenge has only one requirement: a lilac flower.  It can be stamped, photo, or an actual flower.  Easy enough.  Here is their board:


This challenge is open from 9 June to 9 July 2015.  So, I do encourage you to play along.  The design team has created some beautiful pieces to share! and these colors are so soft, and sweet!
For the sketch challenge, I am using a sketch from a past challenge.  This challenge closed yesterday. Just my luck, right!  But, I love it, so I am using it.  The sketch comes from Retro Sketches.
*

*Please be aware, that this challenge has already closed.  But, I just love this sketch!  I will most likely use it in the future for other items.
and here is what I created:


I was really inspired by the white elements in the Lilac inspiration photo.  Along with the books and the vase holding all those beautiful lilacs.  So I really wanted to use those elements where I could.

Recipe:  I used kraft card stock for the card base.  I just love this as an anchoring element.  I used a Teresa Collins white and light grey floral pattern paper as the largest pattern piece.  I thought this mimic the window/mirror in the photo.  I matted that pattern piece with a scrap of lilac colored textured card stock.  
I added two different but supporting pattern pieces for the 'tore' piece in the sketch.  One is a text pattern paper from Stampin' Up! that is retired, and no longer available.  I also added an 'old' Melissa Frances pattern paper to the 'stack'.  I distressed the edges and layered them crooked.
I wrapped a piece of pale purple seam binding around them, and added a scrap piece of white crochet trim.  I added a pale purple dangle to a multi-loop bow, and adhered it to the side of the lilac card.
The lilac card is actually a digital image that I printed from my computer.
I added two trios of sequins to opposite corners, and added a banner  tag.  I hand-stamped the sentiment onto white card stock.  I used my scissors and hand-cut the banner end.  I matted this piece onto a scrap piece of the lilac textured card stock.  I added a scrap piece of the white crochet trim to the top of the banner, and stapled the banner to the card front.
Well, I now need to run into town to purchase a gift card to go inside this card, and get it out in the mail.  Thank you for stopping by!  I hope this weekend is enjoyable!


Wednesday, April 1, 2015

Welcome, Card

Wow! I had so much fun playing along with the talented ladies over @ retro sketches, that I created another card with their current sketch.  {smile}
here is their current sketch challenge

I was anxious to use some new pattern papers from Tilda: the Corner Shop and Tiny Treasures.  
And here is what I created:


Recipe:  This card is larger than my typical A2 size, it's 4 1/4" x 6".  I am pairing it with an A6 envelope, to give the banner, and button some extra room.
Ok, I started with the kraft card stock purchased from a big box store.  I lined the inside of the card with a piece of very vanilla card stock, and then matted it onto steel blue card stock.
So, I used the same sheet of pattern paper, and show-cased both sides of this beautiful pattern paper.  The striped pattern paper has this beautiful polka dot trim.  Since I added some cotton trim and ribbon to the top of the floral pattern paper, I purposefully turned the striped pattern paper, so the polka dots would be near the bottom of the page.
I cut the floral pattern paper 1/2" smaller than the striped pattern paper.  I used my thread cutter to distress the edges of both pattern papers.  I machine stitched the cotton trim along the top edge of the floral pattern paper.  I then sewn a strip of blue stitched cream ribbon across the cotton trim.  I also did a double border stitch on the floral pattern paper. 
I added foam tape to the back of the paper doll card, to help give it some height off the card front.  I sponged baked brown sugar classic ink along the edges of the banner pieces.  I used glue dots to hold the banners to the cream twine.  I secured the banner 'string' (cream twine) to the card front with vintage metal brads.
I added a vanilla button to the top left corner of the card.  I also tied a simple bow behind the button.  
Finally, for the floral cluster I added glitter to the petal tips, and rhinestones to the blossom centers.  The floral cluster is adhered to the card front with foam tape, also.
Thank you for stopping by! and I hope you have been inspired to play along with the wonderfully talented ladies over @ retro sketches.


Tuesday, March 31, 2015

I Won't Forget, Card

Welcome.  I wanted to take a quick break from my craft room, and share a card I made for a special friend; Denita.  We have been getting together once a month to craft.  Now, who wouldn't love that? {smile}.  And this sweet friend, is pretty creative!  She makes me craft better!  Anyways, when we got together earlier this month she shared a book tutorial.  And she made it simple, easy to follow instructions, and even cut out 'sample' pieces for me.  How super awesome is that?  Well, I wanted to send her a thank you card for everything! Lunch, the tutorial, her time, her friendship, and just being a very giving, considerate, and friendly person.   
Anyways, to help get some of those creative juices flowing, I stopped by a favorite sketch challenge site:  retro sketches.  I love this site, because their sketches are easy to use, and the design team is very inspirational.  Here is the currently sketch:

here is what I made:


Recipe:  I started with kraft card stock from a big box store.  I love the color.  The weight of this card stock is on the light side, so I added a matted panel to the inside to balance out the weight, so the card will stand.  
different view: straight on
I still have a few scraps from my LemonCraft purchase: Forget Me Not.  So, I matted the two different pattern papers onto some Tim Holtz texture steel blue solid card stock.  I did a single machine stitch border.  
For the half circle element, I added a tea dyed paper doily.  [yes, I tea dyed several paper doilies to have on hand when white is too bright.]  I also added some pale blue seam binding to the doily.  I just had to.  I tied a simple bow.  But you know me, there is nothing simple about it.  I tied a simple bow with cream twine to the seam binding bow, and then topped it off with a white clay blossom I had made and baked a few weeks ago.  [I always make extras when I make any clay embellishments.]
The sentiment is heat embossed in early espresso.  I wanted a stark contrast, but not black.  I added a flair button, and then some blue pearls and clear rhinestones.  
This card is pretty simple for me, but I think it still has a lot of pizzazz!  Now, I need to head into town to get this gem off to the post office.  Thank you for looking! and I hope you have been inspired to play along with the talented ladies over @ retro sketches.


Sunday, March 22, 2015

Spring Birthday, Card

~ photo heavy post ~
WOW!  I have been busy crafting, and that always makes me happy {smile}.  I have also been busy cooking/baking!  Another happy chore!  So, lets get right to the paper craft you have come to see {smile}.  Today, I am entering a card in a few four paper crafting challenges.  Some of these challenges are new to me, and some are favorites {smile}!
For the sketch, I stopped by the Retro Sketch Challenge site.  They always have easy to use sketches, and the inspiration from the design team is always great to look at {smile}.

Then I stopped by a 'new to me' recipe challenge site:  Crafts 4 Eternity Recipe Challenge.  Their current challenge is : R#218 Pastel Shades.  Now, if you know me, I can do this {smile}!

I also stopped by another 'new to me' challenge site:  Fussy and Fancy Friday Challenge.  Their currently challenge is: Girly.  Now, I can do girly very well, if I say so myself!  And I love their quote: 'less is more . . . but more is better'.  LOVE IT!   Because if you know me, I love embellishments and layers!

And my last stop is by a favorite challenge site, that I have to admit, I don't play very often with: Crazy 4 Challenges.  Now, don't let that discourage you.  These ladies are super talented and they have some very fun, and creative challenges.  I just, well, kinda get side tracked.  But check out this 'still open' challenge:  Put On A Bow!  Now, if you know me, I love bows.  I put bows on almost everything I make, and not just a simple bow, but my favorite multi-loop bows!

Ok, so with all of this inspiration! and creativity! HERE is what I made:


Recipe:  I started with white card stock by Paper Trey Ink.  They make some of the best heavy weight card stock in the industry.  
The two pattern papers are from a craft company LemonCraft, in Poland.  The paper collection is called Heart Painted.  It is a collection of sweet, floral, vintage-y papers in green, pinks, polka dots, music sheets, and text.  Yes, a treasured purchased {smile}.  I added a strip of wide cream lace between these two pretty pattern papers along the left side of the card. 
So, I used a thread cutter to rough up the edges of the two pattern papers, and in doing so, I had a heavy hand on a small section of each paper.  I added a scrap piece of music paper to fill the 'hole'.  I then I inked them with crumb cake classic ink, by Stampin' Up!  I just love their products!  Great quality and beautiful production!  

I'm a big fan of sewing on cards, and so I did a double messy border stitch along the smaller pattern paper.  I made sure not to stitch over my tear {smile}.  I think machine stitching always adds such a 'home-spun' look, and helps elevate the craftsmanship.  (my opinion)

I had three small scraps of some of my favorite trims sitting on my craft table.  And you know me!  "Use what you have!"  So, I machine stitched the tulle ruffle piece under the cotton trim piece first.  And then machine stitched the white thin crochet piece over them {smile, love it}.  I purposefully left the top of the cotton trim peeking out over the crochet trim.  I also used the edge of my scissors to help 'un do' the cut edges.
I made a double bow with some cream cotton twine from Paper Trey Ink.  I just love this stuff!  And then I made a double bow out of some pale pink seam binding.  But, it looked too pink for this card.  (hard to believe anything could be 'too pink'.)  So, I had a left piece of light cream seam binding sitting on my craft table, so I tied a bow around the pink  double-bow, to create this triple-bow piece.  I think that the light cream seam binding helps soften the look, and adds a little neutral to the pink.
I took off the legs of a vintage pearl brad, and used glue dots to adhere the brad top to the bow collection.  And then I added a clear crystal dangle in the bottom of the multi-loop bow collection.
I pulled out two small pink and white paper blossoms.  I added white paint to their pink petals, and some glitter.  And adhered them to the top of my sweet bow collection.
For the sentiment, I stamped the piece onto shimmer white card stock by Stampin' Up! in versa mark ink.  I added some pale pink embossing powder and heat embossed this piece.  I added some foam tape to the back and adhered it to a scrap piece of very vanilla card stock, by Stampin' Up!.  I fussy cut the very vanilla piece by hand, and used a photo corner punch to make the banner ends.

I actually finished the inside of the card.  I took a piece of whisper white card stock and matted it with some blushing blossom card stock, both by Stampin' Up!, and did a little machine stitching and some hand stamping {smile}  Hoping these two steps would show some cohesiveness of the card front and inside.
Well, thank you for visiting, and getting the scoop on my creation.  Now, I need to get this card in the mail.  Yeah, it is actually going to someone special.  Sorry if you were looking to purchase this card out of my Etsy shop, HERE.  {frown}  I hope you have been inspired, or motivated to play along in any of these challenges!  All of them are great, creative, and inspiring on their own, too!