Showing posts with label silver cord. Show all posts

Sunday, December 23, 2018

Rustic Christmas

Happy Holidays to everyone.  I created a card for one of my favorite challenge sites.  And this has 2 happy endings - I got the opportunity to get back into my craft room, and I am a guest designer!  The wonderfully creative ladies over @ Word Art Wednesday have asked me to create a card for their current challenge {yahoo!}.
So, without further ado, here is my card:


Recipe:  this blank-inside card is a typical A2 size (4 1/4" x 5 1/2").  I used a soft kraft card stock for the card base.  I just love this true 'cardboard' color.  I used a 'peeled paint' pattern paper as my first matt.  I love this worn look.  It reminds me of old country barns.

The second matt, is a soft, vintage plaid of red, green, and cream/vanilla.  It looks so country, and so home-y.    I did add a kraft matt, to this plaid matt, and then used my sewing machine to add a simple border stitch to this piece.  I wrapped a piece of red buffalo check ribbon around the pattern papers, and then tied a simple bow.  To keep with the over-all look of the card, I tied a wooden button to the bow with thin silver cord.  There is a tiny charm tied to that wooden button.  It is a vintage holy leaf with a bell.
To add a little flair, I added a candy striped poinsettia just above the button-bow combo.  This paper blossom is from the Sweet Peppermint collection by Prima. I thought the stripes matched beautifully with the plaid in the matt, and that vintage silver glitter just adds the right amount of nostalgia {smile}.  I used the word file provided by Word Art Wednesday for my sentiment.  I adhered it to the card front with foam tape.  And it works just beautifully!
My card is simple.  But, I think it has a lot of flair and country charm!  I hope you are able to play along with us @ Word Art Wednesday.  Because I know we just can't wait to see what you create!
I hope everyone had a nice Christmas holiday, and was able to spend time with family and friends.

Monday, July 18, 2016

Hello There Friend

Howdy.  I made a card yesterday for a special girlfriend.  She moved to Yuma about 4-5 years ago.  I miss her most days.  She was always easy to talk to, and had such a great outlook on life.  A very positive person.  Anyways, I wanted to send her a card.  A very special card, for a special woman.
I am entering my creation into the current challenge over @ Word Art Wednesday, for their anything goes challenge.
I am also entering the current challenge over @ Crafting by Designs, for their flowers & lace challenge.  My flowers are digital, but my lace is real.  {smile}

here is what I came up with:


Let me apologize for the 'rough' photo.  I am still figuring out the new upgrade on my photo program.  

Recipe:  I used white card stock from Paper Trey Ink.  I just love their heavy weight card stock.  It works great for card bases.
I used a scrap piece of baja breeze designer pattern paper, by Stampin' Up!.  I just love the faded blue color.  Very vintage, and works with shabby chic style paper crafts {smile}.  
I adhered a digital library card to the center.  I added a double border with my sewing machine.  I just love sewing on cards. 
I wrapped a piece of white lace and baja breeze seam binding around the lower portion of the library card.  I secured the trims to the card front with a double machine stitch.  
I tied a double bow with the seam binding.  I also tied a silver star with some thin silver cord, and created a simple bow.  I tied the silver bow and seam binding bow together with a pale pink button.
I inked the stamp with basic black classic ink, and stamped directly onto the library card.  
To add some softness (and hide an ink smudge) I added a trio of marshmallow sequins to the card front.  Now, I need to get this card into the mail.  Thank you for looking. {smile}
I really enjoyed working with these library cards, so I will be making a few to sell in my Etsy shop.


Tuesday, January 19, 2016

Pretty Vintage Mason Jar

So, I've been busy crafting.  I'm trying to get a few different, and new, items for this weekends Trash to Treasure Trunk Show.  But, I want to have repurposed, recycled, and reused items, that have a new, pretty life!  {smile} And one of the things I love to make for parties, is painted mason jars.  But I didn't just paint and distress my jars.  I also added some trims to jazz-up the jars! {smile}

To start, I painted the jar with cream/vanilla chalk paint.  I wanted a warm color under the main color, of white.  I allowed the paint to dry in-between coats.  I painted the jar with white chalk paint, as my final color and layer.
Once the paint was dried, I started distressing the jars with sandpaper.  I used three different grits of sandpaper.  I started with a medium grit, to knock off the most paint.  I did that, over all the raised lettering.
Then, I used the fine sandpaper to distress areas of the jar that would normally receive some 'wear and tear'.  And finally, some super fine grit sand paper, over the whole jar.  That way, all the brush strokes and 'thick' painted areas could be removed, and allow some varied imperfections to shine through. {smile}
The final touch was a layer of a creme sealant.  I hand-applied the sealant with a sponge and in a circular motion.  Once it set for 30 minutes, I used a soft rag and buffed the sealant.  Now, this distressed jar, will not 'distress' any further with normal handling.
No paint was applied to the inside of the jar; that way you can add fresh flowers, or a plant, or anything else that may require water.  *Just be careful not to soak or scrub the outside of the jar.
Now, let me share another jar.  This one is distressed in the same manner as the other jar.  However, I added some silver gilding randomly to add some antique sparkle.
I wrapped some taupe colored lace around the mouth of the jar.
I then added some antique pink tinsel just above the lace.
And then I added some pink and white paper shred garland.
The final touch, was a pale pink seam binding multi-loop bow, tied with thin silver cord, and an antiqued star added.
Thank you for stopping by today to see what I have been crafting.  I hope you have been inspired to paint and distress an empty jar for yourself.  And have FUN decorating it with what you have on hand.  {smile}

Tuesday, November 24, 2015

Blue Fabric Scrap Holiday Tree Gift Bag

Howdy!  Oh boy!  I had so much fun making my other 'tree', that I decided to make another. {smile}  The wonderfully talented and inspirational ladies over @ the Shabby Tea Room have a current challenge O' Christmas Tree, and the inspirational photo is just to die for!  Super adorable and simply country!

Look at these layered/stacked strips to create Christmas trees!  The distressing, the buttons, and the pretty stars make these simply beautiful!
I am also entering this holiday gift bag in the current challenge over @ Unicorn Challenge Blog.  Their current challenge:  Christmas is Coming, and I think these bags are perfect!


and here is my other fabric scrap 'tree':


I had so much fun making the first one, that I just had  to make another!  I used Pool Party, Real Red, and silver accents to create this ice-y holiday gift bag.  
I used fabric (retired) from Stampin' Up!.  The ribbons and trims are from various makers.  (notice the red velvet ribbon?  purchased that on sale!)  I tied on buttons (retired) from Stampin' Up! and Paper Trey Ink, using the current silver thin cord from Stampin' Up!.  
The snowflakes stamped on the shimmer white card stock are retired from Stampin' Up!.  I used going grey classic ink, by Stampin' Up! to create the background and sentiment piece.  
Once again, I added machine stitching.  I think it just adds that homespun look and feel.  I added a silver glitter star to the top of this tree.  And a silver tone snowflake charm to the sentiment piece.

These and many more gift bags will be for sale at my next holiday craft fair.  I hope you get a chance to stop in and pick up some wonderfully crafted homespun holiday gifts and packaging.


Thank you for stopping by.  Im heading back into my craft room to finish up on a few desk top calendars.  I love making these.  They add that special personal touch to your office space/desk.


Saturday, November 21, 2015

Vintage Frost Christmas

Howdy.  Yeah, crafting, crafting, and bit more crafting for my next holiday craft fair.   I found some wonderful pattern papers that I had in my holiday stash, and super happy to create with them {smile}.  I had 'won' a 6" x 6" pack of Vintage Frost Basics pattern paper by Maya Design (from Sweden).  And I just love it!  This paper pack has vintage winter pattern papers in pink, blues, and brown, with images of angels, ice skates sleds, mittens, snowflakes, stars, and Santa {smile}!  Super special.  
The biggest draw back of crafting during this time of year, is that it is dark when I leave for work and dark when I return home.  So photography is difficult.  {frown}
One of my favorite European challenge sites is ScrapMagic.  I just love their inspiration boards.  Very inspiring, and really gets your crafting mojo running.  Here is their latest inspiration board:
No. 13 : Beige & Blue
Color requirements:  blue and beige
Mandatory elements: rhinestones, pearls, and lace
challenge closes November 30th.

I am using a sketch from Retro Sketches:

this sketch challenge is now closed.  I missed the deadline.

I am also entering A Snowflake Promise challenge:
theme: Christmas/Winter

and here is what I created:


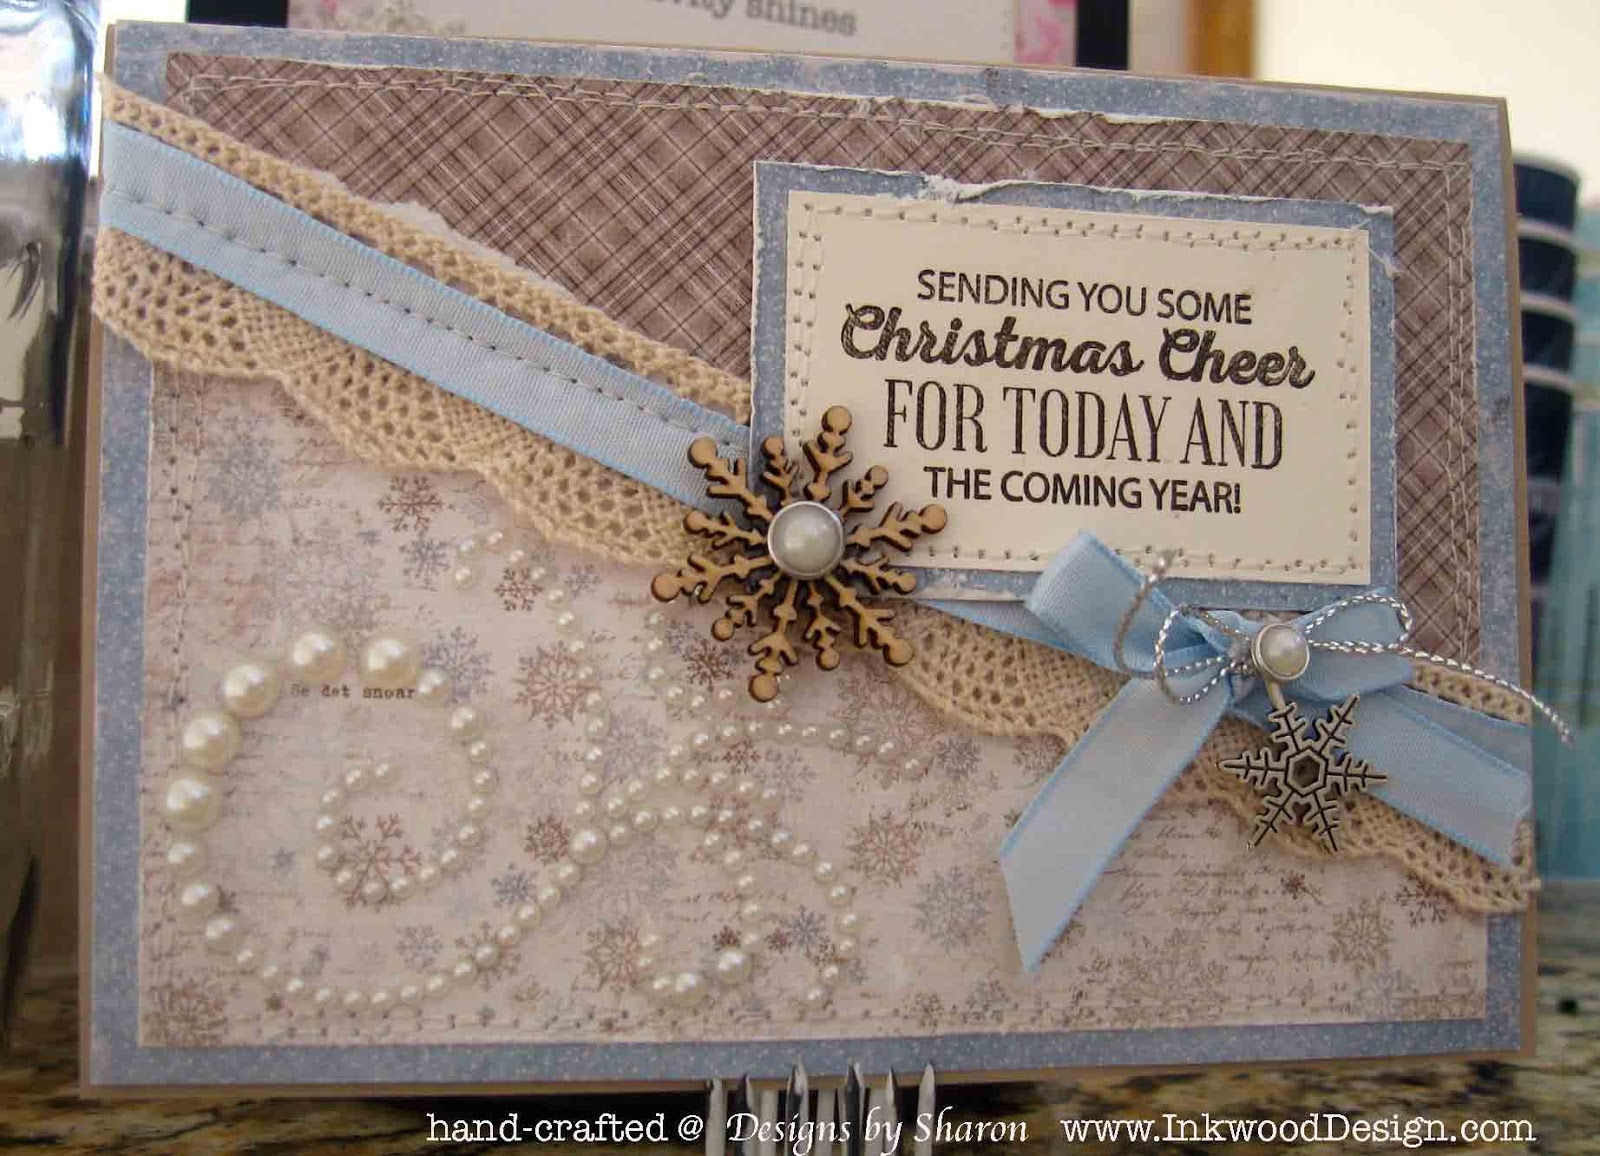
I took two sheets of the pattern paper (one blue and brown snowflake, and brown check) and torn each in half diagonally.  I didn't want to waste any of the patten papers, so I made two cards with my two torn papers.


Each card was made the same way, just changed the sequence of the papers, the snowflake embellishments, and the sentiment.  I made two 6" x 4 1/4" blank greetings cards.  I adhered the two torn pieces to the blue distressed pattern paper, and did a double border stitch with my sewing machine.  
I then stacked the crochet trim and light blue taffeta ribbon, and machine stitched the trims to the card front.   I tied the blue taffeta ribbon into a simple bow.  I tied a snowflake to the bow with thin silver cord, and added a silver rimmed pearl to the silver cord bow.
I stamped my sentiment in Early Espresso classic ink, onto very vanilla card stock, both by Stampin' Up!.  I matted the sentiment block onto the same distressed blue pattern paper as the main card.  I also added a double border stitch.  I adhered the sentiment block to the card front with foam adhesive.  I added a pearl swirl diagonally below the sentiment block.  I also added a wooden snowflake and rimmed pearl to the sentiment block.  


Thank you for looking.  I hope that I have been inspired you to create something beautiful.  {smile}


Saturday, December 27, 2014

love u

Howdy!  I hope everyone had a fabulous holiday! and that you were able to share it with family & friends.  We did!  We had a wonderful Christmas.  My mom came into town, and as always it is wonderful to spend some time with her {smile}.  We got to spend sometime at our daughters house.  Her children are just so precious.   Anyways, one of my new years resolutions (typically every new years) is to spend less on crafting supplies, use what I have, and get my supplies in order.  So, before I head into my craft room to clean up the clutter of holiday crafting these past several months, I want to share a card I made this morning.
The wonderful ladies over @ Divas by Design have a final challenge: anything goes!  
And here is what I made:


I didn't purposefully set out to make a valentines card.  It just kinda happened.  So, lets get started with the recipe and a few close ups {smile}.
The card base is aqua mist card stock from Paper Trey Ink.  I just love the weight of their card stock - heavy, yet workable.

The matt is lagoon from stampin' up!.  I just love this new color.  The floral pattern paper is a digital paper I recently purchased.  Love the polka dots and the colors.    The middle panel is also a recent digital purchase, also.  I thought the blue 'love' piece matched the blue in the floral pattern paper.  i also loved the flowers on this piece.
I matted that piece onto a textured pool party card stock by Stampin' Up!.  
I did a little machine stitching.  I just love the look.  The top banner piece is actually a christmas pattern paper that I had a scrap of, so I just flagged the end.  I did a sloppy machine stitch.
I tied a blush button by Amuse Studios with a thin silver cord.  I added a white tag that I had laying around my crafting space.  I die cut the 'U' from silver glitter paper, by Stampin' Up!.  

I added a scrap piece of white lace trim piece I had left over from holiday card making.  I also added some pink pirouette seam binding, by Stampin' Up!. I tied the seam binding into a multi-loop bow, and added a vintage kraft button by PTI.  I hot glued a Melissa Frances key hole.  And I added a pink heart stick pin.  To finish off the card, I added several white faceted sequins.

All the edges of the different papers were sponged with crumb cake classic ink, by Stampin' Up!

Thank you for stopping by.  Now, I must head into my craft room, and clean up the mess I created from my crafting for the past holiday craft shows.  See ya soon!


Saturday, December 13, 2014

Peace & Joy

~ large photo post ~

Howdy, howdy, howdy!  Whew!  my craft fair circuit is done.  And I have to say, 'thank you!' to all of the folks who had stopped by my booth to look, investigate, and purchase my hand-crafted paper goods.  It really feels good, to have folks (other than your family) 'like' what you do.  It validates your efforts, your vision, and your artistry.  thank you so much! {smile}
I already have ideas for next years craft fairs.  How crazy, huh?  But, before that, I need to work on the job at hand: my Christmas cards.  Yeah, I haven't even started making them.  But I know what I am going to make.  And I have already calculated how much pattern paper and card stock I need to make my Christmas cards.  So, before I head out to the store, let me share a craft with you.
The wonderfully talented ladies over @ Craft Hoarders Anonymous Challenge want to see your holiday hoard collection being used.  I know you aren't surprised that I have quite a hoard collection.  So, let me share with you another craft I made.


These gift bags are made with a majority of Stampin' Up! supplies.  Yeah, I have a hoard collection of that, too! {smile}   The finished bags measure 3 3/4" x 8 1/2".  The bag inside measures roughly 3 1/2" x 6 1/2" x 2".  So, not a lot of space.  But, these are so sweet, that the bag also works as part of the gift.  So, small trinkets fit: lotion, candy, jewelry, gift card, gloves, perfume, etc.
Recipe:  The bag base is made with Pool Party card stock.  The matt is made with Lagoon card stock. I used the new All is Calm DSP (designer specialty paper).  I just love the blues (and greens) with white and silver sprinkled through.  So, I paired two 'similar in concept' (snow falling) pattern papers.  (dots and snowflakes).  
I did a single machine stitch border around the top pattern paper.  The bottom pattern paper is able to 'stand' on its own, with the large silver embossed font.
I stamped the sentiment in versa mark, and sprinkled with silver embossing powder.  And heat embossed: this creates a raised lettering.  
To hide the seam, I wrapped a piece of white lace trim around this piece, and topped it off with a piece of the lagoon satin ribbon.  I tied a simple bow with another piece of the lagoon ribbon.  To jazz up the bow, I tied another bow with a piece of thin silver cord and an altered jingle bell*.
For the top of the bag, I cut two snowflakes.  The large snowflake I used dazzling diamond glitter paper.  The second snowflake I used the silver/vellum pattern card stock.  I added a bermuda button and tied it with thin silver cord.
The angel is a free download found here.  I adjusted the size and printed onto whisper white card stock.  I used foam tape to pop the angel. {smile}
To finish the bag, I glued a piece of the white/silver pattern paper (from the same collection) to a small clothes pin.  I also added a long piece of pool party cotton ribbon (2 feet).  I used coordinating but different ribbon, to repeat the different colors of blue in the pattern paper.  
For the tag at the top, I stamped the sentiment in lagoon classic ink onto whisper white card stock, and matted it onto pool party card stock.  I used the cordinating oval and scallop oval hand-held punches by Stampin' Up!. 
The stamp set  used to stamp the bags is Snowflake Serenade.  The stamp set used to stamp the tags is Signature Christmas stamp set.  The die to create the snowflakes is the Fancy Snowflake die.  All of which are from Paper Trey Ink.
Thank you for looking.  I hope you all are having a great weekend.  I am off to town, to pick up the last few sheets of pattern paper, and rolls of ribbon to complete our family Christmas card. {smile} Don't forget to head over to Craft Hoarders Anonymous Challenge.  I'm sure you can whip up something with your precious collection of holiday crafting supplies! {smile}


*altered jingle bell: paint your jingle bell with acrylic paint (I used titan white). While the paint is still wet, dip the bell in glitter (I used dazzling diamond glitter).  Once the bell is dry, spray with Aqua Net hairspray.  This will seal the glitter to the bell, so it doesn't flake off.  

Sunday, November 23, 2014

Magnetic 'A'

Howdy! and yeah, I have been crafting more {smile}.  It's really a joy and not a job.  I sometimes wonder what my dear husband thinks.  Hummmm.
Anyways, one of the items that I make and sell at the Arts and Craft Fairs that I attend are magnetic letters.  The letters measure approximately 4" tall, and anywhere between 3 1/2" to 4" wide.  I make them with the intention to be a monogram of sorts.  But really, after you make your purchase, you can use them in any fashion you desire.  {smile}
Each letter is uniquely decorated, and the back and sides are painted.  I adhere two very strong magnets to the back.  They cling to most metal surfaces: locker, metal message board, refrigerator, and such.
Now, from my style (shabby chic), you would think that my customer base is women.  Well, that isn't exactly true.  My youngest recipient has been a 5 year old boy.  And I sell almost half my letters to teenage girls.  Who would have thought?  But, if truth be told, I don't have a customer in mind when I create them.  I just love to craft.  So any (and all) sale is a good one!
Here is my latest addition to my supple:


To craft these letters, the easiest way for me to do these, is to think of someone whose name starts with that particular letter, and craft for 'them'.  I know, it's not very scientific, or easy to duplicate, but that is my process. {smile}  
And here is a little more truth: I crafted this letter with Rachel Ashwell in mind.  She is the creative mind behind the shabby chic couture collections at Target: yeah, the store.  I don't know her, but I was inspired by her 'work'.  
I do take special orders on magnetic letters.  Just convo me as to what letter, and what your likes and dislikes are.  For example:  'F' - love florals, polka dots, buttons, keys, pale purples, and silver.  dislikes are birds, hearts, and pinks.   I sell these letters for $8 each.  There isn't an extra fee for special orders.  Just a time frame.  I can easily create one in a two week time period.  But, I have done a special order in a week.  
So, if you are looking for an unique gift during this holiday season, for someone special: mother, grandmother, sister, bff, teacher, baby sitter, or a great co-worker, these make wonderfully personal gifts.  {smile}
I'm heading back into my craft room, to craft a few more! {smile}  On a crazy side note, I can't find any 'Z' letters.  {frown}.  I think that's odd.
Anyways, have a great day, and enjoy the last of your weekend!  


Monday, July 14, 2014

Bunco Six

Prize number six.  Remember we are counting backwards from eleven.  Let's get started with our prize reveal!  [sorry, with a lot of last minute juggling of different problems, some photos were 'forgotten' to be taken, and therefore, I do not have photos of prize number seven.]
Now, with a lack of time, due to work, family, and some last minute decorating changes and menu items, these photos are not the greatest, or the clearest.  Deepest apologies!


A fabric covered composition book.  The greatest thing about this book cover, is that, once the book is used up, simply remove the book, and slide in a new one!


I used a mix of cotton and linen fabrics, along with a sweet trim.  The wooden button, helps keep it rustic!  While keeping the overall look shabby chic country!


To keep the gift card matching the gift bag, I used the same trim, and grey polka dot pattern paper.  I added a kraft seam binding to help coordinate the gift card to the kraft paper bag.  The added silver cord bows on wooden buttons, adds charm {smile}.