Showing posts with label fabric. Show all posts

Saturday, July 1, 2017

Vintage Red, White/Cream, and Denim Blue

Howdy.  I've been busy trying to get out of a funk.  Trying to stay motivated to keep running.  Keeping up with chores.  And trying to find my passion for creating.
This little project took me about a week.  Only because I didn't want to spend any money completing this project.  I am seriously trying to 'use what I have on hand' instead of just buying more stuff.
I have seen several beautiful 'vintage' american flags on the internet.  Mostly Pinterest.  And well, I felt a desire to create one.  I used scraps of various fabrics, lace, and trim to create mine.  I wanted something that conveyed 'old', 'americana', and simply shabby chic pretty!  Here is what I made:


2 1/2' x 4'

To display your American flag, the union jack is ALWAYS at the upper left corner, regardless of its vertical or horizontal.
The union jack (blue panel) is made from denim.  I machine washed it, to give it a soft feel.  And then I machine stitched various red and white fabrics & trims.  The stars were cut with a star die, using scrap pieces of the blue/white fabric in the flag.  I wanted materials that looked vintage, or had that Americana 'feel'.  I am happy with how it turned out.  I just don't know 'how' to hang it.  Any suggestions?
The 3 I's in the center is for my family.  My ancestors were part of the American Revolution.  The 3 I's represent the 3% of Americans who originally fought against the British.  After the war, these fighters were awarded land 'out west' as payment by our government.  Thank you for your bravery! 
Some of the fabrics were not long enough, so I simply stitched pieces together, to create longer strips.  I think that this piecing together, helps give it a 'worn' look.  
Thank you for stopping by.  Enjoy your American Independence weekend.  Thank a solider for their service & duty, and remember those who have sacrificed.


Saturday, October 29, 2016

Finished Frames

Howdy.  I wanted to share the altered frames that I finished and just forgot to post the images.   {frown}  Sometimes I think I have too many items on my 'plate'.  Or maybe I just need to get organized.  Either way, here are the finished frames. (original post HERE)

wedding or baby boy

baby girl or shabby kitchen

I picked up these frames from a discount store.  They measure roughly 6" x 6".  The photo opening measures 4" x 4".   I just loved the overall look of the frames: the cluster of roses in each corner, the scalloped edge, the beaded trim around the opening.  Just pretty.  
I made two different looks.  The first frame, I used a kraft colored linen as the fabric piece.  I thought the contrast between the white of the frame and the color of the linen was pretty.  
I machine stitched three different cotton trims to the middle of the piece.  I added a ticket, a paper blossom, a key, and button to the cluster of objects for the focal piece.  I tied a piece of pale blue seam binding around the key.  I was thinking 'wedding' for this framed piece.  But, it really doesn't have a specific piece.
The second frame I wanted to make a bit more feminine.  So I used a white and rose print cotton fabric.  I machine stitched two pieces of cotton trim.  I added another ticket and button to my cluster.  But this time I added a spoon, tied with pale pink seam binding.  I was thinking baby girl or shabby kitchen for this framed art.  But really, there isn't a specific theme.  
Thank you for stopping by.  I just wanted to share with you what I have created.  {smile}  These two framed pieces will be for sale at my Craft Fairs.  Remember, shop early for the best selection.  {smile}

Thursday, September 29, 2016

Frame This

Howdy.  I've been busy with everything in life, except creating.  {frown}  and I simply couldn't take anymore days without paper, fabric, or bling.   I purchased some frames a few months ago, and decided I needed to get busy creating something sweet, something pretty, and something shabby!  A spoiler alert, these are not done.  {frown}  But, it is a start!
here is what I have been up to:


The top two white frames are not for anyone specific, or any specific occasion.  Just something pretty.  {smile}  The bottom gold frame is for someone special!  I will take more photos when I am done.  I just wanted to share some photos of what i have been working on.  Now, I haven't completed decided on painting or not painting the white frames.  The creative process wasn't stopped!
Enjoy your day!


Monday, May 30, 2016

Rag Quilt Insert

Happy Memorial Day!  I hope you are well.  And don't forget to give Thanks to those military personnel who have sacrificed and who have fought for the freedoms we enjoy today!  {a moment of silence to say 'thanks' and say a prayer}
I have been working on my 'bed spring light' over the weekend.   I have the frame, which was shown earlier this month.  But, I was struggling with what to put behind the bed springs.  And I believe that I have it figured out!  (yeah!)  I recently purchased this gorgeous Rachel Ashwell shabby chic fabric, and some linen in a light kraft color and a dark brown-copper color.  I believe that I will be mixing all of them.  {smile}
I took the shabby chic fabric, and the light kraft linen fabrics, and cut them into scallop squares.  I also added some cream colored battling between the two fabric pieces.  Made little 'sandwiches' and sewn them together.  

shabby chic fabric squares
I sewn a simple X across each scallop square 'sandwich'.  Then I sewn the squares together in each row.  And then, the rows were sewn together.


Finally, I used super sharp scissors to cut snips in the fabric between the blocks, and machine washed this piece again, to help 'fluff' the snipped fabric between the squares.


Yes, the finally piece has the blocks in a different order. {frown}  Unfortunately, I was doing other 'things' while putting the rows together, and didn't realize I had the bottom two rows switched. {frown}  And now, that I am looking at this photo, I realize that I have two of the same blocks in the same row.  What the heck!  Well, this is the final piece.  I will not be making any changes.  Remember (or at least, this is what I am telling myself) a section of rusty bed springs, with lights will be sitting right on top of this piece.  I created this rag quilt piece to help give the 'bed spring light' a shabby chic, feminine look.  Hopefully, (fingers crossed) that with the bed springs, lights, drag chain, and chandelier crystals on top of this  piece, will distract your eye, and you won't notice the two pink ruffled squares in the same row.
Please stay tuned.  I will be going into town today, to pick up some globe lights for this piece.  The chandelier crystals should arrive around the middle of June; so a few weeks away.  But, I am planning on adding the chandelier crystals after the bed springs and lights are 'attached'.  I'm getting closer to being done!
Thank you for stopping by!  Have a great day, be safe, and take some time to craft something!


Friday, April 29, 2016

Junking

While in Phoenix, this past week, I stopped by two very special, vintage, 'junking' shops:  Sweet Salvage and Melrose Vintage.  And oh my!  I just love both of these vintage, chippy paint, junking stores.  They are both very different, but very wonderful!
My first stop was @ Sweet Salvage.  This shop is on 7th Street.  And only open 4 days a month.  Yeah, you read that correctly.  4 days a month.  The third thursday thru that Sunday, this vintage, retro, 'junking' store opens its doors to an eager community.  I took my oldest granddaughter, and she loved it too!  We are now planning another trip.  {smile}


I picked up these bed springs.  Well, I also picked up a vintage skirt, some cheese graters, a window, and a few other little trinkets. {smile}  Now, when I brought these home, my husband was speechless.  Rusty bedsprings?  You paid cash?  Yes, I did!  I have plans for these bed springs.  I want to create a decor piece with them.  My current 'plan' is to distress a wooden frame, insert a burlap covered matt board.  I want to attach the bed springs to the burlap.  I'm thinking with a staple gun.  I also want to string lights through the bed springs.  I'll take pictures, during my process and share those with you, soon.  {smile}

And right down 7th street, is this charming, vintage shop: Melrose Vintage.  This little shop is open a few days a week, Wednesday thru Saturday.  This beautifully decorated shop has vintage, french furniture, antiques, decor items, Rachel Ashwell fabrics and paints, and a scrapbook section.


I picked up three different Rachel Ashwell fabrics at this vintage shop, along with a whole roll of this sweet pale pink seam binding.  I know, how super beautiful!  I don't have any 'real' plans for the fabric, but these beautiful, pink blossom fabrics, will add just the right amount of shabby chic-ness to any project.  {smile}


I also picked up some pattern papers, these paper blossoms, sequins, tins, and 2 rolls of this beautiful frayed-edge fabric.  The tins are pretty shallow, so those will make wonderful holiday ornaments.  The roll of fabric will be used for another fabric strip banner.

Thank you for stopping by.  I will be baking cupcakes tomorrow for a party.  I'll take a photo or two and share those with you, too!  Have a great weekend, and hopefully you get a chance to create something beautiful!


Sunday, November 29, 2015

Christmas Roses Gift Bags

Howdy.  I hope this post finds you all well, and busy making stuff {smile}.  Me, of course!  I had such a great time making my previously posted fabric scrap 'trees' that I decided to make several more, using various fabric scraps.  Today, I want to share a new red gift bag.
I am entering this bag into these three challenges:  Die Cuttin Divas, Inky Impressions Challenge, and Crafting By Desings.   
The wonderfully talented ladies over @ Die Cutting Divas have a great holiday preparations challenge:  Tag, Bag, or Box.  Sounds perfect! and let's just admit it, something we need to get crafting, anyways.  {smile}
I am playing along with the creative design team over @ Inky Impressions Challenge.   Their current challenge is to use: Traditional Christmas Colors: Red, Green, and Kraft.  I believe this is right up my alley, so to speak.  The design team has done a wonderful job at providing us with some inspiration.  
I am also playing along with the ever inspiring design team over @ Crafting By Designs.   Their current challenge is themed: getting ready for Christmas.  I think all of us can create something beautiful to play along with their challenge, too. {smile}
Finally, I am using the inspirational photo from the card Concept.  I am not 'playing' along with their challenge, due to the fact, that their challenge site is for cards, and not projects.  But their inspirational photo is very beautiful, home-y, and a bit vintage-country. {smile}


and here is my Red Holiday bag:


close-up of the 'tree'
Recipe:  The outside of the bag measures 4 3/4" x 12" .  The 'bag' itself measure 4 1/2" x 9 1/2".  For the base of the gift bag, I used a rich, dark red card stock, very similar to Cherry Cobbler card stock by Stampin' Up!.
I used very vanilla card stock for the main panel, and matted that with my favorite Kraft card shock by Paper Studios.  I used a snowflake stamp set to hand-stamp the snowflake background in crumb cake classic ink.  I just love how 'soft' this color is on vanilla.  {smile}  I added a single border stitch with my sewing machine.  I think it really adds a 'finished' and homespun touch to my projects.
I used a kraft striped paper straw as my tree trunk/branch.  And then I just tied various fabrics, crochet trims, ribbons and trims to the straw.  I then added my tree topper (red velvet bow), and vintage buttons tied with kraft twine.
I trimmed the fabric strips in varying lengths to create the 'tree' shape.  I used hot glue to adhere the 'tree' to the snowflake stamped panel.
The sentiment is from a homespun holiday stamp set by Paper Trey Ink.  And then finally, I added a wooden snowflake to the sentiment rectangle and topped it off, with a green faux half pearl.

I finished the bag with a decorated mini clothes pin, and a gift tag.
Thank you for looking.  I hope you have been inspired to craft something beautiful for your holidays.


Tuesday, November 24, 2015

Blue Fabric Scrap Holiday Tree Gift Bag

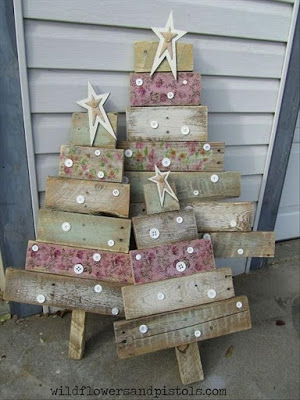
Howdy!  Oh boy!  I had so much fun making my other 'tree', that I decided to make another. {smile}  The wonderfully talented and inspirational ladies over @ the Shabby Tea Room have a current challenge O' Christmas Tree, and the inspirational photo is just to die for!  Super adorable and simply country!

Look at these layered/stacked strips to create Christmas trees!  The distressing, the buttons, and the pretty stars make these simply beautiful!
I am also entering this holiday gift bag in the current challenge over @ Unicorn Challenge Blog.  Their current challenge:  Christmas is Coming, and I think these bags are perfect!


and here is my other fabric scrap 'tree':


I had so much fun making the first one, that I just had  to make another!  I used Pool Party, Real Red, and silver accents to create this ice-y holiday gift bag.  
I used fabric (retired) from Stampin' Up!.  The ribbons and trims are from various makers.  (notice the red velvet ribbon?  purchased that on sale!)  I tied on buttons (retired) from Stampin' Up! and Paper Trey Ink, using the current silver thin cord from Stampin' Up!.  
The snowflakes stamped on the shimmer white card stock are retired from Stampin' Up!.  I used going grey classic ink, by Stampin' Up! to create the background and sentiment piece.  
Once again, I added machine stitching.  I think it just adds that homespun look and feel.  I added a silver glitter star to the top of this tree.  And a silver tone snowflake charm to the sentiment piece.

These and many more gift bags will be for sale at my next holiday craft fair.  I hope you get a chance to stop in and pick up some wonderfully crafted homespun holiday gifts and packaging.


Thank you for stopping by.  Im heading back into my craft room to finish up on a few desk top calendars.  I love making these.  They add that special personal touch to your office space/desk.


Red Fabric Christmas Tree Bags

Howdy!  Oh, it feels good for my soul to craft, sew, and just simply create!  I saw the inspirational photo over @ the Shabby Tea Room for their current challenge, O' Christmas Tree.  and oh boy!  That photo gave me the idea of making some Christmas trees from fabric scraps.  I imagine you can do the same with strips of pattern papers.  Umm, maybe I'll create a few of those, too! {smile}


Look how super cute and country this is!  I love the buttons and the stars on top are just adorable!
I also stumbled upon a 'new' challenge site to me: Try It Tuesday.  They have a new challenge: Bags & Boxes.  So, I thought how perfect!


here is what I made:


I made a gift bag, and used the inspirational photo to create the cover.  I made a fabric scrap holiday 'tree' with traditional red and green holiday colors.  I used fabric (retired) from Stampin' Up!, ribbons  and trims from various places.  The buttons (retired) are from Stampin' Up!.  The kraft twine is from PaperTrey Ink.  The tags, and stamps are from Paper Trey Ink, as well.  
I stamped the snowflakes in kraft ink onto vanilla card stock.  Matted this stamped piece with kraft card stock.  I did a purposefully sloppy double machine stitch border.  
I tied my various fabric and trim scraps onto a kraft striped paper straw.  I hot glued the 'tree' to the card stock.  
I tied a simple bow with the red ribbon strung through a Webster's Pages chipboard button and used hot glue to adhere it to the top corner of the sentiment piece.

Thank you for stopping by.  I hope you have been inspired to play along with the talented ladies over @ the Shabby Tea Room & Try It Tuesday.  My gift bags will be for sale at my next holiday craft fair.  Hope to see you there!


Wednesday, February 18, 2015

Fabric Banner and Tutorial

~ photo heavy post ~

Howdy!  If you were here this weekend, I had great asperations to have an Explosion Box to show you.  Well, I have never made one, and so my first attempt is taking longer than I expected.  Therefore, I don't have mine finished.  But it is underway.  And yeah, its a Baby Girl theme.  {smile}
I hope to have it done in a few days.  You see, I won't be able to work on it until the evenings when I get home from work, and finish my wife-ly chores (cooking, cleaning, laundry, etc).

But I did want to share with you another craft I finished Sunday evening.  {smile}.  I have been wanting to make a fabric rag banner for quite a while now.  I see them on the internet, and the tutorials say they are 'easy'.  So, I have finally sat down to create one.  There are quite a few photos, so grab something to drink, and take a look at what I made! {smile}

Fabric Banner
I made a shabby-chic fabric strip banner!  I have to admit, when I was done, I was sooooo happy with it!  I couldn't stop smiling!  I love a project that comes to together with ease and actually looks the way you believe it will, when you are done!  So, let's get started with this tutorial!
I have looked at several (and I do mean several!) tutorials.  They all basically say to start with 5 different fabrics.  Well, I didn't.  I wanted my banner to be a product of a mixture of what I had on hand, and what I envisioned it to be.  I wanted something shabby chic, farm-land, country, sweet, and a lot girl-y.  So I started with three fabrics I had purchased just for this project.  These fabrics are from Tilda.  Love their stuff: paper, fabric, ribbon, embellishments, etc.

these are the fabrics I used.  Fat Quarters
I used fat quarters for my fabric sizes (18"  x 22").  I didn't want a long banner, or a super short banner.  I washed and dried my fabric before I started.  I wanted that soft, 'worn' look. 
I laid my fabrics out, and with a ruler, cut a slip at each inch, on the long side.

cut slips one inch apart
Now, this will seem a bit rash, but tear your strips.  Tear the fabric.  It's ok, tear it.  By tearing it, you give the fabric a rough edge.  Which is what I wanted.  But, if that is NOT what you want, cut it.  I would suggest a rotary cutter, so your cuts are straight.  You could also use peeking sheers, so you have a decorative edge.
Now, gather more 'material' that you believe coordinates, and cut/tear lengths that measure the same as your fabrics.  I used trims: ribbon, lace, seam binding, and decorative trim.

my three fabrics, white lace, trim, gold satin ribbon, blue seam binding and pink seam binding
I used a thick twine for my 'sting' to loop my pieces onto.  I simply pulled out a length of the heavy twine that roughly measured the length I wanted my banner, and then added a foot and a half on each end.  That way, I would have plenty of length to tie my banner.  
To start, I looped a strip of the white lace at each ending point.  This served two fold: mark the end and to keep my banner confined to a measured space.
Next, I only had enough length for three strips of the gold satin ribbon.  So, I tied one to the center of the banner space, and then eye-balled the placement of the other two strips.
Next, I only had four lengths of the cream ball trim.  So, I looped those pieces onto the twine, so that the banner was divided into quarters.
This type of measuring isn't exact, but it did help guide me as to how many fabric strips to add to my banner, so that it looked balanced, and not too wonky.
Lets get those fabric strips on the twine!  My pattern was simple.  Fabric. Fabric. Fabric. Lace. Fabric. Fabric. Fabric. Lace.  I think the blue floral pattern fabric looks the boldest/strongest, so I used that fabric strip as my middle fabric.  I repeated this pattern across the whole banner length.
I added the seam binding last.  I didn't have a lot of either seam binding.  So, I added a length of the blue seam binding to each side of each gold satin ribbon.  I added a length of the pink seam binding to each side of each cream ball trim.
To finish, I simply fixed any places where the fabric was bunching up, too much, and viola!

close-up of a section of my banner
Now, you are probably wondering what I am doing with the banner.  I don't plan on selling this one.  If you would like me to make you one, just convo me, and we can talk particulars: size, length, price, etc.  This one was made for a friendship high tea I am hosting at my house this year, late spring.  But, I love it so much, it just might make it into my display booth at this years Spring Craft Fair on May 2nd, 2015!
Stay tuned, I promise, I will have photos of an Explosion Box this week!


Thursday, June 26, 2014

Covered Composition Book

Sorry for the delay.  I have been busy getting things organized for two parties coming up.  
So, anyways. . . I saw these fabric covered composition books on . . . well, Pinterest, of course!  And I just had to try my hand at sewing one.  Now, I am not a sewer.  I sew on cards, because its super easy and there is no measuring or straight lines required.  
Here is my finished book cover.


I used this tutorial, and really enjoyed the whole process.  Thanks for looking.  I'll share more soon.


Tuesday, June 10, 2014

Hand Crafted for a Friend


close-up of the tags

Howdy!  Thank you for stopping by to see what I have been crafting.  As some of you may know, I really enjoyed the whole experience of creating my own chicken wire message board.  I enjoyed it so much, I went out looking for another frame.  Well, my excitement got the best of me, and I cracked the frame during the chicken wire installation {frown}.  So, I am out searching for another.  It was kind of an expensive lesson to learn, but it has been learned.
Anyways, while I was altering that one, I also altered a smaller frame for a different project.  My poor husband, he must think I have lost my mind.  This new frame is a lot smaller than my message board frames.  But, it punches a lot of pizzazz!  The 'opening' of the frame measure 3" x 3".
I started with a silver frame (sorry, I forgot to take a picture of it), I spray painted it in Ivory Satin finish.  Let it dry for 24 hours.  Applied my antiquing glaze.  Let it dry for 24 hours.  Applied a sealant.  Let it dry for 24 hours.  And put it all back together.  During the various drying times, I worked on the insert, and accomplished other chores, including going to work, and participating in the swap meet last Sunday.

a Bunco prize
This creation was inspired by a very similar picture frame Tammy Roberts had done.  I actually read her specific blog post and followed her process.  Upon locating her blog post for this post, it appears that her blog is down. {frown}  So, I am not sure what has happened.  But Tammy R. is a very talented person, who shares what she knows and is very inspiring to me {smile}.

a different view to show the detail on the frame
Anyways, here how I put it all together:  Tammy recommended that you cut your fabric, batting, and chipboard 3 inches wider and longer than your photo frame opening.  (I did 2 inches.)  Stack your materials from the bottom up: chipboard, batting, and material right side up.  Sew a basic quilters square.  I don't quilt, so I did a basic diamond pattern.  I started on the two longest diagonals and filled in from there.
I cut a blossom shape out of felt.  I used a spiral blossom piece. (Tammy layered her blossom pieces.)  Tammy also stitched only the very edge of her petals.  I did the best stitching I could.  I am no pro at using a sewing machine, so you can't really see my stitching (its not so much at the edge {frown}).
Adhere a rhinestone to the center of your blossom.  Tammy did the same.  Now add whatever embellishments that catch your eye, tickle your fancy, and have fun!

While I was working on this picture frame, my goal, was to create a porcelain looking frame.  I just love that vintage look.  I applied the antiquing glaze to help showcase the detail on the frame.  Without that definition, the frame looked too flat.  And not from my type of paint, but rather the detail got lost.  
close-up of the butterfly stick pin
The fabric was purchased at a big box sewing store from the remnant bin.  The leaves were hand cut from cream burlap.  The ribbon was purchased at a small craft boutique during a recent trip to Phoenix, Arizona, when my oldest granddaughter had a dance competition.  The tiny clothes pin is from Stampin' Up!.  The tiny tags were made with a tiny tag stamp set and coordinating punch by Stampin' Up!  The kraft vintage button is from Paper Trey Ink, and the rhinestone is from Jolee.  The butterfly stick pin is from Maya Road.

Thank you for looking.  I hope you have found something of beauty and possibly have been inspired as well {smile}.


Sunday, March 31, 2013

Stripes Finished Bag


Happy Easter!  I hope this holiday gives you an opportunity to spend time with both family and friends.  We are eating Easter Dinner at my daughter's house.  There is an egg hunt scheduled for the early afternoon.  Im sure the kids will enjoy that.
I finished Stripes sleeping bag, yesterday.  I decided to wait until today, to share this little cutie.  Back story: Stripes is a stuffed animal (zebra) that my oldest granddaughter has carried around since she was 2.  She's 6 1/2 now.  


Haley loves pink.  I purchased these fabrics from a local sewing center (Joann's).  There were originally 4 fabrics that came bundled together, cut into fat quarters.  The patterns are bright and simply beautiful together.  So, this is my first one.  Please have a kind eye, as I am seriously new at sewing.
Here is where I found the instructional PDF.  And I'm glad that I did.
Thank you for stopping by!

Sunday, August 19, 2012

Altered Onesie

Good Morning All!  I hope you are able to spend some time this weekend crafting!  I know that it is always a good day when I can spend time crafting something!  It's a hobby passion of mine.  But, I'm not generally too picky.  paper crafts, altered art, sewing.
My fifth grandchild was born last weekend.  So, I was super happy to help deliver her instead of being in my craft room.  But, this weekend I got to make her something!  Yesterday, I let you in on my idea of altering an onesie for her.
Here is the first one:


and a close-up of that cute little birdie:

I was searching the internet for a 'quick and easy' tutorial on sewing 'patches'.  I just wanted a basic design, nothing too elaborate or difficult.  I'm a beginner sewer.  Is that a word? sewer?  I know I'm not a seamstress.  And, I did a pair of sleeves once.  but that was with major supervision and help.
So, anyway.  I found this lovely lady who did some wonderfully creative appliqué designs.  Sarah @ Daffodil Designs, has this great tutorial found here.  If you are looking for something fairly simple, this is your spot.  Sometimes, simple is just beautiful!  
I went to a discount store and purchased a package of onesies sized 3-6 months.  I figured that she can grow into them.  So, I will be altered the other two today.  But, I just loved how the first one turned out, so I just had to stop and share it with you!  Stop by later this week, to get a peek at the other two.  I'm so excited and super happy with how this project is turning out!
Enjoy the rest of your weekend, and craft something!  I am!