Showing posts with label the shabby tea room challenge. Show all posts

Tuesday, November 24, 2015

Blue Fabric Scrap Holiday Tree Gift Bag

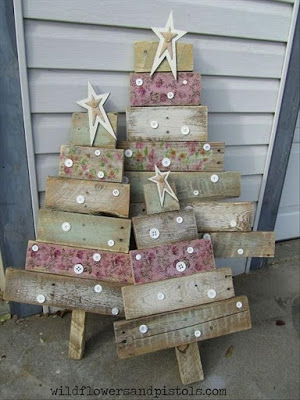
Howdy!  Oh boy!  I had so much fun making my other 'tree', that I decided to make another. {smile}  The wonderfully talented and inspirational ladies over @ the Shabby Tea Room have a current challenge O' Christmas Tree, and the inspirational photo is just to die for!  Super adorable and simply country!

Look at these layered/stacked strips to create Christmas trees!  The distressing, the buttons, and the pretty stars make these simply beautiful!
I am also entering this holiday gift bag in the current challenge over @ Unicorn Challenge Blog.  Their current challenge:  Christmas is Coming, and I think these bags are perfect!


and here is my other fabric scrap 'tree':


I had so much fun making the first one, that I just had  to make another!  I used Pool Party, Real Red, and silver accents to create this ice-y holiday gift bag.  
I used fabric (retired) from Stampin' Up!.  The ribbons and trims are from various makers.  (notice the red velvet ribbon?  purchased that on sale!)  I tied on buttons (retired) from Stampin' Up! and Paper Trey Ink, using the current silver thin cord from Stampin' Up!.  
The snowflakes stamped on the shimmer white card stock are retired from Stampin' Up!.  I used going grey classic ink, by Stampin' Up! to create the background and sentiment piece.  
Once again, I added machine stitching.  I think it just adds that homespun look and feel.  I added a silver glitter star to the top of this tree.  And a silver tone snowflake charm to the sentiment piece.

These and many more gift bags will be for sale at my next holiday craft fair.  I hope you get a chance to stop in and pick up some wonderfully crafted homespun holiday gifts and packaging.


Thank you for stopping by.  Im heading back into my craft room to finish up on a few desk top calendars.  I love making these.  They add that special personal touch to your office space/desk.


Red Fabric Christmas Tree Bags

Howdy!  Oh, it feels good for my soul to craft, sew, and just simply create!  I saw the inspirational photo over @ the Shabby Tea Room for their current challenge, O' Christmas Tree.  and oh boy!  That photo gave me the idea of making some Christmas trees from fabric scraps.  I imagine you can do the same with strips of pattern papers.  Umm, maybe I'll create a few of those, too! {smile}


Look how super cute and country this is!  I love the buttons and the stars on top are just adorable!
I also stumbled upon a 'new' challenge site to me: Try It Tuesday.  They have a new challenge: Bags & Boxes.  So, I thought how perfect!


here is what I made:


I made a gift bag, and used the inspirational photo to create the cover.  I made a fabric scrap holiday 'tree' with traditional red and green holiday colors.  I used fabric (retired) from Stampin' Up!, ribbons  and trims from various places.  The buttons (retired) are from Stampin' Up!.  The kraft twine is from PaperTrey Ink.  The tags, and stamps are from Paper Trey Ink, as well.  
I stamped the snowflakes in kraft ink onto vanilla card stock.  Matted this stamped piece with kraft card stock.  I did a purposefully sloppy double machine stitch border.  
I tied my various fabric and trim scraps onto a kraft striped paper straw.  I hot glued the 'tree' to the card stock.  
I tied a simple bow with the red ribbon strung through a Webster's Pages chipboard button and used hot glue to adhere it to the top corner of the sentiment piece.

Thank you for stopping by.  I hope you have been inspired to play along with the talented ladies over @ the Shabby Tea Room & Try It Tuesday.  My gift bags will be for sale at my next holiday craft fair.  Hope to see you there!


Sunday, March 1, 2015

The Sweet Life, card

Welcome!  my dh plowed all the snow off our driveway, and shoveled it off the walkways!  Yahoo! and the State did come through late yesterday to plow the road.  I can now leave, if I want to.  But, maybe I'll stay and craft something {smile}.
Since I was snow bound yesterday, for a good portion of the day, I decided to make the best of it, and craft!  It was very good for my soul.  But to start the creative juices flowing, I set out to surf the world wide web.  Because these days, everyone wants to share what they have made, and the challenge sites are pretty user friendly.
To start, I stopped by a favorite of mine!  the Shabby Tea Room.  I haven't played in any of their challenges this year, so I wanted to participate.  The ladies there always have wonderful work, and their inspiration is just gorgeous!  This is the current challenge:


Now, for those who know me, isn't this just right up my alley?  Pink, Aqua, flowers, jars, shabby chic goodness!  So, yeah, I have created something for this challenge!


I bet you were thinking that I would have a mason jar on my card, huh?  Well, I almost did!  But, I was struggling with it, and so I decided to let this beautiful pattern paper from American Crafts, take center stage!  The collection is called Polka Dot Party!  The Aqua and Cantaloupe stripe pattern paper has these cute little scottie dogs on the reverse side.  The Cantaloupe and Dark Grey polka dot pattern is a solid aqua with white splatters on it.  And the beautiful floral pattern paper has arrows.  Very modern, and very versatile!  Which is always a good think in paper!  Don't you agree?
 RECIPE:  The card base is Coastal Cabana card stock by Stampin' Up!.  I layered a piece of the polka dot pattern paper onto the stripe pattern paper and ran this stack through my sewing machine to add a simple machine stitch border.  
I then matted a piece of the floral pattern paper onto Crisp Cantaloupe card stock by Stampin' Up!.  Ran that stack through my sewing machine, to give it a simple machine stitched border, too.  I just love how the pattern look 'old', vintage, and worn.  So, that is why I think the machine stitching pairs so perfect!  I tucked in a scrap piece of cream lace trim to the left of the floral pattern piece.
I added a pale pinkish colored crinkle seam binding around the front of the card.  And machine stitched it the front of the card.  I make a multi-loop bow.  Added a pearl brad to the center of the bow and adhered it to the card front.
I stamped my sentiment onto whisper white card stock, by Stampin' Up! in versa mark ink.  I added some silver embossing powder, and heat embossed the sentiment.  This gives some dimension to the sentiment.  I added foam tape to the back of the sentiment square and tucked it in close the bow.  
The final touch was adding some silver faucet sequins to the card front.  It looked like it was missing something and buttons just wasn't cutting it, so I added sequins.  To tie in the pearl brad, I added some pearls to the center of the sequins.  That way the sequins and brad don't look out of place.
Thank you stopping by!  I am having so much fun working with this paper, I just might make some more pretty things!  


Saturday, November 22, 2014

Blessings

The holidays are quickly approaching! and I have been a little busy getting some crafts complete.  To be efficient, I have combined some challenges.  I know, I could probably make more stuff if I separated the challenges, but I am in a pinch for time.
We are hosting Thanksgiving dinner at our house this year.  And, well, I always do more than I have to, and I really like everything to 'belong'.  So, I do a place setting, a Thanksgiving trivia card, and of course a little 'party' favor.  So, I sent out to find some inspiration to get my decorations in order.
I went to some favorite challenge sites, and found some great inspiration!  First stop:  the Shabby Tea Room.  They have a great fall inspired photo to help get those creative juices flowing! oh, and a requirement: burlap and/or twine.  How country/shabby is that?  Awesome!
Here is their inspiration photo:


and then I headed over to Word Art Wednesday.  Their challenge this week is: Anything Goes!  They always include a wonderful scripture, and this week, it fits perfectly with the above inspiration photo.


here is what I made:


I needed to make 5 cards,  and well, the only 'thanksgiving' pattern paper I had, that had colors in it like the inspirational photo, were only scraps (Authentique).  So, that is what dictated the card layout.  I used Scarlet card stock for the card base, by Paper Trey Ink.  I matted the two pattern papers onto Linen card stock, by Paper Trey Ink.  [it is very close to River Rock card stock by Stampin' Up!]
I machine stitched a purposeful 'sloppy' border stitch around the card twice.  I just love how random, and home-y it looks. {smile}
I cut a large scallop trim piece from kraft card stock, by Recollections.  I used this piece to hide the seam where the two pattern papers meet.  
I wrapped a piece of Scarlet satin ribbon, by Paper Trey Ink around the scallop trim.  Then I wrapped kraft twine by Paper Trey Ink, around the ribbon and tied on a wooden button.  (I used glue dots to hold the button in place, so it wouldn't flop around.)
I printed the scripture onto very vanilla card stock, by Stampin' Up!.  Then I did a double matt: scarlet and kraft.
Easy peasy, and pretty plain for me.  But, I do love it!  
Thank you for stopping by! I hope you have been inspired to play along with both of these fabulous challenge sites!


Thursday, December 15, 2011

winning & sew glad we're friends

This is a two part post, so bear with me.
1. (first)
First, I want to say that I know how blessed that I am, that I have the opportunity to paper craft.  Paper crafting is my hobbie.  I love it!  I love the creative part, I love the challenge, and I love to put a smile on someone's face.  I have entered several challenges over these past two years, and I know that I am 'competing' with many, many other talented folks out there.  But, there is still an excitement and thrill, when you win.  These past two weeks, I have entered a theme challenge site, (one of my all-time favorites) the Shabby Tea Room.   I wasn't picked as the 'winner' or 'top three', but I was an 'honorable mention' two weeks in a row.  Here were my enteries:

Winter Picnic

the Magic of Christmas

I am #9 for both challenges.  There is a sense of pride and a thrill to see your name!  So, I hope that you, too, get to have that sensation, and enter a challenge.  Any challenge.  Show all of us what you can do!  

2. (second)
Now, I want to share with you a 'gift' that I made for a girlfriend.  There are 12 of us, who get together the first Thursday of each and every month, to share a meal, gossip, and play Bunco.  One of our new gatherings, has been during the month of December.  We each select a name, and do a secret Santa gift exchange.  We have a price limit of $25, so no one goes broke.  Here is what I made for my secret Santa gift:

picture frame pin cushion & coordinating card

also, a set of Christmas Thank You cards

I packaged the Christmas thank you cards, in one of the boxes I use at my craft fairs.  That way, it looks professional.  There are six cards - blank inside, and seven envelopes.  I usually make a mistake, so I figure that I can't be the only one.
Thank you for looking.  I'm off to get started on my next challenge entry!  Won't you join me?