Showing posts with label holiday. Show all posts

Saturday, February 3, 2018

Pastel Christmas Greetings

Howdy, and welcome to my little piece of blog-land.  I've been a bit busy completing some special orders, and other everyday chores that all of us have {frown}.  But, I did have a chance to create something (I think) is sweet, and pretty {smile}.
I am entering my creation into two challenges:  Merry Monday Challenge  and  The Holly and Ivy Christmas Challenge .  
The Merry Monday Challenge, is a Christmas card challenge site, all year long!  How sweet is that?  Their current challenge is to use pastel colors.  And they have an inspirational photo to help get the creative juices flowing.
I just love the vintage ornaments that create the wreath! so pretty!

My next stop is the Holly and Ivy Christmas Challenge.  Their current challenge is anything Christmas.  This provides you with the ability to just create.  And so I did!
and here is what I created:


My 'card' is a packaged gift card holder.  That might sound a bit confusing, but it really only takes a few seconds to explain.  You know those packaged gift cards you purchase at the grocery store, or the 'always open' pharmacies?  Well, that's what fits inside!  Now, you don't have to rip open the packaging to get to the gift card.  Just simply slide the whole package inside this cleaver little card.


Recipe:  I used Dark Chocolate card stock by PaperTreyInk, for the card base.  I just love this creamy, rich brown color.  And their card stock is heavy weight, so it will stand up to being embellished.
The pattern paper I used, is from a digital collection I purchased last year.  I just love this collection of rustic, holiday images in pastel hues.  Simply beautiful.  I printed the pink pattern background onto white card stock by PaperTreyInk.  I printed the deer pattern paper onto white linen card stock by PaperTreyInk.  I love the texture.  I matted the deer pattern paper onto white card stock.  

I machine stitched the three layers of paper together.  I just love how machine stitching gives my paper crafts that homespun look {smile}.  On the bottom panel, I also machine stitched the white glitter snowflake to the layers.  I wrapped the top flap with white crochet trim, and an aqua polka dot satin ribbon (polka dot side down).  I tied a simple bow with the ribbon.  I tucked a half white glitter snowflake in behind the crochet trim at the left upper corner.  The main panel, was a 6" x 6" sheet of digital pattern paper, that I shrunk down 50% before printing.  That way I could print that sheet as a 3" x 3" piece.  I matted it with Mint card stock by PaperTreyInk, and then with Dark Chocolate card stock.  I used foam adhesive to lift this beautiful piece off the card front.  I added this piece to the right of the simple bow.   My pink satin blossom, is from the Sweet Peppermint collection by Prima.  I just love their blossoms.  And with the pretty rhinestone blossom center, it is perfect for this paper craft.   I hand-stamped 'joy' onto a scrap piece of the pink background pattern paper I used for the first layer. And then adhered it to the back of a tiny Melissa Frances resin frame.  The finishing touch was that tiny white present bow.  I thought is help tie-in all the white, and give my card a little more 'pretty' {smile}. 

Well, thank you for looking.  I hope you have a chance to create something beautiful this weekend.  I'm in the mood to bake some scones.  I found this delicious sounding recipe for Apricot & Brie scones.  YUM!


Tuesday, January 23, 2018

Winter Wonderland in Blue & Green

Howdy.  I have another holiday-themed gift card holder.  I hope you are up for one more {smile}.  I am entering this gift card holder into two 'new-to-me' challenges: First Belarusian Challenge, and the Holly and Ivy Christmas Challenge .
My first stop is @ First Belarusian Challenge.  This is a challenge site from Russia, and yes, they do have a 'translate' button.  Their current challenge is Winter Fun.  You need to look at what the design team has created.  Truly creative and simply gorgeous!  They also have an inspirational board:


My next stop is @ the Holly and Ivy Christmas Challenge.  Their current challenge is Always Anything Christmas Goes.  This design team uses pattern papers and die cuts with a creative flair.  You will certainly be inspired!
and here is what I created:


and a different view:


Recipe:  The base of this gift card holder was made out of Pool Party card stock by Stampin' Up!  I just love this soft, creamy, pale blue color.  I used two pattern papers from the same digital pattern paper collection.  I used Mint card stock by Paper Trey Ink for the matt of the music & floral pattern paper.  I added a simple border of machine stitching, to give it a homespun look and feel.  I just love the music & floral pattern paper, so I wanted the pattern paper to be center stage.  I added a pale green seam binding and vanilla crochet trim.  I just love how soft, and vintage seam binding makes projects, and the crochet trim to echoes the same softness.  The paper blossom is from the Sweet Peppermint collection by Prima Marketing.  I think this pink blossom goes very well with the pattern paper.  I added a double bow tied with the seam binding.  I tucked a sentiment chipboard piece to the opposite side of the paper blossom.  And finally, to add a bit more sparkle, I added several silver sequins.  I just love how shiny they are {smile}.  Once you open this 'card' you will find your gift.  Gift card, that is!
card opened:


Thank you for stopping by.  I hope you aren't too tired of looking at Holiday/Christmas themed cards and projects.  I hope that you have time to play along with these or your favorite challenge site.  Crafting makes the soul happy {smile}.

Saturday, January 20, 2018

Sweet Peppermint Kisses for Santa

~ photo heavy ~

Howdy, and welcome to my little piece of blog-land.  I hope your new year has gotten off to a roaring start!  Me, I've been doing what I always do: crafting, baking, running, and chores.  So, not much of a change.  But, I am ok with that.   
For my holiday break I got the Flu, and boy was that awful!  I was in bed for a week, and couldn't get  the energy to do much of anything productive.  Then, it was back to work, back to marathon training, back to life.  I have been working on a few special orders: cupcakes, and crafts.  Let's just admit it, those are my two favorite things!
I am entering one of my creations in three paper crafting challenges:  Paper Story, As You See It, and Word Art Wednesday.  We will start with International first, and finish at home.
I stumbled upon this incredible paper craft challenge site while following a favorite paper crafter overseas.  And I am happy I did!  The folks over @ Paper Story have a super talented group of designers who I am sure will inspire you!  This challenge site is from Russia, but they have a 'translate' button, so it is super easy to play along!  Their current challenge is called: Olivier.  It is a 'recipe-based' challenge.  They have given you mandatory elements, just like in a recipe, but with an option to switch one 'ingredient' with something else, just like a recipe.  How super fun is that?  Here is their recipe: Paper, Flowers, Lace, Beads (brads, buttons, chips, dots, sparkles), Chip (chipboard), Tape (cord/braid ok), and Machine Line.  

My next stop:  As You See It.  This challenge site has some very creative challenges, and their design team has a range of styles, so no matter yours, you will be inspired.  Their current challenge is a sketch.  (Love these)
I rotated this sketch 90 degrees left, and then mirrored it
And my final stop was Word Art Wednesday.  I just can't brag about this site enough.  The design team is super talented, the write-up is inspirational, and the site is just plain NICE!  Their current challenge is: Anything Goes & Family Friendly.  Who wouldn't want to play along?

and  here is what I made:

Paper: Sweet Peppermint, Flower: manufactured, Lace: two kinds, Beads: button and sequins, Chip: chipboard mittens, Tape: thin silver cord, and Machine Line: machine sewing on both panels.
another view:


Recipe:  This gift card holder was made with pattern paper from the Sweet Peppermint holiday collection by Prima Marketing.  The base of the 'card' is crumb cake card stock by Stampin' Up!  I just love the heavy weight of it.  The matt is real red card stock by Stampin' Up!, as well.  
I used the tiny green dot pattern paper for the panels.  I didn't want any distractions from the focus: Santa!  I machine stitched this pattern paper to the red matt.
I then layered 4 different pattern papers from the Sweet Peppermint collection: the red stripe, the multi-check, the snowflake, and the multi-colored dot.  I did matt the snowflake pattern paper with crumb cake card stock, to give the layered rectangles a 'base'.  The sentiment/journaling card is adhered to the front with foam tape.  I also added a file tab, from the Sweet Peppermint collection, to the side of the Santa journalling card.
I wrapped two different lace trims around the top portion.  I just love the softness this brought to my 'card'.  I tied a double bow with one of the lace trims.  
The flower and leaves are both from Prima Marketing, as well, and yes, the same collection: Sweet Peppermint.  I just love the contrast between this mint color and the reds.
I added a chipboard piece from the same collection.  I thought mittens were a nice touch.  And the silver outline adds a nice sparkle!
I added some silver sequins to mimic the sparkle from the glitter on the flower and the silver on the chipboard.  I added an aqua vintage button to the lower right corner of the journalling card.  I thought it matched the flower beautifully, and tied it with some slim silver cord.  
here is what the 'card' looks like opened:


I love making these 'packaged' gift card holders, because it makes gift giving super easy.  Now, when you purchase your gift cards from the store, you no longer have to rip them open, to give the card.  Just slide the whole thing, right into the pouch, and viola!  I make a lot of these for my Holiday Craft Fairs, and folks seem to really enjoy them.  {smile}  My crafts are 'one-of-a-kind', in that I do NOT mass produce.  It makes each item special.  Now, I do make similar, but not match-matchy, carbon copies.  
Thank you for stopping by.  I hope that you have been inspired to play along with any/all of these challenge sites.  Enjoy your weekend, and take care!

Friday, December 29, 2017

Holiday Sweet Peppermint

~  photo heavy ~

Howdy!  I wanted to share with you a craft I made during the holidays.  I think it turned out super sweet, and well, I was really in love with it! {smile}  So, I want to share it with you!
Now, along with sharing this craft with you, I am entering it in 5 different challenges.  Wow, five.  That's a lot.  But, why not share what you love with the world, right?!  And so, grab a cup/glass of something: coffee, tea, champagne, or simply water.  
My first two challenge site stops are from Russia.  Yep, all the way over there!  I just love how different cultures 'see' paper crafting.  Simply gorgeous work, from all aspects of the world.
My first stop in Russia, is a challenge site:  Shabby Chic.  Their current challenge is Magic Frost.  You should really check out this group of talented ladies work.  Their work is very pretty, shabby, and super sweet.  Their current challenge has two required elements: paint and lace.  That just sounds like a fun, and creative!  (They have a translate button)


The next challenge site from Russia is Mistress Owl.  This wonderfully creative design team has sketches, and mood boards, that are very user-friendly!  Their current challenge is a sketch.  (They have a translate button)

Now, the next two challenge sites are Anything Goes.  First one, SugarPeaDesigns.  The thing I love about this challenge site, is the time it allows for challenges - a month.  Very accommodating for all of us living busy lives, but still find time to craft!


And the other Anything Goes challenge is Crafting By Designs.  The challenge site is very family friendly, and encourage the best of everyone who crafts.


And my final challenge site, is As You See It Challenge.  This challenge site provides sketches, themes, and color challenges.  So a little bit of a variety to keep you interested in playing along with each new challenge.  Their current challenge is a theme challenge - Sparkle.  So, you can add sequins, glitter, shimmer, etc.  And who doesn't love glitter/sparkle? {smile}


Now, before I reveal what I created, let me say, I hope all of you had a wonderfully grand holiday!
my paper craft project:


and a different view:


It's a packaged gift card holder.  Here is a view of this gift card holder opened:


Recipe: I started with Crumb Cake card stock by Stampin' Up!.  Only because they have a great heavy weight card stock, that won't buckle with embellishments.  The red card stock matt, is actually Pure Poppy card stock by PaperTreyInk.  Again, another great heavy weight card stock that won't collapse.  
The pattern papers that I used as both from the same collection: Sweet Peppermint by Prima.  Yeah, it's a Christmas collection.  It debut last year.  Once I saw what Frank Garcia did with it, I just had to make a purchase.  To add a homespun look to my paper project, I added some machine stitching to the pattern papers.  Then, I simply added various embellishments to make it both fun, and pretty! {smile}
I also machine stitched some cotton scallop trim lace to both flaps.  I then added some red and white striped ribbon.  I just love the red color and the stripes on this cotton ribbon.
I edged the chipboard wreath in white paint and glitter.  I tucked a Bingo card behind in behind the wreath, just a bit off-center.  I thought the layer added some visual interest.
I added a scrap piece of the pattern paper to the inside of a small resin frame.  I had quite a few different selections (sledding children, bird, girl, santa, and others), but decided on the Santa Claus, because let's face it, Santa is King!
I added some paint and glitter to a pair of red jingle bells.  Once dry, I threaded some silver bakers twine through the jingle bells, and strung them to the left of the wreath.
I painted a white, creamy Prima paper blossom with more paint, and glitter.  Then adhered it just above the left side of the wreath.  A loop of the silver twine is peaking out of the upper right of the painted and glitter paper blossom.  I thought it added additional visual interest. {smile}
I tied a simple bow with that beautiful red striped ribbon.  And then tied a tiny plastic candy cane with thin silver twine to the center of the bow.  The bow was adhered to this projects front with my hot glue gun.  I selected to add the bow here, because my strips of red stripe ribbon didn't quite line-up as well, as I hoped they would.  So, why not turn a 'mistake' into 'an opportunity to embellish'!
I hand-stamped my sentiment with basic black archival ink, onto very vanilla card stock.  I used a sentiment from the Love Lives Here Holiday stamp set by PaperTreyInk.  Then matted it with a scrap piece of the Pure Poppy card stock.  Finally, adhering it the gift card holder with foam tape.
Thank you for stopping by.  I hope that you have a chance to play along with any (or all) of these challenge sites {smile}!


Saturday, December 9, 2017

A Chocolate Hug & Kiss

Howdy, I hope this post finds you well, organized, and in the holiday spirit!  I wanted to share with you a little project I did, for several sweet folks in my life.  
I wanted to 'package' some chocolates in a fun and festive way.  But, something a little different, and sweet.  So, I headed to Pinterest.  (who doesn't these days)  And I stumbled (happily) across these tiny little chocolate packages.  When I say 'tiny' that is exactly what I mean.  T I N Y !!!  But super cute!  Ok, let's just admit somethings are just more adorable when you shrink them.  These little packages are no exception to that rule.  So, I set out to my craft room, and whipped up 13 of them.

here they are:

the whole lot

Now, when I photographed them, I forgot to add something to the photo to show scale.  So, I will just describe the tininess.  Each little teeny tiny package holds one Hershey Kiss and one Hershey Hug.  And you have to put them in point to point, or you won't be able to close the little 'box'.  That's how teeny tiny they are.  But, the adorable-ness is off the charts!
I found a tutorial on-line, so I quickly made one 'sample', and then some whipped them up.  Super fast, and easy.  And they used scraps to complete.  So more bonus points. {smile}  
The original designer is Dani Dziama.  She is a Stampin' Up! demonstrator and on their official design team for 2017.  So, just a quick pointer if you make these: random pattern paper works best.  But if you use directional pattern paper, cut your pattern 4 1/4" wide, and pay close attention as to which end you put the closure.

a close-up

I wrapped the tops with various Stampin' Up! ribbon I had on hand.  These narrow ribbons work best.  Also, I added a dimensional adhesive (aka foam tape) to the back of each small oval sentiment.  Just to elevate it off the package.  I think these turned out super sweet!  And who knows they just may make an appearance at next years holiday craft fair!  {smile}
Well, thank you for stopping by.  I hope you have been inspired to create something unique and sweet for the folks in your life.  I am off to baking cupcakes.  A super sweet friend has placed an order of milk chocolate cake, sweet whipped filling, and green vanilla buttercream icing with tiny red hearts.  So, let's get this baking party started!  {smile}  They are for a Grinch-themed holiday party.  How fun is that?

Monday, November 27, 2017

a Bright Pink Holiday

Howdy.  I hope you are well.  Me, I've been busy crafting.  I have a craft fair this weekend coming up, and so it's a 'craft-apolooza' here {smile}.  I have to stop myself, and take photos, or I'll just keep crafting.  Not, that that is a bad thing.  It just means I can't share what I've made.  {frown}
I came upon this bright pink and blue pattern paper.  Now, I'm not a bright any-color kind of person.  But the graphics in the patterns were just too sweet!  To me, it looked like something my oldest granddaughter would love.  So, yeah, I purchased the paper.  and I crafted a few things for the craft fair, too!
To help get my work out there, I am entering three different challenge sites: Get Creative Challenge, A Snowflakes Promise Challenge, and Word Art Wednesday.  My typical style is shabby chic.  But, this paper is just too sweet to pass up!
The folks over @ Get Creative Challenge, current challenge is: Holidays.  The design team will certainly get you inspired with their creative work.

The folks over @ A Snowflakes Promise, current challenge is: Anything Goes.  But don't let that stop you.  The design team has created some sassy paper crafts {smile}

And last, but certainly not least; the folks over @ Word Art Wednesday, current challenge is: Anything Goes - Family Friendly.  This group of super talented ladies will certainly inspire you.  They start each challenge with an explanation of a specific scripture.  And they provide you with a word document to add to your paper craft.  But it is not required.  

and here is what I made:


Let me first apologize for the photography.  It was getting late, and the lighting  in my house is awful for photographing, but wonderful for romantic evenings.  {smile}  The photo shop program I use, will lighten up the shadows, but washing out the bright hues of the colors.  So, this was a happy medium I found.
Recipe:  I used Mambo Pink & Tempting Turquoise card stocks from Stampin' Up!.  I used a die from Paper Trey Ink, to 'cut' the tote bag panels (front and back).  I used a snowflake die set by Paper Trey Ink to cut the snowflake pieces.  I used Dazzling Diamond glitter card stock from Stampin' Up! for the snowflakes.  Bermuda Blue ribbon from Amuse Studios.  The paper blossom is from a big box craft store.  The button is from the vintage aqua mist button collection, by Paper Trey Ink.  And finally, the silver snowflake charm and silver twine is from Stampin' Up!.
I just love the pink stripe pattern paper, so I used that as my main panel.  To introduce the bright blue, I added a strip of triangle pattern paper as the belly band piece.  I wrapped a piece of white cotton trim around the triangle pattern paper, to accent the softness & femininity of the collage pattern paper. 
I added some machine stitching to the main panel.  I just love how sweet it makes my paper crafts {smile}.   But, my heart just swoon over the holiday collage paper, so I made that my focal piece.  I matted the collage piece with Tempting Turquoise card stock, to help pop that blue!   And you know I just had to add some machine stitching to this piece, too!  I used foam tape to adhere this piece to the front of the 'tote'.  To add some sparkle, and tie into the theme, I cut out two snowflakes, using glitter paper.  I added a bright pink paper blossom to the larger snowflake, and an aqua button to the smaller snowflake.  I tied a silver snowflake charm to the vintage button, using silver twine (more sparkle).  I used hot glue to adhere the snowflakes and blossom/button, to the front panel.
And once I had the 'tote' put together, I wrapped the 'tote' in Bermuda blue satin ribbon.  This is a single sided satin ribbon.  That means that one side is shiny and the other matt.  I kept the ribbon shiny side up, to help add more sparkle.  (But, I just love the contrast of the matt side.)   Viola! that is my sweet bright pink holiday tote!
Now, don't forget to photograph your creations, or at least do it when the light is better, and then share what you made with all of us!  Have a great week!


Sunday, October 15, 2017

Mini Hand Sanitizer Holder

Wow, I didn't realize that it has been almost a whole month since I posted.  I guess time really does fly.  I have been busy crafting.  I'm working on several holiday craft fair items, and trying to make new things, too.  And here is a 'new' item: mini hand sanitizer holder.  My thought process is making the packaging pretty for the little things; to give the gift big impact.  
A popular store, to do some basic holiday shopping is Bath & Body Works.  Let's face it, they have some wonderfully smelling soaps, lotions, candles, and various air fresheners.  They have a scent for just about everyone.  They are even carrying a mens line of products.  I was surprised (but not really) that they started carrying air fresheners for your car.  
An item that my grandchildren and I carry with us, is their mini hand sanitizers.  They even have 'fun' clips to hold these little bottles to your back pack, gym bag, purse, etc.  But, I want to make a 'fun' holiday package for these little bottles, and make gift giving easier and pretty.

front
We all have office/work gifts to get during the holiday season.  But, with everything else we all need to buy, we can't really afford to spend another hundred dollars.  So, we all wrack our brains trying to find something 'good', but not too expensive.  I work at a hospital, so everyone there are germ-a-phobes, and they all love food.  So, usually I make some homebaked goody.  But, this year, I think I'll get them these cute mini hand sanitizers.  They are relatively inexpensive 5 for $6.  An useful gift, without breaking the bank and I won't have to spend an hour in the kitchen {smile}.  Now, I need a way to package them, other than throwing them in a little gift bag. . . and that is how I came upon this idea!

Left-side

Right-side
This is my first one.  So, it isn't perfect.  There is usually a learning curve to making anything out of paper.  I usually keep these for my samples.  I don't give away these first generations, because they usually have a 'mistake' in/on them.
The sentiment rectangle is actually the 'piece' that holds the flap down/the box closed.  Pretty easy to load with the hand sanitizer, just slide the bottle in.  Easy, Peasy, and Pretty!
I used Ocean Tide card stock for the base.  I matted the pattern papers and sentiment rectangle onto Early Espresso card stock.  I added a small strip of foam tape to the bottom of the sentiment rectangle, to lift it off the box.  I used a small snowflake die to cut out the snowflake, using glitter paper.  I added a trio of wood-grain sequins to continue the woods-y feel of the pattern paper.  I used some scraps of this holiday themed pattern paper from 2 years ago.
I am going to try and make a 'bag' holder for these little bottles, too.  I think 'bags' may be a nice option.  {smile}


Sunday, January 1, 2017

Winter Friendship Tea

~ long, and photo heavy ~

Howdy!  whew, another year.  But this one will be better: more joy, more laughter, more time with friends, and more time creating!  Like most of you, I too, have resolutions.  Mine are basic: all of the above, and better health, and eating better.  My promise to myself, my family, my friends, and my followers. So, here is where we start.  
Day one:  I have plans today.  I had a 'good' breakfast (eating better).  I will go for a 5 mile run (better health), once I finish here.  And then, I will drive into town and pick up a planner.  So, I can start writing down what I need to do.  Pencil in time for what I want to do.  And get my gym schedule on the book.  This will help me organizing my time better.
My plan for tomorrow: clean my craft room (getting organized).  Yes, clean.  It will most likely take me 5/+ hours.  It is a disaster.  So much so, it has spilled onto the dinning room table, and one counter in the kitchen.  It is a mess.  And a nightmare.  My poor husband doesn't say a word.  Gotta give the guy props!  
But first, I took some time to craft.  Before you give me a pat on the back, or a bravo, it is late crafting.  Late, in that this project should have been done at least a week ago, if not sooner.  You see, I am having a winter/Christmas Friendship tea for 10 wonderfully charming, and dear friends.  Next weekend.  Yep, January 7th.  They all know about it.  They received their unofficial, invite 4 weeks ago.  And, unfortunately, I am just now getting their official invites in the mail.  This project was put on the back burner (so to speak) for two reasons: time, and creativity.  
Time: between holiday parties, retirement teas, and 3 days of family obligations during Christmas, oh, and 2 holiday events, and one wedding; I was running out of time.  Yeah, still working 40hours a week at the hospital, and taking call 3 nights a week.  I cook dinner almost every night.  And my dog Sasha depends on me for everything: walks, meals, love, attention, and play time.  Did I mention I have a husband?  Yep.  I have one of those, too!  Time, is something I barely had any of this past month.  
Creativity: I made all the decorations, food, and personal touches to the retirement tea, crafted 4 kids ugly sweaters (for the annual ugly sweater contest), decorated a trophy for said event, made dishes for Christmas Eve lunch, and dinner.  More dishes for Christmas dinner.  Made birthday cards for a group of us ladies who paper craft.  Made the Secret Santa gift for said holiday party.  Made Cinnamon nuts for my grandchildren's teachers and coaches holiday gifts, and decorated the jars.  Helped my oldest granddaughter make Peppermint Bark for her dance team.  And we made custom tags, and packed them rather sweetly.  And one last craft fair that required almost non stop crafting to get inventory up for the event.  So see, my creativity was there.  Just buried under everything else.  Now that I have had a chance to catch my breathe, and before I put away all my holiday themed crafting supplies, I needed to create one more thing: Winter Friendship Tea invites.
I am entering them into two challenges:  Brown Sugar Challenge & Word Art Wednesday Challenge.  Both challenge sites are anything goes & family friendly.
I made these 'flip' book/cards:


here is the inside:


one more:


and the inside:


Recipe:  I used the Mistletoe Collection, from Kaisercraft, one sheet of stickers, and one package of diecuts.  I printed my 'tags' (invites) onto whisper white card stock by Stampin' Up!.  Trimmed them to 3 1/4" x 3 3/4".  I cut a scrap piece of the shimmer ribbon from Stampin' Up! and stapled it to the top of each invite.  I rounded just the top two corners.
Each panel measures 4" x 6".  I wanted to get the most pieces out of my paper.   I adhered the pocket to the inside of the front panel before adding washi tape.
I 'trimmed the edges with washi tape, and then used my corner rounder.     
From the cover to the back-
cover:  I cut a piece of coordinating pattern paper 3" x 5" and used my spiral notebook punch to create a decorative edge to one side of the pattern paper.  I used my corner rounder on the two corners that were left plain.
I cut my border stickers into 3" segments.  I stamped my sentiment 'To my friend' onto a 3/4" wide white card stock, and stamped in Lagoon ink.  I used a square punch to create the flag/banner end.  I adhered the sentiment piece with foam tape just on top of the border sticker.  
I stamped my 'TEA' image onto white card stock, using real red classic ink.  I added an image and a word from the stickers and die cuts to each cover.  
inside cover:  I created the pockets with the same pattern paper.  Each pocket is cut 3 3/4" x 2".  The bottom corners are rounded.  I made paper bows using my bow builder punch by Stampin' Up! with the scrap pieces of pattern papers.  Then I added either a sticker or die cut just below the bow.
inside back panel:  I added adhesive to the back of each of the little silver polka dot treat bags.  I added a scrap piece of pattern paper to the top of each bag, and adhered them.
I added a decorative strip of paper to the bottom portion of each bag.  A creative way to help secure the bag to the panel.  I added a word from the word page with foam tape.  Inside each bag is a tea bag.  Fitting I thought {smile}.
the back panel: is left blank.  I simply stamped my trademark in dark grey ink.  I thought that since the treat bag is silver metallic and the washi tape is either silver/gray, the ink should also coordinate with the whole over all look.  
I packed each invite in a clear envelope.  This works two ways: eye candy for our mail carriers, and a look at your treasure in your snail mail {smile}.  It's the easiest way to share a smile!
Thank you for looking.  and yeah, these aren't really 'flip books', because there is no 'flip'.  But I was inspired by what I found on the internet.  I hope that I have given you a smile, too!  a quick note: I saw a video on how to make flip books on youtube using project life cards HERE.  That is where I got my inspiration.  


Sunday, November 20, 2016

Vintage Noel in Paris Card

Howdy.  I haven't stopped Christmas crafting yet!  I have just been side railed with a few other obligations.  I was baking individual size Lemon Cream Coffee Cakes, 3-inch Traditional French Apple Tarts, and a few dozen Boston Cream Cupcakes.  And  yeah, I had to make pretty gift cards to go with them {smile}.
But, I did find time to make some holiday cards and a few gift bags to match {smile}.
I am playing along with two different paper crafting challenges:  Mix It Up Challenge and Brown Sugar Challenge
So, let's start with Mix It Up Challenge.  They have a sketch and an inspirational photo.  You can use either or both.  How sweet is that?  I used the inspirational photo!


I was inspired by the red and green colors of the holiday photo, along with the holiday theme.
The other challenge I am entering is Brown Sugar Challenge.  These talented ladies have an Anything Goes theme.  Always great ideas from the design team.  They use items from the current sponsor and create some of the most beautiful paper crafts!
here is the card that I made:


Recipe:  I used real red card stock from Stampin' Up!  I just llove the heavy weight.  The pattern paper I used is from a few years ago.  I don't remember who made it, but that is all I have left {frown}.  The green gingham pattern is the reverse side of the holy/polka dot pattern.  
I machine stitched a piece of cream cotton trim and red gingham ribbon to the card front.  Tied a double bow with the ribbon.  I tied a larger double bow with kraft twine and tied a silver Tim Holtz pinecone to the twine.  Then layered my trims:  rat twine and red ribbon.  
I added a dark green glittered paper blossom to the top of the bows.
My focal piece is actually a digital download.  I printed the image on white linen card stock by Paper Trey Ink.  I originally purchased the digital image to print on kraft card stock.  I haven't given up on the idea.  {smile}   I thought this image would look better on white.  To help accent the white polka dots (aka snow falling)

Thank you for looking!  I hope your weekend is wonderful! and creative!


Tuesday, December 8, 2015

Last Craft Fair for 2015

Howdy!  Whew. what a crazy busy holiday crafting season!  Well, I am trying to get as much done as possible for my last craft fair for the holiday season this year.  
I have never done the arts and craft fair @ St. Pius X High School, in Albuquerque, NM.  So, {fingers crossed} hopefully this one is good.  


My booth will be in the main gym this year.  (booth 03).  I hope you all get a chance to come by and see what folks have made.  Me?  I'm a bit excited to see the crafters.  I love picking up unique and one-of-a-kind gifts.  {smile}  I am working on a few more gift bags, hopefully I get some desk top calendars finished, and more altered/decorated salt shakers.  {smile}


Tuesday, November 24, 2015

Red Fabric Christmas Tree Bags

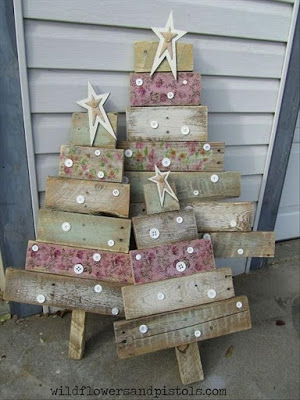
Howdy!  Oh, it feels good for my soul to craft, sew, and just simply create!  I saw the inspirational photo over @ the Shabby Tea Room for their current challenge, O' Christmas Tree.  and oh boy!  That photo gave me the idea of making some Christmas trees from fabric scraps.  I imagine you can do the same with strips of pattern papers.  Umm, maybe I'll create a few of those, too! {smile}


Look how super cute and country this is!  I love the buttons and the stars on top are just adorable!
I also stumbled upon a 'new' challenge site to me: Try It Tuesday.  They have a new challenge: Bags & Boxes.  So, I thought how perfect!


here is what I made:


I made a gift bag, and used the inspirational photo to create the cover.  I made a fabric scrap holiday 'tree' with traditional red and green holiday colors.  I used fabric (retired) from Stampin' Up!, ribbons  and trims from various places.  The buttons (retired) are from Stampin' Up!.  The kraft twine is from PaperTrey Ink.  The tags, and stamps are from Paper Trey Ink, as well.  
I stamped the snowflakes in kraft ink onto vanilla card stock.  Matted this stamped piece with kraft card stock.  I did a purposefully sloppy double machine stitch border.  
I tied my various fabric and trim scraps onto a kraft striped paper straw.  I hot glued the 'tree' to the card stock.  
I tied a simple bow with the red ribbon strung through a Webster's Pages chipboard button and used hot glue to adhere it to the top corner of the sentiment piece.

Thank you for stopping by.  I hope you have been inspired to play along with the talented ladies over @ the Shabby Tea Room & Try It Tuesday.  My gift bags will be for sale at my next holiday craft fair.  Hope to see you there!