Showing posts with label snowflake charm. Show all posts

Sunday, January 21, 2018

Oh Deer, Winter . . .

~ photo heavy ~

Howdy, and welcome back.  Yeah, some days I craft, and craft some more, and other days, I am busy with life's chores.  Lucky for me, this weekend has been one of those craft, and craft some more days {smile}.  Now, before everyone gets too excited, it's snowing like crazy here, and the wind is blowing harder/faster than a ________.  (I'll let you fill-in-the-blank)  So, I have re-arranged my running schedule: todays run will be run tomorrow, and tomorrows run will be run on Tuesday.  The treadmill work will be done . . . . not sure at this moment, but I need to get some miles done.  So, I am focusing on that.
Ok, now for some crafting!  I am working on a few holiday themed orders, and entering one of them in three (yes, 3!) challenges:  Catch the Bug Challenge, Time Out Challenge and Tic Tac Toe Challenge.  Now, I believe that the last two challenges are 'new-to-me' challenges, so this will be fun!
Let's start with Catch the Bug Challenge.  I see their sketches a lot, and have wanted to play, so I am not one hundred percent that I haven't played with them before.  But, just look at this current challenge sketch!  How beautiful!
The first thing that catches my eye about this sketch is the simplicity: aka easy to work with!  You can do so much with it, or leave it clean and simple.  Me, I'm more on the more is better.  And if you haven't fallen in love with this sketch yet, simply look at what the design team has created, and you will be running to your craft room.  (just like me!) 
Ok, now on to the Time Out Challenge.  Their current challenge is to be inspired by words.  Their words.  Here is their graphics:
I went with: Gift & Open it
Ok, I don't know about you, but this screams gift card holder to me.  Or how about Birthday, or a Thank You gift, or . . .  another endless possibilities challenge.  Oh, and don't forget to see what the design team has created.  Super fun!
And my last stop, is Tic Tac Toe Challenge.  Another fun, and creative group of folks.   This may be a regular challenge for me.  (smile)
I went diagonal: light blue, ribbon, and sequins
and here is what I made:


and another view:


This over-sized card, is actually a 'packaged' gift card holder.  It's for those gift cards that are purchased that have these think wrappers.  So, instead of ripping apart the packaging to get the gift card out, simply slide the whole package into the pocket of this gift card holder!  Ta-Da!


Recipe:  I used Cocoa Bean card stock from Paper Trey Ink.  Love the heavy weight of their card stock, it gives these types of projects stand-up power!  I used Pool Party card stock by Stampin' Up! for the matts.  I just love this shade of pale/light blue.  The pattern papers I used were from the same collection: Oh Deer! by Close To My Heart.  (It was from 2016)  and yes, I hoard saved my scraps.
I did some machine stitching to hold the layers of paper in place, along with some adhesive.  The gold satin ribbon and cream crochet trim are also machine stitched to the cover.  I thought the gold satin ribbon matched the music pattern paper beautifully.
The sentiment rectangle is actually a journalling square that was cut down and matted with a scrap of Cocoa Bean card stock.  I added a retired mini paper clip to the top left corner of it, and a pair of silver sequins to the right corner.  It is adhered to the card front with foam tape to lift it off the card front.  
The paper blossom is actually from the Sweet Peppermint collection by Prima Marketing.  I just love how it adds just the right amount of contrast to the blue, without looking too gold.  
I painted and glittered two silver jingle bells, and tied them with some silver and cream bakers twine.  I then tied a triple-bow with the same bakers twine, and tucked it under the paper blossom.  I added a retired Stampin' Up! snowflake charm to the knot.  I added one lone silver sequin just to the left of the paper blossom to help repeat the silver accents.
The three banner pieces peaking out from under the pinecone pattern paper are simply scraps of this beautiful collection.  I flagged the ends with a pair of scissors.
Since my focal piece is the sentiment, I decided to add some embellishments to the lower right corner, instead of a sentiment.  So, I took two silver foil embossed pinecone die-cuts from the Oh Deer! collection and adhered them.  The top pinecone is adhered with foam tape, so that they wouldn't be smashed on.  I tied some of the same silver and cream bakers twine to a snowflake charm, and hot glued it to the stacked pinecones.  
Thank you for stopping by.  I hope you have been inspired to play along with any/all of these challenges.  Enjoy the rest of your weekend.  Hope to be back soon {fingers crossed}.

Monday, November 27, 2017

a Bright Pink Holiday

Howdy.  I hope you are well.  Me, I've been busy crafting.  I have a craft fair this weekend coming up, and so it's a 'craft-apolooza' here {smile}.  I have to stop myself, and take photos, or I'll just keep crafting.  Not, that that is a bad thing.  It just means I can't share what I've made.  {frown}
I came upon this bright pink and blue pattern paper.  Now, I'm not a bright any-color kind of person.  But the graphics in the patterns were just too sweet!  To me, it looked like something my oldest granddaughter would love.  So, yeah, I purchased the paper.  and I crafted a few things for the craft fair, too!
To help get my work out there, I am entering three different challenge sites: Get Creative Challenge, A Snowflakes Promise Challenge, and Word Art Wednesday.  My typical style is shabby chic.  But, this paper is just too sweet to pass up!
The folks over @ Get Creative Challenge, current challenge is: Holidays.  The design team will certainly get you inspired with their creative work.

The folks over @ A Snowflakes Promise, current challenge is: Anything Goes.  But don't let that stop you.  The design team has created some sassy paper crafts {smile}

And last, but certainly not least; the folks over @ Word Art Wednesday, current challenge is: Anything Goes - Family Friendly.  This group of super talented ladies will certainly inspire you.  They start each challenge with an explanation of a specific scripture.  And they provide you with a word document to add to your paper craft.  But it is not required.  

and here is what I made:


Let me first apologize for the photography.  It was getting late, and the lighting  in my house is awful for photographing, but wonderful for romantic evenings.  {smile}  The photo shop program I use, will lighten up the shadows, but washing out the bright hues of the colors.  So, this was a happy medium I found.
Recipe:  I used Mambo Pink & Tempting Turquoise card stocks from Stampin' Up!.  I used a die from Paper Trey Ink, to 'cut' the tote bag panels (front and back).  I used a snowflake die set by Paper Trey Ink to cut the snowflake pieces.  I used Dazzling Diamond glitter card stock from Stampin' Up! for the snowflakes.  Bermuda Blue ribbon from Amuse Studios.  The paper blossom is from a big box craft store.  The button is from the vintage aqua mist button collection, by Paper Trey Ink.  And finally, the silver snowflake charm and silver twine is from Stampin' Up!.
I just love the pink stripe pattern paper, so I used that as my main panel.  To introduce the bright blue, I added a strip of triangle pattern paper as the belly band piece.  I wrapped a piece of white cotton trim around the triangle pattern paper, to accent the softness & femininity of the collage pattern paper. 
I added some machine stitching to the main panel.  I just love how sweet it makes my paper crafts {smile}.   But, my heart just swoon over the holiday collage paper, so I made that my focal piece.  I matted the collage piece with Tempting Turquoise card stock, to help pop that blue!   And you know I just had to add some machine stitching to this piece, too!  I used foam tape to adhere this piece to the front of the 'tote'.  To add some sparkle, and tie into the theme, I cut out two snowflakes, using glitter paper.  I added a bright pink paper blossom to the larger snowflake, and an aqua button to the smaller snowflake.  I tied a silver snowflake charm to the vintage button, using silver twine (more sparkle).  I used hot glue to adhere the snowflakes and blossom/button, to the front panel.
And once I had the 'tote' put together, I wrapped the 'tote' in Bermuda blue satin ribbon.  This is a single sided satin ribbon.  That means that one side is shiny and the other matt.  I kept the ribbon shiny side up, to help add more sparkle.  (But, I just love the contrast of the matt side.)   Viola! that is my sweet bright pink holiday tote!
Now, don't forget to photograph your creations, or at least do it when the light is better, and then share what you made with all of us!  Have a great week!


Saturday, September 16, 2017

Christmas Craft Fair

Howdy.  and welcome to my little slice of blog-land.  I received both good news and bad news this past week.  First, the bad news.  Who are we kidding.  Let's just get this over with.   The Tramway Community Church will NOT have a holiday craft fair this year.  Boo-Hoo!  I just love this craft fair. The fellow artists are true artist.  And the patrons are equally great!  I will miss the folks there.  I have had the same booth location for 5/+ years.  And well, I have gotten to know a few of my 'neighbors'.  I also have some shoppers who visit my booth every year.  They are familiar with my work, and rave about my creations.  So, I am on the look out for a 'new' holiday craft location.  If anyone knows of any that they are familiar with, please pass along the info. 
Now the good news.  I have been selected to participate in the La Cueva High School Holiday Craft Fair, again this year!  Yahoo!  This is another 'juried' craft fair.  So, you already know that the crafters are pretty good! and our creations are devine!
So, with all the frenzy of holiday craft fairs, I have started making items to sell.  And, as usual, I start with some easy things, and then get into my groove.  Today, I made a card with some holiday scraps. I'm pretty happy with how my card turned out.  Please stop by these two challenge sites, and play along!
I stopped by a 'new' to me sketch challenge site.  Cheerful Sketches Challenge Blog.  The design team will certainly inspire you!

the sketch is easy to work with.  easy to create something beautiful in your own style.
My second stop is an all time favorite challenge.  Word Art Wednesday.  Their challenges are anything goes.  But their design team creates some beautiful cards!

and here is what I created:


this blank inside greeting card is A2 size: 4 1/4" x 5 1/2".  I used some retired and 'long-ago' products.  The card base is made form Night of Navy card stock by Stampin' Up!.  I just love the dusky card blue.  The music sheet is a digital download that I printed on cream textured card stock.  It helps keep the paper from looking too flat.  I used a vintage Christmas ornament pattern paper for the main panel.  I machine stitched these two papers together.  I love the way machine stitching looks on cards.  {smile}
I took a scrap piece of scallop bordered eyelet trim and a dusky green seam binding, and did a quick and incomplete stitching to the paper stack.  I left the trims unfinished, to give the card a more homespun look.  I tied the seam binding into a double bow, and then tied a gold twine to the bow.  I finished the bow off with a snowflake charm.  Now the card has some glimmer. {smile}
I fussy cut an ornament block, and matted on a teal textured card stock.  I added some foam tape to the ornament square and adhered it to the front of the card.
I added a piece of vanilla card stock to the inside of the card.  That way, you have a place to write a special message, and you won't have to dig for a special pen!
Thank you for looking.  Now, I need to get back to crating a few more simple 'things'.

Saturday, November 21, 2015

Vintage Frost Christmas

Howdy.  Yeah, crafting, crafting, and bit more crafting for my next holiday craft fair.   I found some wonderful pattern papers that I had in my holiday stash, and super happy to create with them {smile}.  I had 'won' a 6" x 6" pack of Vintage Frost Basics pattern paper by Maya Design (from Sweden).  And I just love it!  This paper pack has vintage winter pattern papers in pink, blues, and brown, with images of angels, ice skates sleds, mittens, snowflakes, stars, and Santa {smile}!  Super special.  
The biggest draw back of crafting during this time of year, is that it is dark when I leave for work and dark when I return home.  So photography is difficult.  {frown}
One of my favorite European challenge sites is ScrapMagic.  I just love their inspiration boards.  Very inspiring, and really gets your crafting mojo running.  Here is their latest inspiration board:
No. 13 : Beige & Blue
Color requirements:  blue and beige
Mandatory elements: rhinestones, pearls, and lace
challenge closes November 30th.

I am using a sketch from Retro Sketches:

this sketch challenge is now closed.  I missed the deadline.

I am also entering A Snowflake Promise challenge:
theme: Christmas/Winter

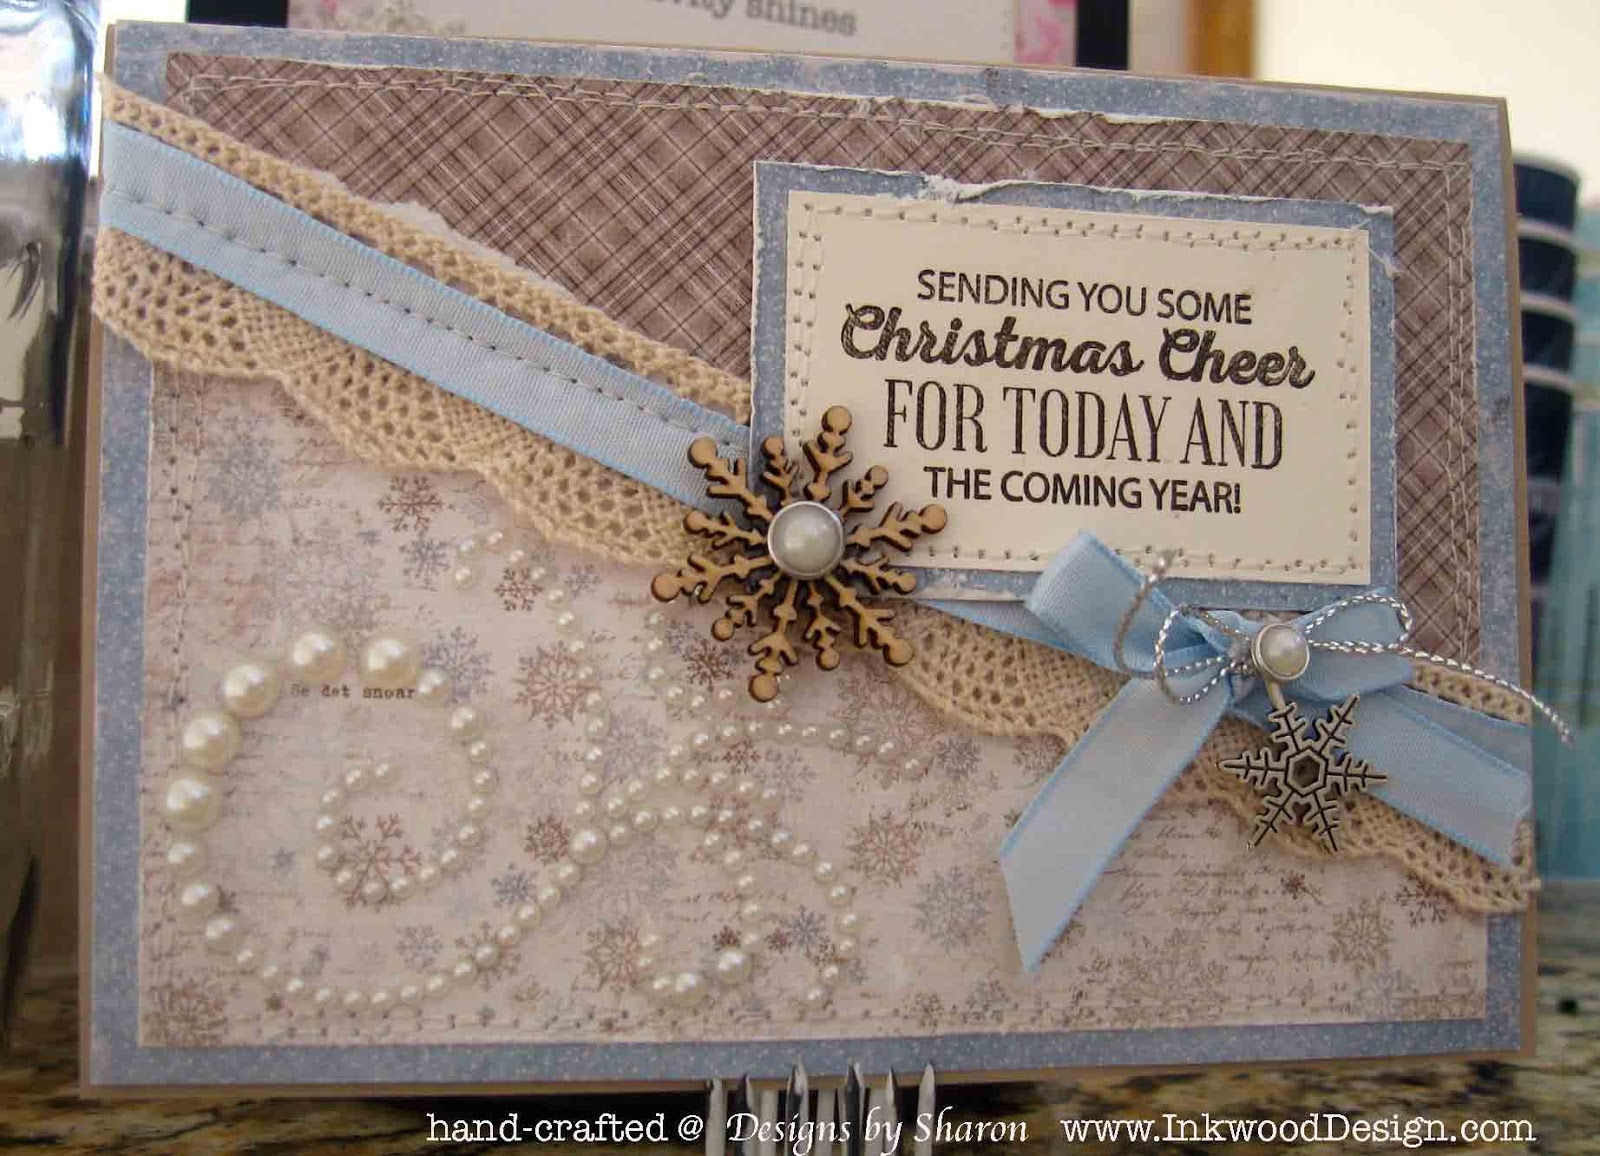
and here is what I created:


I took two sheets of the pattern paper (one blue and brown snowflake, and brown check) and torn each in half diagonally.  I didn't want to waste any of the patten papers, so I made two cards with my two torn papers.


Each card was made the same way, just changed the sequence of the papers, the snowflake embellishments, and the sentiment.  I made two 6" x 4 1/4" blank greetings cards.  I adhered the two torn pieces to the blue distressed pattern paper, and did a double border stitch with my sewing machine.  
I then stacked the crochet trim and light blue taffeta ribbon, and machine stitched the trims to the card front.   I tied the blue taffeta ribbon into a simple bow.  I tied a snowflake to the bow with thin silver cord, and added a silver rimmed pearl to the silver cord bow.
I stamped my sentiment in Early Espresso classic ink, onto very vanilla card stock, both by Stampin' Up!.  I matted the sentiment block onto the same distressed blue pattern paper as the main card.  I also added a double border stitch.  I adhered the sentiment block to the card front with foam adhesive.  I added a pearl swirl diagonally below the sentiment block.  I also added a wooden snowflake and rimmed pearl to the sentiment block.  


Thank you for looking.  I hope that I have been inspired you to create something beautiful.  {smile}


Wednesday, November 11, 2015

French Holiday Set

~ photo heavy post ~
Howdy.  Welcome.  Before you asked, I haven't quite finished my trophy cups.  But, I promise, I will.  As they will be for sale at my next Craft Fair - this Friday!  I was able to work on a few other holiday projects.  For those of you who don't know, I love taking non-holiday pattern paper, and creating holiday projects.  {smile}  I do love typical holiday pattern papers, but sometimes, its fun to set out side of the box.  Exercise your creative mojo, so to speak!
A month ago, I saw quite a few wonderfully creative projects using Gilded Lily pattern paper by G45 (Graphics 45).  And let's just say that I fell in love with both the paper and the projects.  So much so that I went out and purchased a few sheets of the pattern paper.  Then, it just sat there.  (I'm sure this sounds familiar to a lot of you - smile)  This pattern paper has royal images of Marie Antoinette, crowns, lilies, script, dots, and flourishes.
I set out to start working on holiday projects to have for sale, at my next holiday craft fair.  And then, I grabbed that beautiful Gilded Lily pattern paper.  I also stopped by Mojo Monday challenge site to get a layout.  This is this week's sketch:


and here is what I did with the sketch:


Let's look at each piece separately!
First, the bag:


As you can tell, I rotate the sketch.  I also used a 'tag' for the circle piece.  The tag is heat embossed with pink embossing powder.  I used cream velvet ribbon for the top of the tag.  But I didn't want a lot of bulk with a traditional tag 'loop', so I tied the velvet ribbon with kraft twine, and added a jingle bell.  {jingle bells are fun!}  I switched out the floral accent piece with a holiday shabby chic piece.  {smile}
and a close-up:


I wanted the bulb and snowflake to move, so they are tied onto a Tim Holtz safety pin, that is secured to the front of the bag with a rhinestone floral brad.  I also added some fabulous trim in a make-shift 'junk bow': tulle, pom pom trim, crochet trim and thin ribbon.  I used kraft twine to hold everything together.

The gift card holder:


I wrapped some white cotton trim and seam binding around the top flap of the gift card holder.  I  layered a silver glitter snowflake on top of the trims.  And then added that sweet bow, with a snowflake charm tied to it.  {smile}


And the inside of the gift card holder.  Simply tuck the gift card into the bottom flap.  The sentiment is heat embossed with silver embossing powder :  Greetings of the Season.  Elegantly simple.

and now the stocking stuffer - chocolate!


I used some of the scraps of the pattern papers, and wrapped some chocolate candies.  I added a cream crochet knot, tied on a simple tag stamped with 'Noel', and tied the gold cord into a simple bow.  {smile}  Something elegantly simple.  Perfect {smile}

Well, thank you for looking.  I hope you have found some inspiration and get an opportunity to craft something fabulous, too!


Wednesday, September 30, 2015

Holiday Happiness: Card


Sorry, it's another holiday card.  And I imagine that I will be posting more and more holiday paper crafts here.  I will be making a few non-holiday items, and yeah, I'll post some images here, too.  {smile}.
I had ordered some Scandinavian pattern papers from Italy, and they arrived yesterday!  and yeah, I just had to play with them.  
To give me some focus, I stopped by a favorite sketch challenge site:  Mojo Monday.  The sketch challenge is not only a sketch, it has a specific card shape, too:  Tall & Skinny.  Their suggestion is 3 1/2" x 5 1/2".  I am not too fond of tall and skinny.  It's very hard for me to work with.  So, I gave my card a little leeway: 4 1/4" x 6".  It's tall, but not too skinny.  {frown}
here is the sketch:

But just look at this sketch!  WOW! wonderful!  I love the layers, the trio of embellishments and the ribbon piece.  I got this!
here is what I made:


The photos aren't that great, sorry.  I actually finished the card this morning before work.  So the sun hadn't even rose yet.  (It was completed before 6a.)  I took photographs of it once I got home, after work around 6p.  The sun was going down, so I went outside to get the most light.  Please bear with me.
I used my new Tilda pattern paper: Sweetheart.  I fell in love with this pattern paper as soon as I saw it.  The large scale polka dots, the sweet animal silhouettes, the floral images, the mixture of blue and red with pink thrown in the mix.  Just beautiful!
My first layer is the red large scale polka dots.  Then I added the blue animal silhouette pattern paper. I wanted to show as much of this pattern paper as possible.  And then finally, the sweet, small scale floral bouquet pattern papers.
I matted each of these pattern papers with kraft card stock, and then machine stitched them.  I did a double border of a simple stitch line, purposefully sloppy.  {smile}
I added two ribbons/trims instead of the one.  I added a white pleated glitter tulle, and then machine stitched a light blue gingham pattern ribbon to the card front.  I tied the ribbon into a simple bow, and tied on a silver snowflake charm.  
For the round element on the small square, in the sketch, I added a flair button.   Santa is wearing a pink coat.  {smile}.
I replaced the trio of embellishments, on the sketch, with a scrap piece of crochet trim, that had scallops. I thought it added a bit of softness and elevated the home-made feel.
I used a retired Stampin' Up! card stock for the card base: bordering blue.  It matched the blue in this pattern paper perfectly.


I hand-stamped the envelope flap with my branding, and the inside sentiment, in cherry cobbler classic ink.  I also stamped the front of the envelope in bordering blue classic ink.  I added a banner made from the pattern papers I used on the outside of the card, and machine stitched them to the very vanilla card stock.
Thank you for looking!  I am planning on making two desk top calendars, and a few gift card holders, with this pattern paper collection.  I think they are just lovely {smile}.  Please check back later.

Saturday, September 26, 2015

Vintage Winter Treasure Tin

Welcome!  I was surfing the internet, and stumbled upon two new challenge sites, that I should play along with.  I say 'should' because I need to get more holiday crafts completed.  
I stopped @ the Papertake Weekly Challenge.  They have a new challenge, titled: it will soon be here: Christmas!

I also stopped by A Snowflake Promise challenge site.  Their current challenge is: winter/Christmas.


here is what I made:


I have really loved decorating these blank tins.  {smile}  I first paint the tins with chalk paint, then distress with various sand papers, and finally seal the tin surface.  I wanted to make some tins that were event specific.  And I had some scrap pieces of this beautiful winter holiday pattern paper from Authentique.  {smile}

the outside of the tin:


I distressed the pattern papers, too.  I layered some of the papers, and added some machine stitching.  
This blank tin measures approximate 3 3/4" x 2 1/4".  
Thank you for looking.  I'm working on a few tins for 'new' babies.  {smile}


Wednesday, December 10, 2014

Coffee, Chocolate, & Friends

Whew!  I apologize for being absent lately.  But, yeah, I've been crafting {smile}.  My last craft fair for this holiday season is Friday.  And well, between working full-time, taking care of my DH, attending 3 holiday dinners, and one doctor visit (that left me unable to walk for a day and a half) I haven't had a lot of time to post.  But, I have been taking pictures, so soon, my life will slow down a bit. {smile}  Pipe dream?  I hope not!
The wonderful ladies over @ Craft Hoaders Anonymous Challenge have a great challenge this week.  They want to see your holiday craft hoard used.  I don't know about you, but I have tons of holiday crafting supplies: pattern paper, embellishments, stamps, sentiments, trinkets, ribbon, buttons, and oh so much more!  I actually have so much holiday hoard supplies, that it is boxed up after each holiday season, because I don't have room in my craft room for all of it.  How incredibably crazy is that?  (between you and me, my husband doesn't use the word 'crazy' when the subject is brought up.  Lets just say that.)
Ok, so for this first project, you are probably thinking that I am not really showcasing my hoard collection, but this is a super cute gift.  


I attended a holiday dinner with a gift exchange for the lovely ladies that I stamp with.  For the gift exchange, there was a price limit of $10.  Ok, do you know how stinking hard it is to make a gift for $10?  If you craft, I'm sure you know what I am talking about.  If you don't, lets just say, it's difficult.
Anyways, these ladies are all Stampin' Up! demonstrators, so I felt the need to use current SU! products.  Hmm.  Maybe this doesn't qualify as a 'hoard'.  But, I have a lot of stuff!
I used the new holiday DSP (Nordic Noel).  I just love the houses.  The bright cheery colors is always a plus!  So, I positioned my DSP, so that the cut would be a row of full houses and not chopping them off. (It's the OCD in me.)
I matted this pattern paper onto coral card stock.  I added a strip of pool party cotton ribbon.  And yeah, I had to sew it on.  I made a simple bow.  But it still needed something, so why not add another bow.  Right?  So, I added another bow with the new gold shiny ribbon.  It help pull the baked brown sugar colored house out.  I also added one of the new snowflake charms to the gold bow.   To keep the sewing stitches from showing on the underside, I matted this whole piece onto a piece of cherry cobbler card stock.  I used a corner rounder punch to all the corners.  You know, since the corners are rounded on the tin.  (OCD shining through)
I used one of the new coffee collection stamp sets.  I stamped the coffee cup twice on shimmer white card stock in chocolate chip classic ink.  I stamp the coffee cuff onto  the back side of the house pattern paper, that how I got the stripes.  I fussy cut the cuff out and adhered it to the top coffee cup.  I put foam tape between the two coffee cups and adhered them to the front of the tin.  To jazz up the coffee cup, I added a tiny pool party button tied with white bakers twine.  I thought it gave the coffee cuff that 'home-made' feel.
For the inside of the tin, I wrapped some chocolates with the same DSP, and added a Starbucks gift card.  I actually found a Starbucks gift card, that had the same colors in it!  Yahoo! (another OCD affliction)  It's the one with the holiday Christmas tree that is decorated with ornaments.


And yeah, I added a piece of the coral card stock to the bottom of the tin.  (another OCD problem.)  I like things to look 'finished'. Not just 'done'.  I hope someone out there knows what I mean.  And now I realize that when I took this picture, I forgot to add my gift card addition.  Ugh!  
Anyways!  the lovely ladies over @ Craft Hoarders Anonymous Challenge want to see you use a portion of your hoard collection, and make something!  Oh, and don't forget to share!
Have a great day!  And who knows I may end up adding another project!


Tuesday, December 2, 2014

Roses & Reindeer

Well, the crafting hasn't stopped.  But, I am taking a small break to post a few pictures.  I love sharing what I create, but I always under-estimate the amount of time it takes to photograph, edit, and post images. {frown}
A wonderful lady who works at my Dentist office, came by my last craft fair (@ Tramway Community Church) and purchased all of the gift card holders I had created.  {smile}  It is very nice to 'sell out'.  And this gave me the push to create some new ones, using some different pattern papers, and embellishments.


These little cuties are a blast to create.  It really forces you to think differently.  The space to embellish is only 4" x 2 1/2", with a slope.  So, it needs to be minimalist, without looking bare.  It's always good to have a challenge, right?
I forgot to photograph these before I packaged them.  So sorry for the cello bag glare.  
Speaking of packaging.  What is stamped on the bag topper is what is heat embossed on the inside.  Also, there is a dot on the back of the bag topper, to show what color of embossing powder was used for the inside.
Recipe:  The top gift card holder:  I used the roses G45 Christmas paper for the outer flap.  The polka dot pattern paper is Aqua dots & stripes by Echo Park.  I used garden green card stock by Stampin' Up! for the base.  I also used the new real red cotton ribbon by Stampin' Up!.  It is soft and ties some beautiful bows.
The bottom gift card holder:  I used Eskimo Kisses by Basic Grey.  That paper is easily 3 yrs old.   I only had scraps, so the top panel piece wasn't wide enough to fit across the whole card.  So I made it into a panel.  I added a text pattern paper So Noted by Carta Bella.  The gift card base is made with Pool Party card stock by Stampin' Up!.  I also used the new cotton ribbon by Stampin' Up! in blushing bride.  
I tied on snowflake charms from Stampin' Up!.  Yeah, they are new this holiday season.
I created two different by equally perfect sentiment pieces.  I stamped both in real red classic ink onto whisper white cardstock; both from Stampin' Up!. 
Look for these and many more different styles of gift card holders at my next craft fair this Saturday @ La Cueva High School, in Albuquerque, New Mexico.

Thank you for stopping by.  I'm heading back into my craft room, to finish some more gift card holders.  And a few more cards, gift bags, and gift card/box combos. {smile}