Showing posts with label scrap magic. Show all posts

Monday, November 28, 2016

Vintage Chic Christmas Card

Welcome to my little piece of blog-land.  Grab a cup of coffee/tea, and scroll through my posts.  I have been busy crafting and posting what I have created.  I was browsing a local paper store, and stumbled upon this beautifully neutral pattern paper by Heidi Swap: Vintage Chic.  A beautiful collection of pattern papers in cream, black, grey, teal, and pink.  Amazing.   Now, if you scroll down a few posts, you will see that I have crafted two notebooks, a gift tote, and a few cards.  But, I am not done crafting with these beautiful pattern papers, yet! {smile}  
While surfing the web, I stopped by one of my favorite eastern European challenge sites: Scrap Magic.   Their current challenge is kraft & pearls, it is part of their 'contrast' challenge.  They also have a beautiful inspiration board.  And if you need a little more creative eye candy, please check out what the design team have created.  You will be pleasantly surprised {smile}.

*there is a translate button for this site

This challenge and my 'new' Vintage Chic pattern paper, are perfect together!
I also stopped by the Christmas Card Challenge.  I wanted to see what their new challenge is.  Their current challenge is Anything Goes.  Easy to work with {smile}.


and here is what i created:

*my mix of textures, and **my repeat of color

Recipe:  I used kraft card stock by Paper Trey Ink, for the card base.  I used mint macaroon card stock by Stampin' Up! for the matt.  I used 3 different pattern papers from the Vintage Chic collection by Heidi Swap: kraft & cream stripes, grey polka dots on cream, and ledger print on cream paper.  I sponged all the edges with crumb cake classic ink, by Stampin' Up!.  It's a soft kraft color ink.
I adhered the kraft & cream stripe paper onto the mint macaroon card stock, and sewn a simple border stitch on the main panel.  
I used my Tasteful Trim die to create the large scallop panel with the grey polka dot on cream pattern paper.  I wrapped a piece of mint macaroon taffeta ribbon around the large scallop die cut piece.  
I used one of my digital bingo cards and matted it on mint macaroon card stock.  I tucked it just under the large scallop piece.  
I used a mini banner punch by Stampin' Up! to create my trio of banners.  I sponged all the edges with crumb cake classic ink.  I used a scrap piece of mint macaroon card stock to matt each banner piece. I adhered them to the main panel, and then used my stapler to secure them to the card front.  (*I love mixing different textures: paper, fabric, metal, pearls/rhinestones, etc.)  I tied my bow upside down.  I like how the bow sat, upside down, better then right side up.  
I stamped my sentiment in baked brown sugar classic ink by Stampin' Up!, onto white card stock.  I wanted a soft, creamy, kraft color, and love how this color looked.  I used mint macaroon as my matt. I used foam tape to 'lift' the sentiment block off the card front.  
I used one of my Prima: Coffee Break fabric blossoms, to add a feminine touch to the card.  I just love the lace and pearl center.  So delicate and pretty.  
For my final touch, I added some kraft-colored, flat-back pearls, and some mint-colored, flat-back jewels in two clusters of three.  (**Kraft and Mint are the two main colors, and so I repeated these colors whenever I could.)
Thank You, for visiting my blog.  I hope you have found some inspiration.  And I hope you have the opportunity to play along with either of these challenges.  I know that they would love to see what you have created {smile}.


Sunday, May 22, 2016

Provence-Style Rose

Howdy!  Hope this post finds you well, and enjoying your weekend.  Me, busy as a bee.  But, what's new.  I always wait patiently for the summer, because I tell myself, 'life will slow down, and I can catch my breathe.'  And we all know that is so far from the truth.  No one's life 'slows down' during the summer.  Actually, it is quite opposite.  We are all in a rush to get in some vacation time, and attend as many cook outs as possible.  {smile}
I did however, take some time for myself this morning to create a card for a challenge or two.  (ok, 3) So, here we go!  I stopped by the creative challenge site: Crazy 4 Challenges.  Their current challenge is a sketch.  Awesome!
I turned the sketch 90 degrees to the left

My next stop, was the beautiful challenge site:  Scrap Magic.  They always have great inspiration boards.  Their current challenge is to craft in Provence Style.  {I'm going to try it}


And last, I stopped by the Brown Sugar Challenge site.  Their current challenge is - Anything Goes.

here is what I crafted:


Recipe:  I used kraft card stock for the base of the card.  I love the rustic look of this paper.  I used two different pattern papers, and both are years old.  (sorry, I'm trying to use what I have on hand.)
The main panel is a Valentine's day theme paper from My Minds Eye.  It has that weathered look to it.  The blossoms are done in a faint reddish purple color.  I used the edge of my scissors to distress the edges.  I then swiped some white canvas ink over the edges.  And finally, I added some machine stitching.  
The grayish polka dot pattern paper is from a Christmas collection.  (my scrap piece no longer had the manufacture name on it.  If I had to guess, I'd say another My Minds Eye pattern paper.  I matted that piece with a scrap piece of kraft card stock.  A little more machine stitching.
The cotton-rhinestone piece is actually from Prima.  And probably 6/+ years old.  I still have 5 of these left, in a cream, a brown, and this beautiful rose color.  [I know this sounds like I'm a hoarder, but, really just a collector.]  I painted a wooden button with white acrylic paint, and dunked it into a tub of glitter.  Once the paint was dry, I took a small piece of sand paper to the button, to rough it up a bit.  I tied the button to the card front with kraft twine, from Paper Trey Ink.  I tied a double bow between the card and button.
I added a scrap piece of cotton trim just above the cotton-rhinestone piece.  I felt that the card needed another layer of fabric.  
My sentiment piece is hand-stamped and machine cut.  I used a coordinating stamp and die set from Amuse Studios for that piece.  [Vintage Labels is the die & stamp set]  I stamped the outline, and sentiment with basic grey classic ink, by Stampin' Up!  The Hand Scripted sentiment stamp set comes with various words to mix and match.  The card stock I used for the sentiment piece, is actually the back side of the weathered blossom pattern paper I used for the main panel.  The grey streaking is a distressed look for the paper.
I added a white resin piece from Melissa Frances.  I thought the basket of blossoms was a perfect fit for this card.  I used a retired Pale Plum marker, by Stampin' Up! to color two blossoms and the bow. I thought this color of purple matched the cards overall look perfectly!  And finally, I added a trio of pearl halves.  {smile}

Thank you for stopping by.  I hope that I have inspired you to create something beautiful or simply to play along in any or all of these challenge sites!


Sunday, April 17, 2016

Be{e} Sweet

Welcome.   I set out in to my craft room this morning.  I have a few cards to make, so I decided to get started before my deadline.  It's snowing again at my house, so I don't really want to adventure outdoors.  (yes, snowing in the middle of April.)
I stopped by a few favorite challenge sites to get my creative juices flowing, and found these two challenges to participate in: Scrap Magic & Shabby Scrap.  (Both of these challenge sites are in Russian, so please be aware.)
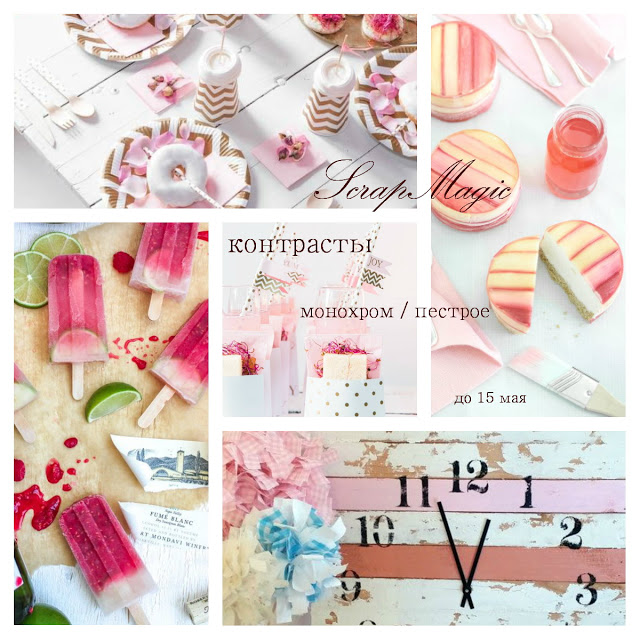
My first stop is Scrap Magic.  They always have the most beautiful inspiration boards I have seen.  They typically have a mandatory element and a few embellishment requirements.  But not this challenge.  Here is their inspiration board:
(You need to do a monochromatic color scheme with a contrast color. ) 
My next stop is this beautifully shabby chic challenge site Shabby Scrap.  They have some very talented ladies on their design team, who will certainly inspire you.  
(their current challenge is this sketch)

and here is what I made:
my monochromatic is yellow and my contrast is green

Recipe:  My card is an A6 size (4 1/4" x 6").  I used some scrap pieces from my scrap box.  I really need to get this scrap stash dwindled down.  {smile}
The bee print and floral pattern paper are from the same collection.  But, I only had these two strips, so I am not sure who the manufacturer is.  {sorry}.  The yellow polka dot glitter paper is from My Mind's Eye.  
I started to do a simple border stitch with my sewing machine, but I ran out of thread before I could get all the way around the card.  But I love the 'un-finished' look it gave my card front.
The black script text pattern paper is from Teresa Collins.  And yeah, that is all I had left of that piece.   
I stamped my sentiment onto whisper white card stock by Stampin' Up!.  I used the You're Cherished stamp set.  (It is easily 5years retired.)
I wrapped some medium green crinkled seam binding around the middle-ish of the card.
I added a bee resin medallion by Melissa Frances, to the sentiment & text stack, then adhered this piece to the card front.  I made sure to leave room for my multi-loop bow.  
I really love the sparkle of the gold glitter outline to the text circle/polka dot pattern paper, so I made sure to add some gold accents.  I tied a double loop bow with thin gold cord from Stampin' Up!  It was in the holiday mini catalog for 2015, and I simply fell in love with it!  I added my multi-loop seam binding bow over the gold cord and adhered it to the card front with my glue gun.  I cut off the legs to this nostalgic brad, and simply adhered the 'button' part to the center of the layered bow.
I wanted a bit more gold, so I added a trio of gold sequins to the card front.

My card is off to the mail box, as I am sending this to a very special friend.  She has been by my side cheering me on, as I conquer new challenges in my life.  So, I want to make sure she knows how blessed I am to have her by my side.  {smile}


Sunday, April 10, 2016

Peach Matthew Card

Howdy.  I needed to get a card in the mail this weekend, and needed a bit of inspiration to get those mojo juices moving.   I am entering my card into five different, but very inspirational challenges.  Lets get started.  I stopped by Scrap Magic to work with their current inspirational board. 
Mandatory to use Peach and Green, you must also include floral pattern, fabric or gold.
I stopped by Sugar Pea Design to check out their sketch challenge.  These ladies are sure to inspire you with their creativity.

I stopped by the faithful challenge of Word Art Wednesday, to see what scripture they are using this week.   The scripture of Matthew 11:28 is perfect for my card.  {smile}

I stopped by the Brown Sugar Challenge, to see what this talented challenge site has for their current challenge: Anything Goes!  Well, that couldn't be simpler!
And finally, I stopped by Really Reasonable Ribbon Blog for their current challenge:  Flowers & Trim.  They don't have a required number of flowers, so this one will do {smile}.
and here is what I made:


this card was selected as a Top 3 Winner @ Really Reasonable Ribbon Challenge Blog.  

Recipe:  I used crumb cake card stock for the card base.  I used a green polka dot pattern paper from Authentique.  The peach blossom pattern paper is from Authentique, from the Grace collection.  The peach pattern paper used for the scallop trim, as well as the peach text pattern paper are from the Grace collection, as well.  I added a simple border stitch with my sewing machine, to help convey that homespun feeling.
I tied peach seam binding around the card, and added a little more machine stitching.  I tied a multi-loop bow with the same peach seam binding.  I added a green paper blossom, from Kaiser crafts, just above the bow.  I tied a scrap piece of gold thin tinsel around the multi-loop bow.  
To help tie the gold accent, I added a trio gold sequins.  I printed the scripture onto whisper white card stock.  I cut the scripture into a tag, and adhered it to the card front with foam tape.  I added a scrap piece of peach seam binding.  I tied the seam binding with a scrap piece of pistachio twine.
Thank you for looking.  I might be able to get a better photo tomorrow.  


Sunday, February 28, 2016

Congratulations Cake: Card

Howdy!  I hope your weekend is going well.  Me, I've been busy, cleaning, and getting stuff ready for tomorrow - the beginning of the work week.  {grimace}  And, I came upon a card I forgot to post last week.  UGH!  But, have no fear!  I am posting it here! (cute little rhyme)
I am entering this card into two challenges, so without further ado, here we go!
My first stop is at this wonderfully creative Russian challenge site: Scrap Magic.  They publish Inspiration Boards, give you a few requirements, and then let your mojo run free!
Here is the inspiration board:
For this current inspiration board, you are required to use turquoise and pink colors.  And you need to add a cake/rose to your project.  Their design team is very creative and I am sure that you will find more than enough inspiration from their projects, and their wonderful inspiration boards.  Their challenge site is in Russian, but they have a 'translate' button.  It's super easy to play along.  
My next stop is Really Reasonable Ribbon Challenge #135.  Their current theme is: Celebrate.  This can be any type of celebration: birthday, wedding, baby, etc.  Their design team is clever and creative!  You will find a lot of inspiration regardless of your paper crafting style!
my card was selected as a 'Top Three' @ Really Reasonable Ribbon Challenge #135! Yahoo! and thank you ladies!  Look for my 'badge' on my AWARDS page.
here is my card:

Recipe:  This card is a A-6 size card (4 1/4" x 6").  The card base is Soft Sky by Stampin' Up!  I just love the soft, pale, blue color.  Very pretty, and a bit shabbylicious!  The pattern papers are from Tilda. (I used three different, but beautiful collections.)  I used my sewing machine to add a simple border stitch to the card front.  Yeah, the thread is a silver metallic.  I thought it added a homespun feel with some sparkle! {smile}
The journal card is actually a digital download.  I just love the stripes and floral images with the blue french as an overlay.  Super pretty!   The 'cake' is from Tilda, also.  I adhered the cake to the journaling card with foam tape.  I just love the stripes on the cake.  It looks yummy and beautifully stunning at the same time.

The lace trim is a scrap, and I can't remember where I purchased it.  But, I'll need to buy more, I only have about 6inches left. {frown}  The seam binding is Soft Sky, by Stampin' Up!.  But I fear this may be a retired color.  And I used the last of what I had stashed.  {frown}  Ugh, this is dreadful!  I just love working with seam binding.  It is easy to manipulate and easy to color!
I tied a multi-loop bow with the seam binding, and then added my extras.  {smile}  I used some thin silver cord, to tie on a aqua mist vintage button, (by Paper Trey Ink) then tied on the key, and finally created a large loop bow behind the seam binding bow.  I adhered the bow piece onto the card front with my hot glue gun.
I added the key to the bow, because I think it signifies so many things to different people: the key to knowledge, the key to happiness, you hold the key to my heart, the key is the future, and so many other thoughts.
I made two trio clusters with some sequins (marshmallow, and pink blush) and one lone aqua mist vintage button to the card front.  I think it adds of bit of 'interest' to the card.
I stamped my sentiment in Going Gray classic ink, by Stampin' Up! using the Timeless Love stamp set.
Thank you for stopping by.  I do hope that you get a chance to play along in a challenge this weekend.  It is really great to see how others interrupt the sketches, inspirational boards, and such.  Ok, I am off to clean some floors.  WOW! sounds fun, huh?  But before I go, I want to remind you don't forget to stop back by on Tuesday, for my Triple T Tuesday segment.  {smile}


Tuesday, February 23, 2016

Spring Macaroon: Card

Howdy/Welcome.  I created a card earlier today, to show how to add machine stitching to your card, without the stitches seen on the inside of card, HERE.  Anyways, I stopped by some favorite (new and old) challenge sites, to give me a starting point, and I have to say, I'm pretty happy with how my card turned out!  
The first challenge site I visited was, Scrap Magic [No.16 Spring].  This is an old favorite.  I don't always play along in their challenges, but I just love looking at what the design team creates.  Very inspirational, and very creative!   This challenge site, creates a mood board, they give you primary colors and mandatory elements.

The primary colors: Turquoise and Pink.  Mandatory elements: rose/dessert, and delicate work.  Please be aware that this challenge site is in Russian.  They do provide a translate button.
The second challenge site that I visited was Retro Sketch Challenge [#203].  This is another 'old' favorite.  I just love their sketches!  They are super easy to work with, and the design team is sure to inspire you to play along.
My card was selected as the Retro Sketch Challenge Rock Star!  Super happy and excited!  I'll be posting my 'award' on my Awards page {smile}  I just can't stop smiling!

And finally, a 'new' favorite challenge site: Really Reasonable Ribbon Challenge [#135 - Celebrate]. I had stumbled upon this challenge site while visiting a blog.  And I was intrigued as to what this site was about.  And well, I think you can figure it out too - Ribbon.  And I love ribbon! so I played along in one of their past recent challenges, and stopped by again, yesterday.  You will be inspired by their design team, and their wonderfully creative challenges.  Their current challenge: Celebrate!  Create a paper craft or project showcasing this theme (birthday, anniversary, wedding, baby, etc) and make sure you use ribbon or trim on your craft!
here is what I made:


Recipe:  I used Lagoon card stock by Stampin' Up! for the card base.  And this card is a bit 'large'.  It measures 4 1/4" x 6".  I believe it is considered a A6 size card.  I am really loving this larger size.  The first matt is Mint Macaroon card stock by Stampin' Up!.  I just love how those two colors match the two shades of turquoise macaroons on the pattern paper!  
I took a piece (3 3/4" x 5 1/2") of whisper white card stock by Stampin' Up! to use as my 'base' for the focal piece.  I cut two strips (1" x 12") of different pattern paper by Authentique, Infused.  I selected the floral pattern paper and the macaron pattern paper.  I tore the ends of the pattern paper strips to add 'interest'.   
I hand stamped the sentiment in Soft Suede classic ink by Stampin' Up!.  I used a new stamp set: Birthday Blossoms.  I just love the simple, cursive font of this sentiment.
I added a bright pink seam binding, and fancy, white crochet trim.  I did a simple machine stitch to attach the seam binding and crochet trim to the front of the card.  And then, I added a simple border stitch around the top of the card.  
I added a journalling card to a different piece of pattern paper (mint stripe) from the Infused collection by Authentique.  I added foam tape to the back of this journalling card.
I tied a triple loop bow with the bright pink seam binding, and adhered it to the front of the card with hot glue.
I added a collection of marshmallow sequins to the bottom of the card.  I didn't want to distract the eye from the beauty of this card, celebrating a birthday!


Saturday, November 21, 2015

Vintage Frost Christmas

Howdy.  Yeah, crafting, crafting, and bit more crafting for my next holiday craft fair.   I found some wonderful pattern papers that I had in my holiday stash, and super happy to create with them {smile}.  I had 'won' a 6" x 6" pack of Vintage Frost Basics pattern paper by Maya Design (from Sweden).  And I just love it!  This paper pack has vintage winter pattern papers in pink, blues, and brown, with images of angels, ice skates sleds, mittens, snowflakes, stars, and Santa {smile}!  Super special.  
The biggest draw back of crafting during this time of year, is that it is dark when I leave for work and dark when I return home.  So photography is difficult.  {frown}
One of my favorite European challenge sites is ScrapMagic.  I just love their inspiration boards.  Very inspiring, and really gets your crafting mojo running.  Here is their latest inspiration board:
No. 13 : Beige & Blue
Color requirements:  blue and beige
Mandatory elements: rhinestones, pearls, and lace
challenge closes November 30th.

I am using a sketch from Retro Sketches:

this sketch challenge is now closed.  I missed the deadline.

I am also entering A Snowflake Promise challenge:
theme: Christmas/Winter

and here is what I created:


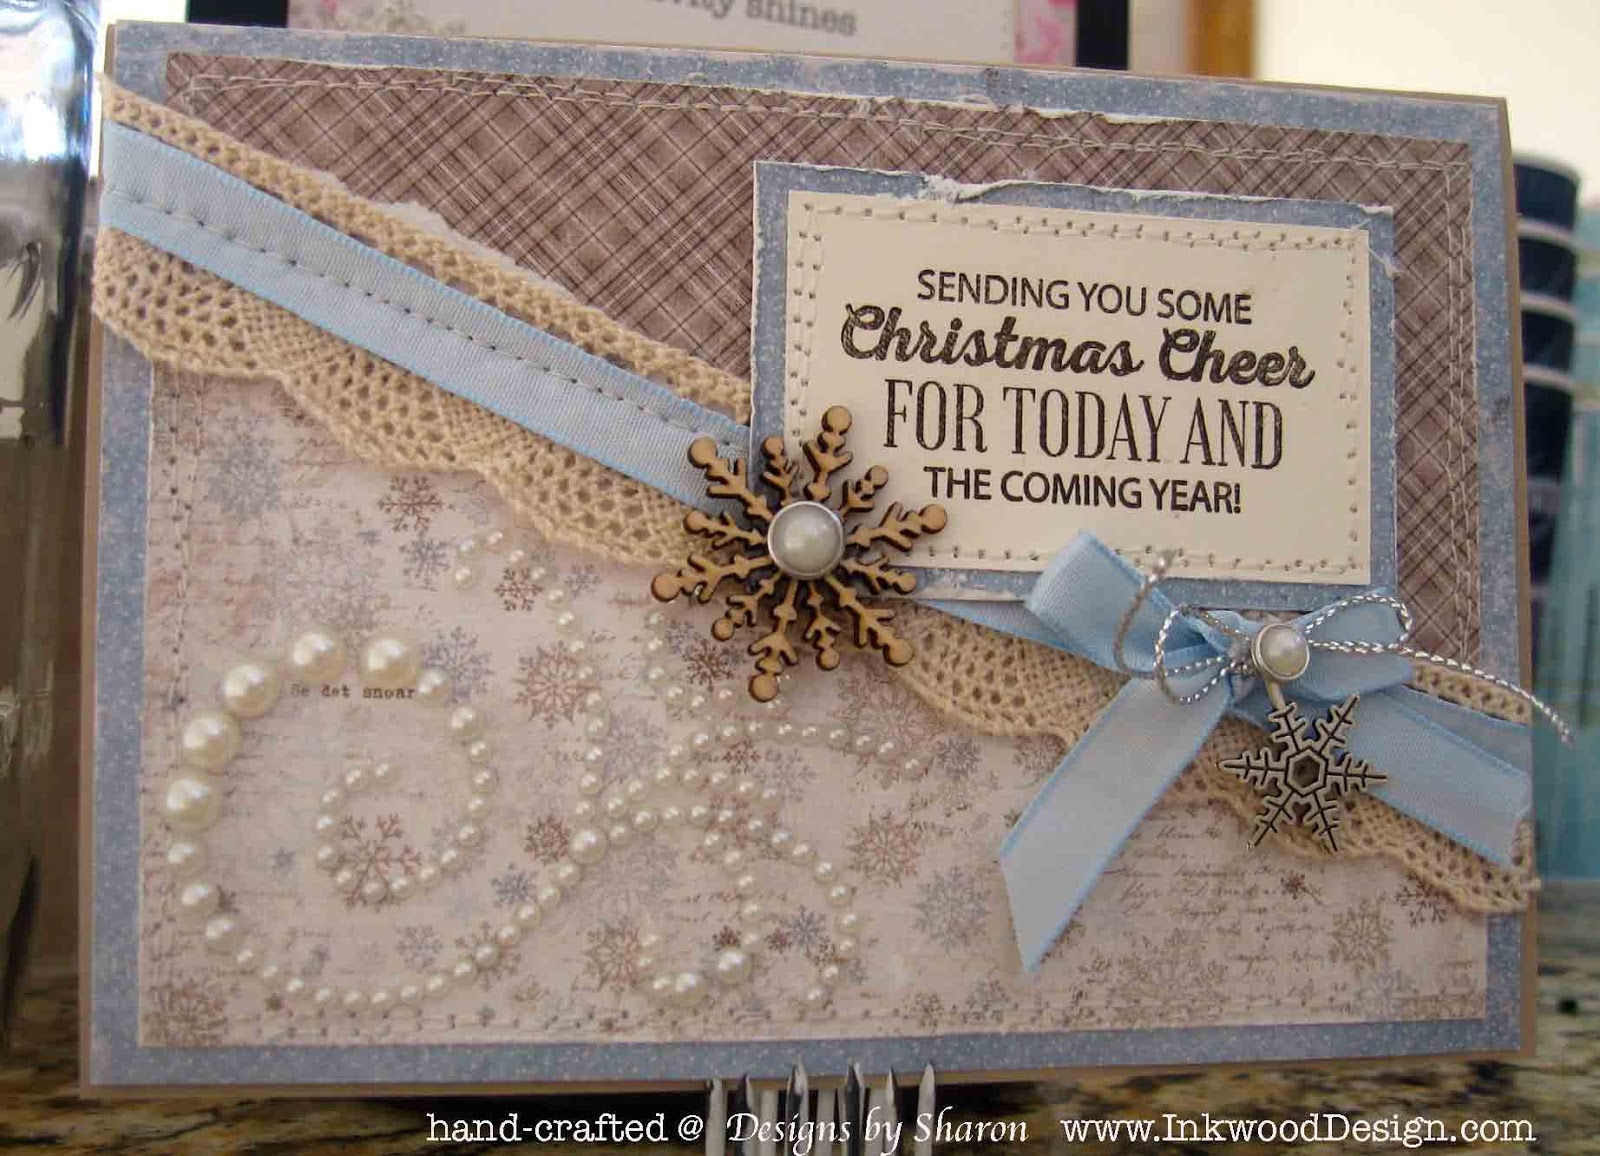
I took two sheets of the pattern paper (one blue and brown snowflake, and brown check) and torn each in half diagonally.  I didn't want to waste any of the patten papers, so I made two cards with my two torn papers.


Each card was made the same way, just changed the sequence of the papers, the snowflake embellishments, and the sentiment.  I made two 6" x 4 1/4" blank greetings cards.  I adhered the two torn pieces to the blue distressed pattern paper, and did a double border stitch with my sewing machine.  
I then stacked the crochet trim and light blue taffeta ribbon, and machine stitched the trims to the card front.   I tied the blue taffeta ribbon into a simple bow.  I tied a snowflake to the bow with thin silver cord, and added a silver rimmed pearl to the silver cord bow.
I stamped my sentiment in Early Espresso classic ink, onto very vanilla card stock, both by Stampin' Up!.  I matted the sentiment block onto the same distressed blue pattern paper as the main card.  I also added a double border stitch.  I adhered the sentiment block to the card front with foam adhesive.  I added a pearl swirl diagonally below the sentiment block.  I also added a wooden snowflake and rimmed pearl to the sentiment block.  


Thank you for looking.  I hope that I have been inspired you to create something beautiful.  {smile}


Sunday, June 14, 2015

Cute Baby; Card

Howdy!  I had a few custom orders to get completed and out in the mail.  Whew.  Love being busy.  It keeps me focused.  And on a personal note, I am up to 7 miles.  Running.  I am working on my time, and distance.  [If  you didn't know, I am training for a half marathon.  check out my InstaGram page.]
The easiest paper crafting style I can create, is shabby chic, with a bit of vintage thrown in for good measure.  I am a sucker for pink, vanilla, text, seam binding, lace, and paper blossoms.  And thanks to the world wide web, I can see what folks from a round the world create.  And so, for today's card, I am participating in two Russian challenges.  
To give me some inspiration, I chose to work with the inspiration board provided by Scrap Magic.


They have requirements.  Colors: Sand, & Pink.  Mandatory elements: rose, ribbon, metal, and wear.
What a beautiful collage.  I love the soft, sweet colors, and the little additions of gold.  Very pretty. This challenge closes on July 1st.  So, I may be submitting another paper craft {smile}.

Now, to give me some direction, I chose to work with art-kladovaya.  I love this sketch!  


I love the circle elements and the pattern piece at the top right of the sketch.  This challenge is almost closed.  this challenge site closed minutes before I could add my entry.  {frown}

And here is what I created:


Recipe:  I used a kraft yardstick from a big box store.  I love the softness of the kraft brown.  For the pink bottle pattern paper, I used Carta Bella latest baby girl pattern paper.  For the pink & brown polka dot  pattern paper, its a scrap from Impressions (at least 8 yrs old).
I did  a double simple border stitch.  I added a little distressing to the edges of the papers, including sponging.  I tore the paper and added a scrap piece of cotton trim in the tear, and then added some stitching along the bottom of the tear.
I added three different ribbon scraps under the heart brad for my sentiment.  I added a trio of paper blossoms (two pink, and one brown)  I thought the colors would go nicely with the card.  I added leaves cut from text paper, to give some contrast.  I added two kraft vintage buttons by Paper Trey Ink.  I added a 'cute' lightbulb and a scrap piece of cream tule.

Thank you for stopping by!  I'll get back in my craft room.  I have a few special orders to get out in the next few weeks.  {smile}  A little sneak peak, I ordered some beautiful holiday elements to add to my Christmas crafts for this years craft fair.  I'm super excited to see them in person!