Showing posts with label vintage labels. Show all posts

Sunday, May 22, 2016

Provence-Style Rose

Howdy!  Hope this post finds you well, and enjoying your weekend.  Me, busy as a bee.  But, what's new.  I always wait patiently for the summer, because I tell myself, 'life will slow down, and I can catch my breathe.'  And we all know that is so far from the truth.  No one's life 'slows down' during the summer.  Actually, it is quite opposite.  We are all in a rush to get in some vacation time, and attend as many cook outs as possible.  {smile}
I did however, take some time for myself this morning to create a card for a challenge or two.  (ok, 3) So, here we go!  I stopped by the creative challenge site: Crazy 4 Challenges.  Their current challenge is a sketch.  Awesome!
I turned the sketch 90 degrees to the left

My next stop, was the beautiful challenge site:  Scrap Magic.  They always have great inspiration boards.  Their current challenge is to craft in Provence Style.  {I'm going to try it}


And last, I stopped by the Brown Sugar Challenge site.  Their current challenge is - Anything Goes.

here is what I crafted:


Recipe:  I used kraft card stock for the base of the card.  I love the rustic look of this paper.  I used two different pattern papers, and both are years old.  (sorry, I'm trying to use what I have on hand.)
The main panel is a Valentine's day theme paper from My Minds Eye.  It has that weathered look to it.  The blossoms are done in a faint reddish purple color.  I used the edge of my scissors to distress the edges.  I then swiped some white canvas ink over the edges.  And finally, I added some machine stitching.  
The grayish polka dot pattern paper is from a Christmas collection.  (my scrap piece no longer had the manufacture name on it.  If I had to guess, I'd say another My Minds Eye pattern paper.  I matted that piece with a scrap piece of kraft card stock.  A little more machine stitching.
The cotton-rhinestone piece is actually from Prima.  And probably 6/+ years old.  I still have 5 of these left, in a cream, a brown, and this beautiful rose color.  [I know this sounds like I'm a hoarder, but, really just a collector.]  I painted a wooden button with white acrylic paint, and dunked it into a tub of glitter.  Once the paint was dry, I took a small piece of sand paper to the button, to rough it up a bit.  I tied the button to the card front with kraft twine, from Paper Trey Ink.  I tied a double bow between the card and button.
I added a scrap piece of cotton trim just above the cotton-rhinestone piece.  I felt that the card needed another layer of fabric.  
My sentiment piece is hand-stamped and machine cut.  I used a coordinating stamp and die set from Amuse Studios for that piece.  [Vintage Labels is the die & stamp set]  I stamped the outline, and sentiment with basic grey classic ink, by Stampin' Up!  The Hand Scripted sentiment stamp set comes with various words to mix and match.  The card stock I used for the sentiment piece, is actually the back side of the weathered blossom pattern paper I used for the main panel.  The grey streaking is a distressed look for the paper.
I added a white resin piece from Melissa Frances.  I thought the basket of blossoms was a perfect fit for this card.  I used a retired Pale Plum marker, by Stampin' Up! to color two blossoms and the bow. I thought this color of purple matched the cards overall look perfectly!  And finally, I added a trio of pearl halves.  {smile}

Thank you for stopping by.  I hope that I have inspired you to create something beautiful or simply to play along in any or all of these challenge sites!


Tuesday, March 4, 2014

homemade #335

I have been in my craft room getting ready for the Spring Craft Fair this month.  I really wanted to use some of this new pattern paper I received in the mail yesterday. . . Vintage Bliss.  It's the new collection from Simple Stories.  To say its gorgeous, is an understatement.  Or at least it is for me.  This pattern paper has all my favorite graphics: polka dots, text, florals, chevrons, doilies, canning jars, and prize ribbons!  Oh my!  
To help get me started into a creative mood (aka mojo) I turned to no other than the creative gals over @ Mojo Monday.  Seemed like the logical step.  Right?  Here is this weeks sketch.  Oh, and its a prize week (the first week of the month).

the sketch:

and here is my card:


I used crumb cake card stock for my base.  I then added pieces of the polka dot and plaid to a piece of whisper white card stock.  I added a thin strip of scallop bordered pool party texture card stock to separate the two patterns.  Then I ran this piece through my sewing machine and used more of that beautiful silver metallic thread around the border.
I took a piece of the floral text pattern paper and matted it with some more crumb cake card stock.  For my banner piece, I just had to add some crochet trim.  I really wanted to add that piece.  To give it some character, I stapled the crochet trim at the edge.
For my sentiment piece I used Country Born stamp set by CTMH.  I used Vintage Labels stamp set and matching die set by A Muse Studio, to create the decorative sentiment label.
For my butterfly, I stamped the image in versa mark, then added pool party embossing powder.  Heat set it onto vellum card stock and fussy cut it out by hand.  I added a small pearl to the butterflies body.
For my blossom, I hand made that.  I used two cotton candy colored sheer fabrics.  I cut 3-4 circles of different sizes.  Then I used my heat gun to melt the fabric.  I'm not a fan of using a flame to create the look, and my heat gun heats up rather nicely for this affect.  I added a single rhinestone bead I had left over from another project.  I used a blossom builder punch for the leaf shapes.  I used a green polka dot pattern paper for those.
Thank you for looking.  Hope you get a chance to head on over to the Mojo Monday blog and play along.  You could win their challenge!  Anyways, I hope I have inspired you, or at least gave you some eye candy {smile}.


Wednesday, September 18, 2013

Homemade Happiness

Welcome.  
I had a little free time yesterday, so I created a card, to enter in two of my favorite challenges.  I have a few favorite challenge sites, that I stalk frequently stop by.   The first is Mojo Monday (#311)  Who doesn't love a great sketch?  The other is the Shabby Tea Room (#184)  The Shabby Tea Room, has some of the most wonderful inspiration photos.  Their photos are typically shabby chic in style.  But every once in a while they are vintage, and feminine.  Who wouldn't love that?


use white, cream, and neutral colors, and include twine

here is what I created:


I did use some creative liberties with this sketch.  I did keep the main elements, but it went together a bit different.   I pulled the circle element forward.  And, I turned the bow on its side.
I used the vintage wallpaper embossing folder to create some texture to the main panel.  To create the scallop edge on the vertical strip, I adhered the crochet trim with a zig zag stitch using my sewing machine.  For the ribbon, I crinkled some crumb cake seam binding.  I also used my sewing machine to attach the ribbon to the card front. {smile}  I just love sewing on cards.
I cut a scallop circle with the Perfect Pennant die, and adhered a lolly made from a black pattern paper.  I used the Stars #2 die, to cut a star out of silver glimmer paper.  To give the center of the star a little interest, I wrapped some linen thread around the star and tied a white vintage button and made a bow.
For the rectangle piece, I actually cut a decorative shape for my sentiment.  I used the Vintage Labels stamp set by Amuse Studios.  I stamped the border in soft suede classic ink.  Then stamped the sentiment in basic black classic ink.
I purchased the Country Born stamp set from a CTMH consultant several months ago.  When I saw the images and sentiments, I knew I just had to have it!  Unfortunately, this is the first time this stamp set has been inked.  (I imagine other crafts collect purchase stamps that don't always get inked in the first week month.  Right?)  The fonts for this stamp set, are beautiful.
Thank you for stopping by! and I hope you get a chance to play along with your (or mine) favorite challenge or two! {smile}.


Tuesday, April 3, 2012

You're a Treasure: #130, #51, #159.

I hope all of you had a fantastic weekend.  Me, I really had a wonderful time.  I actually wore a 2-piece bathing suit, rubbed mud and baked in the sun.  I also soaked in various natural mineral water pools.  Totally relaxing.  Last night, it was snowing.  Snowing so long, that my husband will actually have to use the snow plow this morning to get our cars out of the driveway.  How crazy is that?
So, the weather actually kept me indoors, and sent me to my craft room.  This gave me an opportunity to participate in three challenges, with one card.  How sweet is that?
I wanted to try a different element, and Just Us GirlS challenge, is a Wild Card challenge this week.  So, I headed over there.

The wonderfully talented Elise has given us a challenge to make a zipper flower.  Sounds great! and a bit intimidating.  I have never made one, and so I did need to check out the accompany tutorial here.  Dana, did a fabulous job showing us how to create this great material blossom.  Dana, suggested to use a metallic zipper, to help with the contrast in materials.  However, I couldn't find one in our little town store.  So, I used a non-metallic zipper, and my material blossom didn't turn out half bad.

I wanted a fresh, new color combo, so I headed over to see what the creative ladies over @ CR84FN Color Challenge, have posted.  Here is the unique color challenge: Pink, Peach, and Blue.  Here is their inspiration board.  The pictures are quite pretty: a beautiful cake, a happily married couple, and refreshing drinks by the water.   The quote is quite inspirational, too:  Make the best use of what is in your power and take the rest as it happens. ~ Epictetus
I used some scraps to create my card.  I didn't want to go to one more store on my way home.


Ok, I have a new, creative element: my zipper flower.  And I have a color combo for my card.  But, I need some guidance to help pull everything together.  So, I headed over to a favorite sketch challenge site:  Card Patterns.  Michelle is the wonderful designer of this sketch. I knew that I was going to use scraps, so this seems perfect!  I love to add ribbon, buttons, and I have a zipper blossom, so it just seemed perfect!  I love the scallop edge, and the row of pearls at the top.  


Here is my card:

I used some pattern paper from Lost & Found, for my pink.  I used Blush Blossom as my 'peach' color.  And I used Aqua Mist, as my Lt. Blue.  Ok, I didn't put on three 'blossoms', but instead two.  I made my first ever zipper 'flower' with a brad center, and paper daisy with a pink polka dot center with a glitter button tied with some pool party striped bakers twine.  I substituted a multi-loop bow with a peach butterfly brad center, as my third 'flower'.  I made two different 'leaves'.  The first set are up top, cut from white distressed pattern paper.  I crinkled them by hand and sponged.  For the paper daisy, I added 5 punches from a fern punch.  
For the center oval sentiment shape, I substituted it with a decorative label die.  I used a favorite Paper Trey Ink stamp set to stamp this wonderful sentiment 'You're a treasure' in black ink.  I used a scrap piece of pattern notebook paper that already had that wonderful blue print on it.  I adhered the label to the card front with foam tape.  I added the mini vintage tag to the bottom right corner.  I stamped 'you're too kind' on it.  I used a button brad to hold it to the corner of the label.  
Instead of adding a row of pearls/brads to the upper edge of the card I added an architecture piece.  I used a small paint brush and a gold ink pad, to add random gold distressing on the card edges and the architecture piece.  
I added a row of 5 mini half faux pearls to the bottom of the main sentiment.  I added three glitter butterflies to the card front, to help with the feminine feel, and I love the sparkle.
Thank you for looking!  I hope the weather were you are is wonderful.

Sunday, March 18, 2012

Birthday Wishes, my friend #232

I can't believe that this weekend is almost over.  But, that is how time flys at my house.  I made a birthday card for one of my good friends, and I haven't given it to her yet.  So, my fingers are crossed that she doesn't realize it is for her, until she opens the envelope, later this coming week.  I made her card using the Mojo Monday #232 sketch.  I also used her favorite color combo.  (Isn't that what friends do?)

Here is the sketch:

Here is my card:


 I have to say that I think this card came out pretty!  I used some pattern paper from Basic Grey.  I just love how their papers coordinate together and the print is just so pretty.  I used a label from Amuse Studios.  I used a flower from Kaiser crafts.  The bucket I received in a gift stash from another friend.  The solid card stock, the classic ink, the satin ribbon, the leaves punch, and the sentiment came from Stampin' Up!.  
Ok, so my friend loves black and white, with just a punch of color.  Any color except pink.  She isn't a fan of pink.  I wanted to use a pretty blue, but I couldn't match paper blossoms and the ribbon I had on hand to do that.  So, I used green.
Ok, if you look at the sketch, my proportions aren't a true match, but I just loved the graphics in the pattern paper, that just a strip wouldn't do it justice.  Also, I didn't want a large text box/rectangle.  So, I swapped the dimensions.

Thank you for looking!  I hope that you enjoy the rest of your weekend.  I am actually running out the door to do some shopping.  I have quite a few gift cards from the holidays that I want to redeem.  See, the best kind of shopping : FREE!

Saturday, March 3, 2012

Wedding Music

The weekend is upon us, and it's a beautiful day, today! The sun is shining and there are snow clouds in the sky.  It's a good day, to sit in my craft room, with the blinds open and view is beautiful.  I'm not sure how you craft, but me, I listen to music.  All kinds of music, everything from Van Morrison, Poco, to Creed.  And we all know how music changes your mood.  A nice simple beat of regae can turn an otherwise 'rough' day, into something 'happy'.  And the fast beat of metal can cause you to drive faster, and a bit more aggressive.  Well, for me, the same is true with how music can influence my crafting.  I tend to listen to 'old' music to create a calmer mood in my craft room.  It allows me to think clearer and not rushed.  
The reason I rambled on about music, is because Holly over @ Our Creative Corner, has asked us to: "take inspiration from a song and work it into any papercraft project you'd like. Just make sure your post includes the song title (and if possible the artist) that inspired you!"  What a creative idea!

Here is my card:
Angel from Montgomery by Bonnie Raitt


I wanted to make something 'pretty' and I wanted to use this fabulous sketch @ Sasya-Sketch, here:


I know, I wasn't very creative with this sketch.  But, it was just so beautiful, that I wanted to use it, in its original state.  No flipping, no changes, just keep it as is.
This card is also another one of my collaborations of a 'million' products.  No restrictions, just create.  So, here we go.  

I used pattern paper from Cosmo Cricket.  I used solid card stock from Paper Trey Ink and Stampin' Up!.  I used ink from Paper Trey Ink and CTMH.  I used crochet trim from Paper Studios.  My main flower is a collaboration from several.  The yellow one is from a company that is no longer around.  The white one, is a 'naked' flower mean for 'coloring'.  The next white flower below that one is one I cut from waffle paper and then adding dazzling diamond glitter to the tips.  The two white leaves came from a wedding floral sprig.  The tiny yellow flower comes from Webster's Pages.  The tag comes from Melissa Frances.  The buttons are a collection of Amuse Studios, Paper Trey Ink, and CTMH.  The stamps are from Stampin' Up! and Amuse Studios.  The label is from Amuse Studios.  I used a distress paint on the edges of the pattern paper pieces.  I made a cluster of various rhinestones at the top of the main flower.  The large half faux pearl was added at the end of this creation.  I added a string of half faux pearls to the bottom of the sentiment, and wanted to continue that elegance, that softness.  I think the scrap piece of crochet trim helped.
Thank you for stopping by.  Leave me a comment, I'd love to know what types of music help you create!

Saturday, February 25, 2012

Over the Edge for You

Happy Saturday! I hope that this post finds all of you in good health and enjoying your weekend.  For me, the perfect afternoon, is sitting in my craft room, creating something pretty.  I have a great view outside my window, and I always have my favorite music playing.  
And yesterday wasn't any different.  Tui, is the hostess this again this week, over @ Our Creative Corner, and she has a fabulous challenge for us  this week.  It's called, 'Over the Edge'.  Tui's challenge is for you 'to create a card, or paper craft item with a design element that flows off the edge of your card'.  How fun is that?  I encourage you to stop by the challenge blog and see what these fabulously talented ladies have created!  You will be inspired!

Here is my card:


For this challenge, I have two elements that flow off the edge of my card.  The seam binding and button embellishment at the top of the card.  As well as the sentiment tag, at the right upper corner.
I'm not completely satisfied with this card.  I'm pretty happy, but now I see something that I should have done.  There really isn't a defining border to either of the pattern papers.  So, I wish I had sponged the edges.  There are two different pattern papers with the same colors in them.  
I cut two different color butterflies.  I used crumb cake seam binding.  To create the tag, is used speckled cream paper.  I used a matching die and stamp set, from amuse studios.  The sentiment is from a retired Stampin' Up! stamp set, Kind and Caring Thoughts.  The flower is a left over from a scrapbook page I did over 6 years ago.  (yes, I hoard hold-on to unique scrapbooking materials.)  The text paper is from Melissa Frances.  The button came from my 'jar o'buttons'.  The pattern paper is from Wild Asparagus, and is easily 5/+yrs old.
Thank you for stopping by.  I hope you find time to play along with us in this weeks challenge.  

Sunday, June 12, 2011

Sweet Birthday

We are celebrating one of my 'sister's birthday on Tuesday!  I can't wait!  There are 6 of us, and we all are the bestest friends!  We all get together as often as we can, and we ALWAYS have the greatest time!  We meet for dinner, and laugh, and eat, and talk, and laugh!  We are not blood related, but you wouldn't be able to tell by how much we get along; like sisters!  So, this month we are getting together for Ronda's birthday.  Ronda's favorite paper crafting company is Basic Grey.  

Her hand-made card


Ronda, loves shabby chic, and girlie.  So, this is what I made her.  I loved creating this card.  I found this wonderful sketch on the Waltzing Mouse challenge blog.  I don't own any of their stamps, so I didn't enter this card into their challenge.  But, I just loved the sketch.  I made the white flower out of clay.  I purchased a mold from a store @ Etsy: MoldMuse.  I used a white polymer clay that has sparkles in it.  How pretty, huh?  It was fun and super easy to make.  I added a small scallop sticker trim to the brown panel.  I found a lone faux half-pearl swirl in my bling drawer, and it worked sooo well, I attached it.  
The fabric and paper flowers were purchased.  I thought the colors really worked with the colors in the card.  The trim is both crochet and seam binding.  The multi-loop bow I made myself.  That sparkley button, is out of my million dollar stash.  (I call it that, because they are $11 for 2 buttons.) Yikes, right? But, Ronda is a 'sister', and she's worth it!  I attached that pricey button with my hot glue gun.
The the 'Happy Birthday', I used one of my ALL time favorite Stampin' Up! stamp sets: Vintage Labels.  I love the swirls!  I hope that she does too!
I added a corsage pin, as a last touch.  I have these clear crystal corsage pins, so I added a small pink button and a cream pearl.  I keep the whole decorative pieces in place with my hot glue gun!  I love that thing.  The oval HB tag is attached with foam tape.  So, I stuck the corsage pin thru the foam.
Thank you for stopping by today.  I hope that you have seen something that inspires you to create your own pretty paper craft item!  I haven't quite decided if I'm going to make a matching 'bag' or not.  So, check back before Wednesday, to see what I've decided.  And don't forget, Wednesday, is another Blog-iversary Question!

Friday, June 10, 2011

Birdie Birthday

I need a Birthday card for my son-in-law's mother, Barbara.  She is a wonderful lady, and very kind.  So, I want to make something pretty!  Something vintage.  Something 'girlie'.  So, I headed over to Cupcake Creations for some inspiration.  The colors for this challenge are:  Light Pink, Medium Green, and a Neutral.  

Here is their inspiration board:
Here is my card:


The card base is Sahara Sand cardstock.  The main panel is Pink Pirouette card stock.  I stamped a flourish and a 'Postale Carte' in Pretty in Pink classic ink onto the pink cardstock.  I ran the pink cardstock thru my Big Shot inside my Vintage Wallpaper embossing folder.  I sponged some pink ink randomly.  I used a sanding block randomly, too.  Then I grabbed my scissors and distressed a few spots on the edges.  I added some text paper behind the distressed edges.  I wanted to give this special birthday card some contrast.  I stamped Happy Birthday in Basic Brown classic ink, onto the Sahara Sand DSP.  I thought that it looked better without a tag.  To jazz-up the neutral DSP, I also stamped a fancy frame in white craft ink and used white detail embossing powder.   For the ribbon, I loved the crochet trim, but I also loved the seam binding, so I combined the two.  I used Pear Pizzazz seam binding, and Pretty in Pink dyed Very Vanilla seam binding.  I tied a double-bow with each color of the seam binding and put them together, with a vintage brad.  I used my glue gun to attach the vintage brad to the crochet trim.  The stamp multi-colored flowers/stems, I 'colored' my stamp with markers, huffed, and stamped.  To add a little sparkle I added some dazzling diamond glitter to the flower centers.  I also stamped a different swirl in Wild Wasabi classic ink, onto the text paper peaking out from behind the circle piece.  I tore the bottom edge and sponged with some sahara sand classic ink.
Thank you for looking.  I hope that you have seen something you like, and leave me some well-wishes.

Saturday, June 4, 2011

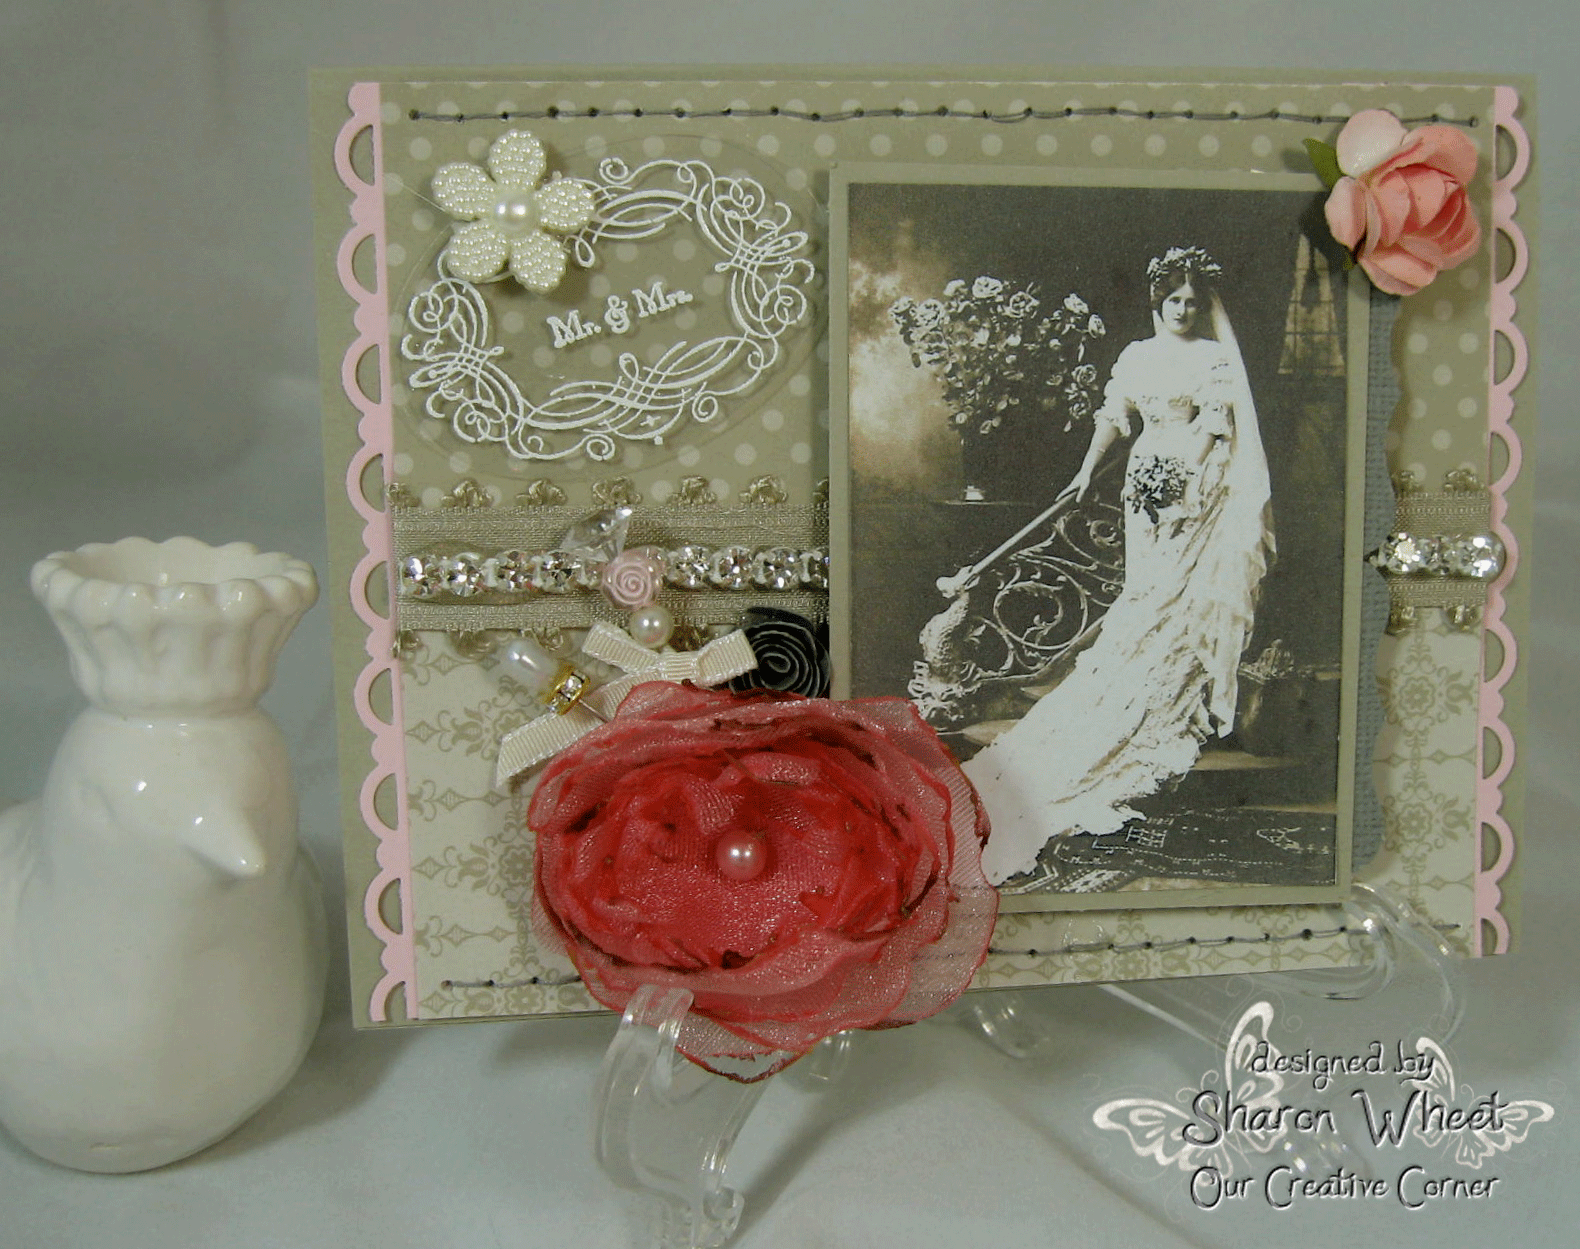
the Bride & Her Room #60

Well, I'm the hostess again this week, over @ Our Creative Corner challenge blog!  The theme this week, is weddings!  I figure its that time of year, and you probably need to crank-out a wonderfully hand-made card, layout, or altered 3-D item, so why not enter the challenge.  There are a few requirements, tho.  You'll need to add some sheer fabric (organza, tulle, etc.), some trim (lace, ribbon, bakers twine, etc.), a flower (hand-made, or purchased), a pearl (or two, or a swirl) and some stitching (faux, hand, or machine).  Whew!  Sounds like a long laundry list, but you'll be amazed at how easy it will all come together!

Here is my card:

For my card, I needed some color inspiration, so I went to the Color Room, to find some soft, pretty, elegant colors that I thought would work.  Here is the Inspiration Board, that I used.  This Color Room challenge is already closed, but aren't the colors just fabulous!


  Here is the Inspiration Board:
For the colors, I used:  Pink Pirouette, Going Grey, Peony, and Sahara Sand.  You will recognize the Stampin' Up! colors.  For those I used in cardstock.  The Peony, is actually the color name of the sheer fabric I used.  I used Sahara Sand as my card base.  I layered some Sahara Sand DSP together, added a strip of scallop trim borders in Pink Pirouette to two parallel edges.  The ribbon that hinds the seam is retired, Beachfront Ribbon Originals.  I added some of that wonderfully sparkly rhinestone trim.


For my three flowers: the large one is hand-made from Peony organza.  I cut 8 total circles.  (4 of 2 sizes).  I generally use a heat gun to melt the edges, but this time I used a lit tea light candle.  I melted each petal separately and then stacked them.  I threaded a pink pearl with some linen thread, and did a few quick stitches to hold it on.  I added two dressed-up corsage pins to this big beautiful flower.  I started with plain pins and just added small various beads I have in a stash.  Tied a thin Very Vanilla ribbon onto one pin.  The tiny grey flower is hand-made, I just used my hand-held scallop punch and hand-rolled it.  The other small pink flower I purchased a few years back.  


To make my tag at the upper left corner, I just stamped the 'Mr & Mrs' and frame in Whisper White craft ink, and used my Glacier ultra fine EP, and heat set them onto a scrap piece of clear card stock.  I added a flower-shaped pearl button to the upper edge of the tag, just to give it a 'finished' look.  The 'Bride' is actually a download from the Graphics Fairy.  They have some very nice free graphics.  I just did a search.  Easy peasy!  I hand-stitched the top and bottom borders of my card with some grey thread.  


Thank you for stopping by!  I hope that we, at Our Creative Corner,
have inspired you to create a wedding-theme paper craft and enter our challenge!  You never know, you could be our next top talent!

Thursday, June 2, 2011

Welcome, Baby {CS35}

Well, its Thursday, and that means its time for another challenge over @ Creative Sketches!  This week it is a sketch that we are working with.  I hope that you all have a chance to play along.  The rules/guidelines are posted on the challenge blog.  

Here is the sketch:

Looks pretty 'user-friendly', doesn't it?  So, take some time, sit at your craft table, and create something wonderful, and link it to the challenge!  You never know, you could be our challenge winner!  To give you a bit of inspiration, this is what I came up with:

A Boy Baby Card:

I used Crumb Cake cardstock as my card base.  I layered a piece of Baja Breeze DSP as my main panel. Yes, its the same piece of paper, just the other side!  How resourceful, huh?  I wanted to tie in the Soft Suede, so I added a thin piece of a scallop trim border to separate the two different patterns of paper.  I added a piece of Baja Breeze seam binding to hide my seam.  Slipped on a silver ribbon slide.  Pretty, and I didn't use a hundred products!  The three stamps are all retired.  The baby onesie is from a hostess set featured in the Occasions Mini catalog earlier this year (A Slice of Life).  The fancy frame is from Sale-a-Bration last year (Vintage Labels), and the sentiment is from a hostess set from the Occasions Mini catalog that just expired (Something to Celebrate).  I used Baja Breeze, Bashful Blue, and Pink Pirouette markers to color the onesie.  I added some foam tape behind the two 'tags' to elevate them off the card.  I didn't want it to look too flat.  See, easy peasy!  Enter our sketch challenge, and use colors and products from any company you have on hand.  You don't need to go out and buy new stuff to compete!  Lets see what wonderful things you can create! and share them with us and everyone who stops by!  You just might inspire someone!

Sunday, May 29, 2011

Designer's Challenge

My usual Saturday mornings I am surfing the web for some fun, creative, and not too to challenging challenges.  And I hit the jack pot!  Those super creative girls @ Color Combos Galore have a new Inspiration Board #194 this week.  You see, my wedding anniversary is today, and I could not come up with a card for my husband to save my life.  And then, I saw this:


I know what you're thinking, 'these are girl colors with flowers for the inspiration'.  But, take another look.  These colors can easily be for a masculine card.  And the challenge is to use numbers.  Think Tim Holtz.  Now do you see it?  

So, here is my card:


and a close-up of the clear card stock & calendar:

I started with a matt piece I ran thru the Big Shot using an embossing folder, so the card wouldn't look so flat.  I used Daffodil Delight, Wild Wasabi, Sahara Sand, and Pure Poppy card stocks, classic inks, and embellishments, all of which are from Stampin' Up!.  I printed the calendar from Crafty Secrets blog (its a free download).   I matted it onto a scrap piece of pattern black paper.  That piece is layered onto a piece I cut with a 'spiral notebook page' die from PTI.  The # '29' and 'frame' (Vintage Labels) were stamped in Whisper White craft ink onto clear card stock, and heat embossed with glacier white detail EP.  The only flower I did not make was the center yellow flower.  The rest I made with dies and punches.  I used the leaf portion of the 2-step bird punch to create leaves.  The ribbon is a retired ribbon from Stampin' Up!, I think its 3 yrs old.  I made the banner with a Stampin' Up! die and a recent retired stamp set, 'Something to Celebrate'.  I sponged everything with matching classic inks.  Some pieces received a heavier hand in sponging then others.
Thank you for looking.  My wonderful husband and I have been married 12 years.  I know that doesn't sound long, but we are happy!

Saturday, May 14, 2011

Au Natural, with a twist!

Well, it's Saturday, and that means another creative challenge from the gals @ Our Creative Corner!  Linda, is our hostess this month, and she has a super challenge this week!  Use your light neutrals (ivory, cream, light grey, beige, etc.) for the main colors in your project.  Use dark neutrals (black, chocolate, dark grey, etc.) as your accents.  The twist part, is you must also use a button and some lace. How fun is that?  So, without further ado, here is my entry:

Ok, so here are the deets:  I used all Stampin' Up! supplies, minus the template and the two pearls.  Pretty cool, huh?  For all those who know me, know that I don't smoke.  But, doesn't a cigarette box, make the cutest 'holder'?  I know!  So, before we get too involved with the all the particulars. . .   Do you know what you can fit inside a cigarette box?  Well, this one, you can fit business cards, ATC's, chap stick and a few small goodies (band-ades, ointment), a gift card, and more 'stuff'.  So, how cute would it be to swap ATC's carried in your cute little altered cigarette box?  Or hold all your 'crafty' business cards in?
Ok, onto the box.  I printed the template onto Very Vanilla cardstock.  I found the template @ Just Something I made  you will need to locate her Wednesday April 29th 2009 post.  It has a free download. (put in 'Cigarette box' into the search box at the top, and you'll find it quick and easy.)  My printer doesn't accept cardstock, or at least good quality cardstock.  So, I take my template and cardstock to my local Kinkos and print there.  (It's only 9 cents a copy.)

I didn't want to stamp directly onto the template, so I made 'panels' out of scraps of Very Vanilla cardstock.  I did a collage stamp on each panel and then adhered them to the box.  Pretty simple.  I used three different stamp sets.  Charming, Clearly For You, and Vintage Labels (retired).  I used Going Grey (retired), Sahara Sand, River Rock, and Crumb Cake classic inks.  I used a scrap pieces of First Edition DSP and tore little pieces, sponged and adhered to the panels.  To make my flowers, I used the Square Lattice embossing folder to give the Soft Suede cardstock some texture, and then used the small die Flower Fusion.  I used the left over scrap pieces of the Soft Suede cardstock and the Beautiful Wings die to create the butterflies.  I sewed the pearls onto the flowers with Linen Thread and an upholstery needle.  I had some left over length of the Linen Thread, so I made little loops behind the flowers.  I added a scrap piece of Chantilly Crochet Trim to the cigarette box.  To keep the box closed, I sewd 2 flower shaped buttons from the Neutrals collection with the Linen Thread, and strung some Early Espresso Bakers Twine around the buttons.  To keep the text straight when I stamped it, I did use a Stamp-a-ma-jig.  The rest, I eye-balled.
Thank you for looking, and I hope we see a creation of your over @ Our Creative Corner Challenge blog.  And if you have a moment, please stop by Linda's blog The Funkie Junkie.  She is super talented, and always has some eye candy!
Have a great weekend!  And let me know what you'd put into a 'cigarette box'!