Showing posts with label beach front ribbon originals. Show all posts

Monday, June 20, 2011

Thank You #2

Ok, as promised, the second card.  (Please stroll down to the previous post to 'catch-up')
I needed a some inspiration, to make a different card, so I headed over to Card Patterns for a little inspiration.                                         
Here is their sketch:


And here is my card:
Card #2
For this card, I used more neutral colors.  The card base is Linen from Paper Trey Ink.  The mat is Stampin' Up!:  Early Espresso cardstock.  The main pattern paper is from Stampin' Up!, and has been retired for 3/+ years ago: Brocade Background.  I stamped En Francais in Crumb Cake classic ink.  The stamp is not 'solid', because I did that 'finger tapping' technique.  The scalloped pattern paper is a scrap.  Don't know the maker, or name, sorry.  The top pattern paper is from the Brocade Background stack.  The pretty ribbon isn't stitched to the card, its stitched, tho.  Beach Front Ribbon Originals.  The button is from Stampin' Up! : Neutrals.  I used the Stampin' Up! Tiny Tags stamp set to make the 'thanks {so much}' tiny tag.  I used Linen Thread to tie the tag to the button.  I used the banner from the Stampin' Up! : Petal Cone Die.  The three pearls is from my faux half-pearl stash.  The 'Note of Thanks' stamp is from Stampin' Up! : Kind Thanks stamp set.
Let me know what you think.  If my co-worker doesn't purchase this card, it will go up for sale on my Etsy Shop : Designs by Sharon 
I would like to make at least one more card, for my co-worker to select from.  I'll need to post that one tomorrow.  Come back to see what I have made. :)

Saturday, June 4, 2011

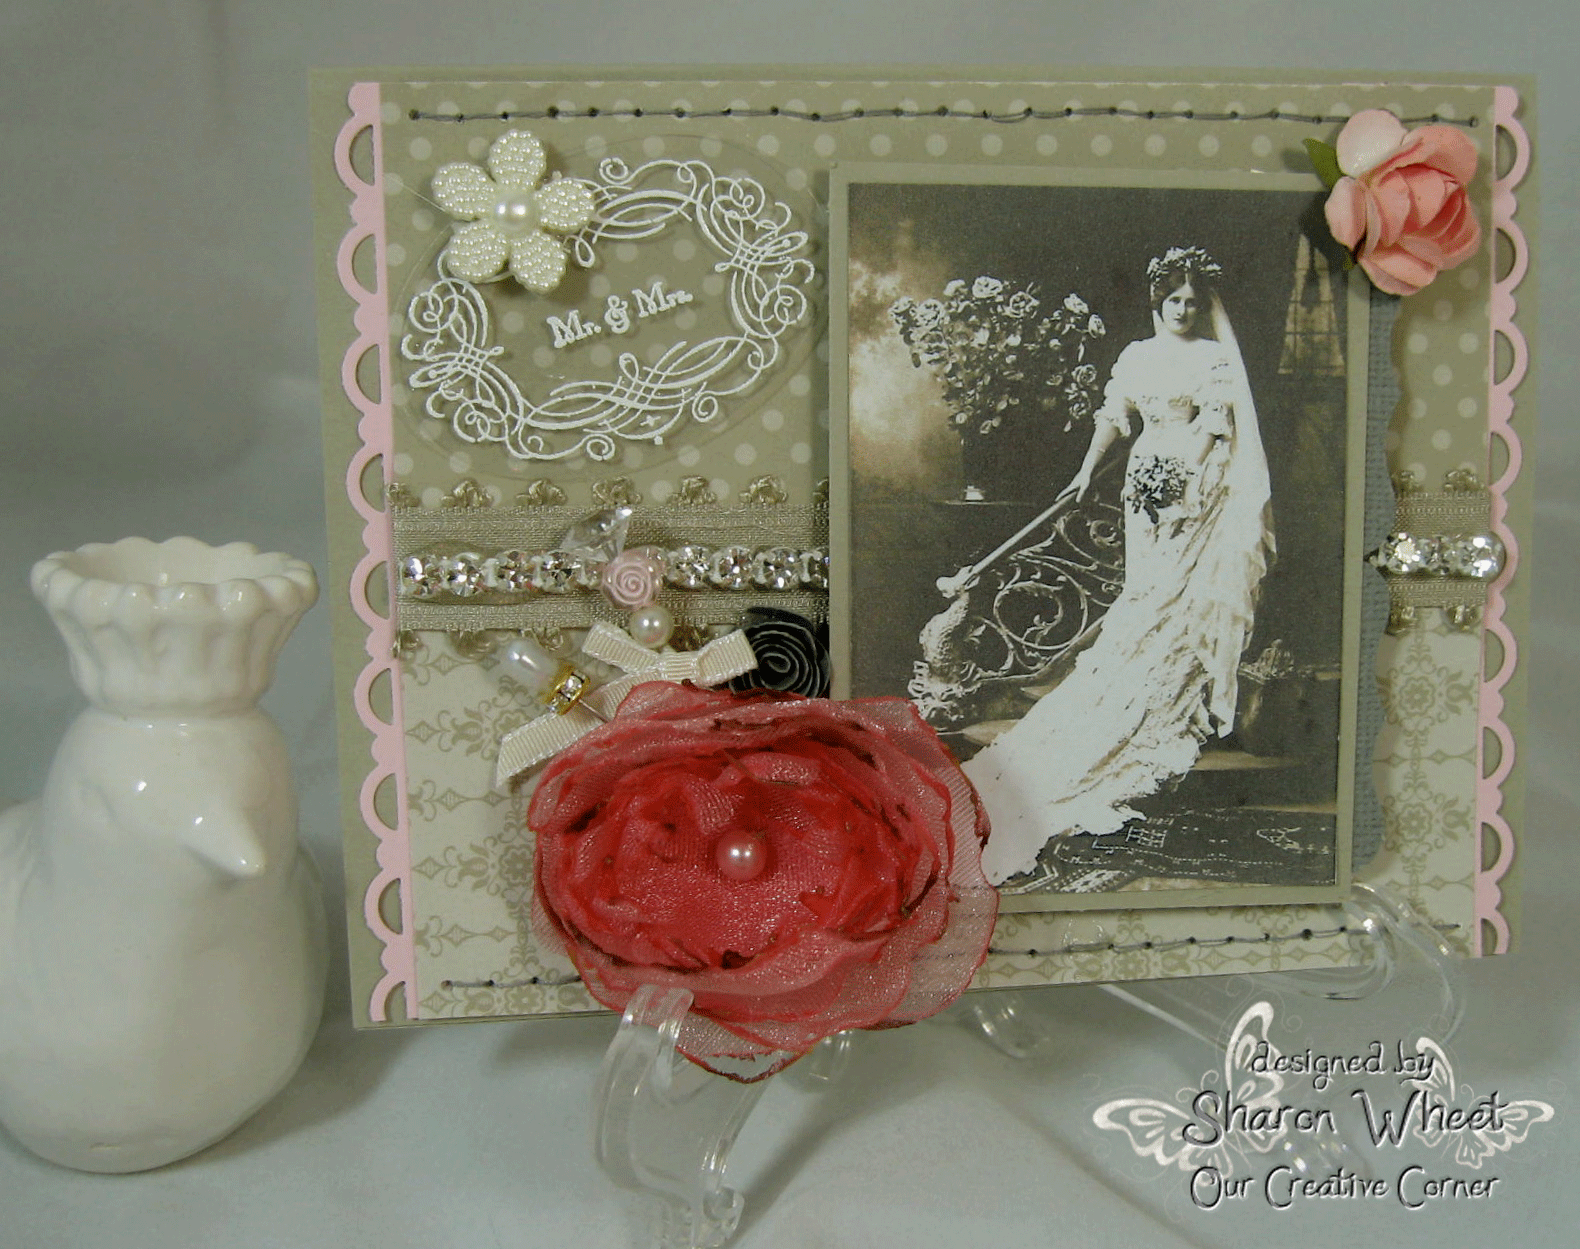
the Bride & Her Room #60

Well, I'm the hostess again this week, over @ Our Creative Corner challenge blog!  The theme this week, is weddings!  I figure its that time of year, and you probably need to crank-out a wonderfully hand-made card, layout, or altered 3-D item, so why not enter the challenge.  There are a few requirements, tho.  You'll need to add some sheer fabric (organza, tulle, etc.), some trim (lace, ribbon, bakers twine, etc.), a flower (hand-made, or purchased), a pearl (or two, or a swirl) and some stitching (faux, hand, or machine).  Whew!  Sounds like a long laundry list, but you'll be amazed at how easy it will all come together!

Here is my card:

For my card, I needed some color inspiration, so I went to the Color Room, to find some soft, pretty, elegant colors that I thought would work.  Here is the Inspiration Board, that I used.  This Color Room challenge is already closed, but aren't the colors just fabulous!


  Here is the Inspiration Board:
For the colors, I used:  Pink Pirouette, Going Grey, Peony, and Sahara Sand.  You will recognize the Stampin' Up! colors.  For those I used in cardstock.  The Peony, is actually the color name of the sheer fabric I used.  I used Sahara Sand as my card base.  I layered some Sahara Sand DSP together, added a strip of scallop trim borders in Pink Pirouette to two parallel edges.  The ribbon that hinds the seam is retired, Beachfront Ribbon Originals.  I added some of that wonderfully sparkly rhinestone trim.


For my three flowers: the large one is hand-made from Peony organza.  I cut 8 total circles.  (4 of 2 sizes).  I generally use a heat gun to melt the edges, but this time I used a lit tea light candle.  I melted each petal separately and then stacked them.  I threaded a pink pearl with some linen thread, and did a few quick stitches to hold it on.  I added two dressed-up corsage pins to this big beautiful flower.  I started with plain pins and just added small various beads I have in a stash.  Tied a thin Very Vanilla ribbon onto one pin.  The tiny grey flower is hand-made, I just used my hand-held scallop punch and hand-rolled it.  The other small pink flower I purchased a few years back.  


To make my tag at the upper left corner, I just stamped the 'Mr & Mrs' and frame in Whisper White craft ink, and used my Glacier ultra fine EP, and heat set them onto a scrap piece of clear card stock.  I added a flower-shaped pearl button to the upper edge of the tag, just to give it a 'finished' look.  The 'Bride' is actually a download from the Graphics Fairy.  They have some very nice free graphics.  I just did a search.  Easy peasy!  I hand-stitched the top and bottom borders of my card with some grey thread.  


Thank you for stopping by!  I hope that we, at Our Creative Corner,
have inspired you to create a wedding-theme paper craft and enter our challenge!  You never know, you could be our next top talent!

Sunday, May 29, 2011

Designer's Challenge

My usual Saturday mornings I am surfing the web for some fun, creative, and not too to challenging challenges.  And I hit the jack pot!  Those super creative girls @ Color Combos Galore have a new Inspiration Board #194 this week.  You see, my wedding anniversary is today, and I could not come up with a card for my husband to save my life.  And then, I saw this:


I know what you're thinking, 'these are girl colors with flowers for the inspiration'.  But, take another look.  These colors can easily be for a masculine card.  And the challenge is to use numbers.  Think Tim Holtz.  Now do you see it?  

So, here is my card:


and a close-up of the clear card stock & calendar:

I started with a matt piece I ran thru the Big Shot using an embossing folder, so the card wouldn't look so flat.  I used Daffodil Delight, Wild Wasabi, Sahara Sand, and Pure Poppy card stocks, classic inks, and embellishments, all of which are from Stampin' Up!.  I printed the calendar from Crafty Secrets blog (its a free download).   I matted it onto a scrap piece of pattern black paper.  That piece is layered onto a piece I cut with a 'spiral notebook page' die from PTI.  The # '29' and 'frame' (Vintage Labels) were stamped in Whisper White craft ink onto clear card stock, and heat embossed with glacier white detail EP.  The only flower I did not make was the center yellow flower.  The rest I made with dies and punches.  I used the leaf portion of the 2-step bird punch to create leaves.  The ribbon is a retired ribbon from Stampin' Up!, I think its 3 yrs old.  I made the banner with a Stampin' Up! die and a recent retired stamp set, 'Something to Celebrate'.  I sponged everything with matching classic inks.  Some pieces received a heavier hand in sponging then others.
Thank you for looking.  My wonderful husband and I have been married 12 years.  I know that doesn't sound long, but we are happy!