Showing posts with label twine. Show all posts

Thursday, May 3, 2018

a bowl of cherries

Howdy, and welcome.  I am super excited today to share with you some happy news and a card!  I recently won the challenge over @ Tic Tac Toe Challenge and was given the opportunity to be a guest designer!  How fabulous is that, right!  So, without any delay let's get to their current challenge #tttc046!

right column: fruit, watercolor, free
Now, before you get discouraged, here are some ideas.  For the 'fruit', you could add apple(s) and create a Teacher Appreciation card.  Or lemon(s)/lime(s) for a Summer themed card.  Or add a pineapple for a Hostess card.  For the 'Free', simply add your favorite item: machine stitching, a button, sequins, a paper straw, etc.  The list is almost endless.  Don't forget to use what's in your stash, and most importantly have fun!  This Tic Tac Toe card, really does lean towards a Summer theme.  I can't wait to see what you create.  Here is what I made:


Recipe:  my card, is a typical A2 size greeting card.  (4 1/4" x 5 1/2").  
FRUIT: cherries, WATERCOLOR: color wash on watercolor paper, FREE: machine stitching, button, seam binding, and lace.
The base of the card is made with Crumb Cake card stock by Stampin' Up!, due to their lovely heavy weight card stock.  The main panel is made from a linen plaid card stock by Paper Trey Ink.  I love this soft color!  I added a piece of 6" lace over the main panel.  I 'attached' the lace with some machine stitching along three sides.  I did a quick, purposefully sloppy double border stitch.  I love adding machine stitching to my crafts.  I think it adds a homespun look/feel.  
I adhered a 4" paper doily to the right side of the card.  I simply folded the over-hang around the main panel.  I machine stitched a strip of pale blue seam binding along the lover third of the card to help anchor the seam binding to the card front.  I tied a double-loop bow, and tied a 'swirl' red button to the center of the bow with some gold twine.  This 'fancy' button reminded me of a cherry with its imprinted design.  {smile}
The sentiment is stamped and heat embossed on a scrap piece of white card stock.  I rounded one end, and pointed the other end.  I thought this shape looked like one of those garden/plant markers.    Super sweet, right? {smile}
I made my own embroidery hoop.  I used a die to cut the shape.  I used a scrap piece of wood veneer 'paper'.  I just love this stuff.  But my shock is dwindling.  {frown}. For the inside of the hoop, I took a scrap piece of watercolor paper and stamped my bowl in Versa Mark ink, and added white detail embossing powder.  I used Versa Mark ink to stamp the cherries, and added deep red embossing powder.  I heated the paper, and my bowl of cherries came to life!  I misted the water color paper heavily with water, and then washed it with a pale blue color.  I wanted the cherries to pop! and the bowl to have some contrast, to showcase the bowls design.  I used a fine tip brown marker to create the cherry stems.  (hand drawn)
The final touch was the trio of wood grain printed sequins.  I felt that they helped tie the wood-grain hoop to the card.  I adhered the main panel of this card to the card front with foam tape.
I believe that if you repeat elements/colors, it helps tie that element to your card.  The color I washed the watercolor paper with, matches the seam binding.  The red in the cherries is repeated with the same color of the button.  The wood grain of the hoop is repeated with the sequins.  The white doily and card base are repeated in the plain paper.
I hope that you join this beautifully talented group of ladies over @ the Tic Tac Toe Challenge.  Just let them know which row you are using on their tic tac toe card, and don't forget to have FUN!  Create something beautiful to share with us, but to also share with your family and friends!  Trust me, they will appreciate your efforts in creating something handmade!


Thursday, February 8, 2018

Sweet Little Moments Card

Welcome.  I'm so happy that you had a chance to stop by {smile}.  I needed to make a card for a friend who is having a birthday this week.  And I needed a little direction, so I stopped by two Russian paper challenge sites, and one of my favorites here in the USA.
My first stop is @ CharmedScrap.  This challenge site, is from Russia.  They do not have a translate button, but there is always Google Translate {smile}.  CharmedScrap, gives you either a mood board, or sketches.  I  love their sketches, because they include layers and little pieces of interest.  Here is their current sketch:

My next stop is @ InterNitka.  This challenge site, is from Russia also.  And again, they do not have a Translate button.  But InterNitka, has some very creative challenges.  The current challenge is a romantic gentle moldboard:

And finally, I am entering my card @ Word Art Wednesday.   This challenge site, is always a Anything Goes, Family Friendly challenge.  This challenge site will certainly inspire you.  They always provide a scripture that you can use in your paper crafting, but is not required.  {smile}

and here is what I created:


Recipe:  I used various scrap pieces of pattern papers from the Rossibelle collection by Prima.  I just love the splashes of copper metallic on the pattern papers, the distressed, worn patterns, and the soft tones.  This collection has pinks, and a vibrant peach hue.  I started with a Cantaloupe card stock by Stampin' Up!.  Their card stock is heavy weight, and stands up nicely to embellishments.  I cut and tore different pieces of the pattern paper, and layered them together.  Some staggered, and some layered.  I roughed-up the edges with the edge of a pair of scissors.  I inked the edges with tea stain ink.  The grey polka dot pattern paper peaking out under the cream cotton trim, is a scrap piece from a holiday collection by My Minds Eye, from 3/+ years ago.  I did a simple double border stitch along most of the card edge.  I purposefully didn't complete the border.  I brushed white paint across the Bingo card, and the Ticket.  I added foam adhesive to the back of the 'sweet' piece.  I layered these pieces in a way to look random. The blossom is from the same collection: Rossibelle.  I added white paint and glitter to the petal edges, and brown ink to the back of the petals, so help show separation.  I tied a double bow of cream & black bakers twine to the dark button and tucked it at the top of the paper blossom.  The wooden disc, was hot glued to the top right corner of the sentiment cluster.  I brushed white paint and tea ink to the edges.
Thank you for looking.  I hope that you get a chance to play along with any/all of these challenge sites.  {smile}

Saturday, December 30, 2017

fa la la Peppermint

Howdy! and welcome.  I hope you all had a great holiday.  Me, I got the flu.  I have been in bed sick for a week now.  And for those who know me, I don't do well being 'down' or laid up in bed.  So, today, I decided, I'm getting up.  I am getting on with life.  Change your mindset, and you body will follow.  It's like when you have been running for 4 hours, and you have 3 miles left, and your legs are tired and heavy, and your mind is screaming at you to stop.  Just stop.  But, you have to turn down the volume in your head, push forward, and keep going.
I made another gift card holder this morning.  I am entering it in three of yesterday's challenge post.  I just loved the themes - Sparkle, Lace & Paint, and the sketch was super easy to work with.  So, here we go again!
First stop:  the wonderfully talented ladies over @ As You See It Challenge, have a fun challenge: Sparkle.  You have to add an element of sparkle to your project: glitter, sequins, glimmer paper, etc.  And let's just be honest here, who doesn't love sparkle?  It just makes you happy!


My next stop is Mistress Owl.  Their current challenge is a sketch.  It was super easy to work with yesterday, so why not use it again today.  This challenge site, is from Russia.  They do have a translate button, to help with the language barrier.  I just love their easy-to-work-with sketches.


And finally, my last stop is Shabby Chic.  Another challenge site from Russia, and again, they have a translate button.  This design team will certainly inspire you!  Their current challenge is Magic Frost.  The mandatory elements are: Lace & Paint.  And your entry must be in Shabby Chic or Provence style.  (they have their definition of these styles on their challenge site)


and here is what I created:


different view:


Recipe:  I used Fine Linen card stock by PaperTreyInk for the gift card holder.  I thought it matched the angels in the pattern paper beautifully.  Again, I used Pure Poppy card stock by PaperTreyInk for the matts.  Its a deep red with orange undertones.  I used the red stripe pattern paper from the Sweet Peppermint collection by Prima, again.  I just love the look of the stripes. {smile}  The pattern paper I used for the main panels is a digital paper.  I printed it onto whisper white card stock by Stampin' Up!.  I love using their white card stock to print my digital papers.  It takes the ink very well, and the card stock is light weight; making layering a breeze.
I used my sewing machine to add a simple border stitch around each panel.  I think this little element adds a lot of homespun charm.  {smile}
I did a better job of lining up my trims.  I layered a white crochet trim, a taupe lace trim, and a mint ribbon.  I machine stitched them to the panels with silver thread.  The silver thread is beautiful, but quite a pain to work with.  The metallic in the thread gives it a bit of stretch, with little tension, so it breaks easily and frequently. {frown}.
I stacked two small journalling cards to the top panel.  I selected the 'fa la la' girls, and a December Bingo board card, this time.  I like how the 'fa la la' color matched the reindeer in my pattern paper.
I die-cut, stamped, and heat embossed the wreath.  I die-cut the wreath from Fine Linen card stock.  I stamped the wreath in VersaMark ink, and used my fine detail  white embossing powder.  This delicate wreath takes a steady hand in stamping.  My trick: place a contrasting color of card stock under the wreath, so when you stamp, you have a better view of lining-up the image.  I adhered the wreath to the front panel.
I tied a double bow with the mint ribbon.  I tied a small plastic peppermint candy to the mint bow with silver twine.  I wanted a bit more red on the card, so I adhered a red button to the bow's center.  To add a bit more sparkle, I added a mirror plastic star just above the button.
The paper blossoms were painted and glittered.  I used a white pearl paint to the petals, and while the paint was still wet, I dunked the blossoms into glitter.
I painted two silver jingle bells with gesso, and glitter.  I tied them with silver bakers twine.  Then tucked them under the larger blossom.  Again, I wanted more red, so I tucked in a red pom pom by the cream paper blossom.
My sentiment was not hand-stamped.  The sentiment is actually from a holiday tag.  I simply trimmed it down with scissors, and did a double matt: pure poppy and fine linen card stock.  I added foam tape to the back of the sentiment.  I wanted it to be lifted off the card front.
Thank you for looking!  I hope this last weekend of 2017 ends just how you want it to.  For me, I will be enjoying the quiet time at home.  And I am sure you have guessed that I will be out running.  I am going to do my best at getting in 10-12 miles tomorrow. {smile}


Thursday, September 7, 2017

Linen Closet Loaded Envelope

Howdy! and welcome to my little slice of blog-land.  I am so happy you are here.  I have been working on a new-to-me project, and I couldn't wait to finish it, to share with you!  Now, please have a kind eye, as I said, this is new to me.  So, if you have any suggestions, please add in the comments {smile}.  I just love you guys!
So, a few years back, Loaded Envelopes were all the rage.  Me, I just couldn't jump on board, because I just couldn't see the loveliness of them.  Well, that all changes about a week ago.  (Hey, better late then never.)  
And, probably like a lot of  you, I didn't want to use 'reserved' paper for a new project.  So, I went hunting in my craft room, and found an unopened paper pad.  Shocking right? like that has never happened to you? {smile}
So, I am entering my new project in a few challenges, but wanted to share my uncompleted project now.  I will add some more photos as it progresses {smile}.  I have to admit, that I am super excited!
My first challenge entry is an all time favorite: Word Art Wednesday - anything goes.  This group of super talented ladies will certainly inspire you!
and my second entry is to the wonderful Brown Sugar Challenge Blog - anything goes.  Another great place to be inspired.

and here is what I made:

empty envelope

loaded envelope


So, like I said, a project in the process.  I did complete a few things, and added them.  But, I have a few more items that I want to add.  I used the paper pack: Linen Closet by DCWV (Die Cuts With a View).  I purchased this paper pad almost 2years ago, when Jo-Anns was having a huge paper sale.  I knew that I would eventually use it, just hadn't decided on what.  
I love this paper pad, because it all coordinates.  The papers are a mix of blues, cream/white, and yellow, with gold accents.  Simply beautiful.  
I didn't want to over load this post with a hundred photos, so I will be sharing photos throughout the week(s) to come.  (promise {smile}).
Before I head out the door to run errands, I have to give credit to my envelope construction.  I found this tutorial on Pinterest, by Michelle Randolph.  [And here is the link]  Easy to follow, and easy to make your own.  BRAVO!
Stay tuned!  Bye for now. 


Sunday, June 18, 2017

Evening Tea

~ photo heavy post ~

Howdy.  I am trying to get back into my craft room, and create beautiful things again.  And yesterday, I was motivated to create something sweet, to share with a wonderful group of ladies.  As some of you know, I have started going to the gym.  Mostly, to help me with my running.  I still don't love running, but I want to improve on my time, form, and ease the struggles.  Anyways, I have met some of the nicest ladies there.  They don't judge, or sh*t talk about anyone.  They accept you for who you are, and encourage you to keep going.  How truly wonderful is that?  Anyways, I wanted to share a special treat with them, so I arranged to have an evening tea, to share with them.  (I made all of these arrangements back in April.  Thank goodness, because I am not sure I would have had the strength to do so now.)
And as you know, I can't just do a party!  There has to be favors!  But, first, let me enter my creations into a few challenges {smile}.  I love the challenges @ Really Reasonable Ribbon, basically, because they give you the freedom to just create, add ribbon, trim, or lace, and call it done.  Super sweet!

Then, I entered the challenge over @ Word Art Wednesday, because this group of talented ladies are inspiring with their words and creations.  They basically have the same philosophy: create something beautiful, made with your heart, and share it with the rest of us.  Simply wonderful!  Just like my gym ladies!
The theme for last nights evening tea, was Mid Summer's Night, by William Shakespeare.  The decorations were wonderfully right on point.  And the food was simply amazing!  I am never disappointed, or dissatisfied.  My friend Beth, always puts on the most amazing events!  So, my favors need to be worthy, and pretty, and shabby chic, of course! 
Here is what I made:


my favorite pink version:


and my favorite blue version:


Recipe:  I used simple 8oz mason jars.  I used various papers from the Jolee's Boutique paper pad, the Parisian Collection.  I cut pattern paper 8 1/2" x 2 1/2", and wrapped it around the jar.  I made sure the top edge of the paper went along the rim of the jar, to keep it straight.  I cut two strips, and used a lace border punch, to create the decorative kraft paper pieces.  I adhered them to the second strip of pattern paper 8 1/2" x 1 1/4".  I adhered these strips to the top center of the first pattern paper.  I wrapped seam binding around the jar, for decoration, and to help secure the pattern papers.  I tied the seam binding into a simple bow.  I used hot glue to secure the bow to the pattern papers.  I stamped my word friends in basic black ink, on to the same kraft paper, and punched a tag shape.  I tied the tiny tag to a matching button with kraft twine and hot glued the button to the jar.
For the lid, I cut out a paper doily, and used the jar's lid to hold it in place, and hot glued a paper blossom to the doily.  Viola!  not to crazy involved, but simply pretty.
So, inside the jars are some homemade Vanilla-Orange sugar cubes, and 2 Cinnamon Honey tea bags.
I wanted to make something sweet for my hostess Beth, so I added some homemade Vanilla-Orange sugar pieces to smaller mason jars (4oz), and created a simpler version of the jar decorations.

and a 'gift' for the hostess and her helper:


I added a strip of pretty pattern paper around the jar, tied some vanilla crochet trim around the jars.  I made the same tags, and tied them to cream vintage buttons.  For the tops, I added pale mint velvet leaf, and two paper blossoms in black and cream to match the pattern papers.
There were two ladies who did not make the tea, so I left their favors for Beth and her assistant.  I hope everyone enjoyed their time last night.  As we got a chance to sit and chat, and talk about ourselves, and what makes us happy.  Of course, we laughed, and shared our time together.  The food was delicious, the tea selected was a perfect pairing, and the company was unforgettable!  
I hope you get a chance to create something pretty and share it with the rest of us!


Sunday, March 19, 2017

Butterfly Notes

Howdy! and welcome.  I have been busy with work, and keeping up with chores and other obligations, that my crafting had to take a back seat for a quite a few days.  Seven, to be exact! {grimace}.  But, have no fear, I have carved out some time to create a card for a few challenges.  {smile}  I hope you haven't given up on me.
There are two of my favorite card challenges that typically have Anything Goes as their themes, and so it really allows me to just create.  You gotta love that!  So, here we go!
My first stop was Brown Sugar Challenge.  They have a talented design team, and let's face it, sometimes we just need some inspiration.

My next stop was Word Art Wednesday.  This group of ladies will certainly inspire you on a creative level and on a faith level, too!  

My last stop is Stampin' Royalty.  This card challenge site, has a theme this week- Spring.  When I think of the word, 'Spring' I think of flowers, butterflies, beautiful colors, and fresh air!

and here is what I made:


my card was selected as a 'top 3 honor' @ Word Art Wednesday!

Recipe:  My card is a typical A2 size:  4 1/4" x 5 1/2".  The card base is this beautiful kraft colored card stock.  I just love the 'brown paper bag' color!  I used three different pattern papers for the base layer.  I started with a beautiful butterfly pattern by Crate Paper.  Then I added a strip of text paper and a layer of music paper.  I distressed the edges of the papers and sponged kraft ink on them.  I did a messy machine stitch all the way around the card.  twice.  
I cut out a ephemera ticket, and distressed its edges in the same manner.  I also added a scrap piece of an aqua colored paper doily to the right side.  I adhered this piece to the card front.
I wrapped a piece of aqua blue seam binding around the card front.  I thought it matched the paper doily perfectly.  
I stamped my blossom cluster in soft suede classic ink, onto white linen card stock.  I used the coordinating die to cut it out.  I adhered it to the card front with foam tape.  I tucked-in my sentiment.  The sentiment is actually the pattern paper name, that I cut down and added a banner edge.
I tied a double bow with the seam binding, and tied a cream button to the bow's center with kraft twine.  I made a large bow with the twine behind the seam binding bow, when I tied-on the button.
I added a trio of iridescent sequins and a few transparent sequins, randomly to the card front, just to give it a little more sparkle.  Because who doesn't love sparkle! {smile}
Well, thank you for stopping by.  I'm heading back into my craft room, to create an inspirational magnet.  I love the small size of these.  I've made several before, but hadn't had an opportunity to photograph any before they were packed-up, and mailed.  {frown}


Saturday, November 28, 2015

Scraps of Trim 'Tree'; Gift Bag

Howdy.  Whew.  I'm been busy.  Busy like everyone else!  This was a big week to cook; which I love!  I really do enjoy baking and cooking.  Creating beautiful, delicious food is one of my passions.  I think food should not only look great, but taste great!  Thanksgiving, is my husbands favorite holiday, because of the food.  Funny, huh?  
One of my other passions is crafting.  Mostly paper crafting.  I love to create beautiful things out of paper.  I made a 'tree' out of scraps of fabric, and totally loved how super cute they came out.  And while I was visiting some of my favorite challenge sites, I read the post of 'Lace' @ Shabby Chic .  It did give me an idea on making a 'tree' out of scrap pieces of lace, crochet trim, and ribbon.  I am pretty happy with they came out.  [they, I made two {smile}].
I am entering a few challenges today with my little creation:  Love to Scrap  , Die Cutting Divas , Scrap & Craft Inspiration , and Crafting By Designs.
The talented ladies over @ Love To Scrap! , will surely inspire you with they variety of creative styles.  Their current challenge:  Anything Goes.
The talented ladies over @ Die Cutting Divas, have a current challenge: Tag, Bag or Box.  You should see the great boxes, bags, and tags these ladies made.  Very inspiring.
The design team over @ Scrap & Craft Inspiration have a current challenge: Shabby Chic or Vintage.  These creative ladies are located in Europe.  and therefore, their styles of crafting is very layered, with lots of embellishing.  Very beautiful, very inspiring,  and very creative.
And finally, the lovely ladies over @ Crafting by Designs, have a current challenge: Get Ready for Christmas.  I strongly encourage you to take a look at this creative design team's entries.  Just lovely!
here is what I made:


I used crumb cake card stock for the 'bag'.  I used a gold card stock as my matt.  I think it adds a bit of  glamour to my bag.  I used shimmer white card stock for the main panel.  I stamped my three different size snowflakes in two different kraft colored inks: crumb cake classic ink, and classic kraft ink.  I used my sewing machine to add a 'homespun' look to my bag, by sewing a simple border.  
I collected my trims: crochet trims, cotton trims, ribbons, and thin tinsels, and tied them around a cinnamon stick.  I added a trio of buttons.  I tied them on to the cinnamon stick with a gold, silver, and cream twine.  And I added a Melissa Frances rhinestone button to the top of the cinnamon stick.
My sentiment is stamped and matted the same way I did the main panel of the bag.

close-up of the buttons:


Thank you for looking.  I hope you have been inspired to create something beautiful, too!  And join these two challenges.  


Tuesday, November 24, 2015

Red Fabric Christmas Tree Bags

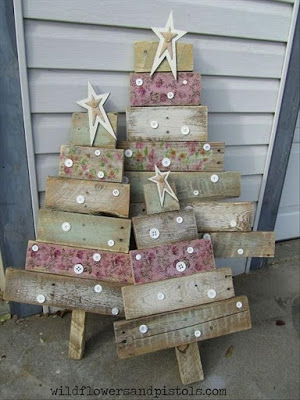
Howdy!  Oh, it feels good for my soul to craft, sew, and just simply create!  I saw the inspirational photo over @ the Shabby Tea Room for their current challenge, O' Christmas Tree.  and oh boy!  That photo gave me the idea of making some Christmas trees from fabric scraps.  I imagine you can do the same with strips of pattern papers.  Umm, maybe I'll create a few of those, too! {smile}


Look how super cute and country this is!  I love the buttons and the stars on top are just adorable!
I also stumbled upon a 'new' challenge site to me: Try It Tuesday.  They have a new challenge: Bags & Boxes.  So, I thought how perfect!


here is what I made:


I made a gift bag, and used the inspirational photo to create the cover.  I made a fabric scrap holiday 'tree' with traditional red and green holiday colors.  I used fabric (retired) from Stampin' Up!, ribbons  and trims from various places.  The buttons (retired) are from Stampin' Up!.  The kraft twine is from PaperTrey Ink.  The tags, and stamps are from Paper Trey Ink, as well.  
I stamped the snowflakes in kraft ink onto vanilla card stock.  Matted this stamped piece with kraft card stock.  I did a purposefully sloppy double machine stitch border.  
I tied my various fabric and trim scraps onto a kraft striped paper straw.  I hot glued the 'tree' to the card stock.  
I tied a simple bow with the red ribbon strung through a Webster's Pages chipboard button and used hot glue to adhere it to the top corner of the sentiment piece.

Thank you for stopping by.  I hope you have been inspired to play along with the talented ladies over @ the Shabby Tea Room & Try It Tuesday.  My gift bags will be for sale at my next holiday craft fair.  Hope to see you there!


Saturday, August 29, 2015

Pretty Thank You: Card


Welcome.  I took an hour this morning to make a card for a very special friend.  She has been my rock when I needed it the most.  She is always available when I need her.  And always helps me see the bright side to life.  I really do love her, and I know I am truly blessed to have her in my life.

a sneak peak
I needed some inspiration and direction, so I went to a few of my favorite challenge sites:
I started @ Shabby Chic.  Because let's face it, that is my easiest style to craft {smile}.


Their challenge is two parts: include an apple(s) or/and use the required colors: soft pink, pale green and white.   Also, your craft must be in Chebbi or Provence style.  Easy for me!

I next stopped by I Love Scrap.  They have sketches that are so easy to work with, and the design team really can get your creative juices flowing with their creativity and clever use of embellishments {smile}.   
I always love the layers in the sketches, and the design team will sure to inspire you.  They have various styles of crafting, but all of them are beautiful!  You just might find a new blog to follow.  {smile}

And finally, I stopped by another creative challenge site:  Brown Sugar Challenge.  Their current challenge theme is: make the sentiment BIG!  I have noticed that several crafting companies have started creating large sentiment stamps and chipboard words.  This is your perfect opportunity to use those large sentiments.  

and here is what I created:


and a slightly different view:


the Recipe:  I used kraft card stock from Paper Trey Ink for the card base.  I love the weight of this card stock, and I really wanted a 'light' kraft color.  
The text matt is a pattern paper from Melissa Frances.  I love the dark grey text on white paper.  It's very beautiful!  The cream floral pattern paper, is from Tilda: Happiness is Homemade.  I used a thread cutter to distress the edges.  I also added some machine stitching along one corner (upper right corner).
I machine stitched a strip of this beautiful gold lace trim to the pale green tiny star pattern paper.  This is also from Happiness is Homemade.  I adhered this piece to the left side of the card.
For my large circle piece, I cut an embroidery hoop out of a thin wood sheet.  I sponged white ink on the edges to help give the hoop some dimension.  I adhered the same dark grey text pattern paper to the inside of the hoop.  I felt that the repeating of this pattern paper would tie the large matt into the over all look of the card.  [I thought that a different pattern paper would look too random and possible out of place.]
I tied a multi-loop bow out of a pale pink seam binding.  And tied a button to the bow, and tied the whole piece to the hoop with some kraft twine.  I made sure my twine had a double wide loop bow, too.
I added a trio of paper blossoms to the lower right of the embroidery hoop.  I selected pale, soft colors that matched the required colors of the Shabby Chic challenge.  I stuck a button stick pin into the floral cluster.
For my sentiment, I could find the right font, the right words, the right shape.  And then, I decided to use vellum as my 'paper', and use embossing powder as my 'ink'.  It sounds relatively simple, but I did stamp several different sentiments in various colored inks, on various shaped papers, before I thought of using vellum.  I selected gold embossing powder, because gold is the accent color on the lace trim.  I used the Hand Scripted stamp set by Amuse Studios, the sentiments are big and 'hand written' style.
I also added a scrap piece of gold washi tape to the bottom right corner on the inside of the card.  And yeah, I added some machine stitching, to tie it all together. {smile}
Thank you for looking.  I'll post some photos of my advent calendar tree soon.  It's super cute!


Tuesday, July 7, 2015

Chalkboard Sentiment; Card

Welcome.  I'm so happy you stopped by and take a look at what I've created today.  If you didn't see my precious post, I've been running.  And running takes a lot of my time.  So my crafting was not been as productive as I'd like it to be. {frown}  However, during my last run, I was able to clear my head, and re-ignite my creative spark.  
I stopped by Mojo Monday late yesterday, to get a peak at their current sketch.  And then last night, I dreamt of a card.  {yeah, I dream about paper crafting.}
And this week, @ Mojo Monday is a prize week.  {yahoo!}  The thing that I love about Mojo Monday sketches, is that they are so easy to use.  Here is their current sketch:


When I first saw this sketch, my first reaction was to rate the sketch 90 degrees right and mirror it.  That would change the sketch to be landscape, and orient the diagonal piece to be on the right side of the card, and the circle piece to more center.  But, then I changed my mind last minute.
here is what I made:


Now, if you know me, or follow me, you already know that I mostly use scraps and pieces that I have on hand, and this creation follows that rule.   I am a paper crafting hoarder.  I could give Hobby Lobby a run for their money.  Don't believe me?  ask my husband.  {smile}  This card is a thin A6 size (4 1/4" x 6")
different view
Recipe:  The card base is made from Paper Studios Kraft card stock.  I just love the color and feel of this card stock.  It's a bit light weight, so I line the inside of the card, to help it stand-up without falling forward.
For the main panel, I cut a 5" x 7" digital paper down to 4 1/8" x 5 7/8".  I added a scrap piece (2" x 4 1/4") of aqua mist polka dot paper, from Paper Trey Ink.   I adhered these two pattern papers together.  I trimmed the overhang from the polka dot paper.  I used a thread cutter to distress the edges.  I then sponged the edges with a light brown ink.  I used my finger nail to make little tears in the papers. 
The square, green, floral paper, is actually a digital download.  It is originally 'coaster' size (4" square). But, I didn't want to cut down the paper, because I love the whole look of this square.  So, I printed it @ 80%, to shrink it down to roughly 3" square.  I distressed the edges with a thread cutter and sponged ink along the edges, too.
I took a scrap piece (4 1/4" x 3") of a text paper from Melissa Frances, and tore the paper into a diagonal shape.  I distressed the edges with a thread cutter and added sponging to the edges.  I adhered this piece across the lower third of the card.  It also helped hide/mask the seams. {smile}
I then added my machine stitching.  I did a double border stitch.  I didn't sew across the text pattern paper, to help give the card a finished look.
I wrapped a scrap piece of aqua colored seam binding around the diagonal piece into a diagonal. 
I have a box of chalk board sentiment tags (circle, rectangle, and square) from Anna Griffith.  I used foam tape to elevate the sentiment piece off the card face.
I added a double loop of kraft twine loop where I wanted my bow.  I tied a simple bow with the same seam binding, leaving room for some tiny paper blossoms.  I cut the legs off of a white enamel brad, and hot glued it to the center of my bow.
I added a trio of tiny pink paper blossoms between the bow and the sentiment circle.  I added a pale green, heart stick pin by Fancy Pants.  I hand-stamped a tiny 'Friend' tag, and adhered it to the bottom portion of the bow.
For the final touch, I added pearls and sequins in a 'random'-ish pattern.  I added a pair of pearls with one pale green sequin above the sentiment circle, and a trio of pearls with a pair of sequins below the sentiment circle.  
Thank you for looking.  I'm pretty happy with how my card came out.  And I hope I have inspired you to create something beautiful!  Don't forget to play along with Mojo Monday challenge, as this is a prize week!  Yahoo!