Showing posts with label vellum. Show all posts

Monday, March 7, 2016

Sweet Blush Thank You; Card


Howdy! and welcome to my little piece of blog-land.  Here, is where I share my passion for card making, and sometimes cupcakes {smile}.  I really do find joy, and peace when I am creating.  And it doesn't matter if it is baking or paper crafting.  The joy is the same.  
I wanted to make another card to add to my Etsy shop, located HERE.  But I needed some inspiration, so I set out to a favorite challenge site, and stumbled upon a new (to me) challenge site {smile}.  
One of my favorite challenge site I visited, Just Us GirlS #333.  It's their 'word week', and this week's word is FLOWERS! On my! I love adding flowers to my paper crafts, so I am playing along with these beautifully creative ladies!

The last challenge I am entering is a 'new' challenge site for me.  I stumbled upon this challenge from visiting a fellow blogger that I follow.  This challenge site is eastern European.  They do not have a 'translate' button, so copy and paste the text into Google Translator.  Shabby Scrap - use rose(s). 


here is what I made:


Recipe:  I used Cream card stock by Paper Trey Ink for the card base.  This card stock is a heavy weight, and wonderful as a card base.   The card size is A6 (4 1/4" x 6").
The three pattern papers are digital papers.  I just fell in love with the pale pink, and blush colors!  I sponged the floral digital paper with crumb cake classic ink.  I trimmed and sponged the library card digital paper.  I rounded two of the corners for a different look, other than a right angle.  I adhered these two digital papers together before I added the machine stitching.  I also added dimensional glaze to the 'front' blue bird.  I loved the pop of color!

I added cream twine to the trio of blush vintage buttons, and adhered them to the card front with my glue gun.  
I used a leaf punch and some shimmer green textured card stock to create the leaves.  I tucked the leaves under the two pale pink paper blossoms.  The larger pink blossom is from Prima Marketing.  The smaller pink blossom is a 'carnation' from an on-line shop.
I trimmed the journalling piece into a tag.  I sponged the edges, and added a hole for the seam binding.  I did a simple loop of pale pink seam binding and tied a simple bow with a pale pink/blush colored thin tinsel.  I added a pale blush paper blossom to the bow.  The tag was adhered to the card front with foam tape.
I stamped the sentiment onto vellum card stock and adhered to the front of the tag.  (I added my adhesive where the lettering is, so that the adhesive wouldn't show through.) 
I used the Signature Greetings, by Amuse Studios.  I heat embossed the sentiment with antique gold embossing powder.

Thank you for looking!  I hope you have been inspired to play along with any or all of these challenges!  I will be adding this card to my Etsy shop in the next few days.  {smile}


Saturday, August 29, 2015

Pretty Thank You: Card


Welcome.  I took an hour this morning to make a card for a very special friend.  She has been my rock when I needed it the most.  She is always available when I need her.  And always helps me see the bright side to life.  I really do love her, and I know I am truly blessed to have her in my life.

a sneak peak
I needed some inspiration and direction, so I went to a few of my favorite challenge sites:
I started @ Shabby Chic.  Because let's face it, that is my easiest style to craft {smile}.


Their challenge is two parts: include an apple(s) or/and use the required colors: soft pink, pale green and white.   Also, your craft must be in Chebbi or Provence style.  Easy for me!

I next stopped by I Love Scrap.  They have sketches that are so easy to work with, and the design team really can get your creative juices flowing with their creativity and clever use of embellishments {smile}.   
I always love the layers in the sketches, and the design team will sure to inspire you.  They have various styles of crafting, but all of them are beautiful!  You just might find a new blog to follow.  {smile}

And finally, I stopped by another creative challenge site:  Brown Sugar Challenge.  Their current challenge theme is: make the sentiment BIG!  I have noticed that several crafting companies have started creating large sentiment stamps and chipboard words.  This is your perfect opportunity to use those large sentiments.  

and here is what I created:


and a slightly different view:


the Recipe:  I used kraft card stock from Paper Trey Ink for the card base.  I love the weight of this card stock, and I really wanted a 'light' kraft color.  
The text matt is a pattern paper from Melissa Frances.  I love the dark grey text on white paper.  It's very beautiful!  The cream floral pattern paper, is from Tilda: Happiness is Homemade.  I used a thread cutter to distress the edges.  I also added some machine stitching along one corner (upper right corner).
I machine stitched a strip of this beautiful gold lace trim to the pale green tiny star pattern paper.  This is also from Happiness is Homemade.  I adhered this piece to the left side of the card.
For my large circle piece, I cut an embroidery hoop out of a thin wood sheet.  I sponged white ink on the edges to help give the hoop some dimension.  I adhered the same dark grey text pattern paper to the inside of the hoop.  I felt that the repeating of this pattern paper would tie the large matt into the over all look of the card.  [I thought that a different pattern paper would look too random and possible out of place.]
I tied a multi-loop bow out of a pale pink seam binding.  And tied a button to the bow, and tied the whole piece to the hoop with some kraft twine.  I made sure my twine had a double wide loop bow, too.
I added a trio of paper blossoms to the lower right of the embroidery hoop.  I selected pale, soft colors that matched the required colors of the Shabby Chic challenge.  I stuck a button stick pin into the floral cluster.
For my sentiment, I could find the right font, the right words, the right shape.  And then, I decided to use vellum as my 'paper', and use embossing powder as my 'ink'.  It sounds relatively simple, but I did stamp several different sentiments in various colored inks, on various shaped papers, before I thought of using vellum.  I selected gold embossing powder, because gold is the accent color on the lace trim.  I used the Hand Scripted stamp set by Amuse Studios, the sentiments are big and 'hand written' style.
I also added a scrap piece of gold washi tape to the bottom right corner on the inside of the card.  And yeah, I added some machine stitching, to tie it all together. {smile}
Thank you for looking.  I'll post some photos of my advent calendar tree soon.  It's super cute!


Tuesday, November 18, 2014

Light Bubbles: bokeh

Howdy!  I hope you are well.  Me, yes.  Thank you.  I had another arts and craft fair this past weekend (Friday and Saturday) at one of my favorite places:  Tramway Community Church.  The folks there are so nice, helpful, and just a joy to be with.  {smile}
Anyways, my mom came up to spend some time with me, and help me sell my paper crafts.  And let me just say, that it was pure joy!  We talked, and sold, and talked some more.  It was really wonderful to spend some time with her, and just hang out!  I made a little money, which is always sweet, especially during this time of year.  So, pluses all around!
For those who don't know, I live in the east mountains of Albuquerque, New Mexico.  And well, we are just below 7500 feet.  Sunday it snowed like crazy.  So my husband got a chance to use his snow plow for the first time this winter season.  And the weather created a delay in my mom getting back on the road to head home.  It did give us a little more time together, but just not the same.  It's kinda like be held hostage at the airport.  You have food, a bathroom, and the people you are traveling with, but all you really want to do is leave.  [No hard feelings mom {smile}]
I wanted to make my mom a card, to say 'thank you' for her help, and let her know that I really enjoyed the time we spent together.  So, I went looking on the internet, and wanted to see if anything out there inspired me.  Well, of course I found something!  
I ran across this photography technique called: bokeh.  It's when parts of the image and/or light are out of the field of focus.  So, when you are photographing something and there is light in the background or side portion, and this part of the image just isn't in focus.  Looks pretty.  And so I ran with it!  

gold, is the accent color

silver, is the accent color
So, both cards are made with soft suede card stock as the base.  The 'blue' piece is aqua mist card stock.  I cut 3-4 branches from a Memory Box die.  I punched 1", 3/4", and 1/2" circles and a trio of snowflakes from vellum card stock.  I added several clear faceted sequins, and then added gold/silver sequins.  
I die cut the letters for 'JOY' out of gold glitter paper.  For the silver version, I heat embossed 'noel' in silver and then stamped 'JOYEUX' in soft suede classic ink.  
The final touch, was a spritz or two with iridescent spray.
But now, that I am writing this post, I think, why did I make my mom a holiday card to say 'Thank You'???  Ugh, sometimes my mind just gets stuck.  As I am preparing for yet another holiday craft show, my mind is stuck in holiday mode.  Sorry mom.  Let me get back into my craft room, and make something a little more appropriate. 
Anyways, I hope you like these, and I hope I have inspired you to create something unique and wonderful!

Sunday, October 5, 2014

Romantic Christmas

Howdy! and welcome.  I was able to spend quite a few hours this weekend crafting.  And I was really anxious to use some new pattern paper I purchased from Sweden.  Yeah, all the way over from Sweden.  Typically I don't purchase a large amount of paper crafting supplies from Europe.  Mostly because paper weights a lot, causing the shipping cost to be ridiculous.  But, this paper is gorgeous!
Tilda paper company, created a beautiful Christmas paper with grays, pinks, reds, and pale blues.  They used images of fancy boots, polar bears, roses, ballerinas, and Santa Claus.  I know, this paper sounds kinda crazy.  But just look!


Now, a little inspiration for the sketch, so I turned to Retro Sketches.  Well, this week, its designers choice.  So, I looked through the archives, and found a sketch, that I think works very well!
here:

I selected this sketch, because I felt that I could show you the beauty of this pattern paper, and still add some sweet touches.  I used the busiest pattern paper for the main image.  I used vellum as the banner matt.  I didn't want any distractions.  And then added a small sweet pattern paper piece over that.   
here is what I crafted:


Recipe:  I used crumb cake card stock for the card base.  I cut this beautiful pattern paper to 4" x 5 1/4".  I did a simple machine stitch along the edges.  I cut a piece of vellum card stock to 2 1/2" x 3 1/2".   I flagged the end.  I cut a red/pink floral edge pattern paper to 2" x 3", and used the flag end as my template so the ends would match.  I inked a holiday sentiment in basic gray classic ink and stamped directly onto the pattern paper.  I wrapped a piece of pool party seam binding around these two banner pieces.  I then did a little zig zag stitching to attach this piece to the card front.  
I cut a strip of three white fabric roses, and tied a multi-loop bow made from the same pool party.  I used kraft twine to tie the bow, and the red button, to this trio of white rolled roses.  I then adhered this decorative piece to the strip of seam binding.
I added a trio of white half faux pearls in a random pattern: two towards the lower left corner, and one near the right upper corner.
For the final touch, I matted this whole piece onto a piece of whisper white card stock.  I have a thin (1/8") border of white card stock peeking out from behind this beautiful pattern paper.
Thank you for stopping by!  And, I hope you get a chance to craft or simply create something fabulous!


Sunday, June 15, 2014

Trio of Roses

close-up of the button card
Welcome.  And Happy Father's Day, to all the wonderful dads out there!  I know your job isn't the easiest, and we do appreciate all your efforts, commitment, and nurturing to our children.  {smile}   
I don't make my husband cards.  It's not that I don't love him enough, or that he isn't worth it.  I just can't.  To make a masculine card is like me trying to change the oil in my car.  I could if my life depended on it, but it won't be pretty, and the job will literally take me  a l l  d a y!

I am hosting Bunco next month, and I have been making some 'prizes'.  As promised, I will continue to post them here.  Not that my Bunco buddies don't love what I do, but I am pretty sure they don't 'follow me'.  Know what I mean?  So this is a safe venue to share.

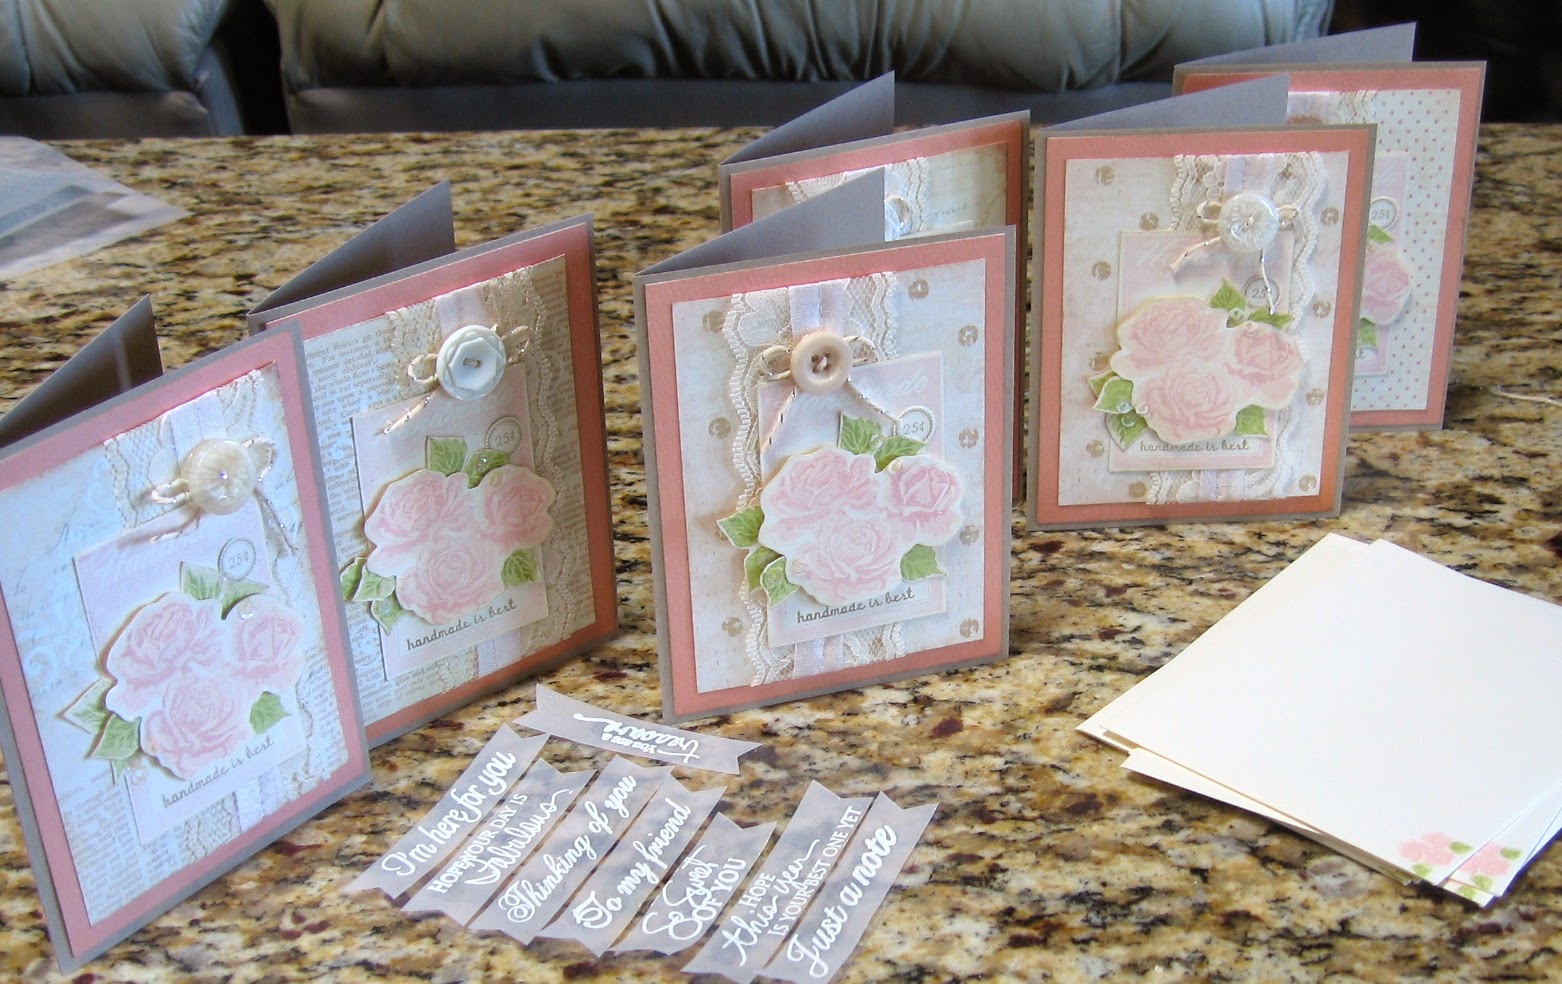
This is a close-up of the focal point on a set of cards I made for one of the prizes.  Yeah, sorry, it's pretty girl-y.  But, I am trying to keep the crafts to follow the theme 'farmland'.  
I used the button boutique stamp set for the button card, and Life is Sweet, for the trio of roses.  It's one of those three-step stamps.  You stamp the main color first, then the petal base in another color, and then the outline in another color.  Sounds complicated, but really not.  The leaves are a two-step stamp.  The button card, trio of roses, and the leaves were all cut by hand, and the edges were sponged with crumb cake classic ink.  The trio of roses and one leaf were adhered with foam tape.  The iridescent sequins were glued-on by hand.
For the full-card:


I used crumb cake card stock for the card bases (6).  The rose colored paper is actually the back side of a green floral print paper I have had in my stash for almost 7 years.  Its from My Mind's Eye, their Tres Jolie collection, Ooh la la pattern line (Sunshine flowers paper).  The neutral pattern paper is a digital download (love them!).  The lace I purchased last year, or so ago.  I buy it in bulk, I believe this is a 25 yard roll.  It's about 2 1/2" wide.  Love it!  I machine stitched the pink pirouette seam binding and lace to the digital pattern paper and adhered to the rose colored paper.
I tied silver bakers twine to a cream vintage button and hot glued it on, just above the button card.  The 'handmade is best' and '25 cents' were stamped in crumb cake classic ink.
There is no sentiment, because I wanted to make a card set that allowed you to select your sentiment. I left a place across the card front, between the sequins for you to add the sentiment.  For those, I stamped them on vellum card stock and heat embossed them in white.  I cut a flag end to the banners, by hand.   I also stamped a tiny trio of roses in the same colors onto the cream envelopes.

6 card set.
I created the banners, in a way, so you just peel the one you want, off the piece of clear card stock, and place it on the card front.  The adhesive that holds the banners on the clear card stock, will also hold them to the card front.  Pretty clever, huh?  The neutral digital papers I selected are a mix of polka dots, text, and random designs in white, on a cream-colored background.  I wanted something with character, but not to distract the eye.

Thank you for stopping by.  Hope you have found some inspiration today {smile}.