Showing posts with label crumb cake. Show all posts

Thursday, May 3, 2018

a bowl of cherries

Howdy, and welcome.  I am super excited today to share with you some happy news and a card!  I recently won the challenge over @ Tic Tac Toe Challenge and was given the opportunity to be a guest designer!  How fabulous is that, right!  So, without any delay let's get to their current challenge #tttc046!

right column: fruit, watercolor, free
Now, before you get discouraged, here are some ideas.  For the 'fruit', you could add apple(s) and create a Teacher Appreciation card.  Or lemon(s)/lime(s) for a Summer themed card.  Or add a pineapple for a Hostess card.  For the 'Free', simply add your favorite item: machine stitching, a button, sequins, a paper straw, etc.  The list is almost endless.  Don't forget to use what's in your stash, and most importantly have fun!  This Tic Tac Toe card, really does lean towards a Summer theme.  I can't wait to see what you create.  Here is what I made:


Recipe:  my card, is a typical A2 size greeting card.  (4 1/4" x 5 1/2").  
FRUIT: cherries, WATERCOLOR: color wash on watercolor paper, FREE: machine stitching, button, seam binding, and lace.
The base of the card is made with Crumb Cake card stock by Stampin' Up!, due to their lovely heavy weight card stock.  The main panel is made from a linen plaid card stock by Paper Trey Ink.  I love this soft color!  I added a piece of 6" lace over the main panel.  I 'attached' the lace with some machine stitching along three sides.  I did a quick, purposefully sloppy double border stitch.  I love adding machine stitching to my crafts.  I think it adds a homespun look/feel.  
I adhered a 4" paper doily to the right side of the card.  I simply folded the over-hang around the main panel.  I machine stitched a strip of pale blue seam binding along the lover third of the card to help anchor the seam binding to the card front.  I tied a double-loop bow, and tied a 'swirl' red button to the center of the bow with some gold twine.  This 'fancy' button reminded me of a cherry with its imprinted design.  {smile}
The sentiment is stamped and heat embossed on a scrap piece of white card stock.  I rounded one end, and pointed the other end.  I thought this shape looked like one of those garden/plant markers.    Super sweet, right? {smile}
I made my own embroidery hoop.  I used a die to cut the shape.  I used a scrap piece of wood veneer 'paper'.  I just love this stuff.  But my shock is dwindling.  {frown}. For the inside of the hoop, I took a scrap piece of watercolor paper and stamped my bowl in Versa Mark ink, and added white detail embossing powder.  I used Versa Mark ink to stamp the cherries, and added deep red embossing powder.  I heated the paper, and my bowl of cherries came to life!  I misted the water color paper heavily with water, and then washed it with a pale blue color.  I wanted the cherries to pop! and the bowl to have some contrast, to showcase the bowls design.  I used a fine tip brown marker to create the cherry stems.  (hand drawn)
The final touch was the trio of wood grain printed sequins.  I felt that they helped tie the wood-grain hoop to the card.  I adhered the main panel of this card to the card front with foam tape.
I believe that if you repeat elements/colors, it helps tie that element to your card.  The color I washed the watercolor paper with, matches the seam binding.  The red in the cherries is repeated with the same color of the button.  The wood grain of the hoop is repeated with the sequins.  The white doily and card base are repeated in the plain paper.
I hope that you join this beautifully talented group of ladies over @ the Tic Tac Toe Challenge.  Just let them know which row you are using on their tic tac toe card, and don't forget to have FUN!  Create something beautiful to share with us, but to also share with your family and friends!  Trust me, they will appreciate your efforts in creating something handmade!


Friday, December 29, 2017

Holiday Sweet Peppermint

~  photo heavy ~

Howdy!  I wanted to share with you a craft I made during the holidays.  I think it turned out super sweet, and well, I was really in love with it! {smile}  So, I want to share it with you!
Now, along with sharing this craft with you, I am entering it in 5 different challenges.  Wow, five.  That's a lot.  But, why not share what you love with the world, right?!  And so, grab a cup/glass of something: coffee, tea, champagne, or simply water.  
My first two challenge site stops are from Russia.  Yep, all the way over there!  I just love how different cultures 'see' paper crafting.  Simply gorgeous work, from all aspects of the world.
My first stop in Russia, is a challenge site:  Shabby Chic.  Their current challenge is Magic Frost.  You should really check out this group of talented ladies work.  Their work is very pretty, shabby, and super sweet.  Their current challenge has two required elements: paint and lace.  That just sounds like a fun, and creative!  (They have a translate button)


The next challenge site from Russia is Mistress Owl.  This wonderfully creative design team has sketches, and mood boards, that are very user-friendly!  Their current challenge is a sketch.  (They have a translate button)

Now, the next two challenge sites are Anything Goes.  First one, SugarPeaDesigns.  The thing I love about this challenge site, is the time it allows for challenges - a month.  Very accommodating for all of us living busy lives, but still find time to craft!


And the other Anything Goes challenge is Crafting By Designs.  The challenge site is very family friendly, and encourage the best of everyone who crafts.


And my final challenge site, is As You See It Challenge.  This challenge site provides sketches, themes, and color challenges.  So a little bit of a variety to keep you interested in playing along with each new challenge.  Their current challenge is a theme challenge - Sparkle.  So, you can add sequins, glitter, shimmer, etc.  And who doesn't love glitter/sparkle? {smile}


Now, before I reveal what I created, let me say, I hope all of you had a wonderfully grand holiday!
my paper craft project:


and a different view:


It's a packaged gift card holder.  Here is a view of this gift card holder opened:


Recipe: I started with Crumb Cake card stock by Stampin' Up!.  Only because they have a great heavy weight card stock, that won't buckle with embellishments.  The red card stock matt, is actually Pure Poppy card stock by PaperTreyInk.  Again, another great heavy weight card stock that won't collapse.  
The pattern papers that I used as both from the same collection: Sweet Peppermint by Prima.  Yeah, it's a Christmas collection.  It debut last year.  Once I saw what Frank Garcia did with it, I just had to make a purchase.  To add a homespun look to my paper project, I added some machine stitching to the pattern papers.  Then, I simply added various embellishments to make it both fun, and pretty! {smile}
I also machine stitched some cotton scallop trim lace to both flaps.  I then added some red and white striped ribbon.  I just love the red color and the stripes on this cotton ribbon.
I edged the chipboard wreath in white paint and glitter.  I tucked a Bingo card behind in behind the wreath, just a bit off-center.  I thought the layer added some visual interest.
I added a scrap piece of the pattern paper to the inside of a small resin frame.  I had quite a few different selections (sledding children, bird, girl, santa, and others), but decided on the Santa Claus, because let's face it, Santa is King!
I added some paint and glitter to a pair of red jingle bells.  Once dry, I threaded some silver bakers twine through the jingle bells, and strung them to the left of the wreath.
I painted a white, creamy Prima paper blossom with more paint, and glitter.  Then adhered it just above the left side of the wreath.  A loop of the silver twine is peaking out of the upper right of the painted and glitter paper blossom.  I thought it added additional visual interest. {smile}
I tied a simple bow with that beautiful red striped ribbon.  And then tied a tiny plastic candy cane with thin silver twine to the center of the bow.  The bow was adhered to this projects front with my hot glue gun.  I selected to add the bow here, because my strips of red stripe ribbon didn't quite line-up as well, as I hoped they would.  So, why not turn a 'mistake' into 'an opportunity to embellish'!
I hand-stamped my sentiment with basic black archival ink, onto very vanilla card stock.  I used a sentiment from the Love Lives Here Holiday stamp set by PaperTreyInk.  Then matted it with a scrap piece of the Pure Poppy card stock.  Finally, adhering it the gift card holder with foam tape.
Thank you for stopping by.  I hope that you have a chance to play along with any (or all) of these challenge sites {smile}!


Sunday, February 12, 2017

{heart} Thanks

~ a few photos ~


Welcome.  I wanted to share a sneak peak of my card for today.  Trying something different.  Want to shake things up, a bit!  Before we start, let me provide a few disclaimers:  There is NO hand-stamping on my card.  And I used a majority of products from the same collection & manufacturer: Prima.  
Now, with that out of the way, let's get to today's post!  Howdy!  I'm happy you are here.  I love participating in paper crafting challenges.  But, like most of you, I don't always have the time I want to craft.  And that is sad.  But, not today!  I carved out a few hours earlier today, to craft a much needed Thank You card.  Unfortunately, I am not participating in several challenges.  Just two.  But don't fret.  I am sure you will like what I made {smile} I know I am happy with how my card turned out.  
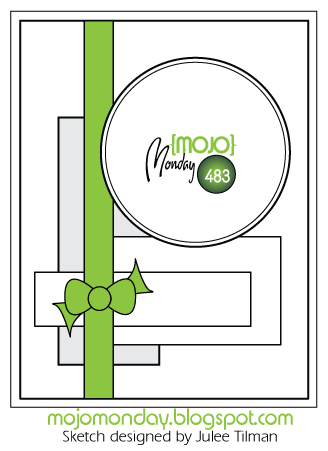
This week, is a contest challenge over @ Mojo Monday.  I try my hardest to always participate in these challenges.  I think the design team does some of their best work during these weeks.  And, they do inspire you to play along.  So, that is what I did.  And I will most likely play along this upcoming week, too {smile}

what a clever sketch.  I just love the circle element and the ribbon piece.  The layered rectangles will add so much visual interest and give me a chance to add different patterns/textures!
I am also entering Word Art Wednesday.  They have Anything Goes, Family Friendly challenge.  This group of lovely ladies, will certainly inspire you.  But, what keeps me playing, is their positive, hopeful, and just genuine love of life!  These ladies will raise your spirits, keep your hope strong, and encourage your creativity!
here is what I created:


Recipe:  My card measures a typical A2 size greeting card: 4 1/4" x 5 1/2".  
My card base is made from crumb cake card stock by Stampin' Up!.  I just love their heavy weight card stock, and the color is just dreamy!
The matts are Blush Blossom card stock by Stampin' Up!.  This beautifully sweet peachy/blush color has been retired for 10yrs.  It's a hoarded collected treasure.  {smile}
The pattern papers are all from Something Blue by Prima.  I wanted to use the neutral colors, and then add a soft, splash of color: blush.  Something sweet, to accompany Something Blue.
I matted all three pattern papers onto blush blossom, and added a simple machine stitching around each rectangle.  I thought it added a softness, a homespun look & feel, and gave it a little vintage-y look.  {smile}  I sponged all the edges of the pattern papers and matts with tea stain ink.

For my circle element, I added a new small lace doily by Stampin' Up! (#142793).  These beautifully delicate doilies are white on one side, and vanilla/cream on the other.  How super clever of Stampin' Up!.  I hot glued a Something Blue dark grey blossom to the card front where the polka dot and text pattern papers meet.    I love how the dark text pattern paper isn't black, but rather a dirty grey.  So I mimicked that color in my blossom.  I wanted to repeat the blush color, so I added a tiny brad with a blush heart, next to the blossom.                              I wrapped coconut seam binding around the card front.  I just love this neutral color.  It doesn't distract your eye, but rather allows your eye to move across the card.  I adhered a wooden sentiment banner to the card front.  I was already stamped with 'THANK YOU'.  So, I didn't have to add a sentiment.              
I tied a piece of coconut seam binding into a triple bow, and adhered it to the wooden sentiment banner piece.  I thought the bow looked beautifully there, instead of below the sentiment.                                  
To finish my card, I added a trio of blush sequins from Close To My Heart.  Just to add a little splash of color, and a little more femininity to my card.
Thank you for stopping by.  I hope your weekend is finishing strong!  We are getting ready for another winter storm to move-in.  We are expecting snow later today/evening.  Take care, and until next time, Happy Crafting!  It really does make your soul happy!


Sunday, January 22, 2017

Home Spun Joy

Howdy.  Sorry this is so late.  I thought I had already taken photos of my card.  {frown}  I made this little beauty on Tuesday, and apparently I forgot to take a few photos.  I've been working longer hours, so it's dark when I leave for work, and dark when I get home.  Which makes photographing anything other than the stars are bit rough.
Well, let's not dwell on the negative.  Let's get right to it!  I wanted to play along with a few of my favorite challenge sites, and they are still open for submissions! Yahoo!
My first stop is Mojo Monday.  I just love their sketches!  And this week's is super fun!

when I first saw this sketch, I was thinking of adding two different papers and using the green strip as their borders.  But, I wanted to add ribbon {smile}, so I changed it up a bit!
My next stop is Sugar Pea Design's Mix It Up Challenge.  This beautiful site gives you a sketch and an inspirational photo.  You can use either or both.  Very easy to work with.

and their current challenge is Anything Goes.  I love that option, because it gives me a whole lot of freedom to use whatever color palette I am currently loving, and what ever embellishments I can't seem to use enough of.  {smile}
And my last two challenge sites, are near and dear to my heart:  Word Art Wednesday, and Brown Sugar Challenge.  These two challenge sites are Anything Goes.  So, I can play along if I can get my post written {wink}.  Both sites are different but equally inspirational.  The wonderful folks over @ Word Art Wednesday have faith based quotes for you to use.  They are a family friendly site.  But their design team will certainly inspire you!  The wonderful folks over @ Brown Sugar Challenge, use more digital images and coloring.  But they too welcome all types of entries: tags, projects, journals, altered items, cards, pages, etc.  Whatever your heart desires to create!
and here is what I created:


and a different view:


I just couldn't decide which view I liked best.  So, I have given you both.   And here is the recipe:
I used Crumb Cake card stock, by Stampin' Up! as my base.  Love the heavy weight of this paper.  The main panel is a pattern paper, Oriental Chic, by Ruby Rock-It.  I just love the woodgrain and floral motif.  I roughed-up the edges with my scissors and sponged crumb cake classic ink on the edges before adhering it to the card front. 
I wrapped white lace and a baby blue gingham ribbon around the card, and tied the ribbon into a simple bow.
For my square panel, I simple cut my second pattern paper, Quilt, by Ruby Rock-It, into a 3" x 3" square.  I matted it onto a scrap piece of crumb cake card stock, and machine stitched along the quilting squares.  I think it adds a special homespun look and feel to the card.
For my rectangle piece, I simply cut a very vanilla card stock piece, and stamped my sentiment.  I used another sentiment from my (new favorite) stamp set: Choose Joy, by Paper Trey Ink.  I used basic black classic ink, by Stampin' Up!.  Since the piece is rectangle but my sentiment isn't, I stamped it high, to leave an empty space at the bottom.  I added a strip of washi tape from my collection.  I was happy that I had some washi tape that coordinated with the quilt pattern.  {smile}  I added a double matt to my sentiment rectangle: bashful blue and crumb cake card stocks by Stampin' Up!
For the circle piece, I didn't like how a paper blossom looked.  But, I wanted something soft and sweet.  So I did a double layer.  I first added a white doily sticker to peak out from both the square and rectangle pieces, and topped it off with a metal rimmed flat back large brad.  I was surprised, that I had a brad that worked so well!
Thank you for stopping by!  I hope that you  have been inspired to play along with any, or all of these great challenge sites.  They each have their own unique style, and creativity, but they are ALL beautiful!  This card is going to one of my best friends.  She has had a few struggles this past week, and I want her to know that I care for her, and that I want her to find peace, and happiness.  {smile}


Sunday, December 25, 2016

Christmas Challenge

Howdy, I hope you are well.  I made my own Christmas cards again this year.  And I want to enter them into a few challenges during this beautiful time of year!
The wonderful folks over @ Brown Sugar Challenge have a Christmas challenge.
Also, the talented ladies over @ Merry Monday Christmas Challenge have a Holiday Cheer challenge.

And finally, the lovely, and inspirational ladies over @ Word Art Wednesday have a family friendly anything goes challenge.

and here is my entry:


I used a variety of products for this creation.  Special mention to Stampin' Up! crumb cake & mint macaroon card stocks, along with Prima Sweet Peppermint collection of pattern papers.  I added a bit of machine stitching, and a big beautiful lace bow!  The complete recipe of products and such can be found on this post.  Thank you for stopping by, and Merry Christmas!


Merry Christmas

Merry Christmas!
I want to take a moment, and wish everyone around this beautiful globe, a very Merry Christmas!  With today's technology we are able to reach out to folks across the globe, and to connect with other cultures, and through other languages, than our own native tongue.  I hope all people find hope, love, and happiness during this season of giving.  And that they start a new year, with a new purpose of forgiveness, love, and laughter.  Our globe is becoming more and more small, and our need to learn to  work and live together becomes stronger and stronger.  May we all find Peace!

I make my own cards, as you all know.  And I make my own Christmas cards, as well.  Typically, I make one card.  But there are years, and this one is no different, that I make 2 cards.  I can't decide which one I like better, so I make both, and it is generally a roulette as to which one you will receive. {smile}  I wanted to share them with you, here, @ my little piece of blog-land: Designs by Sharon.

This one I made first, and I loved the large sentiment piece.  
So of course, I had to add a large bow. {smile}


I wanted a smaller sentiment, but one just as 'pretty', 
to show-off that beautiful pattern paper!


Recipe:  I used Stampin' Up! crumb cake card stock as the base of these cards.  Their card stock is a nice heavy weight, that will stand up to my layers.  {smile}
The layers:  first piece is Mint Macaroon by Stampin' Up!.  I just love this shade of blue green.  It is soft, sweet, and super easy to work with!  
The next layer, is a retired piece from Stampin' Up!.  It came from a holiday collection last year.  I just love sheet music!  
The next layer, is a candy stripe from Sweet Peppermint collection of pattern paper by Prima.  I just love the red and white diagonal stripes.  The shade of red is vintage, and really pops with the mint macaroon.  
And the top layer, is this fun, festive advent calendar holiday print from the Sweet Peppermint collection by Prima.  It has numbers, words, images; everything you would find, or need on an advent calendar.  I thought this paper was just divine, with a bit of nostalgia.  {smile}
I added a simple machine stitch border all the way around.  And yes, sewn through all the layers. {smile}
My sentiment pieces are on whisper white card stock by Stampin' Up!.  I love both the weight of this paper and the feel.  The weight is light, so it won't add bulk to your projects.  The feel is super smooth.  It takes ink (any variety) beautifully!  I matted the sentiment piece with another piece of mint macaroon card stock.  I thought it would help give some definition for that piece, and repeating the same color help solidify that color as belonging to the project.  I kept my sentiment colors, to those I used in the layers of pattern papers.  I didn't want to distract the eye.
I tied bows in either mint macaroon lace or a vintage red gingham print.  The mint lace repeats the mint color from the layers, and the red gingham print repeats the red candy stripes, anchoring both ribbons to the project.  I then tied the embellishment to the bow with thin silver string.  I wanted a sparkle of metallic.  I used either a frosted candy cane or a shiny pine cone.
The cards remain blank inside, and this year I actually wrote in them.  Shocking, I know.  If you didn't know, I never (until now) write in my cards.  I add a hand written note, or typed note to the inside of the card.  That way, you have a card to give.  It's like receiving two gifts in one {smile}.

Well, I am off to the kitchen to get a few dishes started for Christmas dinner.   I hope you are able to share this beautiful season with family and friends.  I think being surrounded by those who love you, and care about your happiness, is enough to bring you joy!  And my heart goes out to those who are serving abroard and can't be with their love ones.  It is a sacrifice to keep our nation safe.  So be vigilant and guard us well.  Merry Christmas! and Peace on Earth.


Sunday, November 6, 2016

Pretty Pink Christmas Card

Howdy.  Welcome.  and yeah, I'm still crafting for my craft fairs {smile}.  I have been working on several more clear box totes.  But, I took a quick break and created an A2 card with more shabby chic pretty pattern papers from the Sweet Peppermint collection by Prima.  I also inked a new stamp set that arrived in the mail, yesterday.  
I am entering this card in three card challenge sites:  Brown Sugar Challenge, Word Art Wednesday, and Stampin' Royality.
The first challenge, I am entering is Brown Sugar Challenge .  Their current challenge is Anything Goes.  I am sure that you will be inspired by this creative design team.
The second challenge, I am entering is Word Art Wednesday.  Their current challenge is Anything Goes.  This is a faith based challenge site.  You are not required to use the scripture, but I am sure you will be happy to do so {smile}.
The final challenge, that I am entering is Stampin' Royalty.  The design team uses Stampin' Up! products, but you are not required to.  Their current challenge is All That Glitters - use glitter somewhere on your project.  Easy peasy.  And who doesn't like glitter? {smile}
*my card was selected as one of the 'top picks' for this challenge!  Thank You!
here is what I made:


Recipe:  The card base is made with the Crumb Cake card stock by Stampin' Up!  I just love the heavy weight of their card stock.  And the color is so darn beautiful!
The pattern paper is Sweet Peppermint by Prima.  I just love both os these patterns:  the soft pastel colored polka dots with some random sheet music print.  And the white snowflakes and white polka dots on a mint colored background is so pretty and sweet {smile}.  I added a quick and simple border stitch with my sewing machine to help convey a homespun look.  
I added a rose pink cotton scallop trim and a kraft-dyed seam binding across the bottom third of my card.  I just love the softness of these two colors together {smile}.  I crinkled the seam binding, to help give it a 'worn' look.  I created a multi-loop bow with the crinkled, kraft-dyed seam binding.  
I used a medium snowflake die by Paper Trey Ink and silver glimmer paper (aka glitter paper) by Stampin' Up! to create the snowflake focal piece.  
I made a little tag, for my sentiment.  I used a scrap piece of linen white card stock by Paper Trey Ink.  I inked up a new stamp set I received in the mail: Rustic Wreath by Paper Trey Ink.  I inked the stamp set with Baked Brown Sugar classic ink, by Stampin' Up!.  I just love the soft pale brown ink color.  I tied a scrap piece of pink sequin trim to the tiny tag, with a length of candy pink bakers twine.  
My card is pretty plain, but pretty {smile}!  Thank you for stopping by!  I have finished a few more little wooden houses, so I'll share a few photos soon.  {smile}


Sunday, March 20, 2016

WaterColor Blossoms; Card

Hello.  I made a card to say 'Thank You' to those ladies who placed orders @ Ashley's KEEP Collective party.  {smile}  The ladies she invited were funny, personable, and friendly. 
The wonderful ladies over @ The Paper Players have a current challenge that fit this bill!  Their theme for their current challenge is to create a clean and simple card with a Spring theme! Yahoo!


And, the wonderfully talented ladies over @ Really Reasonable Ribbon Challenge have a similar challenge: Welcome Spring, and use ribbon, lace, or trim on your project.  Easy!
and here is what I made:


Recipe:  I used crumb cake card stock for the card base.  The matt is made with crisp cantaloupe card stock.  I just love this color.  It's a softer version of the Coral.  
I stamped the floral image in Black detail ink, on to white shimmer card stock.  I used re-inkers to water color the blossoms with aqua painter.  I used crisp cantaloupe, pink pirouette, blushing bride, coral, pear pizzazz, and pistachio pudding.  


Once the blossoms were water colored, I sprayed the panel with a shimmer mist.  I really wanted the sparkle!  Finally, I hand-stamped the 'thank you' from the hand-scripted stamp set by Amuse Studio in Basic Black classic ink.   

I used my paper piercer to create two tiny holes on each side of the blossom stems, and strung a thin, sheer, coral ribbon, and tied a simple, single bow.  I wanted another embellishment, so I added a trio of marshmallow sequins.  The water colored panel was adhered to the cantaloupe card stock with foam tape.
I plan on dropping these beauties in the mail, once I hear from KEEP Collective, that Ashley's party orders have been shipped.  {smile}  I hope the ladies really do love their cards and unique jewelry.  {smile}


Saturday, November 28, 2015

Scraps of Trim 'Tree'; Gift Bag

Howdy.  Whew.  I'm been busy.  Busy like everyone else!  This was a big week to cook; which I love!  I really do enjoy baking and cooking.  Creating beautiful, delicious food is one of my passions.  I think food should not only look great, but taste great!  Thanksgiving, is my husbands favorite holiday, because of the food.  Funny, huh?  
One of my other passions is crafting.  Mostly paper crafting.  I love to create beautiful things out of paper.  I made a 'tree' out of scraps of fabric, and totally loved how super cute they came out.  And while I was visiting some of my favorite challenge sites, I read the post of 'Lace' @ Shabby Chic .  It did give me an idea on making a 'tree' out of scrap pieces of lace, crochet trim, and ribbon.  I am pretty happy with they came out.  [they, I made two {smile}].
I am entering a few challenges today with my little creation:  Love to Scrap  , Die Cutting Divas , Scrap & Craft Inspiration , and Crafting By Designs.
The talented ladies over @ Love To Scrap! , will surely inspire you with they variety of creative styles.  Their current challenge:  Anything Goes.
The talented ladies over @ Die Cutting Divas, have a current challenge: Tag, Bag or Box.  You should see the great boxes, bags, and tags these ladies made.  Very inspiring.
The design team over @ Scrap & Craft Inspiration have a current challenge: Shabby Chic or Vintage.  These creative ladies are located in Europe.  and therefore, their styles of crafting is very layered, with lots of embellishing.  Very beautiful, very inspiring,  and very creative.
And finally, the lovely ladies over @ Crafting by Designs, have a current challenge: Get Ready for Christmas.  I strongly encourage you to take a look at this creative design team's entries.  Just lovely!
here is what I made:


I used crumb cake card stock for the 'bag'.  I used a gold card stock as my matt.  I think it adds a bit of  glamour to my bag.  I used shimmer white card stock for the main panel.  I stamped my three different size snowflakes in two different kraft colored inks: crumb cake classic ink, and classic kraft ink.  I used my sewing machine to add a 'homespun' look to my bag, by sewing a simple border.  
I collected my trims: crochet trims, cotton trims, ribbons, and thin tinsels, and tied them around a cinnamon stick.  I added a trio of buttons.  I tied them on to the cinnamon stick with a gold, silver, and cream twine.  And I added a Melissa Frances rhinestone button to the top of the cinnamon stick.
My sentiment is stamped and matted the same way I did the main panel of the bag.

close-up of the buttons:


Thank you for looking.  I hope you have been inspired to create something beautiful, too!  And join these two challenges.  


Saturday, January 31, 2015

Smiling Today, Card

I got a chance to head into my craft room today.  I have a few cards that need to be mailed out.  But, sometimes most times, I need a little inspiration.  I had recently purchased a few new items, and wanted to craft with those.  I just need a sketch.  So, I headed over to a 'new' favorite:  Friday Mashup - #195 sketch and project (use 2/+ embellishments)  I used the sketch and the embellishment requirements ( paper blossoms, a button, resin lock, lace, cotton ribbon, and pearls).


I purchased a new pattern paper pad from a big box store: Color Bok:  Signature.  It is a collection of shabby chic double sided patterns.  Very pretty. {smile}  The thing that really caught my eye, is the tab piece at the upper right corner.  Just love the thought of that.  And so, thats just what I did!


The sentiment says:  Thinking of you today and smiling.  I really love this sentiment.  {smile}  I will be mailing this card out to my friend Denita.  She is a very good person, and we have a good time when we get together.  I just want her to know that I was happy she came out to my house so we could craft.  {smile}
Here is the recipe:  The card stock is crumb cake card stock by Stampin' Up!  The two pattern papers is actually the same page, I just use both sides {smile}.  
I cut a piece of blushing bride card stock, by Stampin' Up! and trimmed the edges with the open scallop trim hand punch.  I thought this type of scallop would look prettier.  I adhered these pieces together, and then used my sewing machine to add a simple machine sewn border.  I thought it added a bit of charm to the card front.  
I stamped my sentiment onto vellum card stock, by Stampin' Up! in versa mark ink.  I sprinkled on some white embossing powder, and then heat embossed the sentiment.  I used the  We Go Together stamp set by Paper Trey Ink.   I layered a piece of white polka dot and light aqua pattern paper under the vellum.  I cut the same flag end to both pieces.  I also made the polka dot pattern paper a bit longer.  I stapled these two papers to the upper right corner of the card.
I added a piece of white lace to the lower third of the card.  I strung blushing bride cotton ribbon, by Stampin' Up! through the 'holes' in the lace.  I adhered a white resin key hole over the lace/ribbon combo. 
I distressed two paper blossoms and a vintage button with white paint and glitter.  I thought it added a little shabbiness to the card {smile}.  I first added the pink blossom above the key hole.  Tied some cream twine through the light aqua button and tucked it just under the pink blossom.  And finally, I slipped the white rose bud in at the top of this embellishment pair.  
Finally, I added a trio of white half faux pearls to help add some softness, some sweetness to the card front.  I added a medium pearl to the right side of the staple, and a pair of tiny pearls between the embellishments and the sentiment banner.
I hope you get a chance to create a card for this challenge.  I'm sure you will fall in love with the sketch!  Carve out some time today, and create something beautiful and wonderful!  But, before I go, I was wondering, do you hand deliver or mail your hand-made cards?

Saturday, January 3, 2015

XO's For You

Welcome.  I hope you are having a good first weekend of the year!  Me, I'm doing good.  {smile}  I don't know if it is the 'freedom' I feel, now that my craft room is clean and organized, or I simply found some mojo.  Either way, I will take it!
I visited a favorite sketch challenge blog site this week, Cardabilites, and finally got a chance to sit down at my crafting desk, and whip up a card.  Ok, I don't really 'whip-up' a card.  For those who know me, a 'fast' made card still takes me an hour or so.  This one, a bit longer.  I wanted to use some pattern papers I had already cut.  So, I dug through my scrap box to find: colors that I liked, pattern that went together, and papers that made me smile.  Simple process, really.  Now, I just needed to sit and put it all together.  And that is not always so easy.  Three hearts later, and two different blossom centers, I found created what works for me.  

To start, the sketch looks easy to work with.  Use a doily, add a blossom, and you have your two circle elements.  Well, that isn't exactly the direction I went.  


Recipe:  The card base is crumb cake by Stampin'Up!.  The first text matt is from Melissa Frances.  The next blue matt is a pattern paper I received as part of a prize from playing along with the lovely ladies over @ Craft Hoarders Anonymous Challenge.  The pink main panel is the only piece of this pattern paper from Bazzill I have left.  I sponged the edges with crumb cake classic ink, by Stampin' Up!, adhered them together and then did a purposefully 'sloppy' machine stitch.  I went around the card twice.
My first circle element is a doily.  The doily was cut with a doily die, by Paper Trey Ink, using glitter paper by, Stampin' Up!.  The second circle element is a circle {smile}.  I used a white text, aqua pattern paper I think is from Carta Bella.  (It's another scrap piece.)  I used a die to cut this 2" circle.  For the cluster in the second circle element, I built my piece.  I cut a heart shape from some cream felted wool.  I used a retired heart die, by Stampin' Up!   I cut the same heart shape from some silver polka dot vellum card stock.  The flower shape was cut with another retired die, by Stampin' Up!  I used a small scrap piece of another pattern paper from the collection by Bazzill.  The smaller blossom was cut with the same retired die, by Stampin' Up!, but I used some aqua mist felted wool, by Paper Trey Ink.  I ran this circle collage through my sewing machine, using a simple stitch.  
I tied some cream twine through a cream vintage button, both by Paper Trey Ink.  I used hot glue to attach the button.  The leaves were made with a scrap of green pattern paper from Nostalgia.
I added a scrap piece of cream crochet trim, by Paper Studio.  I didn't have a long enough piece to wrap around the card front.  But after 'playing' with this trim, I found I really like how it doesn't cover the card front.
I didn't add blossoms and banner for my sentiment.  Instead, I made a multi-loop bow with 1/4" silk ribbon, by Paper Trey Ink.  I also cut a tag from Whisper White card stock, by Stampin' Up!.  I used the tiny tag die, by Paper Trey Ink.  I stamped my tag with two sentiments from the same stamp set, by Stampin' Up!.  This set has been retired for over 6 years.  I sponged the edges of the tag with more crumb cake classic ink.  
And finally, to give my card a more feminine feel, I added a collection of white half faux pearls and clear rhinestones.
I originally set out to make a St. Valentine's Day card.  So, that is why the sentiment is 'XO's For You'.  This card will be for sale in my Easy shop, HERE.   I hope you enjoy the rest of your first weekend this year.  I am off to the kitchen to make some fresh bread.  Nothing fancy, just white bread.  But it makes the house smell wonderful! and it tastes amazing!  I'll post a photo on my InstaGram page, HERE.


Monday, July 7, 2014

Bunco Nine

~ photo heavy post ~

As promised from yesterday, I have another Bunco prize/gift to share with you today.  We are currently at number nine.  (Counting down backwards from eleven)


If you are just joining me, I stamped and heat embossed this little mason jar in early espresso embossing powder, onto very vanilla card stock.  I punched a 3/4" circle from the same digital paper I used to make my reminder cards, and added (alternating) a gold or silver sticker number.  I fussy cut the jar image out with scissors and sponged the edges with crumb cake classic ink.  I wrapped the top of the little mason jars with coordinating bakers twine.


As with all of the prizes, a kraft gift bag decorated, along with a matching little gift card.  An altered clothes pin to hold the prize number.  And of course, the prize!  But before I share the prize, I wanted to share a quick photo of the gift card.


This prize is a desk top calendar.  The finished size is 4" x 4".  That way, it doesn't has a large footprint, and is super sweet!  Here are the photos:

the cover.  super plain, but you won't see it.


I used Market Street pattern paper, from My Mind's Eye.  I just love this rustic, vintage-y look.  I wanted to keep the months kinda flat.  The pages lay better.  I used my Bind-It-All to put the spiral piece thru the little 'book'.

Thank you for stopping by!  See ya tomorrow!