
~ a few photos ~

Welcome. I wanted to share a sneak peak of my card for today. Trying something different. Want to shake things up, a bit! Before we start, let me provide a few disclaimers: There is NO hand-stamping on my card. And I used a majority of products from the same collection & manufacturer: Prima.
Now, with that out of the way, let's get to today's post! Howdy! I'm happy you are here. I love participating in paper crafting challenges. But, like most of you, I don't always have the time I want to craft. And that is sad. But, not today! I carved out a few hours earlier today, to craft a much needed Thank You card. Unfortunately, I am not participating in several challenges. Just two. But don't fret. I am sure you will like what I made {smile} I know I am happy with how my card turned out.
This week, is a contest challenge over @ Mojo Monday. I try my hardest to always participate in these challenges. I think the design team does some of their best work during these weeks. And, they do inspire you to play along. So, that is what I did. And I will most likely play along this upcoming week, too {smile}
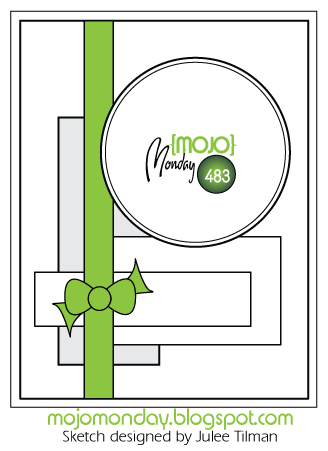
what a clever sketch. I just love the circle element and the ribbon piece. The layered rectangles will add so much visual interest and give me a chance to add different patterns/textures!
I am also entering Word Art Wednesday. They have Anything Goes, Family Friendly challenge. This group of lovely ladies, will certainly inspire you. But, what keeps me playing, is their positive, hopeful, and just genuine love of life! These ladies will raise your spirits, keep your hope strong, and encourage your creativity!
here is what I created:

Recipe: My card measures a typical A2 size greeting card: 4 1/4" x 5 1/2".
My card base is made from crumb cake card stock by Stampin' Up!. I just love their heavy weight card stock, and the color is just dreamy!
The matts are Blush Blossom card stock by Stampin' Up!. This beautifully sweet peachy/blush color has been retired for 10yrs. It's a hoarded collected treasure. {smile}
The pattern papers are all from Something Blue by Prima. I wanted to use the neutral colors, and then add a soft, splash of color: blush. Something sweet, to accompany Something Blue.
I matted all three pattern papers onto blush blossom, and added a simple machine stitching around each rectangle. I thought it added a softness, a homespun look & feel, and gave it a little vintage-y look. {smile} I sponged all the edges of the pattern papers and matts with tea stain ink.

For my circle element, I added a new small lace doily by Stampin' Up! (#142793). These beautifully delicate doilies are white on one side, and vanilla/cream on the other. How super clever of Stampin' Up!. I hot glued a Something Blue dark grey blossom to the card front where the polka dot and text pattern papers meet. I love how the dark text pattern paper isn't black, but rather a dirty grey. So I mimicked that color in my blossom. I wanted to repeat the blush color, so I added a tiny brad with a blush heart, next to the blossom. I wrapped coconut seam binding around the card front. I just love this neutral color. It doesn't distract your eye, but rather allows your eye to move across the card. I adhered a wooden sentiment banner to the card front. I was already stamped with 'THANK YOU'. So, I didn't have to add a sentiment.
I tied a piece of coconut seam binding into a triple bow, and adhered it to the wooden sentiment banner piece. I thought the bow looked beautifully there, instead of below the sentiment.
To finish my card, I added a trio of blush sequins from Close To My Heart. Just to add a little splash of color, and a little more femininity to my card.
I tied a piece of coconut seam binding into a triple bow, and adhered it to the wooden sentiment banner piece. I thought the bow looked beautifully there, instead of below the sentiment.
To finish my card, I added a trio of blush sequins from Close To My Heart. Just to add a little splash of color, and a little more femininity to my card.
Thank you for stopping by. I hope your weekend is finishing strong! We are getting ready for another winter storm to move-in. We are expecting snow later today/evening. Take care, and until next time, Happy Crafting! It really does make your soul happy!


