Showing posts with label blossom. Show all posts

Friday, March 16, 2018

Beautiful You Card

Howdy, and welcome!  Today I wanted to share with you a card I hand-crafted.   I wanted to make something pretty, with a generic sentiment.  This card isn't for anyone, so nothing specific.  I just wanted to paper craft.   I set out looking at a few of my favorite paper challenge sites to get some direction, and I found some very fun challenges.  So, let's get started!
I wanted a bit more direction, so I decided on a sketch challenge.  I knew what I wanted to use, I just needed a little more direction.  So, I stopped by the Paper Craft Crew challenge site.  This challenge site mostly does sketches.  But every now and again they will throw in a theme, or tic tac toe board, but they will always inspire you!  


I didn't rotate or flip their current sketch.  I used it as is!  I also did not switch out the blossom images for any other shaped item.
Since I already knew what pattern paper I wanted to use, and I now have a sketch to work with, I decided to play along with the wonderfully talented ladies over @ Word Art Wednesday.  Their challenges are : anything goes, family friendly.  

You will be pleasantly surprised by this design team.  They are very creative and talented, and the submissions are pretty great too!


and here is what I created:


Recipe:  this blank inside greeting card is the typical A2 size: 4 1/4" x 5 1/2".  I used cream card stock by Paper Trey Ink for the card base.  This card stock is a beautiful heavy weight, so it stands up to my embellishing!  The main panel matt is Kraft card stock by Paper Studio.  I just love the neutral soft color of kraft. {smile}
The pattern papers are digital.  I use my at home printer to print these.  I used whisper white card stock by Stampin' Up! for 3 of the pattern papers.  This card stock has a 'slick' feel to it, and allows the card stock to take the ink from my printer beautifully! I have zero complaints.  The small square that has the sentiment on it, I shrunk down.  It would have printed 6" x 6", but I wanted the whole sheet of paper to be my focal piece.  And I just love the sentiment.  That piece I printed on Linen card stock by Paper Trey Ink.  I felt the added texture would help give my card some depth, and not be so flat.
I cut my top pattern paper, so that the mix of floral images would have some blues in it, to help tie the bottom pattern paper that is a blue collage with copper dots.  
I added a simple border stitch with my sewing machine.  I think it adds a 'homespun' look/feel.  
To hide the seam where the two pattern papers overlap, I added a scrap piece of white cotton trim, and topped that with a scrap piece of pale pink seam binding.  I added a little machine stitching there too.  It holds the card front together, and continues with the machine stitching along the card's edge.
The pink polka dot pattern paper, I flagged the end, for visual interest.  
To make my 'tag' piece, I simply added my pattern paper square to a scrap piece of the same Kraft card stock I used for the main matt.  I used my scissors to make the tag shape at the top.  I used a traditional hole punch to give my tag that finished look.  I threaded a piece of pale pink seam binding through the hole and tied a simple knot.  I then tied a simple knot of pale pink tinsel to a rich brown button, and hot glued it to the top of my seam binding bow.  I adhered the tag to the card front with foam tape, to help elevate it off the front of the card.
The paper blossoms are from my stash.  The brownish blossom is from Prima.  I just loved the color.  Not quite brown.  Not quite copper.  The white paper blossom and the little pink paper blossom are from LemonCraft.  I added some white paint and glitter to the petals, of both blossoms.
Thank you for stopping by and having a look at what I created.  I hope you have been inspired to play along with either or both of these challenge sites.  Enjoy your Friday!


Monday, March 5, 2018

Happy Moments of Spring

Hello.  Welcome.  I want to share an altered notebook I hand-crafted.  I started with an ugly notebook I found in a $1 bin, and decorated it, to give it a new look! and I am super happy with how it turned out!  I am entering my altered/decorated notebook in three different challenges (one in the US, and 2 overseas).
My first stop was the Tic Tac Toe Challenge.  They use a tic tac board, and you choose which row you are working with.  Super fun, and it gives you options {smile}.
I went diagonal with Floral, Gold/Silver, & Sequins
My next stop is a new favorite challenge site from Russia.  They also have a translate button, so it really makes it easier to play along: Paper Story.  They have given us an inspiration board, and you pick what inspires you.  You gotta love that!  Their theme:  sweet inspiration
inspired by the colors, and blossoms
and finally, my last stop is at SaratovScrap.  They have given us an inspiration board as well.  Their theme is:  March banner, freshness of the spring day, tenderness of the first flowers, letters about love.
inspired by the softness, the colors, the blossoms, and the notecard
and here is what I made:


Recipe:  I used a pink and cream pattern paper from Bazzil.  I loved how the random pattern was vague and pretty at the same time.  I had a scrap piece of a digital floral pattern paper, that was just the right size to matt with kraft card stock.  I added cut pieces of different 'tickets', and layered them. 
At the top, I added a scrap piece of cream cotton trim.  I wanted to bring out the pale aqua color in one of the tickets, so I added a scrap piece of an aqua and cream pattern paper and layered a cream text pattern paper on top.  I also added a 'notebook tab' piece of aqua and cream polka dot pattern paper to the top left of the notebook.
I loved the floral pattern from the cream cotton trim, so I added a cream button with the same design to the top of a double bow of pale pink seam binding.  I tied the button to the bow with kraft twine, to help add a little contrast, softly.
The fabric blossom is actually a warm taupe shade, to help help blend it into the background, and not take center stage.  I added a pair of champagne glitter leaves to the blossom, to help add some sparkle.
I added a pair of flat buttons tied with the same kraft twine.  I also added 5 pale pink sequins, to help add a little more pink (my favorite color).  I wanted more sparkle, and found a short piece of rhinestone trim, and so I added it to the  bottom of the top 'ticket'.  
I added a 'hair tie' to the bottom of the notebook, to hold it close.  I just love the pale taupe color and the sparkles is just a bonus.  I did some machine stitching to help hold the pieces together, and to give it a homespun feeling.
Thank you for stopping by.  I hope you get a chance to play along with any/all of these challenge sites!  


Thursday, February 8, 2018

Sweet Little Moments Card

Welcome.  I'm so happy that you had a chance to stop by {smile}.  I needed to make a card for a friend who is having a birthday this week.  And I needed a little direction, so I stopped by two Russian paper challenge sites, and one of my favorites here in the USA.
My first stop is @ CharmedScrap.  This challenge site, is from Russia.  They do not have a translate button, but there is always Google Translate {smile}.  CharmedScrap, gives you either a mood board, or sketches.  I  love their sketches, because they include layers and little pieces of interest.  Here is their current sketch:

My next stop is @ InterNitka.  This challenge site, is from Russia also.  And again, they do not have a Translate button.  But InterNitka, has some very creative challenges.  The current challenge is a romantic gentle moldboard:

And finally, I am entering my card @ Word Art Wednesday.   This challenge site, is always a Anything Goes, Family Friendly challenge.  This challenge site will certainly inspire you.  They always provide a scripture that you can use in your paper crafting, but is not required.  {smile}

and here is what I created:


Recipe:  I used various scrap pieces of pattern papers from the Rossibelle collection by Prima.  I just love the splashes of copper metallic on the pattern papers, the distressed, worn patterns, and the soft tones.  This collection has pinks, and a vibrant peach hue.  I started with a Cantaloupe card stock by Stampin' Up!.  Their card stock is heavy weight, and stands up nicely to embellishments.  I cut and tore different pieces of the pattern paper, and layered them together.  Some staggered, and some layered.  I roughed-up the edges with the edge of a pair of scissors.  I inked the edges with tea stain ink.  The grey polka dot pattern paper peaking out under the cream cotton trim, is a scrap piece from a holiday collection by My Minds Eye, from 3/+ years ago.  I did a simple double border stitch along most of the card edge.  I purposefully didn't complete the border.  I brushed white paint across the Bingo card, and the Ticket.  I added foam adhesive to the back of the 'sweet' piece.  I layered these pieces in a way to look random. The blossom is from the same collection: Rossibelle.  I added white paint and glitter to the petal edges, and brown ink to the back of the petals, so help show separation.  I tied a double bow of cream & black bakers twine to the dark button and tucked it at the top of the paper blossom.  The wooden disc, was hot glued to the top right corner of the sentiment cluster.  I brushed white paint and tea ink to the edges.
Thank you for looking.  I hope that you get a chance to play along with any/all of these challenge sites.  {smile}

Tuesday, January 23, 2018

Winter Wonderland in Blue & Green

Howdy.  I have another holiday-themed gift card holder.  I hope you are up for one more {smile}.  I am entering this gift card holder into two 'new-to-me' challenges: First Belarusian Challenge, and the Holly and Ivy Christmas Challenge .
My first stop is @ First Belarusian Challenge.  This is a challenge site from Russia, and yes, they do have a 'translate' button.  Their current challenge is Winter Fun.  You need to look at what the design team has created.  Truly creative and simply gorgeous!  They also have an inspirational board:


My next stop is @ the Holly and Ivy Christmas Challenge.  Their current challenge is Always Anything Christmas Goes.  This design team uses pattern papers and die cuts with a creative flair.  You will certainly be inspired!
and here is what I created:


and a different view:


Recipe:  The base of this gift card holder was made out of Pool Party card stock by Stampin' Up!  I just love this soft, creamy, pale blue color.  I used two pattern papers from the same digital pattern paper collection.  I used Mint card stock by Paper Trey Ink for the matt of the music & floral pattern paper.  I added a simple border of machine stitching, to give it a homespun look and feel.  I just love the music & floral pattern paper, so I wanted the pattern paper to be center stage.  I added a pale green seam binding and vanilla crochet trim.  I just love how soft, and vintage seam binding makes projects, and the crochet trim to echoes the same softness.  The paper blossom is from the Sweet Peppermint collection by Prima Marketing.  I think this pink blossom goes very well with the pattern paper.  I added a double bow tied with the seam binding.  I tucked a sentiment chipboard piece to the opposite side of the paper blossom.  And finally, to add a bit more sparkle, I added several silver sequins.  I just love how shiny they are {smile}.  Once you open this 'card' you will find your gift.  Gift card, that is!
card opened:


Thank you for stopping by.  I hope you aren't too tired of looking at Holiday/Christmas themed cards and projects.  I hope that you have time to play along with these or your favorite challenge site.  Crafting makes the soul happy {smile}.

Sunday, December 3, 2017

Sweet Floral Holiday Bags

Howdy! I wanted to share with you a project I did.  I made a paper tote and gift bag.  But, I used non-holiday pattern paper, to make holiday themed bags.  Because like a lot of us can't always afford to purchase another collection of pattern paper.  And lets face it, I really need to start using the paper I have, and not keep adding to my collection {smile}.  I am entering the current challenge over @ A Snowflakes Promise Challenge - Anything Goes.


and here are my projects
the paper tote:


and here is my gift bag:


~ disclaimer:  I was crafting late into the evening, and lighting was scarce. ~

Recipe:  I used Cocoa Bean card stock, and snowflake die, are by Paper Trey Ink.  The pattern papers I have used are digital papers.  The sentiment is a stamp.  The vellum card stock, Early Espresso embossing powder, seam binding, ribbon, and champagne glitter paper are by Stampin' Up!.  The tulle trim is Mellissa Frances.    The two peach blossoms (on the tote) are from Recollections.  The beige blossom (on the bag) is from Prima.  The tiny pink ornament bulb is from a big box store.
The Tote:  I used a die from Paper Trey Ink to die cut the tote.  I layered the pattern paper onto solid card stock, and added some machine stitching.  I adhered the floral circle paper to the front of the tote with foam tape.  I tucked the snowflakes between these two layers.  I hot glued the blossoms to the corners.  To create the sentiment piece, I heat embossed the sentiment onto vellum and adhered it off center of the blossom circle.  And lastly, wrapped the ribbon around the tote, to help give it a finished look.
The Gift Bag:  I only had scraps of this pattern paper, so I wanted to use them up, before I started printing again.  The large floral pattern was a 6" x 6" piece.  So, I cut my piece 4 1/2" x 6", to use more of what I had.  I added two different polka dot papers, both of which were scraps.  I added some machine stitching to give it a homespun look.  I added the tulle trim and seam binding to help hide the seam where the two papers meet.  I tied the seam binding into a multiple loop bow, attached a bulb, and tucked in a paper blossom.  I created the sentiment piece, just like I did for the tote (heat embossing).  To hide the seam, at the top, where the two pattern papers joined, I added a scallop trimmed pattern paper.  I adhered the card stock panel to a paper bag.
These two types of bags were for sale at yesterdays craft fair.  I hope these two samples have given you some inspiration to use the non-holiday themed pattern paper for your next holiday paper craft.  {smile}

Saturday, November 25, 2017

A Shabby Country Christmas

Howdy, and welcome.  This post is a bit long, so grab a cup of tea, coffee, or any other favorite beverage.  Today, I felt like 'talking'.
For those who know me, or follow me regularly, you know that I have a weakness for pinks, blues, creams, and trims.  I think I can make just about anything shabby chic, with little to no effort.  Just give me a hot glue gun, a jar of buttons, my basket of seam binding and cotton trims, and watch out! {smile}  I also know that it is not the 'love' of everyone. (not quite sure why not, but oh well.)
I posted a decorated notebook I made last night, and well, I just HAD to make more.  I ended up decorating three large notebooks (5 1/2" x 7"), and three little ones (3" x 4 1/2").  They all ended up being just as sweet as can be.  But, I figure you already knew that {smile}.  So, this morning I woke up and started decorating a few more notebooks, but wanted to use some of this 'new to me' pretty paper.  So, I am sharing my creation with you and a few challenge blogs:  Scrapslet, Your Next Stamp, and Word Art Wednesday.  Here we go!
My first stop was Scrapslet.  Their current challenge is a color challenge.  This challenge is from Russia, but they don't have a translate button {frown}.  However, this collection of crafty ladies will certainly inspire you!


My next stop was Your Next Stamp.  Their current challenge is both a sketch and an inspirational photo.  You can use either, or both.  I am using the sketch.  I love their sketches, because they allow you to add your own style to these super user-friendly sketches.  This challenge is no exception.

I rotated the sketch 90 degrees.

And my last stop was Word Art Wednesday.  This is a constant for me.  Their challenges always have a scripture and the warmth and acceptance from these ladies is contagious!  I have never met any of them in real life, but I imagine they are the kind of ladies you invite over for tea, and sit and chat for hours.  Just plain lovely folks.  Oh, their current challenge is anything goes - family friendly.


and so, here is what I did:

decorated notebook (5 1/2" x 7")

Recipe:  I started with an ugly black notebook.  Then, I grabbed supplies from my craft room, and made it pretty!  {smile}  I used a chocolate brown card stock as my base, and layered on some pretty digital paper.  I used my corner rounder punch to round the bottom corners of a few of the papers, to mimic the notebook cover.  
My firs layer of paper is this beautiful blue winter pattern paper.  I added a strip of tiny polka dot paper across the top.   I then cut a rectangle piece of the brown reindeer pattern paper and adhered it on top.  The sketch has this piece under the band.  But, I wanted it to peek out of the top of the trim.
I next used a die to cut the decorative piece of pink pattern paper.  And a different die to cut the sentiment piece.  I thought that the various decorative edges would work well together, and break up the repeating pattern of rounded corners.  I hand-stamped my sentiment onto the scallop trimmed rectangle and adhered it to the front of my paper stack with foam tape.  I then took this stack of papers to my sewing machine and started sewing.  I did simple borders on all the pattern papers, except the scallop rectangle (due to the foam tape).  
I wrapped the cream cotton trim around the band at the top.  And wrapped a pale pink seam binding piece around that.  I tied the seam binding into a simple know.  I didn't want the bow to compete with any of the embellishments.  (To me Junk Bows are eye catching!  so that is why I kept it simple.)
I used a medium size snowflake die to cut a snowflake out of white glitter paper.  I cut the snowflake in half, to embellish my blossom.   For the blossom, I stacked three 4-petal flowers on top of each other, staggering the petal placement.  I secured the three blossoms with a brad.  I hot glued a faux pearl & rhinestone gem to the center of the blossom.  I hot glued the blossom and the two pieces of snowflake to the lower left corner of the notebook.  I also hot glued a silver decorative snowflake to the right upper corner of the sentiment piece.  
And the big finale is the snowflake charm on the spiral and a coordinating pen.  I cut a thin piece of pattern paper, rolled it up tight, and stuck it in the barrel of the pen.  I hope you like it.  I think it came out beautifully.  Oh, and here is a photo of the second notebook I decorated with the same pattern paper.


Thank you for stopping by to have a look-see, as to what I crafted.  And yeah, I'll post again soon.  Sometimes its just hard to stop crafting and take a photo.  But, I'm working on it! {smile}
My one and only holiday craft fair is December 2, 2017 @ La Cueva High School (Albuquerque, NM) from 9a to 4p.   Come out and see my crafts in person.  I promise you won't be disappointed!


Sunday, September 3, 2017

Celebrate Rossibelle Card

Howdy! and welcome!  I hope that on this special holiday weekend, that you are enjoying what makes you happy, and finding the time (and energy) to partake in your passion.  For me, my passions are baking, crafting, and running.  The baking and crafting give my mind a chance to create something beautiful and tasty {smile}.  The running keeps me active, and makes eating clean easier {smile}.  [I post running and food on my InstaGram acct.]  Here, is where I post my creative side!
I purchased a few items from the Rossibelle collection from Prima Marketing.  I just fell in love with the mix of patterns (stripes, texts, and florals) and the colors (various shades of pinks & charcoals, black, and metallic copper)  I used the scraps of this collection to make a card for a few challenges.  I think you will be happy!
My firs stop is Freshly Made Sketches.  This challenge site has some very creative and user-friendly sketches to work with.  I know you will be inspired {smile}
The simplicity of this sketch is what made me want to play along.  The cluster of shapes, can easily be transformed into almost anything: a bouquet, a collection of words, a large image, etc.
My next stop is If You Give a Crafter a Cookie.  I have played along with this challenge site a while back, but came back.  This challenge site has come very clever inspirational boards.  So, I am sure that you will be inspired to play along.  Don't forget to check out their design team; very clever.


The polka dots, stripes, and blossoms is what swooned my heart.  The overall color palette really spoke to my heart, too!  I love the words on the cookies, too!
My final stop is Word Art Wednesday.  This challenge blog, is Anything Goes.  So, create what you want, and enter their challenge.  Easy peasy.  But, please take a moment to read their write up.  You will certainly be inspired.  They also give you a free image of their scripture piece.  So, download it, print it out, and use it on your paper crafts.  The design team will certainly inspire you!  You won't be disappointed.

and here is what I created:


This card is a typical A2 size card (4 1/4" x 5 1/2").  I used scraps of 12" x 12" paper I left over from a previous project.  I did set aside a few other larger scraps to decorate a notebook (a share for later).
I used basic black card stock from PaperTreyInk for the card base.  I just love their heavy weight card stock.  I did add a panel of very vanilla card stock to the inside of the card.  That way, a hand-written message could easily be added, without a metallic pen.
I inked the edges of the papers with charcoal ink, to help define the edges.  The metallic accents on the papers is how the paper is printed.  I just love the random-look of it!

For my 'cluster', I layered a few pieces of Ephemera - red ticket, S playing card, and the floral clock face.  I added a medium shade pink fabric blossom.  I tied a double bow of pale pink seam binding, and tucked it in between the blossom and clock face.  I wanted a little more sparkle of copper, so I added a copper brad.  I took off the legs of the brad, and was left with the cap.  I hot glued the cap to the center of the double bow.   
For my sentiment, I stamped in Versa Mark ink, and used an 'ultra fine copper kettle' embossing powder, and heat embossed.  I cut the sentiment out by hand, to look like a wrd made with a label maker.  I think it adds a super sweet, and simple sentiment that can easily be used for almost any occasion - birthday, wedding, anniversary, retirement, graduation, promotion, etc. {smile}         Viola!

Thank you for stopping by.  I hope you have an opportunity to craft something beautiful today, just 'cause.  {smile}.  I'll be starting on my holiday craft fair items this week.  Super excited!


Thursday, February 16, 2017

My Planner

Howdy, and good morning.  One of my new years resolutions, is to be more organized.  Can someone be 'more' organized? or is it simply 'organized'?  Well, I feel that I am pretty organized, per say.  But, I  also believe that there is always room for improvement.  So, I am working on being 'more' organized.  And to help me conquer this task, I purchased a planner to keep everything together at my finger tips.  {smile}
If you do a search for 'planner' on the internet, you will be bombarded with images, tutorials, and various manufacturers products.  A lot of eye candy!  So, during the last week of December, I headed to a local craft store, and picked up a few items.  And I finally did a little bit of crafting, and decorated the cover of my planner, and the inside cover of my planner.  {smile}


My planner is striped in a rose gold metallic and cream.  I really liked how these two colors looked together.  I started with a paper lace doily from Stampin' Up!.  I layered a scrap piece of cream and gold metallic lace, towards the bottom of the doily.  Then I added a piece of pink polka dot washi tape.  I purchased that big beautiful fabric blossom in the clearance isle of a craft store.  So, I hot glued the blossom, to the cover.  I die cut two leaf pieces and my initials from a scrap piece of glitter paper, that is pretty similar in 'gold' color on the cover.  I adhered the two leaf pieces to the upper left of the blossom, and adhered my initials to the right of the blossom.   I adhered the rose gold and rhinestone charm just under the blossom.  And the final touch was adding a trio of blush sequins, and a trio of flat-back 'pearls'.


I am pretty happy with how the cover is decorated.  I didn't want too much on the cover, as I use my planner daily.  It's kind of a ritual now a days.  I open it, and look at my various sections each morning, while I am drinking my coffee.  It helps me stay on track for projects, and I get to review my calendar, and make notes of different items of interest.  I am truly loving this whole process! {smile}  I also wanted to make a few additions for my planner, and to make the inside just as pretty!


I trimmed a Project Life card and re-rounded the corners to this beautiful metallic card:  'By being YOURSELF you put something WONDERFUL into the world that was not there before'.  I think all of us need reminders how special each of us are.  And that we should celebrate not being carbon copies of each other.  
I made 4 different but equally beautiful 'clips'.  I took large paper clips and simply added things I love!  Three are made out of paper, and one is another beautiful blossom.  {smile}  The sign, coffee cup, and mason jar are made from paper.  I added a little foam adhesive between the front and back piece of heavy card stock.  And hot glued the paper clip in place.  For the blossom, I simple tied a double bow to the paper clip and hot glued the pink paper blossom to the bow.  I backed it with a scrap piece of pink felt.  I added some small gold accent post-its, and two magnetic closures: a tiffany blue flag, and a gold metallic diamond shape.  I printed a calendar year onto heavy card stock and slipped that in the large pocket.  So, I can see the whole year in one view.  I also made a few notes for each month.  That is where I jot down large projects.  
Well, thank you for looking, and spending a little time with me, to see what I have been doing.  I hope you are still on track with your new years resolution(s), too.  Changing how you do things, and creating 'good' habits are hard.  It does take work, and discipline.  But, I know that I am happy with the changes I have made this year.  I am still exercising 3 times a week.  Running 2 days a week.  Making better, healthier choices of food.  And having time on my calendar to craft, really takes the stress away.  I don't fret about deadlines anymore, and I can get so many more things done in the day.  It makes me believe that my stress is reduced, which is good for my heart, and my family. {smile}  And I continue to work on my 'problem' areas each day.  So there are strides there.  And feeling like I am in control of those areas, is empowering!  Have a great day!


Sunday, February 12, 2017

{heart} Thanks

~ a few photos ~


Welcome.  I wanted to share a sneak peak of my card for today.  Trying something different.  Want to shake things up, a bit!  Before we start, let me provide a few disclaimers:  There is NO hand-stamping on my card.  And I used a majority of products from the same collection & manufacturer: Prima.  
Now, with that out of the way, let's get to today's post!  Howdy!  I'm happy you are here.  I love participating in paper crafting challenges.  But, like most of you, I don't always have the time I want to craft.  And that is sad.  But, not today!  I carved out a few hours earlier today, to craft a much needed Thank You card.  Unfortunately, I am not participating in several challenges.  Just two.  But don't fret.  I am sure you will like what I made {smile} I know I am happy with how my card turned out.  
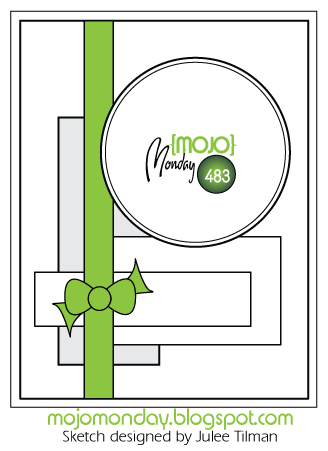
This week, is a contest challenge over @ Mojo Monday.  I try my hardest to always participate in these challenges.  I think the design team does some of their best work during these weeks.  And, they do inspire you to play along.  So, that is what I did.  And I will most likely play along this upcoming week, too {smile}

what a clever sketch.  I just love the circle element and the ribbon piece.  The layered rectangles will add so much visual interest and give me a chance to add different patterns/textures!
I am also entering Word Art Wednesday.  They have Anything Goes, Family Friendly challenge.  This group of lovely ladies, will certainly inspire you.  But, what keeps me playing, is their positive, hopeful, and just genuine love of life!  These ladies will raise your spirits, keep your hope strong, and encourage your creativity!
here is what I created:


Recipe:  My card measures a typical A2 size greeting card: 4 1/4" x 5 1/2".  
My card base is made from crumb cake card stock by Stampin' Up!.  I just love their heavy weight card stock, and the color is just dreamy!
The matts are Blush Blossom card stock by Stampin' Up!.  This beautifully sweet peachy/blush color has been retired for 10yrs.  It's a hoarded collected treasure.  {smile}
The pattern papers are all from Something Blue by Prima.  I wanted to use the neutral colors, and then add a soft, splash of color: blush.  Something sweet, to accompany Something Blue.
I matted all three pattern papers onto blush blossom, and added a simple machine stitching around each rectangle.  I thought it added a softness, a homespun look & feel, and gave it a little vintage-y look.  {smile}  I sponged all the edges of the pattern papers and matts with tea stain ink.

For my circle element, I added a new small lace doily by Stampin' Up! (#142793).  These beautifully delicate doilies are white on one side, and vanilla/cream on the other.  How super clever of Stampin' Up!.  I hot glued a Something Blue dark grey blossom to the card front where the polka dot and text pattern papers meet.    I love how the dark text pattern paper isn't black, but rather a dirty grey.  So I mimicked that color in my blossom.  I wanted to repeat the blush color, so I added a tiny brad with a blush heart, next to the blossom.                              I wrapped coconut seam binding around the card front.  I just love this neutral color.  It doesn't distract your eye, but rather allows your eye to move across the card.  I adhered a wooden sentiment banner to the card front.  I was already stamped with 'THANK YOU'.  So, I didn't have to add a sentiment.              
I tied a piece of coconut seam binding into a triple bow, and adhered it to the wooden sentiment banner piece.  I thought the bow looked beautifully there, instead of below the sentiment.                                  
To finish my card, I added a trio of blush sequins from Close To My Heart.  Just to add a little splash of color, and a little more femininity to my card.
Thank you for stopping by.  I hope your weekend is finishing strong!  We are getting ready for another winter storm to move-in.  We are expecting snow later today/evening.  Take care, and until next time, Happy Crafting!  It really does make your soul happy!


Sunday, July 3, 2016

Shabby Chic Altered Monogram G

Howdy.  I hope you are having a great holiday weekend.  Please don't forget, to take a moment and thank those who have given the ultimate sacrifice, so you can enjoy your freedoms.   God Bless America!
I love to create, and make all sorts of items: cards, cakes, altered monograms, pies, altered art, gourmet dinners, and so much more!  I sell a fair amount of my crafts in my Etsy shop HERE.  And I will even create something special and custom for a client.   All you have to do is ask.  Easy Peasy.  Just let me know what  you like, what you hate, color(s), and any inspirational photos you may have. And that is exactly what I did for a special lady Lari.  She wanted a custom altered monogram, and sent me a photo of the space where it will go, and viola!  Here is what I did:


I covered the naked letter with this beautiful green and pink pattern paper.  I painted the letter a white-cream color.  And then added pretty little details!  There is a piece of pink cotton ruffle material.  And then a double white cotton ruffle material.   I tied a piece of pale pink seam binding around the letter, and made a triple bow.  I tied a white button to the bow with thin silver tinsel.  I tucked a flat back faux pearl and button at the bottom.  I tucked in a white resin frame, just above the bow.  I added white paint and glitter to the pink paper blossom, and then adhered it inside the frame.  I tucked in a little white tulle and pearls.  I painted a metal bird with white paint and dipped it into some glitter.  I took a piece of sand paper and distressed the bird a bit.  I adhered the bird to a stick pin, and tucked him in behind the frame as well.  I added a vintage button and another flat back faux pearl.   I added a trio of flat back faux pearls to the leg of the G.  
This is a custom order from my Etsy shop.  Distressed, vintage, shabby chic, feminine, and just plain pretty!  I have several different letters with slightly different looks.  If you don't see what you are looking for, just convo me, and give me the opportunity to create something one-of-a-kind, and unique just for you!   I don't charge more for custom orders.  Just ask that you give me a week, to create something beautiful just for you!


Tuesday, May 13, 2014

Message Clip

Let me start by thanking those who played to win blog candy.  {smile}  I'll be emailing you to get your addresses.  I hope you enjoy making your Tussie Mussie's, as much as I did.
Now, for today's craft.  I was looking admiring the chalk painted items on Pinterest last week.  So much so, I tried my hand at making my own homemade chalk paint.  I wanted to 'paint' some canning jars and add some small, low water plants to them.  Well, I had such a great time painting them, I started painting some wooden clothes pins.   I did distress my jars, which led me to distress my clothes pins.  And, well, as the jars are drying from the sealant, I set out into my craft room to work alter these painted clothes pins.  And this is what I came up with:


I used a heavy grit sandpaper.  I really wanted them to look weathered and worn.  And then, I wanted them to look shabby chic.  Girl-y.  Pretty.  And 'standing the test of time'.  

I used 3 different stamp sets for the sentiment.  I wanted something 'loving', something 'sweet', something 'home-y'.  So, I came up with 'Sparkle', 'made with {heart}', and 'bliss'.
I inked the tips of the paper blossoms with pool party, blush blossom, and certainly celery classic inks from Stampin' Up!
I cut the lone leaf from some burlap 'ribbon'.  I made multi-loop bows from matching dyed seam binding.  I added a lone pearl to the other side of the bow.
I stamped a scrap piece of pattern paper with a Paper Trey Ink stamp: Boutique Accessories stamp set.
The two end pins were stamped with retired Stampin' Up! stamp sets.  And I do mean retired. Like 8+ years retired.  The middle pin was stamped with a Paper Trey Ink stamp, from the Handle With Care mini stamp set.

Thank you for stopping by.  I haven't decided if I want to add magnets to the backs, or push pins, or leave them.  What would you do?