Showing posts with label floral pattern paper. Show all posts

Thursday, October 25, 2018

YOU are special card

Howdy.  I wanted to share a card I made, not for anyone specific.  Just to craft.  I wanted to make something pretty, feminine, and special.  {smile}
I picked up some pretty floral pattern paper, and a metallic polka dot pattern paper at a local big box store.  One sheet each.  It had to be the cheapest, I had EVER walked out of a craft store.  Under $2.  I think my minimal purchase was so worth the trip.  Here is what I made!


Recipe:  I used Stampin' Up! card stock for the card base and matt.  I used a simple rectangle of the floral pattern paper for the card front.  The floral paper is just so pretty, I didn't want to cover it up.  I did a simple border stitch with my sewing machine, to help convey the homemade feeling.
I used my Top Note die to cut the decorative piece out of the silver metallic polka dot paper.  I wrapped some white cotton trim around the top note piece, and machine sewn the trim in place.  I wrapped some navy blue corduroy ribbon around the white cotton trim.  I adhered the decorative piece to the left side of the card, to showcase both the floral pattern paper, but to have the decorative shape peeking out.

I did a two-step stamp for the sentiment.  I did a silver metallic embossing powder for the main word: you.  I stamped the rest of the sentiment in basic black classic ink.  I cut a simple, shallow flag banner to the right side of the sentiment rectangle.
I added a Prima blossom, I had in my stash, because I love pink.  {smile}  I tied a simple bow with the blue corduroy ribbon, and tucked it under the blossom.  I used my fabric scissors to cut a banner edge to the ends of the ribbon.  I thought this pop of blue really shows off the blue accent blossoms in the pattern paper.  
My final touch, was the trio of iridescent, structured dots.  Viola!  and now, I want to make more pretty things with this beautiful pattern papers!  Let me get back into my craft room!  See ya soon!


Sunday, December 3, 2017

Sweet Floral Holiday Bags

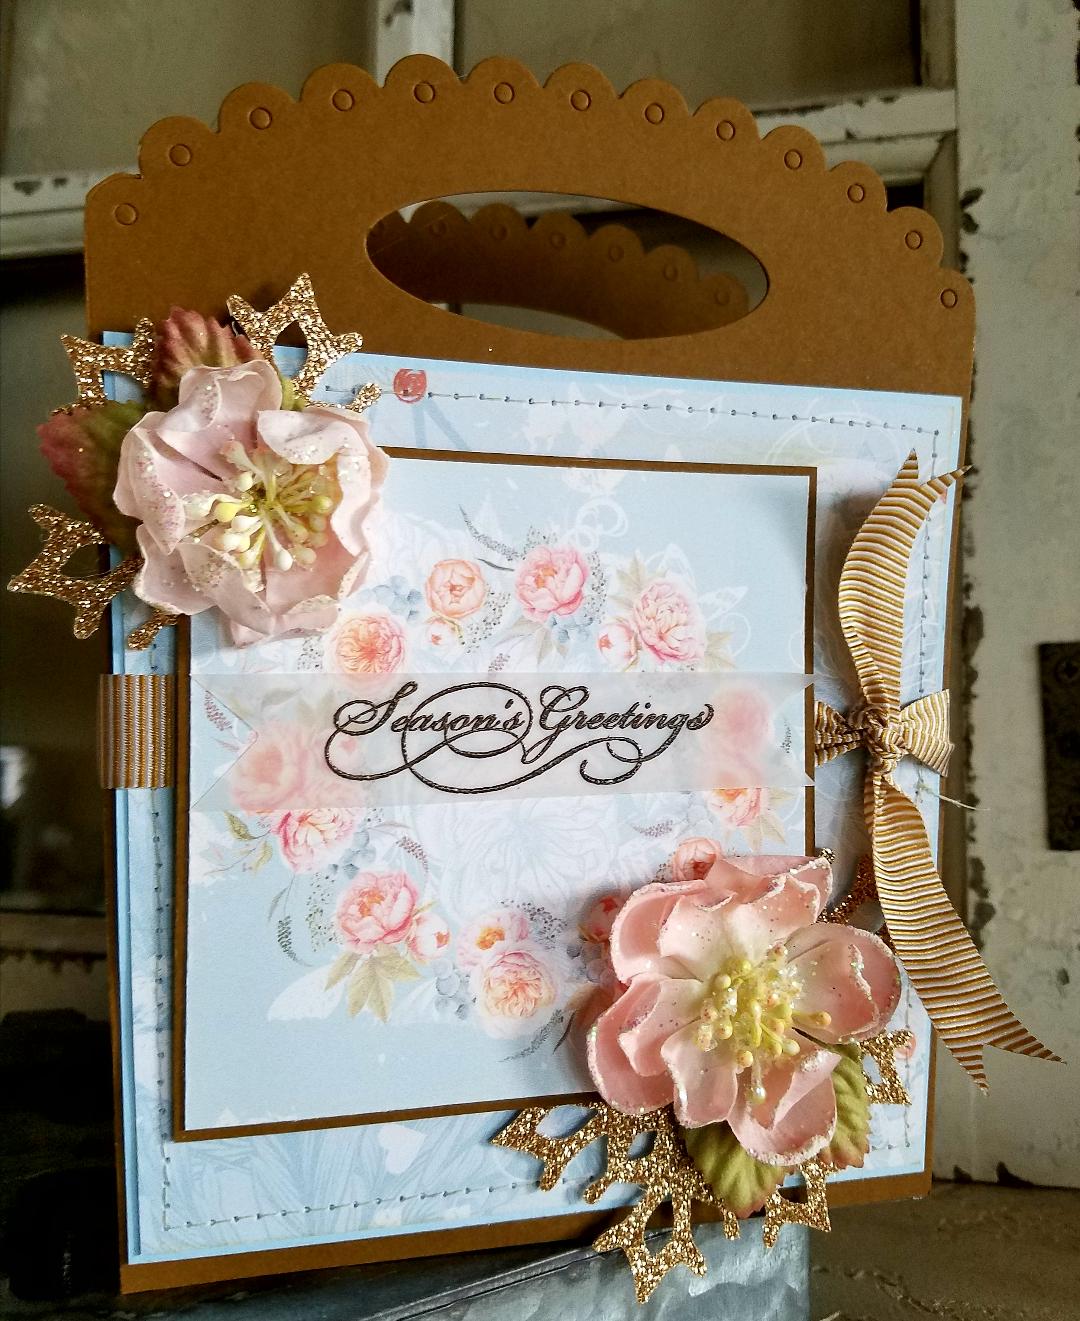
Howdy! I wanted to share with you a project I did.  I made a paper tote and gift bag.  But, I used non-holiday pattern paper, to make holiday themed bags.  Because like a lot of us can't always afford to purchase another collection of pattern paper.  And lets face it, I really need to start using the paper I have, and not keep adding to my collection {smile}.  I am entering the current challenge over @ A Snowflakes Promise Challenge - Anything Goes.


and here are my projects
the paper tote:


and here is my gift bag:


~ disclaimer:  I was crafting late into the evening, and lighting was scarce. ~

Recipe:  I used Cocoa Bean card stock, and snowflake die, are by Paper Trey Ink.  The pattern papers I have used are digital papers.  The sentiment is a stamp.  The vellum card stock, Early Espresso embossing powder, seam binding, ribbon, and champagne glitter paper are by Stampin' Up!.  The tulle trim is Mellissa Frances.    The two peach blossoms (on the tote) are from Recollections.  The beige blossom (on the bag) is from Prima.  The tiny pink ornament bulb is from a big box store.
The Tote:  I used a die from Paper Trey Ink to die cut the tote.  I layered the pattern paper onto solid card stock, and added some machine stitching.  I adhered the floral circle paper to the front of the tote with foam tape.  I tucked the snowflakes between these two layers.  I hot glued the blossoms to the corners.  To create the sentiment piece, I heat embossed the sentiment onto vellum and adhered it off center of the blossom circle.  And lastly, wrapped the ribbon around the tote, to help give it a finished look.
The Gift Bag:  I only had scraps of this pattern paper, so I wanted to use them up, before I started printing again.  The large floral pattern was a 6" x 6" piece.  So, I cut my piece 4 1/2" x 6", to use more of what I had.  I added two different polka dot papers, both of which were scraps.  I added some machine stitching to give it a homespun look.  I added the tulle trim and seam binding to help hide the seam where the two papers meet.  I tied the seam binding into a multiple loop bow, attached a bulb, and tucked in a paper blossom.  I created the sentiment piece, just like I did for the tote (heat embossing).  To hide the seam, at the top, where the two pattern papers joined, I added a scallop trimmed pattern paper.  I adhered the card stock panel to a paper bag.
These two types of bags were for sale at yesterdays craft fair.  I hope these two samples have given you some inspiration to use the non-holiday themed pattern paper for your next holiday paper craft.  {smile}

Tuesday, March 15, 2016

Happy Birthday Mom; Card

Hello, and Happy Birthday Mom!  I made a birthday card a few weeks ago, and have kept it under wraps.  My mom reads my blog.  {smile}  The birthday card I made, is, yeah, for my mom.  Her birthday is actually today.  So, I can 'share' my creation with you today.  My mom's Birthday card will be in her snail mail box today!  Sure happy and sure excited for her!  Because who doesn't love snail mail that isn't a bill or some junk mail [that doesn't even make it in the house]. {smile}


Ok, this card is an A2 size card: 4 1/4" x 5 1/2".  Love this size!  So, let's get right to business, so you know how I made it, and you can use some of these techniques yourself.
For the card base, I used Wisteria Wonder card stock by Stampin' Up!  It's a beautifully heavy weight card stock.  I used a light weight card stock by Amuse Studios in Taupe for the matt.  I used three different, but coordinating pattern papers from Tilda for the card.  I added a pale grey blue floral pattern paper for the main panel.  I added a darker blue tiny floral pattern paper and a pink leaf pattern paper.  [I matched the pinks in the blossoms when selecting the pattern papers.]

I used the edge of my scissors to rough-up the edges of the paper panels.  I did sponge some kraft ink onto the edges to help convey the 'time' or 'age' of the card.  I also used the edge of the scissors to create the 'rip'.  I added a polka dot pattern paper in that area.  I wanted something contrasting, but coordinating.  {smile}
I added a purposefully sloppy double border with my sewing machine.  [I love this look.]  I added some sponging on top of the stitching, to help them 'pop'.  
I had a scrap piece of white cotton trim that was tea dyed, so I stitched that piece onto the front of the card too.  
I strung kraft twine through a trio of lavender moon vintage buttons by PaperTrey Ink and adhered them to the pink leaf pattern paper.  I kept the twine long on purpose.  
The TAG:  this is the focal piece, and one that I'm super happy with {smile}.  I used a scrap piece of taupe card stock for the tag base.  I tied a small piece of wisteria wonder seam binding through the hole, but wanted something more.  so I added a bow tied with lavender thin tinsel.  I love how it adds some sparkle and softness to the over-all whole look of the card. {smile}

My sentiment was created with heat embossing and simple stamping.  I stamped the sentiment in versa mark onto vellum card stock and added silver embossing powder and heat embossed.  I just love how soft and elegant the silver embossing looks.  I used the hand script stamp set by PaperTrey Ink.  I added my adhesive to the back of the vellum piece where the sentiment is to help 'hide' the adhesive, which can be seen through this semi-translucent card stock.  I stamped the 'happy birthday' onto whisper white card stock in basic black classic ink, using Teeny Tiny wishes stamp set by Stampin' Up!.  Then I fussy cut the sentiment and adhered it to the vellum piece.  
I added a gift card to the inside of the card.  That way, my mom can celebrate HER day, anyway she wants: shopping, dining, relaxing at the spa, or simply going to afternoon tea with girlfriends.
Happy Birthday MOM!  I hope your day is fabulous and you get a chance to do what your heart desires.  Love you!
Thank you for stopping by and taking a moment to look at what I have been creating!  Enjoy your day! and come back soon.  I'll be sharing more.


Friday, May 8, 2015

'O' What A Magnetic Monogram!

Howdy!  I'm glad that you stopped by.  I have been busy getting things done post craft fair.  It always takes a bit of work to get things organized and set up for the start of the craft fair.  But it takes a lot of work once you have everything packed up and ready to head home.
You see, products that I don't sell at the craft fair,  need to make sure everything is wrapped correctly. Everything is photographed.  And organized so that I can not put it in my virtual shop over @ Etsy.

I want to share a magnetic monogram that I created.


and here is another view


The magnetic monograms that I sell are a big hit.  The letters measure roughly 4" square.  I paint the letter first.  Then I glue the pattern paper to the letter.  A bit of filing, sanding, inking, and tender care, these letters look wonderfully aged.
I add strips of lace, trim, or multi-loop bows of seam binding.  Or a collection of it all {smile}
I try to make a large variety of letters.  However, I can not find a 'Z'.  So that is about the only letter I don't have.  I'll be busy making more of these gems this weekend.  
I also do custom orders.  So let me know the letter, and then things you love and hate.  An example:  'T', florals, polka dots, buttons and vintage.
Thank you for looking.  I have added this letter and a 'T' to my Etsy shop.  Let me know what you want!