Showing posts with label digital image. Show all posts

Sunday, November 20, 2016

Vintage Noel in Paris Card

Howdy.  I haven't stopped Christmas crafting yet!  I have just been side railed with a few other obligations.  I was baking individual size Lemon Cream Coffee Cakes, 3-inch Traditional French Apple Tarts, and a few dozen Boston Cream Cupcakes.  And  yeah, I had to make pretty gift cards to go with them {smile}.
But, I did find time to make some holiday cards and a few gift bags to match {smile}.
I am playing along with two different paper crafting challenges:  Mix It Up Challenge and Brown Sugar Challenge
So, let's start with Mix It Up Challenge.  They have a sketch and an inspirational photo.  You can use either or both.  How sweet is that?  I used the inspirational photo!


I was inspired by the red and green colors of the holiday photo, along with the holiday theme.
The other challenge I am entering is Brown Sugar Challenge.  These talented ladies have an Anything Goes theme.  Always great ideas from the design team.  They use items from the current sponsor and create some of the most beautiful paper crafts!
here is the card that I made:


Recipe:  I used real red card stock from Stampin' Up!  I just llove the heavy weight.  The pattern paper I used is from a few years ago.  I don't remember who made it, but that is all I have left {frown}.  The green gingham pattern is the reverse side of the holy/polka dot pattern.  
I machine stitched a piece of cream cotton trim and red gingham ribbon to the card front.  Tied a double bow with the ribbon.  I tied a larger double bow with kraft twine and tied a silver Tim Holtz pinecone to the twine.  Then layered my trims:  rat twine and red ribbon.  
I added a dark green glittered paper blossom to the top of the bows.
My focal piece is actually a digital download.  I printed the image on white linen card stock by Paper Trey Ink.  I originally purchased the digital image to print on kraft card stock.  I haven't given up on the idea.  {smile}   I thought this image would look better on white.  To help accent the white polka dots (aka snow falling)

Thank you for looking!  I hope your weekend is wonderful! and creative!


Tuesday, April 14, 2015

Appreciation : Card

Welcome.  If you are stopping by for the first time, please take a look around.  I love paper crafting, but mostly I make cards.  Not always.  My style is typically vintage country chic.  Its a mixture of shabby chic, vintage, and country charm.  You would almost think I live (and work) on a farm.  I don't.  I'd love to have some chickens and tend to my own bee hive.  But, maybe in another life, or when I retire {fingers crossed}.
I have a craft fair coming up, so I am spending my day in my craft room.  I want to make some gift card holders.  But, wasn't sure on the format.  So, I stuck with a card.
The super creative and talented DT over @ Brown Sugar Challenge have a wonderful current challenge:  distress.  I think I can do that {smile}.
here is what I created:


Let me start by saying, I just couldn't make up my mind on the sentiment.  So, I have added several.  Each sentiment has double sided tape on the backs, so you simply remove the protective strip and adhere the sentiment across the white bar on the decorative piece on the little goodie bag.  Super clever, huh?
Recipe:  I started with my favorite kraft card stock from Paper Studio.  I added two different pattern papers for the main panel.  Love the mix of texture and text.  I sponged the edges of the paper with a brown ink.
I added a strip of cream crochet trim and a strip of soft sky seam binding by Stampin' Up!.  Yeah, they are machine stitched.  I also stitched around the text paper.   I made a multi-loop bow out of the seam binding, and added it to the top of the card.  
I found these super cute tiny bags at a major discount store; I purchased them about 6 weeks ago.  I printed these beautiful digital image seed packet covers onto whisper white card stock by Stampin' Up!.  Cut them out, distressed the edges with my thread cutter, sponged brown ink on the edges, and adhered them to the bags.  

I tied a vintage button with kraft twine and hot glued it to the bottom of the bag.  
I purchased a box of these decorative small paper clips (regal clips) from a big box office supply store about 12 years ago.  (yeah, how ridiculous is that?  Anyways, I think you get 100 of them in a box, and I have a few left.)  I tied some soft brown bakers twine that I picked up in the dollar bin at a big box craft store.  Made a tiny tag, and tied this together onto the Regal clip.  

The digital paper I have, has 6 of these seed packet covers, so I am making 6 of these cards.  Each card will have a different color scheme that coordinates with the seed packet cover.  Each card will come with 4 of the sentiments below: happy birthday, thinking of you, thank you, and happy mothers day.  And then at least one other sentiment that goes with the word at the top of the seed packet.  

These little gems will be for sale at my booth at the craft fair at the beginning of May.  Stay tuned.  I will post photos of each card on my Facebook page, when I finish them.
Thank you for stopping by, and I hope you get a chance to play along with the ladies over @ Brown Sugar Challenge.


Thursday, August 14, 2014

Sprite Mojo

my sprite in a jar
Welcome.  I have been a bit busy.  I have been asked to teach a class at a private retreat next week, and well, I have been making a few samples of a mini album I am teaching.  Anyways, along this journey to find some inspiration for my mini album, I stumbled upon this wonderfully creative challenge site.  And, so I have taken a break from creating mini albums to play along.   Sometimes, its good to change your focus, so you can get back on track.
I'm not quite sure how I stumbled upon this challenge blog: Aurora Wings, but I am certainly glad that I have.  This challenge site uses digital images.  I have embraced this new type of images lately.  And this challenge site, asks that you hand color your digital image.  I have to admit, I do love coloring.  There is a certain peace that goes with this activity.  You can't really focus on troubles, or worries.  You need to focus on the task at hand - coloring.  It gives your mind and soul a chance to take a break from the worries and busy-ness of everyday life.  A small retreat for your mind.
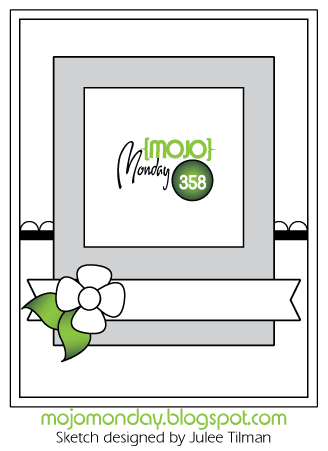
I needed a little direction for my creation, so I went to Mojo Monday, because they have some very easy-to-use sketches.  Here is this week's sketch:

Aurora Wings provided a free digital image this week, for the Sprite challenge.  I want to thank them for doing so.  Their generosity for providing everyone with a free image, is rather sweet {smile}.   I downloaded my free image, and set out to color my little sprite.  This is my first attempt at coloring a digital image.  I typically stamp an image in Staz-On, or heat emboss an image.  Because I typically love to water color.  I wasn't sure how the 'ink' from my printer would hold up to water, so I used my color pencils instead of watercolors.  It was really fun to sit and color.  Here is what I created:


The recipe:  The card base is Cream Cardstock from Paper Trey Ink.  I used Ocean Tides card stock (PTI) for the matt.  I used some scraps I had in my scrap box for the panels.  The yellow pattern paper is from My Minds' Eye and the polka dot pattern paper is from Heidi Swap.  I added a small open scallop trim border with whisper white card stock from Stampin' Up!.  I added some random machine stitching along the sides, and a zig zag stitch across the top of the scallop border.  I used a scrap piece of Melissa Frances pattern paper for the back drop of the jar.  I matted this piece to Ocean Tides card stock.  I added a simple single machine stitch to the piece.  (I repeated the ocean tides card stock matt and machine stitching to keep everything connected.)
I stamp and heat embossed the jar (Friendship Jar stamp set by Paper Trey Ink) onto Vellum Cardstock (Stampin' Up!).  I stamped and fussy cut the jar banner and adhered it to the vellum.  I stamped the bee in Staz-On and used my coloring pencils to color in his body.  The bee is adhered to the card front with foam tape.  
I printed my sprite onto shimmer white card stock by Stampin' Up!.  I adjusted the size of the image to 1 1/2" x 1 3/4".  To color my digital Sprite image, I used four different yellows, two greens, two browns and a black.  I fussy cut him out, and used foam tape to adhere him to the jar.  
I stamped my sentiment from the Garden Variety stamp set (PTI) onto a scrap piece of shimmer white card stock, inked the edges and cut a banner end.  I used hot glue to attach my sun flower and leaf.  I sponged linen ink on all of the edges of card stock and pattern paper.
Thank you for looking.  I hope you have been inspired to play along in either of these challenges, or both!  I have another post today of the second mini album I finished.  Please look for that.  But be aware, it is a photo heavy post.