Showing posts with label the Card Concept. Show all posts

Sunday, February 19, 2017

Love Pink

~ a few photos ~


Howdy, I have been busy making a few different cards, getting my tasks organized, and getting some running done. {smile}  But, I want to share with you, the a card I made today {smile}.
I stopped by a favorite challenge site, for some direction: the Card Concept to see what their current challenge is: Vintage.  I have to say, I am a sucker for text pattern paper, and I just love hearts!


My next stop, is an Eastern European challenge site:  Art-Kladovaya.  These talented ladies have a unique and creative take on paper crafting, so please stop by to see what they have created.  Anyways, their current challenge is:  Shabby Chic.


I used their inspirational photo as my palette.  I love the blossoms, and the pink & white color scheme.
I also want to play along with the wonderful ladies over @ Word Art Wednesday.  Their current challenge is: Anything Goes & Family Friendly.  They include a scripture to include in your paper crafting.  And their post are always inspirational!
and here is what I created:


This is a typical A2 size card: 4 1/4" x 5 1/2".  I added layers of my favorite papers: text, gingham, calendar, and floral.  I inked all the edges of all my papers with a tea stain ink pad.  All of my digital papers were printed on whisper white card stock, by Stampin' Up!.  I love the weight of this card stock, and how beautiful it takes ink.
I started with kraft card stock for the card base.  I just love the color, and the weight.  My first matt, is a text pattern paper from Melissa Frances.  I really like the softness of the cream and deep brown color.  My pink gingham matt, is a digital pattern paper.  I just love this pattern.  I think it adds a softness and vintage look.  {smile}
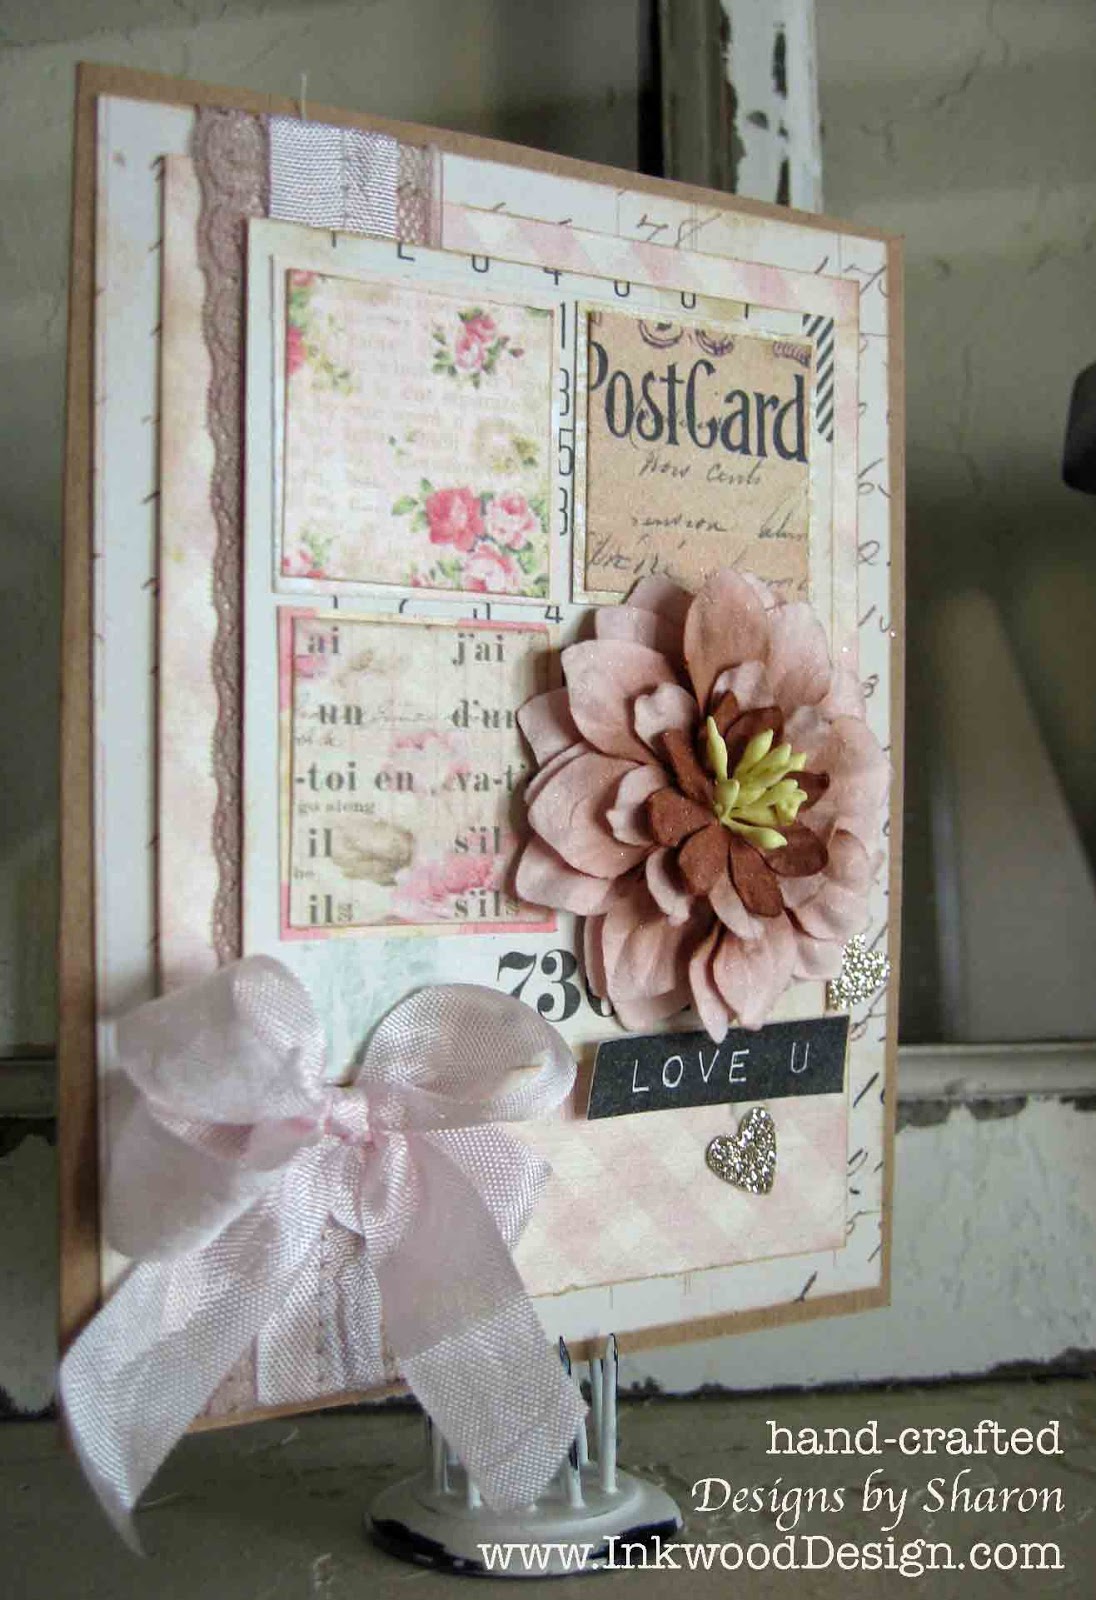
I machine stitched a taupe swiss dot lace and pale pink seam binding to these layered pattern papers.  I also tied a double bow, with the pale pink seam binding.
I cut down a calendar card, to allow the pink gingham pattern paper to show.  I then cut three squares (1 1/2" square) from another digital pattern paper.  I matted each square with a different digital pattern paper.  I just love the mix of patterns & texts.
I added some sparkles to the pale pink & brown paper blossom from Prima.  I adhered the paper blossom to the area on the card, that the missing square should have been placed.
I hand-stamped my sentiment in basic black classic ink, onto whisper white card stock.  I adhered the sentiment with foam tape, to give it some height off my card.  I used a new stamp set: Label Love of Altenew.
I added the champagne glitter hearts to the card front with glue dots.  I felt that it added balance and visual interest to my card.  And finally, I adhered the bow with hot glue.
Thank you for stopping by!  I hope that you have been inspired to play along with any (or all) of these challenge sites.  Now, I'm off to get a few chores done before bed.  


Saturday, January 7, 2017

Echoes of Petticoats & Pinstripes

Good Morning.  Our first weekend of the new year.  I hope you have great plans for the day.  And 'great' can be defined many, many ways.  For me, it is to keep with my new years resolutions: eat better, get more exercise, spend time with those who truly are special to me, make time to create something pretty, and be productive & efficient.  I don't want to waste anymore of my time, on nonsense (people, objects, or projects).
I carved out some time this morning to craft something beautiful.  [I know, that's not shocking, considering that I don't sleep past 5a on weekends.  {smile}]  I noticed three of my favorite paper crafting sites have challenges up this week.  And I really want to play along.  They are very inspirational.
First stop is  the Card Concept challenge.  Their current challenge is titled Pretty Things.  That alone makes me want to craft.  Now, look at their inspirational photo.  Super gorgeous!


Am I right?  I just love the whole photo!  The gold stripe coffee cup, with the blossoms, and dot pattern on the screen!  Oh my beating heart!  The gold zebra is too cute!  This seems too easy!  I used a combination of Clean & Layered, and Classy & Elegant styles for my card.
I had to join an old favorite, Mojo Monday!  Their sketches are super user-friendly!  and this week is a challenge.  Double score!


Ok, when I first saw the sketch, you know I instantly thought of a doily for the circle element, right?
Well, I didn't do that.  I used the smaller rectangle for my sentiment piece, and my bow for the circle piece.  I layered two trims for the green stripe.  And you know I had to add some machine stitching. {smile}
And finally, a very dear, and sweet challenge site: Word Art Wednesday.  These talented ladies always have positive and motivating blog posts.  And their art work is just beautiful!  Their challenges are Anything Goes, Family Friendly.  How refreshing!
here is what I created:


Recipe:  The card base is Sweet Blush card stock by Paper Trey Ink.  Just love this heavy weight card stock.  It makes my cards stand up without falling over.  Also feels nice in your hand.
I used two pattern papers from the Petticoats & Pinstripes collection by Echo Park.  I just love the clean, fresh colors, floral bouquets and interesting 'dots'.  
I cut the floral pattern paper 3" x 5 1/4".  I cut the green 'dot' pattern paper 1" x 5 1/4".  I laid them side by side.  I added a simple border stitch with my sewing machine.
The sentiment i stamped onto shimmer white card stock by Stampin' Up!.  I wanted some 'shine'.  I stamped the sentiment in basic black classic ink, by Stampin' Up!.  I just love the contrast.  I used my Chose Joy stamp set by Paper Trey ink.  This whole set, has inspirational quotes, that are just beautiful!
had to show the gleam of the gold metallic 

I layered my sentiment onto gold striped vellum paper by My Mind's Eye, it's from their Market Street collection.  And yeah, I purchased a whole package of this single sheet (25 sheets of gold stripe vellum)!
I layered two trims for the horizontal rectangle (green strip).  The bottom layer is a white lace, topped with a super pale pink seam binding.  I tied the seam binding into a simple bow.
And finally, I added a trio of gold sequins.  One large sequin just below the bow, and a pair of smaller sequins by the upper right corner of the sentiment block.
And viola! I am done.  Like the inspirational photo, the imagery is clean and not cluttered.  So, I kept my card the same.  Now, I am off to make 9 more cards, as these will go to the ladies who are attending my Christmas Friendship Tea later this morning.  Thank you for stopping by.  I hope you have been inspired to play along with any (or hopefully all) challenge sites.  And that you keep with your new year's plans, whatever they might be {smile}!


Sunday, November 29, 2015

Green & Red Poinsettia Gift Bag

Howdy.  I have been having such a great time making these little fabric scrap Christmas 'trees' that I just had to make another. {smile}.  And today, I am on my second post of these gift bags.  I used the same fabric as the previous post, but this time I created a 'green' bag.
I am entering this bag into these three challenges:  Die Cuttin DivasInky Impressions Challenge, and Crafting By Desings.   
The wonderfully talented ladies over @ Die Cutting Divas have a great holiday preparations challenge:  Tag, Bag, or Box.  Sounds perfect! and let's just admit it, something we need to get crafting, anyways.  {smile}
I am playing along with the creative design team over @ Inky Impressions Challenge.   Their current challenge is to use: Traditional Christmas Colors: Red, Green, and Kraft.  I believe this is right up my alley, so to speak.  The design team has done a wonderful job at providing us with some inspiration.  
I am also playing along with the ever inspiring design team over @ Crafting By Designs.   Their current challenge is themed: getting ready for Christmas.  I think all of us can create something beautiful to play along with their challenge, too. {smile}
Finally, I am using the inspirational photo from the card Concept.  I am not 'playing' along with their challenge, due to the fact, that their challenge site is for cards, and not projects.  But their inspirational photo is very beautiful, home-y, and a bit vintage-country. {smile}

and here is my Green version of my holiday gift bag:


a close-up of the 'tree'
Recipe:  I used green card stock to create the bag shape.  It measures 4 3/4" x 12".  A nice size for that special holiday gift.  {smile}
To create the 'tree' I tied on strips of fabric from a fat quarter set by Stampin' Up!.  It is retired.  But I love the red blossoms, the green accents and the brown patterns.  Very pretty, vintage-y, and a bit country.
I also added some crochet trims, tree tinsel, green velvet ribbon with red satin backing, and a brown gingham ribbon.
The fabric, trims, and ribbons are tied to a kraft striped paper straw.  I topped my 'tree' with a single red paper rose.
I tied on a trio of vintage buttons with kraft twine.
The background and sentiment are hand-stamped using crumb cake classic ink.  I just love how soft and 'innocent' this color looks on vanilla card stock.
I love to add some machine stitching to my hand-crafted cards and projects.  I think it 'finish'es a project, and adds that special homemade touch.  {smile}  I also added some machine stitching to the sentiment rectangle.  
I hope you create something beautiful and holiday inspired, so you can play along with these challenges, too!

Enjoy the rest of your weekend.   And yeah, I have a few more gift bags to share with you.  But, I'll leave those for another post.


Christmas Roses Gift Bags

Howdy.  I hope this post finds you all well, and busy making stuff {smile}.  Me, of course!  I had such a great time making my previously posted fabric scrap 'trees' that I decided to make several more, using various fabric scraps.  Today, I want to share a new red gift bag.
I am entering this bag into these three challenges:  Die Cuttin Divas, Inky Impressions Challenge, and Crafting By Desings.   
The wonderfully talented ladies over @ Die Cutting Divas have a great holiday preparations challenge:  Tag, Bag, or Box.  Sounds perfect! and let's just admit it, something we need to get crafting, anyways.  {smile}
I am playing along with the creative design team over @ Inky Impressions Challenge.   Their current challenge is to use: Traditional Christmas Colors: Red, Green, and Kraft.  I believe this is right up my alley, so to speak.  The design team has done a wonderful job at providing us with some inspiration.  
I am also playing along with the ever inspiring design team over @ Crafting By Designs.   Their current challenge is themed: getting ready for Christmas.  I think all of us can create something beautiful to play along with their challenge, too. {smile}
Finally, I am using the inspirational photo from the card Concept.  I am not 'playing' along with their challenge, due to the fact, that their challenge site is for cards, and not projects.  But their inspirational photo is very beautiful, home-y, and a bit vintage-country. {smile}


and here is my Red Holiday bag:


close-up of the 'tree'
Recipe:  The outside of the bag measures 4 3/4" x 12" .  The 'bag' itself measure 4 1/2" x 9 1/2".  For the base of the gift bag, I used a rich, dark red card stock, very similar to Cherry Cobbler card stock by Stampin' Up!.
I used very vanilla card stock for the main panel, and matted that with my favorite Kraft card shock by Paper Studios.  I used a snowflake stamp set to hand-stamp the snowflake background in crumb cake classic ink.  I just love how 'soft' this color is on vanilla.  {smile}  I added a single border stitch with my sewing machine.  I think it really adds a 'finished' and homespun touch to my projects.
I used a kraft striped paper straw as my tree trunk/branch.  And then I just tied various fabrics, crochet trims, ribbons and trims to the straw.  I then added my tree topper (red velvet bow), and vintage buttons tied with kraft twine.
I trimmed the fabric strips in varying lengths to create the 'tree' shape.  I used hot glue to adhere the 'tree' to the snowflake stamped panel.
The sentiment is from a homespun holiday stamp set by Paper Trey Ink.  And then finally, I added a wooden snowflake to the sentiment rectangle and topped it off, with a green faux half pearl.

I finished the bag with a decorated mini clothes pin, and a gift tag.
Thank you for looking.  I hope you have been inspired to craft something beautiful for your holidays.


Sunday, January 18, 2015

hello, you Card

Welcome!  Sorry I have been absent lately.  I haven't really been paper crafting.  Shocking, I know.  But, I have been trying some different recipes to use the Meyer Lemons a sweet, and dear friend sent me {smile}.  I tried an 'easy' lemon chicken, from the barefoot Contessa.  And it was delicious!  and a Lemon Glazed Zucchini Bread.  I loved it! {smile}.  And a favorite: Lemon Bundt cake by Martha Stewart.   Cooking always gives me a break from the hum of life.  It allows me to slow down and concentrate on creating & crafting.  {smile}  Several of the grand kids did spend a few days at our house.  Anyways!  I did get a chance to head into my craft room, pull out some supplies and craft!  Yahoo!
To help give me some direction, I went to the internet and went to find someplace to play {smile}.  I stumbled upon a challenge site, that I don't believe I have ever played along with.  the Card Concept.  But, I do love their inspiration boards, and their design team will certainly inspire you.  And well, this weeks board really spoke to me!  Look at this!  I was inspired by the blossoms and the colors! (pinks, blush, and green)


I also stopped by a favorite sketch challenge site:  Cardaabilities.  These talented ladies, always have a great sketch, and the design team is sure to inspire you.  Here is their latest sketch:


here is what I created:


To start I need to give you the disclaimer -  this card was not created in simply an hour.  It was rather a labor of love {heart}  I will give you the supplies and tips of creating this card from the base to the last layer.
Recipe:  I used white card stock from Paper trey Ink.  They make great heavy weight card stock that will stand up to an embellished card.  The creamy, tan card stock, is actually Toffee card stock by Amuse Studios.  I just love the soft color.  The floral woodgrain pattern paper, is actually a digital download from a favorite shop of mine @ iralamija.  I added a simple machine stitch along the edge to create a sweet border.
The circle, is actually a cross stitch hoop shape.  I used a die from Paper Trey Ink.  It has a hoop and banner in the set.  I used a piece of a wood sheet, by Stampin' Up! (these wood sheets are retired. {frown})  I brushed clear crackle paint on the wood and then dipped the whole piece into my tub of dazzling diamond glitter.  I cut a 2 1/2" circle from a canvas sheet, by Stampin' Up!.  I sponged some crumb cake classic ink on the canvas circle to help give it some dimension.  I used a liquid glue to hold the canvas piece and the wood piece together.  

I used flowers from Prima marketing.  The larger pink blossom is from their Symphony Blend Amoraso Pink collection (#537852) and the two littler blossoms are from the Cabriole Aqua collection (#566807).  I used my hot glue gun to adhere them to the wooden hoop.   I tied a multi-loop bow with some old ribbon I had on hand.  Its a sheer shimmer vanilla 1/4" ribbon.  I tucked the bow just under the larger pink blossom.
For my banner piece, I stamped my sentiment onto whisper white card stock by Stampin' Up!.  I used Versa Mark ink, and gold embossing powder by Stampin' Up!.  I cut a flag end and an arrow end on the sentiment strip.  I used foam tape at each end, to attach it to the card front.  
I cut my leaves with a leaf die, using some retired pear pizzazz polka dot dap from Stampin' Up!.  And finally, I added a trio of white half faux pearls, by Mellissa Frances to the card front, along with a pair of clear sequins.
This hand made greeting card will be for sale in my Etsy shop.  Thank you for stopping by!  I hope I have inspired you to play along with either of these challenge sites, or simply craft something pretty! {smile}