Showing posts with label dazzling diamond glitter. Show all posts

Friday, May 2, 2014

Bingo!

Happy Friday!  I hope everyone had a tolerable week and is anxious for the weekend.  I know I am.  Well, my weekend already kind of started.  Today, I am at a Craft Fair in Rio Rancho, New Mexico.  I haven't done this venue before, so my fingers are crossed that it will be successful.  Now for me, a successful craft fair, is that I make back my booth rental, and have a fair amount of foot traffic. 
I wanted to share a card I created, it will be for sale at the craft fairs this weekend.
I came across three wonderful challenges:  Sugar Creek Hollow (Bingo), Cardabilities (Sketch), and the Shabby Tea Room (Bingo).


and here is what I made:


Ok, lets get started on the particulars.  For the bingo challenge over @ Sugar Creek Hollow,  I used the right column down (sewing, distressing, and die cut) and the diagonal right to left (sewing, ribbon, and flowers).  For the bingo challenge over @ the Shabby Tea Room, I used the right column down (buttons, polka dots, and vintage trim) and the middle column down (fabric, ribbon, and flowers).
For the recipe:  I used this beautiful pattern paper, I believe it is Teresa Collins.  I like it, because it doesn't have too much going on, so it is beautiful as a supporting, coordinating pattern paper.  As for the gorgeous floral pattern paper!  Oh, my!  I now wish I had purchased 3 sheets of it.  I only bought one (frown).  And it was a purchase I made in Phoenix, so it's not an hour drive into town for me {frown}.  So, I have been hoarding it.  Notice the small scrap?  At first, I was going to accent the pink flower in the pattern paper, but the blue was so much easier to match.  The doily is Martha Stewart.  The white lace trim is from a local sewing store.  The crinkled seam binding is from my stash.  The buttons are Paper Trey Ink vintage in cream, white, and kraft.  The paper flower is from Reflections.  I added white distressing paint and dazzling diamonds glitter to it.  The sentiment is from Verve.  I purchased the stamp set probably 5 years ago.
I machine stitched my card, twice.  I guess for good measure.  (just kidding).  Sewing 'random' is very hard.  I guess it's a habit to sew straight.
Well, thank you for stopping by my little piece of blog-land.  I hope you get a chance to play along in all, some, part, on maybe one of these challenges.  All three sites have wonderful inspirational work by their design teams.  I am off to load the car for my 1st craft fair of the weekend.  


Sunday, April 13, 2014

Save the Date, Mom

~ photo heavy post ~

I hope you are enjoying your weekend.  I am.  I wake up early this morning, because I had a paper crafting idea in my head and I just had to create it {smile}! Had that ever happen to you?   
When I was in Pheonix, I stopped into a vintage, shabby chic style shop, and picked up some gorgeous, and I do mean gorgeous! pattern paper by Teresa Collins: Save the Date.  So, I am set off to craft, and craft I did!  However, I had one little major hiccup.  No sticky strip/scor-tape.  And that is not like me.  I actually went into town yesterday to get some errands done.  And picking up more sticky strip/scor-tape, was one of the errands that I just didn't get around to doing.   Not that I didn't have time, just no motivation.  It was getting late and the thought of running into one more store and standing in one more line was over-whelming, and that errand was skipped {frown}.  So, neither of these two crafts are complete.  So, photographing them, was a bit of a struggle.

here is what I made:


and here are some close-ups:

This is not a card, exactly.  It's another one of those card-gift combo.  I just love making these {smile}.  
I added a soft, gentle brown plaid ribbon to hold the gift box closed.  I didn't want the ribbon to compete with the pattern paper.  I wanted a ribbon that matched, but gets lost with the large flourish pattern paper.

For the top of this tilted piece, I wanted to add something special.  So, I cut a paper doily, and machine sewed some aqua mist dyed seam binding across the top.  I added a multi-loop bow and a pearl brad.
I really wanted to show-off the aqua mist color.  I think it really it's a beautiful shade, and the coral floral print really pops against the aqua pieces {smile}.

I used Soft Suede card stock, by Stampin' Up! to create the outside, main piece.  I used the large flourish pattern as the main panel.  
I used Aqua Mist card stock, to matt the center, main panel.  I thought it really made the floral pattern paper pop!  I love roses, and the colors in this pattern paper is so inviting and refreshing against the cold weather.
I added two rows of machine stitching.  I purposely didn't make straight lines, to give a home-made look.
The reverse side of the rose pattern paper, is this beautiful aqua lattice print.  I matted this piece onto a scrap piece of soft suede card stock.

The leaves were cut from soft suede card stock.  I thought it added a beautiful contrast.  I added three blossoms: Aqua, Coral, and Vanilla.  To add a little pizzazz, I brushed some Picket Fence distress paint along the tips of the petals and added some dazzling diamond glitter.
For the sentiment, I stamped 'happy mother's day' in Baked Brown Sugar classic ink.  I thought soft suede classic ink looked too dark.

And, a card I created with the same pattern paper: Save the Date.


This card, is roughly a copy of the card-box combo I created above.  I did do a 'less is more' concept of this card.  I did the same style of machine stitching on the floral pattern paper.  
I added a decorative edge to the soft suede matt and the aqua lattice pattern paper.  
I added the soft, brown plaid ribbon to the card front.  I tied it in a simple bow sideways, to allow room for a coral colored paper blossom.  I cut some leaves from Aqua Mist card stock.  I added some Picket Fence crackle paint and dazzling diamond glitter to the edges of the blossom and leaves.
A simple, but pretty Mother's Day card, made with some very beautiful pattern paper by Tersea Collins {smile}.  Stay tuned, I will be creating more crafts with these pattern papers.

Thank you for stopping by.  Both of these items will be for sale at my May Craft Fairs.  
I'll have more photos of more crafts soon.  Take care.  I hope you have a chance to craft, and create something beautiful this week!  I need to start working on some Easter themed paper crafts tomorrow {smile}.


Friday, March 14, 2014

Stork Delivery

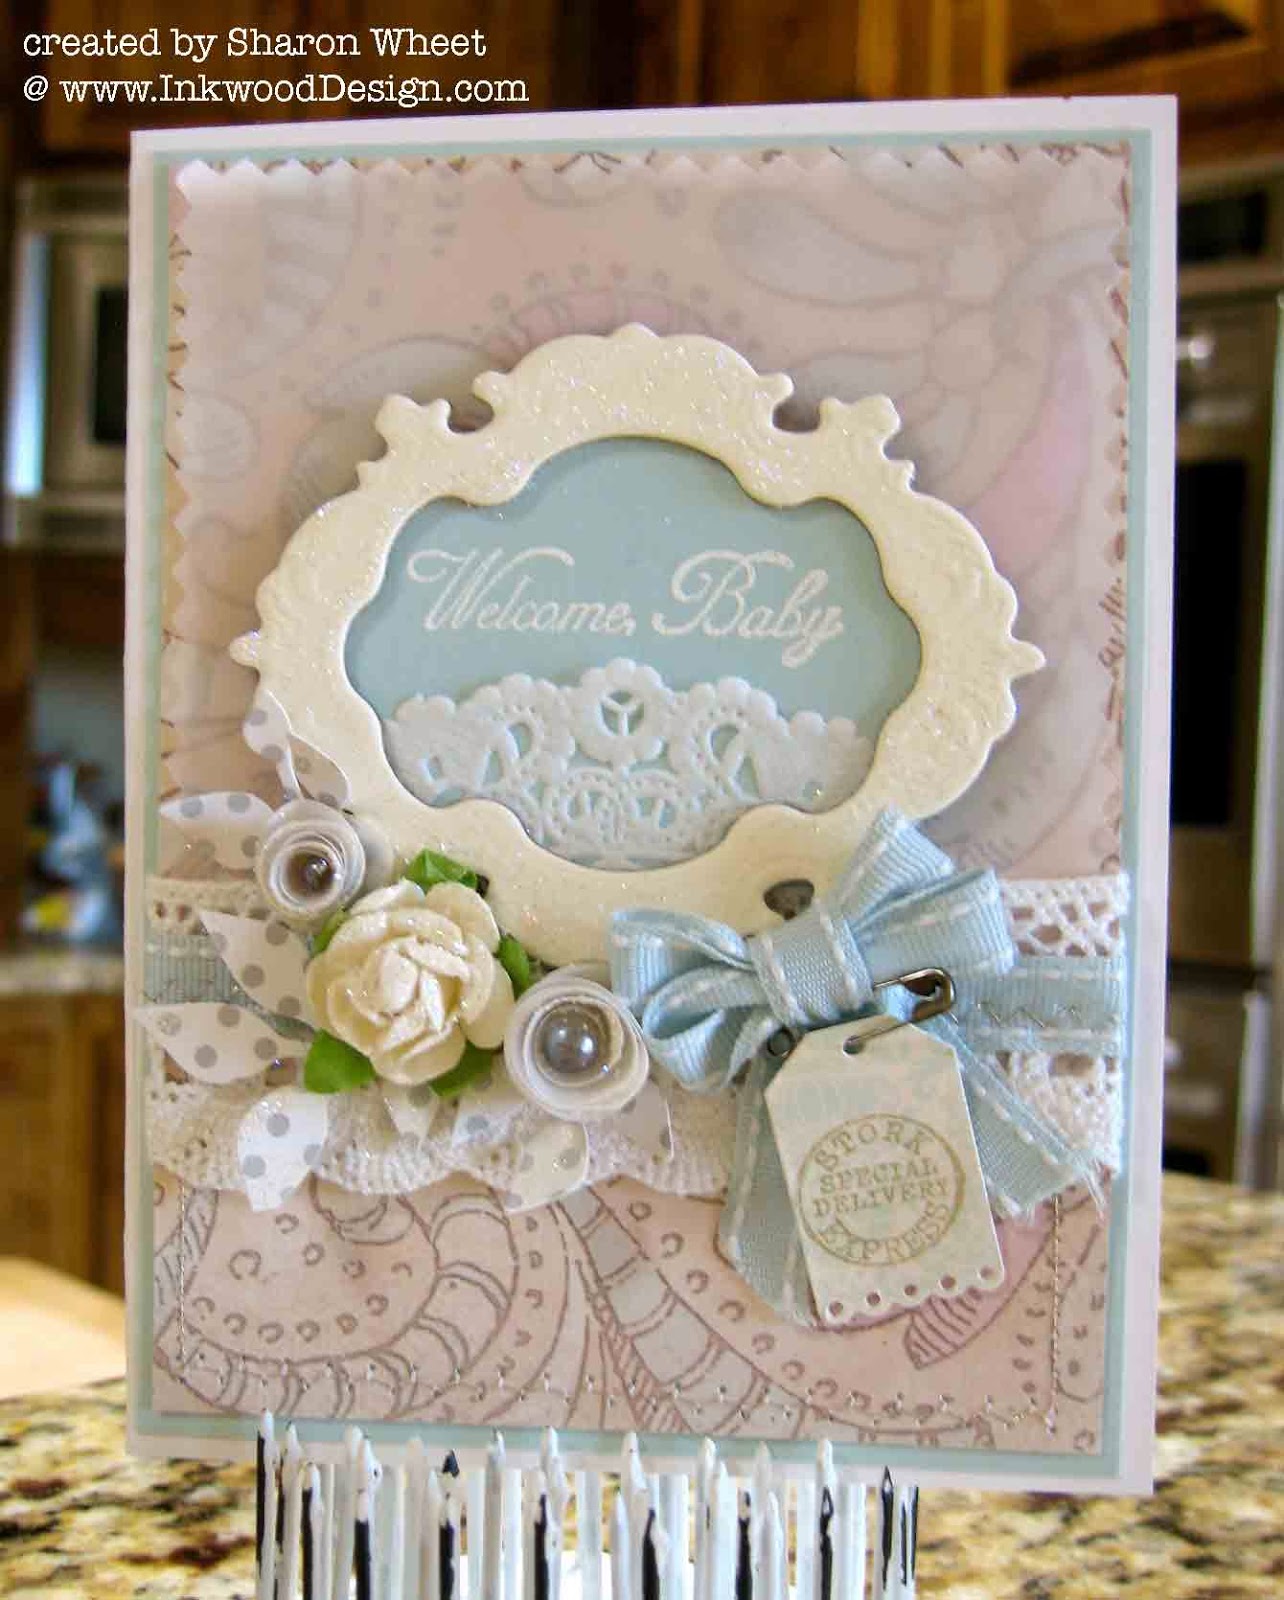
Oh my goodness.  Time just flies these days.  I have a craft fair tomorrow, and I feel like I haven't made a thing to sell.  {frown}   So, let me share with you a sweet baby boy card, and then I must head into my craft room and start creating! {smile}


I opened a delightful package of papers and embellishments from Melissa Frances the other day, and created some soft sweet cards, earlier this week.  Well, I just had to create one more.  Here it is!


Ok, a quick overview and then I must get started on a few other crafts.  I wasn't too wild about this one particular pattern paper.  The colors are soft and pretty but the design is kind of abstract.  So, to soften the whole look, I added a piece of vellum over the pattern paper.  I hope that isn't rude.  To help add some visual interest to the card, I also added some machine stitching using this wonderful silver metallic thread in a zig zag pattern.

Ok, so I have a few of these retired Tattered Angels frames.  LOVE THEM!  I used my TH Picket Fence distress ink to add a bit of a whitewash over the manilla frame.  And while the ink was wet, I dunked it into a tub of dazzling diamond glitter. For the sentiment I stamped and heat embossed in glacier white detail, 'Welcome Baby', onto a scrap piece of pool party card stock.  I added a small piece of a doily to the bottom.
I made two rolled flowers from (2) 1 1/2" circle of vellum card stock.  I added a pearl center, from MF.
I used a die to create the leaf shapes from SU! Neutrals DSP, with the gray polka dot pattern.

I wrapped a piece of white crochet trim over the seam of the vellum card stock.  I added a piece of this gorgeous pool party stitched saddle trim.  To add a little homemade-ness, I used my silver metallic thread and some machine stitching.
I used the same sweet pool party saddle stitch ribbon to make a tiny double bow.
I cute a tiny tag shape from a scrap piece of a pale blue pattern paper.  Stamped the 'Stork Delivery' with an old Crafty Secrets stamp.  I attached the little tag with a tiny safety pin.  I thought it added a little sweetness.  So why not?!
Thank you so much for taking the time to stop by my little piece of blog-land and have a look around.
I will have todays card, and many more, available for sale at tomorrows Spring Craft Sale!  Hope to see you there!


Wednesday, December 4, 2013

Simple Christmas

Welcome.  I haven't been feeling too well this week.  So, this will be short.  
I am playing this week with Mojo Monday.  They have a simple sketch this week, and I just don't' have the energy to add to many extra pieces.
the sketch


here is what I made


I turned the sketch 90 degrees.  I didn't do any stamping.  I used pattern paper from Authentique.  I used their new holiday collection: Glistening.  I love the kraft and cream snowflake pattern paper, and the aqua circle/star pattern paper.  I used pool party card stock and soft suede card stock for this card.  I wrapped some aqua mist satin ribbon around the card front and tied it into a simple bow.  I added some crackle paint to the rim of a kraft button and dunked the button in dazzling diamond glitter, while the paint was wet.  I tied the painted button to the center of the bow with cream twine.
The sentiment piece, is actually a digital piece.  I used foam tape to adhere the sentiment piece to the front of the card.
Easy peasy.  No fuss.  Thank you for looking.  I hope you get a chance to play along with their challenge.  It's the first one of the month, so it is a prize challenge.  Good luck.


Monday, May 27, 2013

a Splash of Daffodil Delight

I love creating.  Paper crafting, is the most accessible for me.  I have a 'ton' of paper crafting supplies, as I'm sure you all do too {smile}.  So, walking into my craft room and sitting at my desk, is as effortless as breathing, for me.  Creating, allows me to express myself, find joy, challenge myself, and it feeds my passion.   I love all kinds of creating; sewing, cooking, baking, cake decorating, paper crafting, and altering common items.   I also love sharing what I love doing.  So, that was the original push to creating this blog - an outlet to share what I make.  However, I don't share so much food, as I do crafting.
Today, I found out that I was last weeks winner @ the Shabby Tea Room, in their 'Open Window' challenge {smile}.  Thank you ladies for selecting my card.  Once I saw their challenge, I kinda already knew what products that I wanted to use.  I just needed to find an hour or so, to sit and create.  I have searched Lauren Meader's shop My Time Made Easy, and I'm narrowing down my choices.  And don't worry, I'll share my creation with you {smile}.
Today, I stumbled upon a different challenge site, Friday Mashup!, and they have a wonderfully creative challenge this week, called Hey, Get the Lead Out! with a wonderful twist: select a neutral with a splash of color, and use your pencil (#2).  Here is their inspiration board:
Here's your Mashup Challenge:
  1. Create a project using "your choice of a Neutral & a Splash of one Bright Color".
  2. Create a project "using a Pencil (regular graphite #2)".
  3. Or Mash it Up and create a project "using pencil & your choice of a neutral & a Splash of a Bright Color".
Ok, so if I told you that my neutral is crumb cake, you wouldn't be surprised, right?  And my splash of one bright color is Daffodil Delight.  And yeah, I used my #2 pencil {smile}.  The talented Lili over @ FM  also included a great tutorial, found here.  
here is what i made:


I used crumb cake card stock for the base of the card.  I had a scrap piece of this beautiful kraft and white floral pattern paper from Basic Grey, little black dress.  This scrap piece was a bit too small, so I matted it onto another piece of crumb cake card stock.  I distressed the edges with picket fence distress paint.  (I love this paint so much, I think I'm addicted.)  I added a strip of a yellow pattern paper from Teresa Collins.  I did a banner end, to give the card stock some pizzazz.  I wrapped a piece of daffodil seam binding around the top and tied a multi-loop bow.  I tied a yellow button distressed with picket fence paint and dazzling diamond glitter, with some cream twine.  I added some random swipes with the distress paint to the bow.  I made the flowers by hand, of course!  I used two different size scallop circles to create these little beauties.  I punched the scallop circles out of very vanilla cardstock and sponged daffodil delight along the scallops, and tightly wound.  I added a tiny floral punch piece from silver glimmer paper as their leaves.
I added some machine stitching around three sides of this card.  I think that little touch, adds a sense of 'home'.
I stamped my sentiment piece onto very vanilla card stock.  I used basic grey classic ink, and stamped off twice.  I used my #2 pencil to trace and shade.  I don't have one of those blending tools, so I used my finger.  I know its not precise, but it worked beautifully.  This technique reminds me so much of the chalkboard technique.  So, it was very comforting to try a new technique, and have a familiarity with it {smile}.
If you want to try your hand at this beautiful technique, please do.  It is rather pretty when you add just a splash of color, as with the challenge restrictions.  But, it isn't a restriction as so, but rather a venue to allow your pencilling to 'shine' and take center stage.  Add your pencil technique to the FM site.


love this card? purchase it here

Monday, May 20, 2013

Paper 'Inspire' Blossoms

Creating is such a wonderful outlet for me.  It allows me to focus on the task at hand, and use the other side of my brain.  If you stopped by yesterday, you saw some beautiful hand-made paper blossoms that I created.  The encouragement came from two wonderfully supportive girl friends, who enjoy paper crafting as much as I do.  Well, after I had made those 'Dream' Blossoms, in a variety of colors, I wanted to create a different looking paper blossom.  So, back into my craft room, I went.
I created these paper 'Inspire' blossoms.  And, I wrote a tutorial, that Amazon Kindle has published.  The e-book is published in a variety of languages and can be purchased and downloaded here.  I also made a pair of these 'Inspire' blossoms to sell in my Etsy shop, here.


Thank you for looking.  I hope you have found some inspiration here, and create something beautiful!


Tuesday, May 7, 2013

Vintage You

There are a few colors that I just love.  Yes, love.  I love the hue, the depth of the richness, the feeling it provokes.  LOVE it.  Pink Pirouette, Soft Sky, Aqua Mist, Latte, Shell, Crumb Cake, River Rock, Sweet Blush, and Vanilla.  These colors are soft, sweet, and perfect for shabby or vintage paper crafts.
But, there are other colors that pair so nicely with these, that it is amazing how wonderful they look together.  My case in point, is this card that I made for the Nacho Average Challenge, this week.  The wonderful ladies over @ NAC, have a great sketch for you to try this week.  
here is this week's sketch:


here is what I created:


I started with Calypso Coral cardstock.  This color is rich and beautiful.  I thought that it help high light my accent colors.  The main panel is actually very vanilla cardstock matted with River Rock cardstock. I used the Very Vintage wheel and River Rock classic ink, to create the background stamp.  I wanted to add some contrast, so I used the Music Notes wheel and basic black classic ink.  I added three separate lines of music notes.  
The blossoms were made from very vanilla card stock, and sponged with calypso coral (outer petals) and pretty in pink (inner petals) classic inks.  I added a pearl jewel to the centers.  I used whisper white craft reinker and painted the tips of the petals and then dumped the whole blossom in dazzlling diamond glitter.  I used old olive cardstock and the build a blossom punch to create the leaves.
For the sentiment strip, I used lace border punch and whisper white card stock to create a decorative edge.  The very vanilla cardstock strip is only 1/2" wide.  I stamped the sentiment in basic black classic ink, using the Loving Thoughts stamp set.  I added a strip of very vanilla seam binding and a neutral glimmer brad to attach this multi-loop bow to the sentiment strip.  
The butterflies were stamped on very vanilla card stock using the Kindness Matters stamp set.  I fussy cut two of the butterflies out.  I scrunched the cardstock to create 3D butterfies.  I didn't want them to look too flat.
I sponged all the edges of all the cardstock with crumb cake classic ink.  I wanted everything to have some depth, and I didn't want the edges to look too 'clean'.  I gave the whole card a spritz (or two) of my home-made white frost shimmer mist.  (Sparkles are pretty!)
Each of us, on the design team, have shared our own  takes on this sketch @ NAC.  However, a majority of us did blossoms {frown}.  But don't let that stop you from using any other object for the cluster.  I know that I would love to see hearts, or a cluster of butterflies, or . . .


~stop by Sunday, May 12th, for your chance to win some blog candy~

Wednesday, May 1, 2013

Altered 'V'

Ok, so I have uploaded my new blog header.  I don't know if I'm totally happy with it.  So, if you come back another day, and it has changed a bit, you'll know my answer to that question.  I thought I already had the codes for the blog background.  Appearently not.  I'll be working on that, too.  In the meantime, here is something new and pretty for you to see!


Have you ever set out to create a few different paper crafts, because you saw these wonderful challenges?  You know what you want to make.  Now, all you have to do is find some crafting time?  That happens to me, more than I would like to admit.  I found a few several challenge sites that have beautiful vintage/shabby chic challenges this week.  The design team really has inspired me to play along.  Now, all I have to do is find the time.  And that obstacle is looking more and more impossible, as this week moves on. {frown}.
So, I'm pulling up my boot straps, and tackling what I can.  (time wise).  Because I don't have any extra free minutes here and there that I can shave off.  You see, I have a few extra requirements placed on me this week.  I know that I will be able to play along in a challenge tomorrow.  And that's about the best I can do this week.
I did want to share a little surprise I have been working on behind the scenes.  I have altered another chipboard letter.  It is for sale in my Etsy shop here.  Here are a few photos:

I used some beautiful pattern paper from Authentique, Grace.  This pattern paper reminds me of my grandmother.  I know that sounds kinda crazy.  But it does.  This small floral print reminds me of her wallpaper.  And the other papers encourage other memories.  So, I went with it.  My grandmother's name was Vivian.  It's easier for me to alter a letter if I know someone who has the same first initial.  And then I create/alter the letter with them in mind.  It's a little weird.  But, its my process.  And I have been quite happy with my results.  
I added a rectangle rhinestone buckle ribbon slide to the front, and weaved my mint green seam binding through it.  I tied the seam binding into a multi-loop bow.  I added some pearls, a button, and a butterfly brad.  I loved how the butterfly had the same colors as the tiny blossoms in the print.


For the paper blosssom.  I started with one of those 'naked' blossoms.  It was white.  So, I sprayed some peach Tattered Angels shimmer mist on the paper blossom, until I was happy with the shade.  I used my picket fence distress paint to the tips of the petals and dunked the whole blossom in my tub of dazzling diamond glitter.  I added a scrap piece of crochet trim.  The leaves I punched with my Build-a-Blossom punch.  I distressed the edges in the same manner as the blossom.  I added a few drops of crystal effects, to give the illusion of dew drops.
Thank you for stopping by.  I hope you get a chance to carve out some crafting time for yourself, and enter a challenge or two.  It really feels good to create something you love and share it with other paper crafters.  Have a good week, and happy crafting! 


~stop by Sunday, May 12th, for your chance to win some blog candy~

Sunday, November 18, 2012

Vintage Zone

Today is my second craft fair.  So this past week, i have been busy working on re-stocking my paper crafts for sale.  Yesterday morning, I started working on decorating some paper bags.  I don't know if I had the right music playing, the 'perfect' papers out, or I was just 'in the zone', but either way I just LOVE what I created.  I really enjoy creating vintage/shabby chic paper crafts, and yesterday was a perfect day for me. Here are some photos of what I created:

This is a food-safe bag.  I stamped the polka dots in white craft ink.  I love how the polka dots resemble falling snow.  Very pretty.  I used a wheel to stamp the lace.  I inked the wheel in basic black classic ink.  
For the tag, I used a decorative die to cut the kraft card stock.  
I printed the digital collage tags on white card stock, to keep the colors true.  I matted the vintage tags onto pink pirouette card stock.  I love how pretty this pink is.  It is a light color, not too much grey, not too much blue.  This color of pink is a soft, light, cool-color of pink.
I used a scallop punch to create the scallop edge in silver glitter paper. I added the scallop trim to the side of the matted tag.
I dyed some white seam binding with spun sugar distress ink.  I crinkled the seam binding, made a multi-loop bow and attached the bow to the matted tag with a rhinestone brad.
I cut a star from some corrugated cardboard.  I painted the edges of the star with picket fence distress ink and dunked the painted star into a tub of dazzling diamond glitter.  I threaded the pink button with thin silver cord and tied a bow.  I attached the button to the star.
To attach the tag to the food bag, I included a wooden clothes pin.  To jazz-up the clothes pin, I painted the top with mod podge and dipped it in silver glitter.
I am planning on giving these bags out filled with home-made cookies, during a cookie exchange I am participating in next month.

I needed a few more paper gift bags for tomorrow's Arts and Crafts Fair, and this is what I set out to make.
For the gift bags.  I covered small paper bags with kraft card stock.  For the pattern paper, I used Market Street by Lost and Found 2. 
I added a decorated tag stamped with 'warm wishes' to help express the feeling of the season. 
I stamped the silhouette of the sledder in black pigment ink and used clear embossing powder to heat set this image.
I used the same corrugated cardboard to cut the snowflake.  I also did the same distressing technique with paint and glitter.  I attached a button to the center of the snowflake.  
I wrapped a piece of crochet trim around the pattern paper, to hide the seam of the two different papers.   I added a TH ticket just below the crochet trim.  I cut a small tag shape from silver glitter paper and used a pink Basic Grey brad to attach the tag to the front of the bag.  I tied some vanilla seam binding into a multi-loop bow and tied a button to the ribbon piece, with some linen thread.
To help hold the bag closed, I tied some kraft twill ribbon at the top.  I added a narrow tag, stamped with a holiday sentiment.

Here is my little dilemma, I just love adore this little gift bag so much, I don't want to sell it.  Have you ever done that?  Created something for your 'shop' or a friend, and then just can't part with it?  To correct this problem, I mass produced some of these gift bags to sell at the Arts and Crafts Fair, and have kept this original one for myself.

Happy Crafting!  hugs, Sharon W.