Showing posts with label Tiny Tags die. Show all posts

Thursday, April 23, 2015

Sew Glad We're Friends, Gift Card Holders

Howdy!  If you stopped by the other day, I shared with you a greeting card, and a decorated mini notebook I crafted using some special pattern papers from Maja Designs and Pion Designs.  Well, I didn't stop there!  I used some of the scraps to make two different, but equally beautiful gift card holders.  I am entering them in a current challenge over @ Word Art Wednesday.  They have an 'Anything Goes, Family Friendly' challenge.  The ladies on this design team, as super talented.  They always include a scripture from the bible, and provide a clip art of the verse to use in your paper crafting.  I however, did not include the scripture.

here is my entry: friends


For this gift card holder, I used a seriously retired pale plum card stock from Stampin' Up!.  I thought this color of card stock matched the background on the pink floral pattern paper.  The scraps I had were a bit narrower than I wanted, so I matted them onto Heather card stock from Amuse Studio.  I like how it compliments the pale plum card stock.  
Anyways, I did some machine stitching, added a scrap piece of white lace.  I have just a few of these half spools left over from a Tilda purchase last year.  [yes, I hoard some things {smile}].  I wrapped a scrap piece of cream crochet trim from Stampin' Up! I had laying on my craft table.  I created another double bow from this pale lavender seam binding.  I stuck in a button stick pin, from a recent Etsy purchase.  I also added a tiny hand made tag, that is hand-stamped with 'friends' in basic black classic ink, by Stampin' Up!.  The inside of this gift card holder is hand-stamped and heat embossed with 'Wonderful You', in pewter embossing powder.


For this gift card holder, I used Lagoon card stock by Stampin' Up!.  Instead of using solid card stock for my matt, I used a scrap piece of this pattern paper.  Its this wonderful grey, charcoal-like color.  It matches the colors in the leaves of the blue floral pattern paper.  [the reverse side, is what I used for the pink lady on the previous gift card holder.]
I added some machine stitching, as well.  I also added a scrap piece of this white crochet trim I recently purchased from Etsy.  I added a pale pink triple-bow, and tied a vintage cream button to the bow.  I made another tiny tag, and hand-stamped the sentiment in basic black classic ink, by Stampin' Up!  This inside is also hand-stamped with 'Wishing you all the Best', and heat embossed with pewter embossing powder.

Thank you for looking!  I am really working on using what I have, and that includes scraps.  I know these are all one-of-a-kind creations, so it will be hard to reproduce them without making another purchase.  I'll have to cross that bridge when I get to it. {smile}


Sunday, December 14, 2014

Jumbo Gift Card Holder

Howdy! and welcome to my little slice of blog-land.  I'm so happy that you could visit.  Sit a spell, have a look around, and hopefully I have inspired you {smile}!
Yesterday, I confessed that I have already started thinking about next years holiday arts and crafts fairs, and a few new items I would like to sell.  Well, today I have a little sneak peak.  {smile}
If you are like me, you do give gift cards to those who either love them, or you aren't quite sure what they would like from their favorite place.  And if you are like me, sometimes these gift cards are purchased from grocery/drug stores.  And yeah, they have this big cardboard piece that advertises who they are, and they have that 'gorgeous' hanger hole at the top.  Sound familiar?  Well, the gift card holders I sell at my booth, only have space for the card.  Crazy, right?  Well, sometimes, you just don't want/can't tear that thing apart to get to the card.  So, I have made a 'Jumbo Gift Card Holder' for just that situation!
Well, to get some direction, I stopped by the Divas by Design challenge blog.  And well, they have a great challenge this week!  Seeing Red!  So they ask that you use lots of red!  And I think I have!


Ok, lets get started.  This is my version of the jumbo gift card holder.  {smile}  It measures 5" x 5 1/2".  In this view, the measurements look 'wrong', but they aren't.  Promise.  Anyways, I'm pretty happy with how it turned out.  I am thinking of possibly making a belly band, to help hold the flap closed, but haven't 'married' that idea yet.  I'm also thinking the belly band could potentially give me another pattern paper, to help give this large piece some more pattern.  I could attach the 3" x 4" 'tag' to it, also.  Hmmm, options, options, options.
Anyways, back to this one.  I used kraft card stock by Recollections for the base.  I used this new 'vintage'-y pattern holiday paper 'Snow Village' by Pink Paisley.  I just love the soft pretty colors and hip patterns.  {smile}
I cut a medium snowflake with the fancy snowflake die by Paper Trey Ink.  I used the gold glitter paper by Stampin' Up!.  Love the glitter/sparkle and shine!  I wrapped some of the new holiday Cherry Cobbler Sheer Linen Ribbon, by Stampin' Up! through the center of the snowflake and tied a simple bow.  I stamped the sentiment onto a tiny tag in Cherry Cobbler classic ink, by Stampin' Up! The tiny tag was made with the Tiny Tag die, by Paper Trey Ink.  The sentiment came from the Holiday Friendship Jar stamp set, by Paper Trey Ink.
I altered a jingle bell, and tied both the bell and the tag to the large bow with some thin silver cord, and made a simple bow with the silver cord.
Just like my other gift card holders, the inside flap of these will be embossed with a holiday message.  
This sentiment card came in the paper pack.  I did stamp the 'Love & Laughter welcome here at Christmas and all year', in cherry cobbler classic ink.  I felt the tag piece needed a little something more.  I hope my friend likes it! {smile}
Thank you for stopping by.  Now, I am off to cut card stock.  I have finished my 'sample' for our holiday Christmas card, and I need to get those made.
If you placed a special order, I will be working on those tomorrow and Tuesday.  Don't fret, I will have those done and ready to wrap by their guaranteed delivery date.  So, until we meet again, happy crafting!  hugs, Sharon W.


Friday, March 14, 2014

Stork Delivery

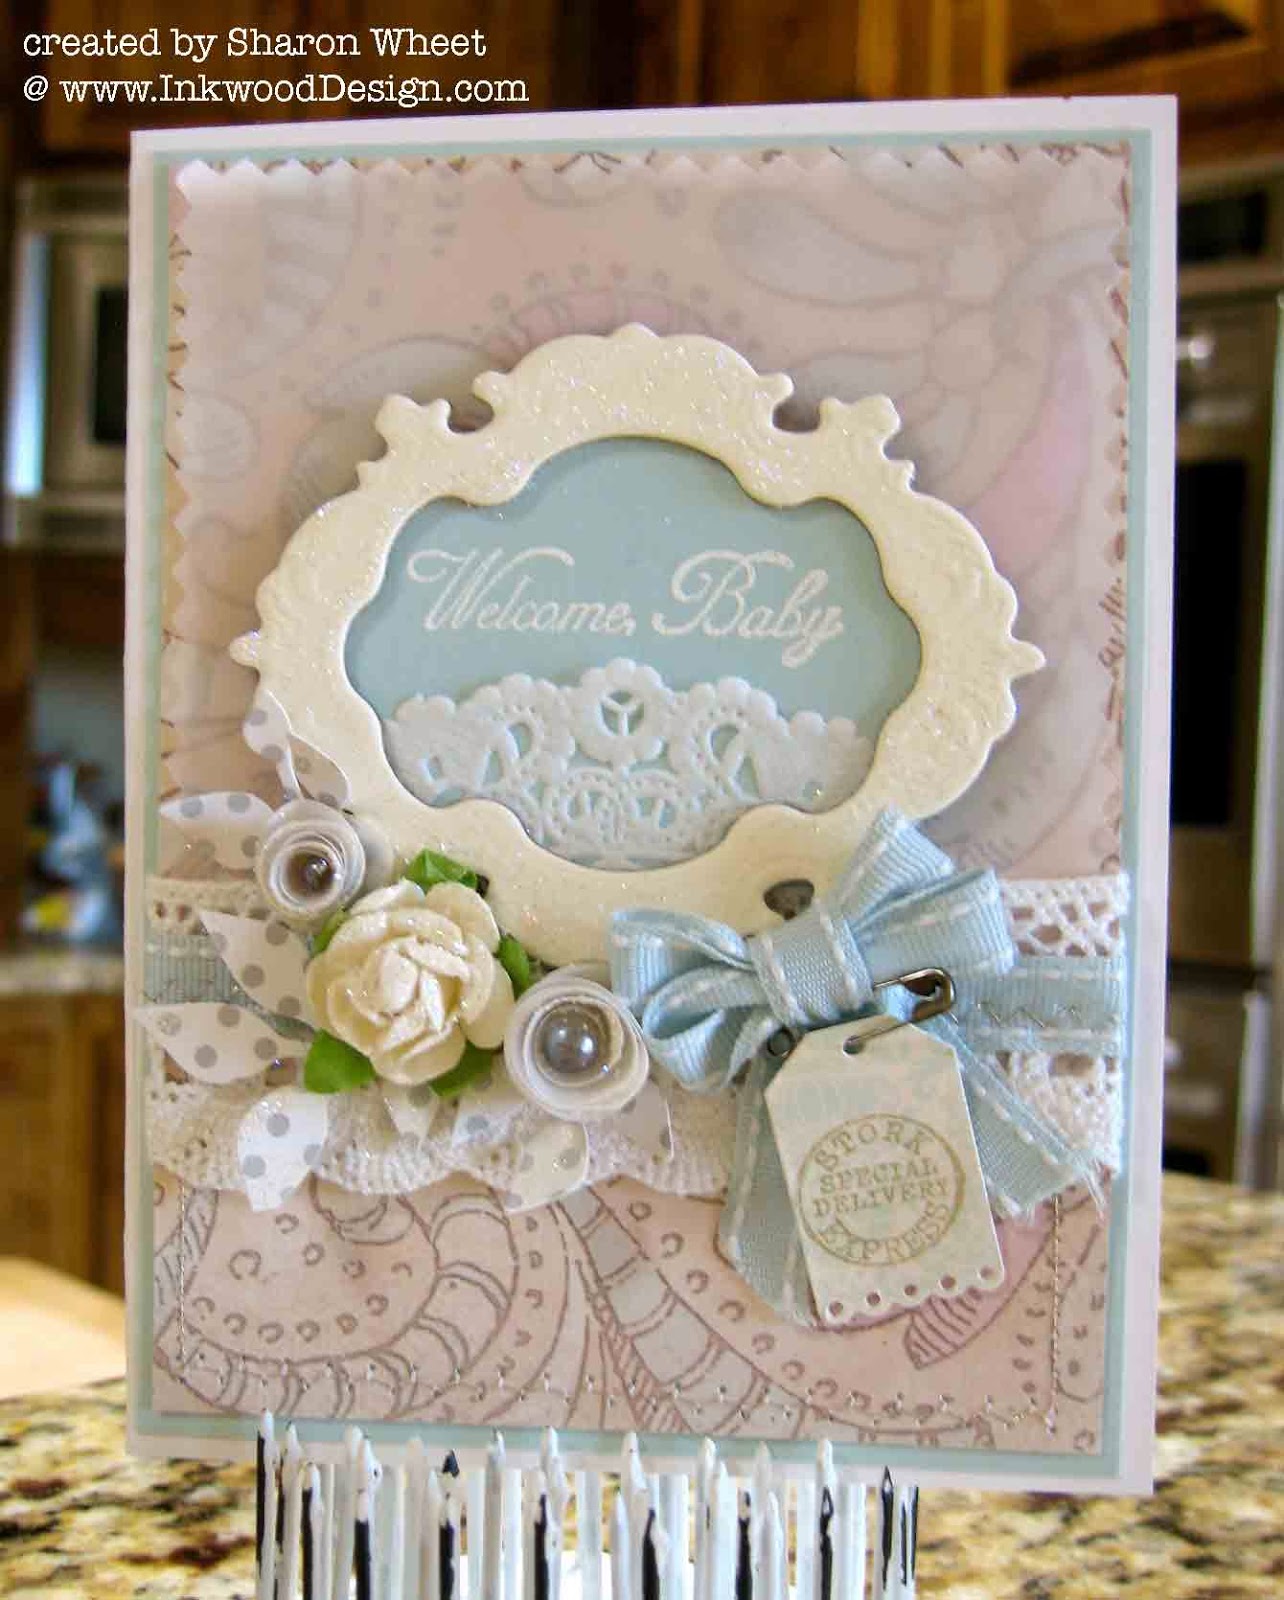
Oh my goodness.  Time just flies these days.  I have a craft fair tomorrow, and I feel like I haven't made a thing to sell.  {frown}   So, let me share with you a sweet baby boy card, and then I must head into my craft room and start creating! {smile}


I opened a delightful package of papers and embellishments from Melissa Frances the other day, and created some soft sweet cards, earlier this week.  Well, I just had to create one more.  Here it is!


Ok, a quick overview and then I must get started on a few other crafts.  I wasn't too wild about this one particular pattern paper.  The colors are soft and pretty but the design is kind of abstract.  So, to soften the whole look, I added a piece of vellum over the pattern paper.  I hope that isn't rude.  To help add some visual interest to the card, I also added some machine stitching using this wonderful silver metallic thread in a zig zag pattern.

Ok, so I have a few of these retired Tattered Angels frames.  LOVE THEM!  I used my TH Picket Fence distress ink to add a bit of a whitewash over the manilla frame.  And while the ink was wet, I dunked it into a tub of dazzling diamond glitter. For the sentiment I stamped and heat embossed in glacier white detail, 'Welcome Baby', onto a scrap piece of pool party card stock.  I added a small piece of a doily to the bottom.
I made two rolled flowers from (2) 1 1/2" circle of vellum card stock.  I added a pearl center, from MF.
I used a die to create the leaf shapes from SU! Neutrals DSP, with the gray polka dot pattern.

I wrapped a piece of white crochet trim over the seam of the vellum card stock.  I added a piece of this gorgeous pool party stitched saddle trim.  To add a little homemade-ness, I used my silver metallic thread and some machine stitching.
I used the same sweet pool party saddle stitch ribbon to make a tiny double bow.
I cute a tiny tag shape from a scrap piece of a pale blue pattern paper.  Stamped the 'Stork Delivery' with an old Crafty Secrets stamp.  I attached the little tag with a tiny safety pin.  I thought it added a little sweetness.  So why not?!
Thank you so much for taking the time to stop by my little piece of blog-land and have a look around.
I will have todays card, and many more, available for sale at tomorrows Spring Craft Sale!  Hope to see you there!


Tuesday, March 11, 2014

Baby Blue

Whew.  It's been a week since I posted.  My apologies.  I have been busy crafting, and getting some new items in my Etsy shop.  But, I did sit down and craft some projects in blue.  The wonderfully talented ladies over @ the Shabby Tea Room have a super fun and creative challenge this week, entitled: Spring is Near. 

Here is their inspiration photo:

Ok, how gorgeous is that?  The requirements are to use baby blue, a bird and spring flowers.  I'm all over that.  {smile}

here is what I came up with:


Ok, I kinda took the requirements literally.   I don't have any embellishments that are flowers, but I have used some floral pattern papers {don't know if that counts}
Anyways, I used some new and not so new pattern papers.  The  bottom main panel is Melissa Frances.  As for the banners:  Paper Studio, Stampin' Up!, Melissa Frances, Authentique, and My Mind's Eye.   That gorgeous saddle stitch ribbon I used is retired Stampin' Up! and so is the stork image {frown}.

How funny that I used a stork for the 'bird'.  Anyways, I stamped the stork in Jet Black Staz-On solvent ink.  I used my blender pen to 'color' pieces of the image.  The baby is colored with blush blossom classic ink.  The baby's sash and ribbon is Bashful Blue classic ink by Stampin' Up!.  I matted the main image onto a piece of sky blue card stock.  I used a watermark stamp and stamped some random water marks.  
The 'It's A Boy' stamp is from Crafty Secrets.   It's probably 5 yr old, so it may not be available any longer, also.

I used my silver metallic thread to sew the saddle stitch ribbon.  I thought it would add a nice sparkle. {smile}

This pretty organza ribbon is bashful blue by Stampin' Up! and it's retired, too.  Good golly, you'd think that I hadn't shopped for a paper craft item in over 2 years.  I created a simple double bow with the organza ribbon.
I created the tiny tag with the tiny tag die by Paper Trey Ink.  I just love the punched heart piece.  The tag sentiment is from a retired stamp set from Stampin' Up! too; tiny tags.  I stamped 'baby' in Jet Black Staz-On, only because I didn't want to get out of my chair to grab my basic black classic ink.  
To attach the tag to the bow, I simply used a tiny safety pin, in distressed silver.  Nothing fancy, but I thought the addition was quite cute {smile}.
Well, that's all for now.  I'll post a few of the other crafts I have been working on, probably tomorrow or the next day.  Just a heads up, they all use about the same pattern papers and ribbons.  Once I got everything out and started crafting, I just couldn't stop.  I don't typically like things to look too similar, but I am beginning to embrace 'change'.  {smile}
Thank you for stopping by.  I hope you have found some inspiration, and play along with the Shabby Tea Room challenge.


Wednesday, February 26, 2014

Baby Girl

I have been busy crafting products for sale at my Spring Craft Fair next month.  And well, I've been making baby themed stuff.  I made a card this time.  I just love how it turned out.  
Anyways, sometimes I need a little direction/inspiration, so I search out some of my favorite 'spots' and it does help.  I knew what papers I wanted to use.  I knew what I wanted to make.  I just needed some guidance to put it all together.  So, without further ado, here is what I created:


I used the same papers that I used for the Card-Gift Combo I created earlier this week.  But, I added a few other 'pieces'.  I kept the main color pink.  Just love pink.  But I also wanted to highlight the aqua mist color, so I matted my yellow pattern piece on Aqua Mist card stock.  I am in love with the pink text/flourish pattern paper from Teresa Collins, so I used it as my main piece.  I'm also loving this silver metallic thread I purchased recently, and just had to use it!


The metallic thread adds just the right amount of sparkle, without looking over done.  I used a sentiment and frame set from Paper Trey Ink: Boutique Borders - Baby Stamp Set.  I just love that piece.  It really gives your sentiment rectangle a bit of flair!  Gotta love flair, right?  I love pairing buttons and bows with baby girl cards/projects.  There is something about the softness, the simpleness of them, that just seems to make it all work.
Anyways, thank you for stopping by.  I hope you have been inspired, or at least loved the eye candy, so to speak.  I'm working on a few 'Spring' themed items (think Bees and Bunnies) for the Spring Craft Fair March 15th, so stay tuned for those.  I should have some photos up by the weekend, if not sooner.  We'll keep our fingers crossed for sooner {smile}.


Tuesday, May 14, 2013

Spring Roses

A dear girlfriend is celebrating her birthday this week.  And, yeah, she is pretty crafty.  In fact, she taught me how to do scrapbook pages.  So, I really want to make her something special.  I created a card and box combination.  That way, one creation does two jobs.
To help get my mojo working, I visited a few different challenge sites, to see what their challenges are this week.  I really needed a starting point: a color combo, a sketch, and a technique or embellishment requirement.  And here is what I found: the Shabby Tea Room (#166),  Mojo Monday (#293), and Just Us GirlS challenge (#188).

color combo:  pink and green
(and include a sewing element):
a button and machine stitching


the sketch:
rotated veritcle

a technique:
(use white ink)
white craft ink and white paint

and here is what I made:

Wow, so where do I start, with my notes.  These card-box combos are alot of fun to create.  You create a card, add on a box, and let you gift 'shine' {smile}.  This template was purchased here.
The card/box base is Vanilla cardstock.  I used Paper Trey Ink cardstock.  It's a heavier weight than Stampin' Up!, because I needed a heavy weight cardstock to hold up to the layers.


We'll start with the front.  I rotated the sketch 90 degrees, so it would be a portrait orientation.  I used a piece of sage shadow card stock, hand-stamped the text with white craft ink, and heat embossed white embossing powder.  I used some digital papers I had on hand.  I selected rose prints that have pinks and greens in them.  I matted the larger paper with shell card stock.  To define it from the main panel.  I then  added some machine stitching.  I didn't use two circles like the sketch.  Instead, I used a circle and a square.  The back square in a text pattern paper.  The forward circle is actually a digital image of pink macaroons.  I think these little cookies are a fabulously-glamorous birthday cookie.  I matted this circle onto a darker green cardstock.  I used white paint to distress the edge of the circle.  I also hand-stamped the doily in white ink and used white embossing powder, on vellum card stock, to create the lace doily.
I used a white/black text pattern paper for my strip.  I also matted it with a beige and ivory floral pattern paper.  I took a strip of pom-pom trim and machine stitched that piece on, too.  I added a hand-made white clay blossom to this strip.
I used two different shades of pink seam binding.  The lighter pink seam binding was tied into a multi-loop and one of my hand-made white clay buttons was tied onto the bow with cream twine.  I added a circle tag.  I hand-stamped 'celebrate' on a circle tag.  I distressed this tag with white paint, and tied it to the bow.  The darker pink seam binding was tied around the card-box combo.  I used a rhinestone brad to secure the seam binding to the spine of the box.  


Ok, for the inside, I continued the white stamping and white embossing.  I used a flourish stamp to add the white swirl to the rose digital paper.  The 'happy birthday' square is hand-stamped in black ink on vanilla cardstock.  The cupcake image is cut from a digital paper.

The front of the box, is decorated with a cream and green pattern paper.  I stamped text onto it, with white craft ink and heat embossed with white embossing powder.  I matted the pattern paper onto mellow moss cardstock.  I added a decorative label with stamped 'Birthday Wishes'.  I added a circle of pink roses.  I also stamped 'friends' in black classic ink onto a different pink floral pattern paper.  I added a heart of silver glimmer paper.
Inside of the box, is two glassine bags of hand-made white clay buttons.  I altered a clothes pin with silver glitter.  I used this glitter clothes pin to hold the two glassine bags closed and together.
I left the back au natural.  Thank you for looking.  I hope you have a chance to play along with your favorite challenge site, too!  It's alot of fun, to create something beautiful for someone.

Saturday, January 12, 2013

Shabby Chic Style

Yahoo it's Saturday!  This has been a killer week at work.  But, I am happy to say that I did get to spend some time in my craft room.  I am the hostess over @ Our Creative Corner.  I wanted to make this challenge with a theme or a style, and let you use the products you have on hand, and either try something new, or really dazzle us with your talents.  The style for this weeks challenge is 'Shabby Chic'.  
The new year has arrived, but let's not forget about the things from our past.  So, create a paper craft item (3-D, scrapbook page, tag, a card, etc.)  in a 'Shabby Chic' style.  Here are some guidelines for this style: Shabby Chic style is generally characterized by a time-worn look that is achieved by inking and distressing.  There are layers of softness that is achieved by the use of ribbon, lace, and crochet trim.  There are feminine embellishments, such as buttons, pearls, glitter, and other sweet embellishments.

Here is what I created: 


I used crumb cake cardstock as the card base.  I just love Stampin' Up!'s version of this color.  It has a creamy richness that is amazing.  I added a soft pink layer, blush by Amuse Studio cardstock.   And then I layered some pattern papers on top of that!  The pink floral pattern paper is a new line from Authentique.  The text paper paper is from Paper Studio.  You can find it at a big-box craft store.  I wrapped a piece of very vanilla seam binding and some new pink lace trim from Stampin' Up!.  I then did a simple machine stitch all the way around the card.  I just love this look.  I added a banner piece of aqua houndstooth pattern paper.  This pattern paper is a new line called vintage chic.  I just love the color and pattern.  I did a few zig-zag stitches.
I took an aqua mist button and added some glue and then dunked it in a tub of fine glitter.  I added a flower shape of text paper under the button.  Then I tied it to the front of a multi-loop bow.  The tag is cut from a tiny tag die.  I purchased this laundry stamp set and have been waiting for the perfect piece to stamp.  So, the three stamps I used are: hand wash, do not iron, made with heart.  I added three blossoms from a flower  trim.  Love the flowers!
I am a big fan of doilies on cards.  So, I added one of Martha Stewart's doilys.  I cut a 1 1/2" circle from a digital download.  Very pretty.  I added some half-pearls, and a silhouette postage stamp.
Not too many layers, but I think it's pretty.  I am really happy with this little gem.  Thank you for looking.  I hope you have been inspired to play along with us @ OCC.

Happy Crafting! hugs, Sharon W.
(love this card? you can purchase it, here)

Saturday, January 5, 2013

Interactive and Beautiful

Howdy!  Well, this year has started just as busy as last year ended.  I was so hoping this year, I'd have a better grip on my time.  And, as you can tell by the tardiness of this post, that hasn't happened yet. {:( }
I am the hostess over @ Our Creative Corner this week.  (super excited about that).  And well, I have known for a  l o n g  time what I wanted to do.  I already had the papers picked out, and the template laying on my craft table.  And well, life got in the way, so I had to push that project aside and tackle some other pressing matters.  But, I stuck in there, and finished it early this morning.
So, the challenge for this week over @ OCC, is super easy and hopefully you have a grand time crafting!   "I thought it would be fun to start off the new year with a gorgeous paper craft item, made with some pretty colors!  The challenge this week, is to use 2 specific colors and a specific object.   The main colors to use for your paper craft item (3-D item, a scrapbook page, a card, a tag, etc.) must be aqua and pink - and any shade will do!  All neutral colors are welcome: white, cream, brown, black, and grey.  And you must include a flower, any kind of flower.  The flower can be hand-made, a stamp, a picture, a digital download, an accent, etc."
To help get you inspired, I created an 'Inspiration Board' that has some very pretty photos in it, with Aqua and Pink, and flowers!
Inspiration Board:
(photos courtesy of Pinterest)

Here is what I created:

For this challenge, I decided to make a Card-Gift combo.  Well, that's what I call them.  They are a combination of a card and gift box.  So, the front of this contraption is the front of your 'card', but when you open it, you reveal the 'gift box'!  I just love making these!   


inside:

outside:

So, on this one, you slide the 'box bottom' out.  How super cute is that?   I have made one that had a flap at the top of the box, here.   This is how I did it:
I used Aqua Mist cardstock (Paper Trey Ink) as my base.  I just love this color.  The blue is cool, light, and easy to pair with.  I then put matts of Blush card stock (Amuse Studio) on all three sides.  I love this color of pink, because it is so soft in its color.  I used one of my all time pattern papers as the main panel, Blush (Lost & Found 2).  I then added a white cotton trim to a dark aqua polka dot pattern paper to the bottom third of the front.  The pink checkered piece is the back side of the floral piece.  I also matted the pink checkered with Blush cardstock.  
The white doily is actually a stamp: Gossamer Lace (Stampin' Up!).  I stamped this image in Versa Mark ink, onto a piece of Latte cardstock (Amuse Studio).  I used ultra detail white glacier embossing powder and heat set the image.  I used my detail scissors and cut it out.  
The 'Cherish' piece is a stamp: Cherish the Moment (Close To My Heart).  I stamped  this image in basic black classic ink (Stampin' Up!), onto a piece of very vanilla card stock (Stampin' Up!) and then hand-cut this piece out.  I matted it onto a scrap piece of Aqua Mist cardstock.  
I added little pieces here and there.  I added 2 trios of faux pearls at opposite corners.   I tied and added a multi-loop bow with Pool Party seam binding (Stampin' Up!).  I added a soft pink paper blossom.  I die-cut a tiny tag (Paper Trey Ink) from very vanilla card stock, and hand-stamped the 'for you' at an angle.  I used a heart-shaped pearl brad (Reflections) to hold the tiny tag to the front of this little cutie.  Finally, I added a round glass 'gem' (Jolee's Boutique) to the bottom right corner of my 'cherish' piece.
I used a Spellbinders die to cut the 'window' out of the box holder.  The 'positive' piece it used as my 'note' area.  I added a scrap piece of the same floral pattern paper to the bottom.  I used my Lots of Tags die (Stampin' Up!) to cut the label piece.  I hand-stamped the simple sentiment from a 'Winter' stamp set (Close To My Heart) in Soft Suede classic ink (Stampin' Up!).  I added a little heart cut from the main floral pattern paper.  I used some First Edition DSP (Stampin' Up!) and a vintage white button (Paper Trey Ink) to create the 'button flower'.
These little 'Card-Gift' Combo's are actually very fun to create.  I purchased a template for this creation @ Creations by AR.
I hope you have been inspired by our design team, and you get a chance to sit down and create something pretty using Aqua, Pink, and a flower!  I hope you join us @ OCC.  

Happy Crafting!  hugs, Sharon W.

Wednesday, December 19, 2012

Frosty Christmas

I have been trying to post a bit more than my usual 3-4 times a week, during these last few days before Christmas.  I want to share a lot of the different things I've made, but also to keep you inspired so you can complete those paper crafts for the holidays.
One of the paper crafts I made this week, is a holiday card for my co-workers.  I give my co-workers a gift card during the holidays.  Last year, I gave each of them a Starbucks gift card.  This year, I wanted to do something a bit more.  I also wanted to present the gift card with a little bit more flair, than securing it to the inside of the card with a glue dot.
Here is the card:


The panel on the front of the card, holds the gift card.  How fabulous, huh?  You just pull down the card stock zipper and the it will open this panel, to reveal the gift card. {smile}

I found this wonderful Winter Frost pattern paper by We R Memory Keepers.  I just love these shades of blue and green, with some grey. I also love the polka dots.  
For the card base, I used Pear Pizzaz card stock by Stampin' Up!.  The first panel is Pool Party card stock by Stampin' Up!.  I cut the pattern papers, so I could get 12 cards out of two 12" x 12" pattern papers.  I cut the grey snowflake pattern paper to 4" x 3".  The green polka dot pattern paper, I cut the paper to 4" x 2 1/2".  I used a piece of white taffeta ribbon to hide the seam where the two pattern papers overlap.
I used a light blue frost texture paper to cut the zipper panel.  I used the Zipper Die, from Paper Trey Ink.  To decorate the front of the zipper panel, I cut the glitter snowflake pattern paper to 2 1/2" x 2 1/2" square.  For the slim pattern paper on the zipper panel, I used the scrap piece of green polka dot pattern paper, I cut it to 1" x 2 1/2".   I have added a pizza gift card under the zipper panel - Dion's.
I used the Tiny Tag die, from Paper Trey Ink to cut the sentiment tag out of white card stock.  I stamped the 'Noel' in Basic Grey classic ink.  I had a package of coordinating crochet doilies, but the package comes with 6, and I needed 12.  So, I cut the doily into quarters.  That way I only used 3.  Now, I still have 3 for other projects.  I added a bow made of Pool Party seam binding.
I added a hand-written message to the inside of each card.  I hope they like them, and thank you for stopping by!  I hope you like them, too!

Happy Crafting!  hugs, Sharon W.