Showing posts with label modern label punch. Show all posts

Friday, February 22, 2013

Every Bunny

Whew, it's finally Friday.  This week has been extra brutal at work.  One of my friends told me yesterday, that she would love to quit her paying job and just stay home: cook, clean, and tote her children to their organized events.  And after the day we had at work, I almost could.  But, I have grown accustom to my pay check.
One of the ways that I keep my sanity, is by creating.  Mostly paper crafts.  But, right now, I'd love to sit at my sewing machine to whip something together.  The thought of sitting at my sewing machine and the humm is like music to my ears.  
On Fridays, the lovely ladies over @ Sketch Frenzy Friday, provide us with a sketch, and we hope to inspire you to play along.  However, today, I am the creator of this weeks sketch!
here is the sketch:

As you know, I am a fan of multiple elements.  And so I have different elements and layers to this weeks sketch.
here is what I created:


The card base is basic grey card stock.  I used some polka dot pattern paper from the Neutral DSP.  I ran a scrap piece of pink pirouette through my Lacey Brocade EF.  I love the delicate design.  I inked the lace wheel with basic grey classic ink and created my own piece of lace trim.  I wrapped a piece of pink pirouette taffeta ribbon around the card, to help hide the seam, and tied it into a bow.  I stamped the sentiment in basic grey classic ink and used the modern label hand-held punch to create the decorative label.  For the focal image, I stamped the bunny in basic grey classic ink, and used my blender pen to color the image.  I stamped the dress portion of the bunny onto pink pirouette card stock and fussy cut the dress.  
I used the framelits labels to create the decorative piece.  To create the blossom, I used the floral fusion die and the buttons #5 for the button center.  I added a trio of pearl jewels in opposite corners, to add a feminine touch.
I love this grey and pink color combo.  I think it looks so elegant.  I also hope that we have inspired you to play along with us @ SFF.

Tuesday, December 25, 2012

Merry Christmas

photo heavy post
I want to wish everyone a very Merry Christmas!  I hope you have received what you wished for.  Me, having the luxury to craft and to share my passions, is my gift.
I have quite a few photos of some home-made gifts, that I will be giving out to family members today.  We go to quite a few family homes.  So, here we go!
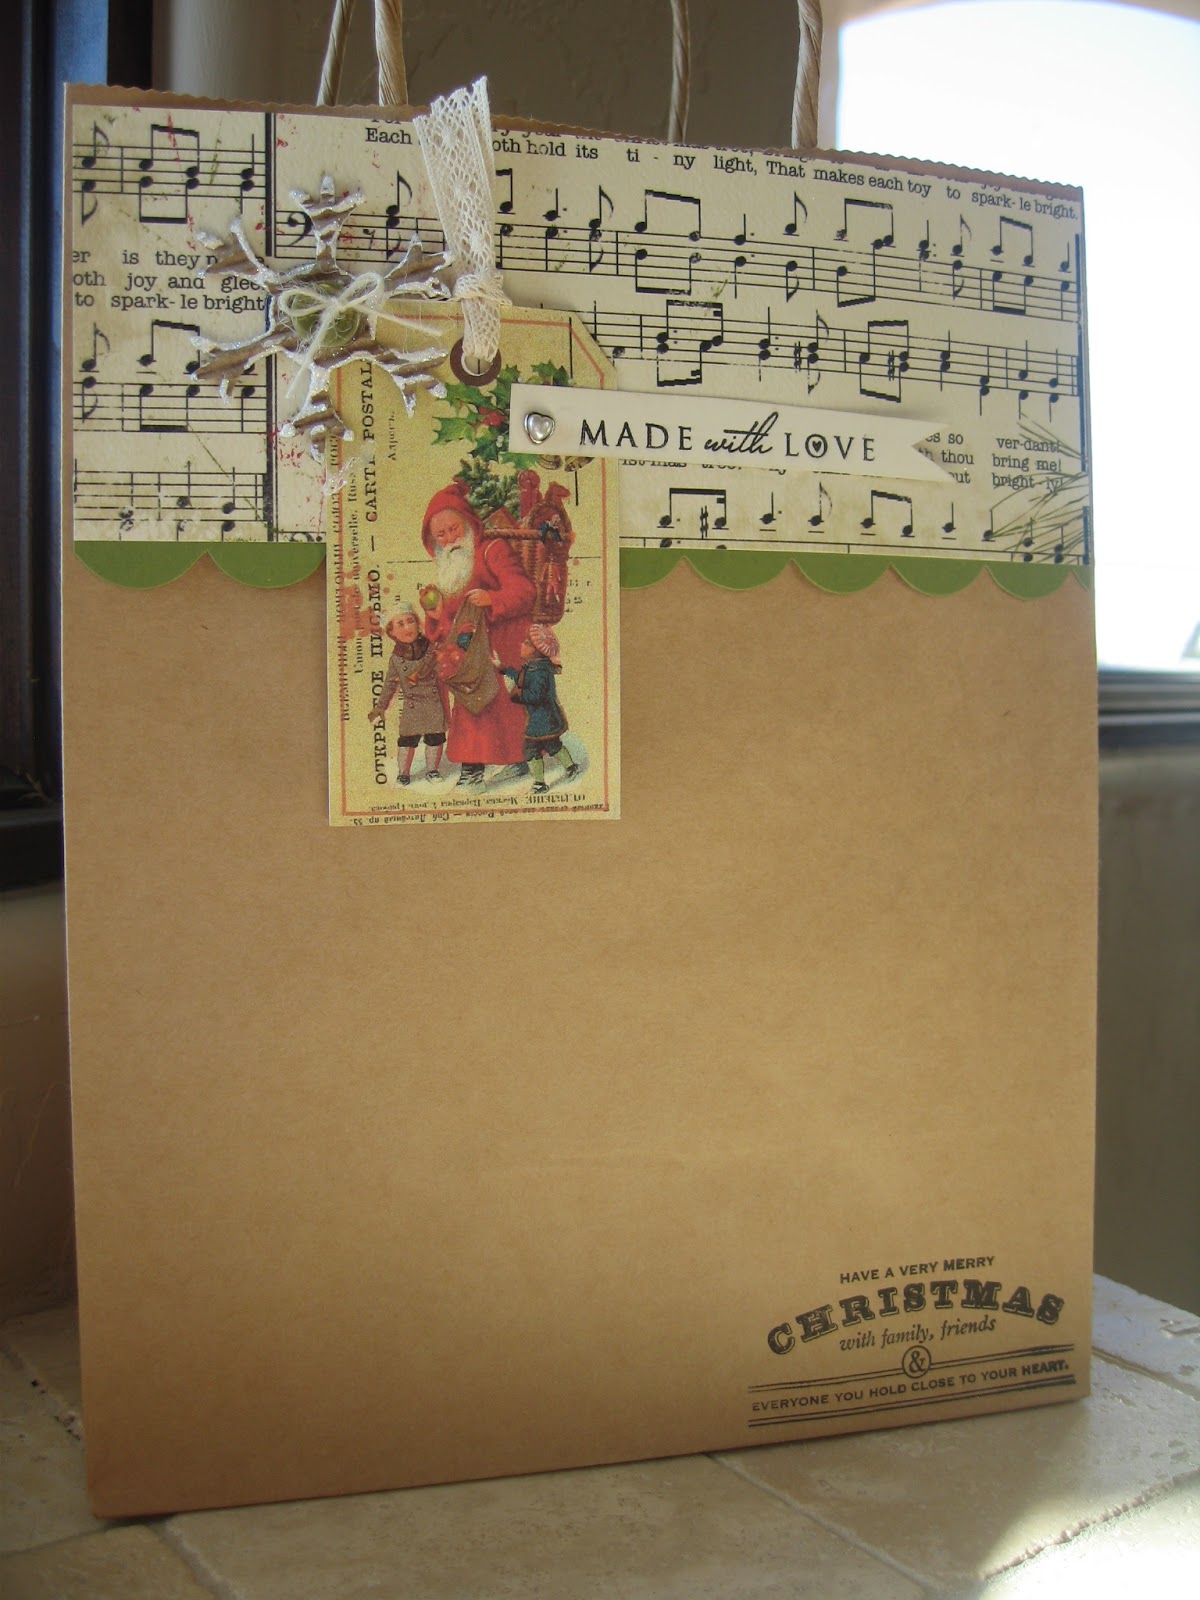
I buy plain kraft bags by the case.  I just love altering the bag to match the gift.  So, I took some medium size kraft paper bags, (with handles) and altered them, with what I had on hand.

gift bags to hold the home-made goodies:

I used 3/4 of a 12" x 12" pattern paper for the toppers.  I cut snowflakes out of coffee cuffs and distressed them with paint and glitter.  I tied cream twine bows onto the buttons, and adhered them to the center of the distressed snowflakes.  The tag is a digital creation.  I stamped the 'made with love' banner and added a heart shaped pearl brad.  I added a green scallop trim to the pattern paper.  I stamped the sentiment on the lower right corner of the bag.  Viola!  I didn't personalize the bags, because I have found that my bags have been re-used for other gifts, so this makes it easier.

close-up of one bag:

 close-up of the sentiment stamped on the lower right corner:

One of my holiday traditions, is to bake Pumpkin-Cranberry bread.  Its moist and super delicious!  You can eat it for breakfast, snack or a dessert.  It also pairs lovely with coffee/latte, tea, or a glass of milk.
I wrapped each loaf in a cello bag, and then tied red ribbon around the bread.  For the tag, I added a digital circle tag.  I printed the type of bread with the computer and used a decorative punch.  The label is adhered to the circle tag with foam tape.

home-made Pumpkin-Cranberry Bread:

 close-up of the tag:

One of my favorite 'candies' during the holidays, is peppermint bark.  And it is super easy and super inexpensive to make.  I put the bark in a cello bag, added a paper doily to the top.  Added a digital circle tag, and my own label.  The label is adhered to the tag with foam tape.  I added a banner piece made from coordinating pattern paper that I had left over from some other holiday creations.

home-made Peppermint Bark:

 close-up of the tag:

I love candied nuts.  They just taste fabulous! and once agin easy and inexpensive to make.  I have a wonderfully easy 10 minute recipe, and so I made a few batches.  My husband also loves them, so I have to make extra!
Once again, I used left over coordinating pattern paper I had from another project.  I used my crop-a-dile to punch the holes.  Strung red ribbon through and tied in a bow.  I added a circle digital creation and my own label to the front.  The label is adhered to the tag with foam tape.  The bags were actually a clearance item from a big box craft store, probably 3-4 years ago.  I purchased them, because they were super cheap, and I knew that I would eventually use them {smile}.

home-made Cinnamon Nuts:

 close-up of the tag:

I hope this has given you something pretty to look at.  Tomorrow, I will be posting some photos of gift card tins we gave as Christmas gifts.   Have a safe and wonderful day!  

Merry Christmas! and Happy Crafting!  hugs, Sharon W.

Friday, November 16, 2012

Sparkle Christmas #140

Happy Friday!  I hope that you have gotten started on your grocery shopping for Thanksgiving.  It's right around the corner, and closer to Thursday it becomes, the larger the crowd at the grocery store.  I did my shopping last night.  And oh my, people's patience is running thin.  So, I needed some alone time.   A chance to sit in my craft room, and create something pretty.  Even though, that was not some folks attitude at the store.
Deb C. over @ Sketch Frenzy Friday has a wonderfully creative sketch for you to try.  Here it is:


Before I show you what I did with this sketch, lets look at its potential!  To start, lets look at the polka dot piece.  You could make this a shape, or you could stamp a background on a section of the card stock.  You could even stamp on a piece of clear card stock to add some visual interest to your card.
For the banner piece, you could make this out of card stock, or add a piece of ribbon.  For the oval piece, this could be your sentiment piece or a decorative piece.   There are a lot of different possibilities for this sketch.
For some color inspiration, I went to the Shabby Tea Room.  They have some of the most creative vintage style paper crafts.  This weeks inspiration photo is sparkle-y, vintage, soft, and simply gorgeous.  Here is their inspiration photo:


The ladies over @ the Shabby Tea Room asks that you use colors found in this photo and sparkle/glitter.  So, here is what I created:


The card base is crumb cake card stock.  The main panel is very vanilla card stock that was run through the vintage wallpaper embossing folder.  I used a scrap piece of dsp and the top note die to create the decorative panel.  I stamped the tree from Lovely As A Tree stamp set in soft suede classic ink, onto a scrap piece of very vanilla card stock.  I used a square punch to create the banner end.  I matted this piece onto a scrap piece of pink pirouette card stock.  I wrapped a piece of crumb cake seam binding around the decorative dsp and tied a multi-loop bow and added a faceted button with linen thread.  I used the silver glitter paper to cut a snowflake with a die.  I added a pink button, and tied a bow with linen thread.  I added various sizes of rhinestones and pearls to the tree.  For my sentiment, I stamped Merry Christmas in soft suede classic ink onto a scrap piece of pink pirouette card stock and the modern label punch.  I adhered the sentiment piece with foam tape to elevate this piece off the card front.

Thank you for looking.  I hope you have been inspired and are able to play along!

Tuesday, September 25, 2012

Vintage Friend

I hope you are having a great start to this week.  Me, it's going pretty well.  And on this Tuesday, I hope you get a chance to stop by the Nacho Average Challenge to play with us!  This week, we have a sketch for you to play with. Here is this week's sketch:


Here is my vintage card:


I have an infinity for shabby chic, and feminine.  And, I just LOVE this color combo I used: Soft Suede, and Calypso Coral.  When SU! came out with this stamp set: Established Elegance, I had to have it!  I just loved the dress form, the button logo stamp, and the flourish.  So, the card base is soft suede card stock.  I just love the soft creamy color.  I added the strip of calypso coral.  But I wanted to jazz it up.  So, I ran it thru the vintage wallpaper EF, and used the new emboss lit to cut the scallop scallops.  I sanded the raised areas and sponged some crumb cake classic ink to this piece, too.  For my tag, I stamped the dress form in soft suede classic ink.  Then I stamped the crown, and button label stamp in calypso coral classic ink.  I added some random flourishes stamped in crumb cake classic ink.  I inked the edges with crumb cake classic ink.  I matted the vanilla tag with some crumb cake card stock.  I crinkled some crumb cake seam binding and made a multi loop bow and attached it the tag with a designer brad in calypso coral.  I added the sentiment tag to the bottom right.  I got this idea from the 'NAC 13' on the original sketch.  I also did some collage stamping for the sentiment tag.  I also matted the tag with crumb cake card stock.  I wanted to keep everything uniform.
Now, don't forget to stop by the rest of the design team's blogs to see what they have created!  I hope you find some inspiration! and please do play along with us @ Nacho Average Challenge.  

Thursday, June 9, 2011

Just a Note

I have made ONE card for THREE challenges!  How efficient!  So, check them out!
Color Challenge:  Creative Sketches has a color challenge this week.  The colors are:  Real Red, Wild Wasabi, Soft Suede, & Whisper White!  These are beautiful together!  Please stop by and see what else the design team has created!  These are super talented ladies, and I am sure you will be inspired!
Sketch Challenge:  Just Us Girls, this week, it is sketch #87.  When you first look at their sketch, you think 'I can do that!' and you should!   I love user-friendly sketches.
Technique Challenge:  The Shabby Tea Room.  Week #65 - Embossing.  Wet or Dry.  See, how fun is that?
 Here are the inspiration boards:

   Creative Sketches - Color Challenge
 Just Us Girls - Sketch Challenge
 Shabby Tea Room - Technique Week

Here is my card:

close-up of the bird
close-up of the flower
Ok, alot is going on here, so grab another cup of coffee, (or other favorite beverage) and have a seat.  
The card base is Soft Suede.  I cut the main panel just slightly smaller than the card front.  Inked my Sanded background stamp in Soft Suede classic ink.  I then ran the stamped panel thru the Big Shot inside an embossing folder to give the main panel some interest.  And dry embossing!  Next, I made my tag.  I cut some Whisper White cardstock to an appropreiate size.  I first stamped the swirl in Soft Suede classic ink.  Then the flourish (Friends 24-7) in Wild Wasabi classic ink.  I sprayed the tag with Log Cabin Smooch spray, and one spritz of Gold Smooch.  I cut two circles from Wild Wasabi card stock and Wild Wasabi DSP, and used my Crop-a-Dile to create the hole and set my green eyelet.  I ran some Early Espresso Baker's twine thru the hole and tied a bow.  I made my flower with Real Red cardstock and used the Birds & Blooms die set.  I used some foam tape between the flower layers to seperate them.   I used the 2-step Bird punch and some Wild Wasabi DSP to make the leaves.  The bird  (Notably Ornate) is stamped in Soft Suede classic ink, and then again in Versa Mark, and heat embossed with clear EP.  I made the oval tag by coloring my stamp with both a Soft Suede and Wild Wasabi markers, and used the extra large oval punch.  My sentiment (Notably Ornate) is stamped in Soft Suede classic ink and I used the Modern Label punch to create the tag.  I lifted the tag off the card front with some foam tape.


Sunday, May 15, 2011

One Fold and Three Techniques

I have two card clubs.  A Saturday card club, and a Sunday card club.  My card clubs run from July-Nov and February-May.  We take off in December and January due to the weather, holidays, schools out, and folks are already too busy to ad one more thing.  So, we meet a total 9 times in our 'year'.
For this clubs' cards, I wanted something new and creative!  So, I was searching the internet and I found a great technique @ Stamping 411:  Faux Mother of Pearl.  So, I went over to SplitCoastStampers to see what they had on the technique and to look at their gallery.   I was looking for some creative inspiration, and found a wonderful layout @ Stamping 411 Sketch 203. I knew that I wanted to teach this technique, and this is the card we made:

On the Grow stamp set


So, now onto the second card.  The ladies in Sundays' club, love a challenge.  So, I saw this fabulous fold on SplitCoastStampers: Side-Step Card.  On their home page, they also have a tutorial (from May11th) on how to create paper buttons.  I thought this would be fun. One of the things I really enjoy doing, is making my own embellishments, so everything is matchy-match.  And, I don't want to spend good money on paper crafting that I can easily make myself.  This second card has alot going on; a fancy fold, paper piecing, and making our own paper buttons!  And this is the card we made:

 Chic Boutique, Puns from the Past, & With All My Heart stamp sets

Thank you for looking.  If you are interested in joining one of my new card clubs please contact me, we start again in July. If you are outside the area, I can mail your kit to you, along with the kit instructions, supplies list, and materials.  Each club member selects which month they want to be the hostess, and must place a minimum club order of $20 each month we meet: July-November 2011 and February-May 2012.  Have a great week!


Tuesday, March 22, 2011

WMSC39 & JUGs76

I was browsing the Internet on Sunday, and found these two challenges! Waltzing Mouse Sketch Challenge #39 and one of my favorite places, Just Us GirlS #76. Waltzing Mouse is doing a sketch challenge that I thought looked fun to play. Just Us GirlS is having a color challenge, that looked interesting. So, here is what I came up with. The colors are Baja Breeze, So Saffron, Soft Sky and Pink Pirouette. Now, at first I thought, oh vintage! I love to do vintage! But, this is suppose to be a challenge. So, what about a baby card? I don't really do baby cards. So, I decided my theme would be 'baby', non-gender specific. Now Waltzing Mouse has these fun pennants in the sketch. I don't have pennant dies, stamps, or punches. So, its a challenge, think sharon. What about using a word punch, with a twist? So, that's what I did. I used the modern label punch and folded one end over. Viola!
Now the hard part. Baby theme, with not too much baby stuff. So, I scrounged, and searched. I put all my baby stuff out. Ok, it consisted of three stamp sets, one package of pattern paper, and no embellishments. Pretty sad, huh. So, I used two stamp sets and one sheet from the baby paper. I found this scrap pretty floral circles, in my stash, and one lone doily tag. Viola!
I must have stamped that one-sie ten different times. Each time coloring it, a different color combination in the color scheme. Then, it struck me. What if you flocked it in white and used So Saffron to color the trim? And it worked!
I used linen thread to hang the pennants. I added those cute tiny bows by the brads to help connect it to my card. No sponging. It was hard to resist at first, but I'm really pleased with the end product.
Let me know what you think!