Monday, November 30, 2015

A Sweet Card For You

Howdy!  Well, don't fret, I don't have another gift bag to share with you {smile}.  I changed gears for a bit.  The switch up helps me re-evaluate what I'm working on.  And the change of focus, actually helps get stuff done, and the creativity can flow easier, or at least for me.
I stopped by Mojo Monday to see what their current sketch looks like.  And boy oh boy, does that design team come up with some fantastic sketches!

I have to admit, when I saw the break between panels, I was a bit stumped.  But, look what I made!


I did stay with the 'tall & skinny' sketch.  This finished card measures 3 1/2" x 5 1/2".    And the recipe:  I started with Mint Macaroon card stock by Stampin' Up!.  I used three different pattern papers from Authentique 'Infusion' collection.  The black text is the back/reverse side of the macaroon pattern paper.
I adhered the macaroon and floral pattern papers to a matt of mint macaroni card stock.  I added machine stitching to this piece, to add a little homespun touch.  {smile}
I added the scallop piece, where the break is in the panels.  
I added a dark pink paper blossom to the top of this main panel piece.  I added two leaves to the blossom in place of the banner pieces.  I wanted a little more sparkle, so I added a 'ribbon end' piece cut with silver glitter paper.  
I changed the small square with a 2" circle.  I also added my sentiment to the circle piece.  I stamped a sentiment from the Timeless Love stamp set, by Stampin' Up! in Basic Black archival ink.  I don't own a 2 1/4" circle punch, so I simply added the sentiment circle to a piece of mint macaroon card stock and hand cut the circle.  I used a piece of sand paper to smooth out the rough uneven edges.  I adhered the circle to the front of the card with foam tape.
And to add a little pizzazz, I added a trio of marshmallow sequins to the card front.
This card will be in the mail tomorrow for a friend (Cathy).  I've been thinking of her lately, and hope all is well.  And this is the best kind of snail mail to receive! {smile}


Sunday, November 29, 2015

Green & Red Poinsettia Gift Bag

Howdy.  I have been having such a great time making these little fabric scrap Christmas 'trees' that I just had to make another. {smile}.  And today, I am on my second post of these gift bags.  I used the same fabric as the previous post, but this time I created a 'green' bag.
I am entering this bag into these three challenges:  Die Cuttin DivasInky Impressions Challenge, and Crafting By Desings.   
The wonderfully talented ladies over @ Die Cutting Divas have a great holiday preparations challenge:  Tag, Bag, or Box.  Sounds perfect! and let's just admit it, something we need to get crafting, anyways.  {smile}
I am playing along with the creative design team over @ Inky Impressions Challenge.   Their current challenge is to use: Traditional Christmas Colors: Red, Green, and Kraft.  I believe this is right up my alley, so to speak.  The design team has done a wonderful job at providing us with some inspiration.  
I am also playing along with the ever inspiring design team over @ Crafting By Designs.   Their current challenge is themed: getting ready for Christmas.  I think all of us can create something beautiful to play along with their challenge, too. {smile}
Finally, I am using the inspirational photo from the card Concept.  I am not 'playing' along with their challenge, due to the fact, that their challenge site is for cards, and not projects.  But their inspirational photo is very beautiful, home-y, and a bit vintage-country. {smile}

and here is my Green version of my holiday gift bag:


a close-up of the 'tree'
Recipe:  I used green card stock to create the bag shape.  It measures 4 3/4" x 12".  A nice size for that special holiday gift.  {smile}
To create the 'tree' I tied on strips of fabric from a fat quarter set by Stampin' Up!.  It is retired.  But I love the red blossoms, the green accents and the brown patterns.  Very pretty, vintage-y, and a bit country.
I also added some crochet trims, tree tinsel, green velvet ribbon with red satin backing, and a brown gingham ribbon.
The fabric, trims, and ribbons are tied to a kraft striped paper straw.  I topped my 'tree' with a single red paper rose.
I tied on a trio of vintage buttons with kraft twine.
The background and sentiment are hand-stamped using crumb cake classic ink.  I just love how soft and 'innocent' this color looks on vanilla card stock.
I love to add some machine stitching to my hand-crafted cards and projects.  I think it 'finish'es a project, and adds that special homemade touch.  {smile}  I also added some machine stitching to the sentiment rectangle.  
I hope you create something beautiful and holiday inspired, so you can play along with these challenges, too!

Enjoy the rest of your weekend.   And yeah, I have a few more gift bags to share with you.  But, I'll leave those for another post.


Christmas Roses Gift Bags

Howdy.  I hope this post finds you all well, and busy making stuff {smile}.  Me, of course!  I had such a great time making my previously posted fabric scrap 'trees' that I decided to make several more, using various fabric scraps.  Today, I want to share a new red gift bag.
I am entering this bag into these three challenges:  Die Cuttin Divas, Inky Impressions Challenge, and Crafting By Desings.   
The wonderfully talented ladies over @ Die Cutting Divas have a great holiday preparations challenge:  Tag, Bag, or Box.  Sounds perfect! and let's just admit it, something we need to get crafting, anyways.  {smile}
I am playing along with the creative design team over @ Inky Impressions Challenge.   Their current challenge is to use: Traditional Christmas Colors: Red, Green, and Kraft.  I believe this is right up my alley, so to speak.  The design team has done a wonderful job at providing us with some inspiration.  
I am also playing along with the ever inspiring design team over @ Crafting By Designs.   Their current challenge is themed: getting ready for Christmas.  I think all of us can create something beautiful to play along with their challenge, too. {smile}
Finally, I am using the inspirational photo from the card Concept.  I am not 'playing' along with their challenge, due to the fact, that their challenge site is for cards, and not projects.  But their inspirational photo is very beautiful, home-y, and a bit vintage-country. {smile}


and here is my Red Holiday bag:


close-up of the 'tree'
Recipe:  The outside of the bag measures 4 3/4" x 12" .  The 'bag' itself measure 4 1/2" x 9 1/2".  For the base of the gift bag, I used a rich, dark red card stock, very similar to Cherry Cobbler card stock by Stampin' Up!.
I used very vanilla card stock for the main panel, and matted that with my favorite Kraft card shock by Paper Studios.  I used a snowflake stamp set to hand-stamp the snowflake background in crumb cake classic ink.  I just love how 'soft' this color is on vanilla.  {smile}  I added a single border stitch with my sewing machine.  I think it really adds a 'finished' and homespun touch to my projects.
I used a kraft striped paper straw as my tree trunk/branch.  And then I just tied various fabrics, crochet trims, ribbons and trims to the straw.  I then added my tree topper (red velvet bow), and vintage buttons tied with kraft twine.
I trimmed the fabric strips in varying lengths to create the 'tree' shape.  I used hot glue to adhere the 'tree' to the snowflake stamped panel.
The sentiment is from a homespun holiday stamp set by Paper Trey Ink.  And then finally, I added a wooden snowflake to the sentiment rectangle and topped it off, with a green faux half pearl.

I finished the bag with a decorated mini clothes pin, and a gift tag.
Thank you for looking.  I hope you have been inspired to craft something beautiful for your holidays.


Saturday, November 28, 2015

Scraps of Trim 'Tree'; Gift Bag

Howdy.  Whew.  I'm been busy.  Busy like everyone else!  This was a big week to cook; which I love!  I really do enjoy baking and cooking.  Creating beautiful, delicious food is one of my passions.  I think food should not only look great, but taste great!  Thanksgiving, is my husbands favorite holiday, because of the food.  Funny, huh?  
One of my other passions is crafting.  Mostly paper crafting.  I love to create beautiful things out of paper.  I made a 'tree' out of scraps of fabric, and totally loved how super cute they came out.  And while I was visiting some of my favorite challenge sites, I read the post of 'Lace' @ Shabby Chic .  It did give me an idea on making a 'tree' out of scrap pieces of lace, crochet trim, and ribbon.  I am pretty happy with they came out.  [they, I made two {smile}].
I am entering a few challenges today with my little creation:  Love to Scrap  , Die Cutting Divas , Scrap & Craft Inspiration , and Crafting By Designs.
The talented ladies over @ Love To Scrap! , will surely inspire you with they variety of creative styles.  Their current challenge:  Anything Goes.
The talented ladies over @ Die Cutting Divas, have a current challenge: Tag, Bag or Box.  You should see the great boxes, bags, and tags these ladies made.  Very inspiring.
The design team over @ Scrap & Craft Inspiration have a current challenge: Shabby Chic or Vintage.  These creative ladies are located in Europe.  and therefore, their styles of crafting is very layered, with lots of embellishing.  Very beautiful, very inspiring,  and very creative.
And finally, the lovely ladies over @ Crafting by Designs, have a current challenge: Get Ready for Christmas.  I strongly encourage you to take a look at this creative design team's entries.  Just lovely!
here is what I made:


I used crumb cake card stock for the 'bag'.  I used a gold card stock as my matt.  I think it adds a bit of  glamour to my bag.  I used shimmer white card stock for the main panel.  I stamped my three different size snowflakes in two different kraft colored inks: crumb cake classic ink, and classic kraft ink.  I used my sewing machine to add a 'homespun' look to my bag, by sewing a simple border.  
I collected my trims: crochet trims, cotton trims, ribbons, and thin tinsels, and tied them around a cinnamon stick.  I added a trio of buttons.  I tied them on to the cinnamon stick with a gold, silver, and cream twine.  And I added a Melissa Frances rhinestone button to the top of the cinnamon stick.
My sentiment is stamped and matted the same way I did the main panel of the bag.

close-up of the buttons:


Thank you for looking.  I hope you have been inspired to create something beautiful, too!  And join these two challenges.  


Tuesday, November 24, 2015

Blue Fabric Scrap Holiday Tree Gift Bag

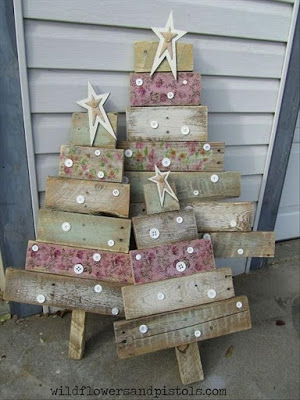
Howdy!  Oh boy!  I had so much fun making my other 'tree', that I decided to make another. {smile}  The wonderfully talented and inspirational ladies over @ the Shabby Tea Room have a current challenge O' Christmas Tree, and the inspirational photo is just to die for!  Super adorable and simply country!

Look at these layered/stacked strips to create Christmas trees!  The distressing, the buttons, and the pretty stars make these simply beautiful!
I am also entering this holiday gift bag in the current challenge over @ Unicorn Challenge Blog.  Their current challenge:  Christmas is Coming, and I think these bags are perfect!


and here is my other fabric scrap 'tree':


I had so much fun making the first one, that I just had  to make another!  I used Pool Party, Real Red, and silver accents to create this ice-y holiday gift bag.  
I used fabric (retired) from Stampin' Up!.  The ribbons and trims are from various makers.  (notice the red velvet ribbon?  purchased that on sale!)  I tied on buttons (retired) from Stampin' Up! and Paper Trey Ink, using the current silver thin cord from Stampin' Up!.  
The snowflakes stamped on the shimmer white card stock are retired from Stampin' Up!.  I used going grey classic ink, by Stampin' Up! to create the background and sentiment piece.  
Once again, I added machine stitching.  I think it just adds that homespun look and feel.  I added a silver glitter star to the top of this tree.  And a silver tone snowflake charm to the sentiment piece.

These and many more gift bags will be for sale at my next holiday craft fair.  I hope you get a chance to stop in and pick up some wonderfully crafted homespun holiday gifts and packaging.


Thank you for stopping by.  Im heading back into my craft room to finish up on a few desk top calendars.  I love making these.  They add that special personal touch to your office space/desk.


Red Fabric Christmas Tree Bags

Howdy!  Oh, it feels good for my soul to craft, sew, and just simply create!  I saw the inspirational photo over @ the Shabby Tea Room for their current challenge, O' Christmas Tree.  and oh boy!  That photo gave me the idea of making some Christmas trees from fabric scraps.  I imagine you can do the same with strips of pattern papers.  Umm, maybe I'll create a few of those, too! {smile}


Look how super cute and country this is!  I love the buttons and the stars on top are just adorable!
I also stumbled upon a 'new' challenge site to me: Try It Tuesday.  They have a new challenge: Bags & Boxes.  So, I thought how perfect!


here is what I made:


I made a gift bag, and used the inspirational photo to create the cover.  I made a fabric scrap holiday 'tree' with traditional red and green holiday colors.  I used fabric (retired) from Stampin' Up!, ribbons  and trims from various places.  The buttons (retired) are from Stampin' Up!.  The kraft twine is from PaperTrey Ink.  The tags, and stamps are from Paper Trey Ink, as well.  
I stamped the snowflakes in kraft ink onto vanilla card stock.  Matted this stamped piece with kraft card stock.  I did a purposefully sloppy double machine stitch border.  
I tied my various fabric and trim scraps onto a kraft striped paper straw.  I hot glued the 'tree' to the card stock.  
I tied a simple bow with the red ribbon strung through a Webster's Pages chipboard button and used hot glue to adhere it to the top corner of the sentiment piece.

Thank you for stopping by.  I hope you have been inspired to play along with the talented ladies over @ the Shabby Tea Room & Try It Tuesday.  My gift bags will be for sale at my next holiday craft fair.  Hope to see you there!