Tuesday, November 24, 2015

Red Fabric Christmas Tree Bags

Howdy!  Oh, it feels good for my soul to craft, sew, and just simply create!  I saw the inspirational photo over @ the Shabby Tea Room for their current challenge, O' Christmas Tree.  and oh boy!  That photo gave me the idea of making some Christmas trees from fabric scraps.  I imagine you can do the same with strips of pattern papers.  Umm, maybe I'll create a few of those, too! {smile}


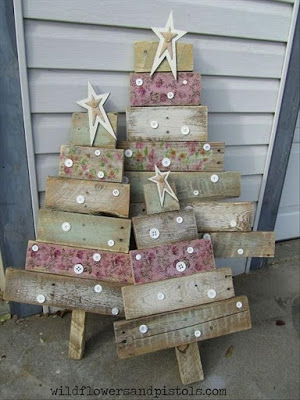
Look how super cute and country this is!  I love the buttons and the stars on top are just adorable!
I also stumbled upon a 'new' challenge site to me: Try It Tuesday.  They have a new challenge: Bags & Boxes.  So, I thought how perfect!


here is what I made:


I made a gift bag, and used the inspirational photo to create the cover.  I made a fabric scrap holiday 'tree' with traditional red and green holiday colors.  I used fabric (retired) from Stampin' Up!, ribbons  and trims from various places.  The buttons (retired) are from Stampin' Up!.  The kraft twine is from PaperTrey Ink.  The tags, and stamps are from Paper Trey Ink, as well.  
I stamped the snowflakes in kraft ink onto vanilla card stock.  Matted this stamped piece with kraft card stock.  I did a purposefully sloppy double machine stitch border.  
I tied my various fabric and trim scraps onto a kraft striped paper straw.  I hot glued the 'tree' to the card stock.  
I tied a simple bow with the red ribbon strung through a Webster's Pages chipboard button and used hot glue to adhere it to the top corner of the sentiment piece.

Thank you for stopping by.  I hope you have been inspired to play along with the talented ladies over @ the Shabby Tea Room & Try It Tuesday.  My gift bags will be for sale at my next holiday craft fair.  Hope to see you there!


a Rosewood Vintage Christmas Card

Howdy.  Welcome.  yeah, I've been busy making holiday stuff; cards, bags, boxes, jar toppers, and altered salt shakers.  {smile}  I tend to do a lot of shabby chic holiday projects.  But today, I have a vintage holiday card.  {smile}
and while I was looking around on the internet, I found some very interesting challenge sites.  There are a few that are 'new' to me, so I really wanted to play along.  {smile}
My first stop was Retro Sketches.  They have wonderful sketches that are easy to work with and the design team is pretty talented.  So I am sure you will find some inspiration.  {smile}  
Here is their current sketch challenge (#189):


I stumbled upon Shopping Our Stash weekly challenge.  Their current challenge (#229) is to use items from your stash, but no stamping.  So, you can use all those little pieces and bits that you have collected over the years, and create something handmade but without adding ink.  Sounds fun!


I also stumbled upon Unicorn Challenge Blog challenge site.  Their current challenge (#3) is: Christmas is Coming.  Sounds perfect, right!  You should check out what their design team has created, very beautiful!


and here is what I made:

I turned the sketch 90 degrees to the right
A sweet, rosewood colored, vintage Christmas card.  I used what I had on hand.  No purchase necessary.  So, that made me happy!  My card base is kraft card stock from Paper Studio.  I just love the color.  I added pattern paper I had on hand from Maja Road - Vintage Frost Basics pattern paper.  The paper pad also has three sentiment/design cards, a trio of postage stamp size images and a pair of tags.  {smile}
I did a purposefully sloppy double border machine stitch around the matt.  I just love the homespun look it gives cards.  I added a scrap piece of white cotton trim to the snowflake pattern paper.  (the sketch has a row of xxx's there).  Instead of a button (in the sketch) I added a 'winter' blossom.  It is actually a trio of pink fabric blossoms that I added white paint, glitter, and flocking to, before adding the rhinestone brad.  
There are two 'ribbon loops' on the sketch, that I wanted to add.  But, I settled for a collection of pretty trims.  I first machine stitched a trio of white crochet scallops, and then a pair of pink pom poms.  I think they add a little bit of whimsey and fun to the card.  And why not?  The girls are throwing snowballs for their dog to chase!
As always, my card remains blank on the inside, to provide you with room to add either your own hand-stamped sentiment, or a hand-written message.  {smile}
The photo doesn't really show it, but the card with the sentiment is adhered to the kraft matt with foam tape to 'lift' that piece higher.  I thought it would look 'cleaner' than plastering it down on top of the two decorate trims, and having bumps.
Well, I'm off to my craft room to finish up some desk top calendars.  {smile} I hope you get an opportunity to create something beautiful, too!


Sunday, November 22, 2015

A Sweet Pink Christmas Card

Howdy.  Welcome.  Well, the sun is out this morning, so I took advantage of the daylight and snapped a photo of a card I made last night.  I LOVE pink, and shabby chic, so why not put those two together to make a sweet, pink, shabby Christmas card?  {smile}
I used the current sketch challenge over @ Mojo Monday.  They have some very user friendly sketches.  And the design team is just so talented!   Here is the current sketch: 
today's the last day for this sketch challenge

I also wanted to enter another challenge.  The current challenge over @ A Snowflakes Promise, is Winter/Christmas.  This challenge site, has some very creative folks on their design team as well.  So, I am sure you will find some inspiration there, as well.
this challenge ends this month

and here is what I made:


So, let me just dive right in, with how I made this card {smile}!  This card is 4 1/4" x 6".  So, its larger than an A2, but smaller than an A6.  I like this size of card, because the A6 envelope allows for bulk from embellishments.  (I know I have made flat cards before, but its been so long ago, I can't remember the year {smile}).
I started with Vintage card stock from Paper Trey Ink.  I just love the heavy weight of their card stock, to use for card bases.  Their vintage card stock, is a bit lighter than Very Vanilla by Stampin' Up!, so that is why the two vanilla pieces don't match.
I used two pattern papers from Tilda (Christmas, and homemade), and one pattern paper from Carta Bella (baby girl).  

I added two different white cotton trims to the top and bottom of the middle panel. I added a double border stitch with my sewing machine.  I also machine stitched a white crochet trim to the bottom of the middle panel.  
I used some scrap pieces to create my flags (I hand-cut my flag ends).  I made a larger flag for the sentiment piece.  I hand-stamped my sentiment, using a stamp set by Paper Trey Ink; Season's Greetings.  I heat embossed the sentiment with silver embossing powder.  It's beautiful, but a bear to photograph.
I stacked two pale pink blossom pieces.  The bottom blossom is glittered, while the top blossom is flocked.  I added a pink cotton rosette to the center, and used a square rhinestone to hold it all together.  I had a scrap piece of that shimmery chenille trim, so I tied it into a bow.  I added a silver-tone ice skate charm, and tied it to the trim with cream twine.

Thank you for looking.  Now, I'm headed back into my craft room, to create another vintage style piece for another challenge!  Yahoo!  I love days like these!  No obligations, or chores.  Just crafting! I hope you get the opportunity to create something wonderful, too!


Saturday, November 21, 2015

Vintage Frost Christmas

Howdy.  Yeah, crafting, crafting, and bit more crafting for my next holiday craft fair.   I found some wonderful pattern papers that I had in my holiday stash, and super happy to create with them {smile}.  I had 'won' a 6" x 6" pack of Vintage Frost Basics pattern paper by Maya Design (from Sweden).  And I just love it!  This paper pack has vintage winter pattern papers in pink, blues, and brown, with images of angels, ice skates sleds, mittens, snowflakes, stars, and Santa {smile}!  Super special.  
The biggest draw back of crafting during this time of year, is that it is dark when I leave for work and dark when I return home.  So photography is difficult.  {frown}
One of my favorite European challenge sites is ScrapMagic.  I just love their inspiration boards.  Very inspiring, and really gets your crafting mojo running.  Here is their latest inspiration board:
No. 13 : Beige & Blue
Color requirements:  blue and beige
Mandatory elements: rhinestones, pearls, and lace
challenge closes November 30th.

I am using a sketch from Retro Sketches:

this sketch challenge is now closed.  I missed the deadline.

I am also entering A Snowflake Promise challenge:
theme: Christmas/Winter

and here is what I created:


I took two sheets of the pattern paper (one blue and brown snowflake, and brown check) and torn each in half diagonally.  I didn't want to waste any of the patten papers, so I made two cards with my two torn papers.


Each card was made the same way, just changed the sequence of the papers, the snowflake embellishments, and the sentiment.  I made two 6" x 4 1/4" blank greetings cards.  I adhered the two torn pieces to the blue distressed pattern paper, and did a double border stitch with my sewing machine.  
I then stacked the crochet trim and light blue taffeta ribbon, and machine stitched the trims to the card front.   I tied the blue taffeta ribbon into a simple bow.  I tied a snowflake to the bow with thin silver cord, and added a silver rimmed pearl to the silver cord bow.
I stamped my sentiment in Early Espresso classic ink, onto very vanilla card stock, both by Stampin' Up!.  I matted the sentiment block onto the same distressed blue pattern paper as the main card.  I also added a double border stitch.  I adhered the sentiment block to the card front with foam adhesive.  I added a pearl swirl diagonally below the sentiment block.  I also added a wooden snowflake and rimmed pearl to the sentiment block.  


Thank you for looking.  I hope that I have been inspired you to create something beautiful.  {smile}


Sunday, November 15, 2015

Card Suitcase

Howdy!  A BIG thank you to everyone who came out yesterday (and Friday) to the Tramway Community Church Arts & Craft Fair!  This festive and handmade event would not have been a success with YOU!  And a personal Thank You to my customers; new and returning!  It was a very enjoyable experience.  And wonderful to see everyone, and taking the opportunity to chat and say 'hello'.  {smile}
here is a photo of my booth:


I was very happy with how I displayed my products.  I did change it up a bit from last year.  So, it always feels good to make it 'fresh & new'.   One of the 'new' display items, was how I displayed some of my larger, more embellished cards.  I placed them in this sealed chipboard suitcase.  The outside of this chipboard suitcase, is this sweet mint green color, while the inside is a luscious pink color.  Right up my alley!
suitcase:


I wanted to decorate or at least jazz up the inside.  But, I didn't want to distract from my cards.  So, I looked through pattern papers I had on hand that were similar to this beautiful mint green color.  And viola!  Look what I found {smile}.  I printed my 'sign' on card stock weight vellum, by Stampin' Up!. I used a coordinating chipboard piece to anchor the bottom of the vellum to the pattern paper, and a chipboard heart to cover the adhesive at the top corner.  

Thank you for looking.  I have many more pieces to craft before my next craft fair - La Cueva High School, in Albuquerque, New Mexico, on Dec 5th (8a-5p) and Dec 6th (9a-4p).  If you are in town, stop-by!  You won't be disappointed.  My booth is B-34.  I'm in the B hall.  Hope to see you there!  


Wednesday, November 11, 2015

Homemade Fancy Christmas

I had so much fun making my last gift bag, that I decided to continue working with the latest sketch from Mojo Monday.
I also stopped by the Merry Monday Christmas Challenge site.  Because let's face it, I'm working on Christmas crafts, so why not let them help inspire me to create something beautiful!

The folks over @ Merry Monday Christmas Challenge,  have a inspiration photo, and a color challenge: pink, green, and white.  I can do that!
here is what I made:


I rotated the sketch.  I also changed the circle element for another square element.  I used ribbon and trim for the long banner piece.  I did add a floral element but I tied on an ice skate!  I used a holiday image and sentiment.  Both of which are heat embossed with early espresso embossing powder, on shimmer white card stock.  

close-up

For the 'panels' I matted each of the pattern papers with kraft card stock.  I also added some machine stitching to these pieces.  I think this adds a homespun look and feel.  I used Happiness is Homemade pattern paper from Tilda.  The large pink blossom is a Melissa Frances item.  I used a light champagne shimmer textured card stock for the base of the bag.  
Thank you for looking.  I hope you have been inspired.  Now, I'm headed back into my craft room, to finish some jar toppers, desk top calendars, and some magnetic monograms.  Oh, and my trophy cups, and some altered salt shakers.  Whew, sounds like a lot, but once I get started, it moves along quickly.