Sunday, December 3, 2017

Sweet Floral Holiday Bags

Howdy! I wanted to share with you a project I did.  I made a paper tote and gift bag.  But, I used non-holiday pattern paper, to make holiday themed bags.  Because like a lot of us can't always afford to purchase another collection of pattern paper.  And lets face it, I really need to start using the paper I have, and not keep adding to my collection {smile}.  I am entering the current challenge over @ A Snowflakes Promise Challenge - Anything Goes.


and here are my projects
the paper tote:
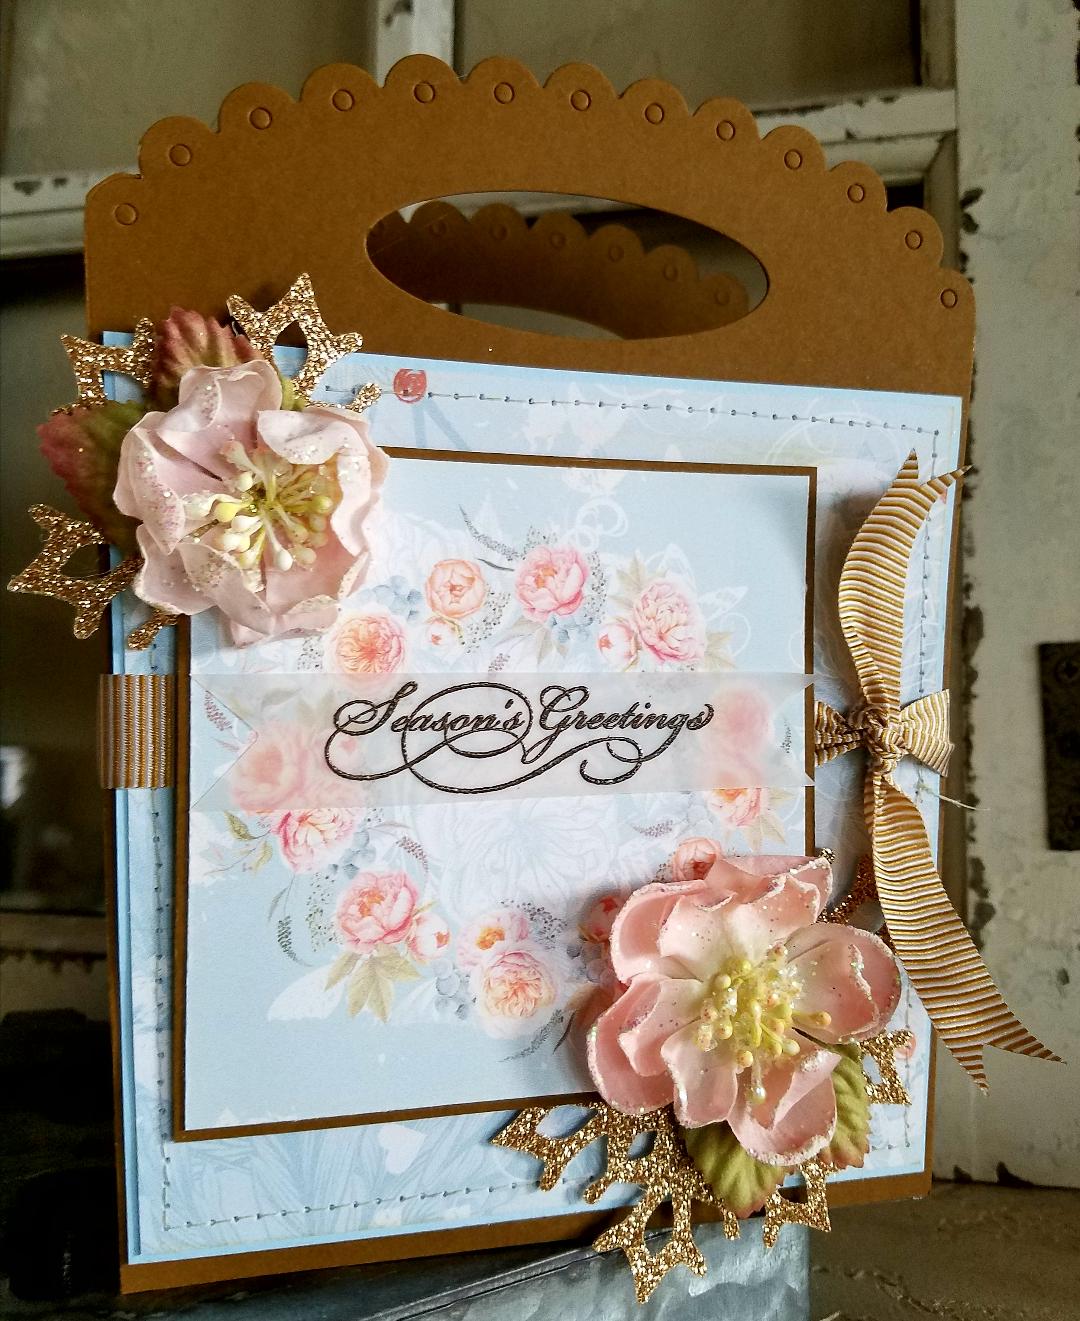

and here is my gift bag:


~ disclaimer:  I was crafting late into the evening, and lighting was scarce. ~

Recipe:  I used Cocoa Bean card stock, and snowflake die, are by Paper Trey Ink.  The pattern papers I have used are digital papers.  The sentiment is a stamp.  The vellum card stock, Early Espresso embossing powder, seam binding, ribbon, and champagne glitter paper are by Stampin' Up!.  The tulle trim is Mellissa Frances.    The two peach blossoms (on the tote) are from Recollections.  The beige blossom (on the bag) is from Prima.  The tiny pink ornament bulb is from a big box store.
The Tote:  I used a die from Paper Trey Ink to die cut the tote.  I layered the pattern paper onto solid card stock, and added some machine stitching.  I adhered the floral circle paper to the front of the tote with foam tape.  I tucked the snowflakes between these two layers.  I hot glued the blossoms to the corners.  To create the sentiment piece, I heat embossed the sentiment onto vellum and adhered it off center of the blossom circle.  And lastly, wrapped the ribbon around the tote, to help give it a finished look.
The Gift Bag:  I only had scraps of this pattern paper, so I wanted to use them up, before I started printing again.  The large floral pattern was a 6" x 6" piece.  So, I cut my piece 4 1/2" x 6", to use more of what I had.  I added two different polka dot papers, both of which were scraps.  I added some machine stitching to give it a homespun look.  I added the tulle trim and seam binding to help hide the seam where the two papers meet.  I tied the seam binding into a multiple loop bow, attached a bulb, and tucked in a paper blossom.  I created the sentiment piece, just like I did for the tote (heat embossing).  To hide the seam, at the top, where the two pattern papers joined, I added a scallop trimmed pattern paper.  I adhered the card stock panel to a paper bag.
These two types of bags were for sale at yesterdays craft fair.  I hope these two samples have given you some inspiration to use the non-holiday themed pattern paper for your next holiday paper craft.  {smile}

Saturday, December 2, 2017

Craft Fair

Howdy! and welcome to my little slice of blog-land.  I hope this post finds you well.  Wow, the first weekend in December.  Whew, where does the time go?  I am at my one and only Holiday Arts & Craft fair today @ La Cueve High School, in Albuquerque, from 9a to 4p.  I am in my usual spot: B-Hall.  Stop by and see my paper crafts in person.  


Just like most craft fairs; arrive early for the best selection.  Remember to wear your walking shoes, and bring a bottle of water.  I hope to see you there!  And remember, I do take special requests/orders.  So, if I have made something that you love, but want more of the item (aka: a set of 8, etc) just let me know.  I don't charge more for these requests.  We can work out a time frame, and any other particulars.  Last year, I had a lady ask me to make her a few covers for her kleenex boxes.  Done.
I tried to take photos of various items I made threw out this paper craft extravaganza, so I will be posting them through out the upcoming weeks.  But, as always, if you are interested in any one item or a collection, just email me.  I will get back to you as soon as possible.  Thank you, and have a wonderful weekend!


Thursday, November 30, 2017

Christmas Past

Howdy.  Yeah, I've been crafting! and it really makes me happy! {smile}  Sometimes, I need a task, and sometimes I just want to make pretty things.  This is task orientated.  But, it's good to have a focus {smile}.
I am entering my paper craft in three different challenges:  Double D Challenge, and If You Give a Crafter a Cookie.
My firs stop is Double D Challenge.  Their current challenge is: Here Comes Santa - Santa must be present on your craft.  You will certainly be inspired by this creative design team.


Next, the lovely folks over @ If You Give a Crafter a Cookie, their current challenge is a photo inspiration.  (santa's suit)  How perfect.  Oh my, the creativity and sweet Santa's.


and here is what I made:

card stock gift tote

decorated mini composition book

Recipe:  I used Kraft card stock from Paper Trey Ink.  I just love the heavy weight of their card stock.  Especially when creating boxes/bags.  {smile}
The pattern paper and tags are from Melissa Frances, the Countdown to Christmas collection.  I just love this vintage, nostalgic look of this holiday paper.  (I believe that this paper is from 3 years ago.)
I matted with Stampin' Up!s Very Vanilla card stock.  
I did hand-stamp the sentiment, for the card stock tote.  The sentiment on the mini notebook is actually a rub-on.  Yeah, I still have some of those {smile}.
I added machine stitching to both projects.  I felt that a simple border stitch would work nicely with this pattern paper collection.  
The tags are adhered to the front of the projects with foam tape.  
I used retired Stamping 'Up! ribbon for each project.  And I simply added odds and ends from my holiday embellishment stash - buttons, tinsel, jingle bells, fringe trim, chipboard stars, flat-back faux pearls, and tiny candy cane.
Thank you for looking.  These items (and so much more) will be for sale @ my holiday craft fair - held @ La Cueva High School.  Saturday, 9a - 4p.  Shop early for the best selection!


Monday, November 27, 2017

a Bright Pink Holiday

Howdy.  I hope you are well.  Me, I've been busy crafting.  I have a craft fair this weekend coming up, and so it's a 'craft-apolooza' here {smile}.  I have to stop myself, and take photos, or I'll just keep crafting.  Not, that that is a bad thing.  It just means I can't share what I've made.  {frown}
I came upon this bright pink and blue pattern paper.  Now, I'm not a bright any-color kind of person.  But the graphics in the patterns were just too sweet!  To me, it looked like something my oldest granddaughter would love.  So, yeah, I purchased the paper.  and I crafted a few things for the craft fair, too!
To help get my work out there, I am entering three different challenge sites: Get Creative Challenge, A Snowflakes Promise Challenge, and Word Art Wednesday.  My typical style is shabby chic.  But, this paper is just too sweet to pass up!
The folks over @ Get Creative Challenge, current challenge is: Holidays.  The design team will certainly get you inspired with their creative work.

The folks over @ A Snowflakes Promise, current challenge is: Anything Goes.  But don't let that stop you.  The design team has created some sassy paper crafts {smile}

And last, but certainly not least; the folks over @ Word Art Wednesday, current challenge is: Anything Goes - Family Friendly.  This group of super talented ladies will certainly inspire you.  They start each challenge with an explanation of a specific scripture.  And they provide you with a word document to add to your paper craft.  But it is not required.  

and here is what I made:


Let me first apologize for the photography.  It was getting late, and the lighting  in my house is awful for photographing, but wonderful for romantic evenings.  {smile}  The photo shop program I use, will lighten up the shadows, but washing out the bright hues of the colors.  So, this was a happy medium I found.
Recipe:  I used Mambo Pink & Tempting Turquoise card stocks from Stampin' Up!.  I used a die from Paper Trey Ink, to 'cut' the tote bag panels (front and back).  I used a snowflake die set by Paper Trey Ink to cut the snowflake pieces.  I used Dazzling Diamond glitter card stock from Stampin' Up! for the snowflakes.  Bermuda Blue ribbon from Amuse Studios.  The paper blossom is from a big box craft store.  The button is from the vintage aqua mist button collection, by Paper Trey Ink.  And finally, the silver snowflake charm and silver twine is from Stampin' Up!.
I just love the pink stripe pattern paper, so I used that as my main panel.  To introduce the bright blue, I added a strip of triangle pattern paper as the belly band piece.  I wrapped a piece of white cotton trim around the triangle pattern paper, to accent the softness & femininity of the collage pattern paper. 
I added some machine stitching to the main panel.  I just love how sweet it makes my paper crafts {smile}.   But, my heart just swoon over the holiday collage paper, so I made that my focal piece.  I matted the collage piece with Tempting Turquoise card stock, to help pop that blue!   And you know I just had to add some machine stitching to this piece, too!  I used foam tape to adhere this piece to the front of the 'tote'.  To add some sparkle, and tie into the theme, I cut out two snowflakes, using glitter paper.  I added a bright pink paper blossom to the larger snowflake, and an aqua button to the smaller snowflake.  I tied a silver snowflake charm to the vintage button, using silver twine (more sparkle).  I used hot glue to adhere the snowflakes and blossom/button, to the front panel.
And once I had the 'tote' put together, I wrapped the 'tote' in Bermuda blue satin ribbon.  This is a single sided satin ribbon.  That means that one side is shiny and the other matt.  I kept the ribbon shiny side up, to help add more sparkle.  (But, I just love the contrast of the matt side.)   Viola! that is my sweet bright pink holiday tote!
Now, don't forget to photograph your creations, or at least do it when the light is better, and then share what you made with all of us!  Have a great week!


Saturday, November 25, 2017

A Shabby Country Christmas

Howdy, and welcome.  This post is a bit long, so grab a cup of tea, coffee, or any other favorite beverage.  Today, I felt like 'talking'.
For those who know me, or follow me regularly, you know that I have a weakness for pinks, blues, creams, and trims.  I think I can make just about anything shabby chic, with little to no effort.  Just give me a hot glue gun, a jar of buttons, my basket of seam binding and cotton trims, and watch out! {smile}  I also know that it is not the 'love' of everyone. (not quite sure why not, but oh well.)
I posted a decorated notebook I made last night, and well, I just HAD to make more.  I ended up decorating three large notebooks (5 1/2" x 7"), and three little ones (3" x 4 1/2").  They all ended up being just as sweet as can be.  But, I figure you already knew that {smile}.  So, this morning I woke up and started decorating a few more notebooks, but wanted to use some of this 'new to me' pretty paper.  So, I am sharing my creation with you and a few challenge blogs:  Scrapslet, Your Next Stamp, and Word Art Wednesday.  Here we go!
My first stop was Scrapslet.  Their current challenge is a color challenge.  This challenge is from Russia, but they don't have a translate button {frown}.  However, this collection of crafty ladies will certainly inspire you!


My next stop was Your Next Stamp.  Their current challenge is both a sketch and an inspirational photo.  You can use either, or both.  I am using the sketch.  I love their sketches, because they allow you to add your own style to these super user-friendly sketches.  This challenge is no exception.

I rotated the sketch 90 degrees.

And my last stop was Word Art Wednesday.  This is a constant for me.  Their challenges always have a scripture and the warmth and acceptance from these ladies is contagious!  I have never met any of them in real life, but I imagine they are the kind of ladies you invite over for tea, and sit and chat for hours.  Just plain lovely folks.  Oh, their current challenge is anything goes - family friendly.


and so, here is what I did:

decorated notebook (5 1/2" x 7")

Recipe:  I started with an ugly black notebook.  Then, I grabbed supplies from my craft room, and made it pretty!  {smile}  I used a chocolate brown card stock as my base, and layered on some pretty digital paper.  I used my corner rounder punch to round the bottom corners of a few of the papers, to mimic the notebook cover.  
My firs layer of paper is this beautiful blue winter pattern paper.  I added a strip of tiny polka dot paper across the top.   I then cut a rectangle piece of the brown reindeer pattern paper and adhered it on top.  The sketch has this piece under the band.  But, I wanted it to peek out of the top of the trim.
I next used a die to cut the decorative piece of pink pattern paper.  And a different die to cut the sentiment piece.  I thought that the various decorative edges would work well together, and break up the repeating pattern of rounded corners.  I hand-stamped my sentiment onto the scallop trimmed rectangle and adhered it to the front of my paper stack with foam tape.  I then took this stack of papers to my sewing machine and started sewing.  I did simple borders on all the pattern papers, except the scallop rectangle (due to the foam tape).  
I wrapped the cream cotton trim around the band at the top.  And wrapped a pale pink seam binding piece around that.  I tied the seam binding into a simple know.  I didn't want the bow to compete with any of the embellishments.  (To me Junk Bows are eye catching!  so that is why I kept it simple.)
I used a medium size snowflake die to cut a snowflake out of white glitter paper.  I cut the snowflake in half, to embellish my blossom.   For the blossom, I stacked three 4-petal flowers on top of each other, staggering the petal placement.  I secured the three blossoms with a brad.  I hot glued a faux pearl & rhinestone gem to the center of the blossom.  I hot glued the blossom and the two pieces of snowflake to the lower left corner of the notebook.  I also hot glued a silver decorative snowflake to the right upper corner of the sentiment piece.  
And the big finale is the snowflake charm on the spiral and a coordinating pen.  I cut a thin piece of pattern paper, rolled it up tight, and stuck it in the barrel of the pen.  I hope you like it.  I think it came out beautifully.  Oh, and here is a photo of the second notebook I decorated with the same pattern paper.


Thank you for stopping by to have a look-see, as to what I crafted.  And yeah, I'll post again soon.  Sometimes its just hard to stop crafting and take a photo.  But, I'm working on it! {smile}
My one and only holiday craft fair is December 2, 2017 @ La Cueva High School (Albuquerque, NM) from 9a to 4p.   Come out and see my crafts in person.  I promise you won't be disappointed!


Friday, November 24, 2017

Sweet As A Peach

Howdy.  I found some time to decorate a spiral notebook.  I printed this pretty pattern paper, added some sparkle, and then added various trims:  cotton trim, satin ribbon, and a junk bow.  
I am entering my decorated notebook in the current challenge posted @ Word Art Wednesday.

I just love soft pinks, and pale blues, with vanilla/cream.  The mix of stripes, chevrons, polka dots, and florals.  So, you know that I just had to purchase this digital paper package.  And, I had a fun time putting this little work of creativity together {smile}.  Here is my creation:


This notebook measures roughly 5 1/2" x 7".  The paper inside is lined.  80 pages.  

I cut the pattern paper and adhered to the cocoa bean card stock.  I then added a simple border stitch with my sewing machine.  I love the homespun look it provides my crafts.  I machine stitched a wide section of cream cotton trim.  I wrapped a piece of gold satin ribbon around the front cover.  I tied the junk bow to a gold and rhinestone buckle.  I could not get the buckle to show in the photo, but it's there.  The sentiment is matted onto Cocoa Bean card stock.  I tucked a vanilla doily behind the sentiment piece.   
I added a trio of buttons that coordinated with the colors in the pattern paper to the bottom right corner of the notebook.  I added a trio of pale pink sequins to give the cover a little more sparkle.
Thank you for looking.  Oh, I also decorated a mini composition notebook.  


Thank you for stopping by.  I'll share more soon.