Friday, October 25, 2013

Simple Kraft

Welcome.  I had to switch my day off from work this week, and it has really messed-up my week.  I keep getting my days mixed-up, to say the least.  Anyways, enough about me {smile}.
This week over @ Sketch Frenzy Friday, a new sketch is up and ready for you to play along.  But, before we get to that, I hope you find a bit of inspiration from what the design team has created!


here is what I did:


I made this card with a special girl friend in mind, Nichole B.  She, is a great person, and makes me laugh!  Nichole, paper crafts, too, and has an unique style of card making.  She is a 'clean and simple' type of gal.  And her favorite color combo is black and yellow.  
I used a build a background text stamp across the top.  I also added a flourish stamped in black to give her card a little pizzazz.  I added a strip of modern medley dsp to give the card a color scheme.  I also banner ended a strip of yellow pattern paper to give the card a pop of color.  I added a frame stamped in basic black classic ink, added a sprig of black leaves, a yellow flower and a vellum butterfly. 
Let's see what you create! and post your card on the SFF challenge site!

Tuesday, October 22, 2013

Thinking of You

Happy Tuesday!  I hope you had a good weekend, and that Monday was not too brutal.  Me, I had a fabulous weekend!  I spent three days crafting with two very wonderful ladies; Valerie and Nichole.  But, now it's back to work, back to the daily grind.  It's Tuesday, and that means that it is time for another challenge from Nacho Average Challenge.  This week, we have a color challenge.  And boy, color challenges are just that for me, a challenge.


here is what I made


I used daffodil delight cardstock for the base.  I used a pattern paper from the Gingham Garden DSP collection.  I also used the Kind and Cozy stamp set for this card.  I did a bit of machine stitching, to hold the banner piece to the card front, with a zig zag stitch.  
I cut a paper doily in half and used that to break-up the empty space.  I wrapped a piece of daffodil delight seam binding around the card front and tied it in a multi-loop bow.  I added a simple bow of white bakers twine.
The sentiment circle is stamped in primrose petal, and the sentiment is stamped in daffodil delight.  I used markers to color the floral images.  The  sentiment banner is stamped in midnight muse.  
I hope we have inspired you to play along with us @ NAC.

Saturday, October 19, 2013

Paper Gift Bag

This weekend had a very nice start!  I caught up with two of the most lovely ladies, to craft it up!  We get together a few different times of the year, and paper craft. We talk about what's going on in our lives, laugh, and truly enjoy each others company.  So, when The Hen House, hosted another stamp retreat this fall, we all signed up to attend, and requested to sit together.  
One of the paper crafting traditions, is to craft something for your table mates. Yes, there is such a term, and yes, that is what we are!  Since I have been making some holiday gift bags, I thought why not make a paper gift bag, to hold some treats for these ladies.  So, here is what I made!


I used paper that I already had on hand, and mix and matched different stamp companies.  The long text stamp is from Tim Holtz.  It says, 'imagination is more important than knowledge. for while knowledge defines all we already know and understand. imagination leads us to all we might yet discover and create.'   The initials and 'my friend' are from Stampin' Up!.  The tag at the top of the bag, 'just for you' is from Paper Trey Ink.  I adhered the same pattern paper to small clothes pins to help hold the bag closed.  The ribbons are from my stash, and the vintage buttons from Paper Trey Ink.
I hope this weekend finds time for you to do what you love!  And spend some time with those who are important to you. 
Well, I am off to bed.  I will share a photo of the cupcakes I need to finish tomorrow.  3 dozen white cake and 3 dozen chocolate cake, with a sweet cream filling, topped with a whipped pink butter cream frosting, and a light dusting of edible glitter.


Friday, October 18, 2013

Whew, it's Friday!  and I can now take a breath and focus on just crafting!  It's a true fun filled weekend for me.  It's the first day of the fall rubber stamp retreat.  Yep, three days of non stop crafting.  Your choice of what you craft, you bring what you want to work on.  Un-interupted crafting time, no chores to get done, no meals to make, no dishes to wash, and no children to take care.  
But, before I get my craft supplies loaded into my car, and start a weekend filled with girl time, laughs,  no sleep, and crafting, 
I wanted to share a card I created for the latest sketch @ Sketch Frenzy Friday.  Kim is this week's designer of the sketch, and I have to say, Kim did a fabulous job creating a very user friendly sketch.


and here is what I created


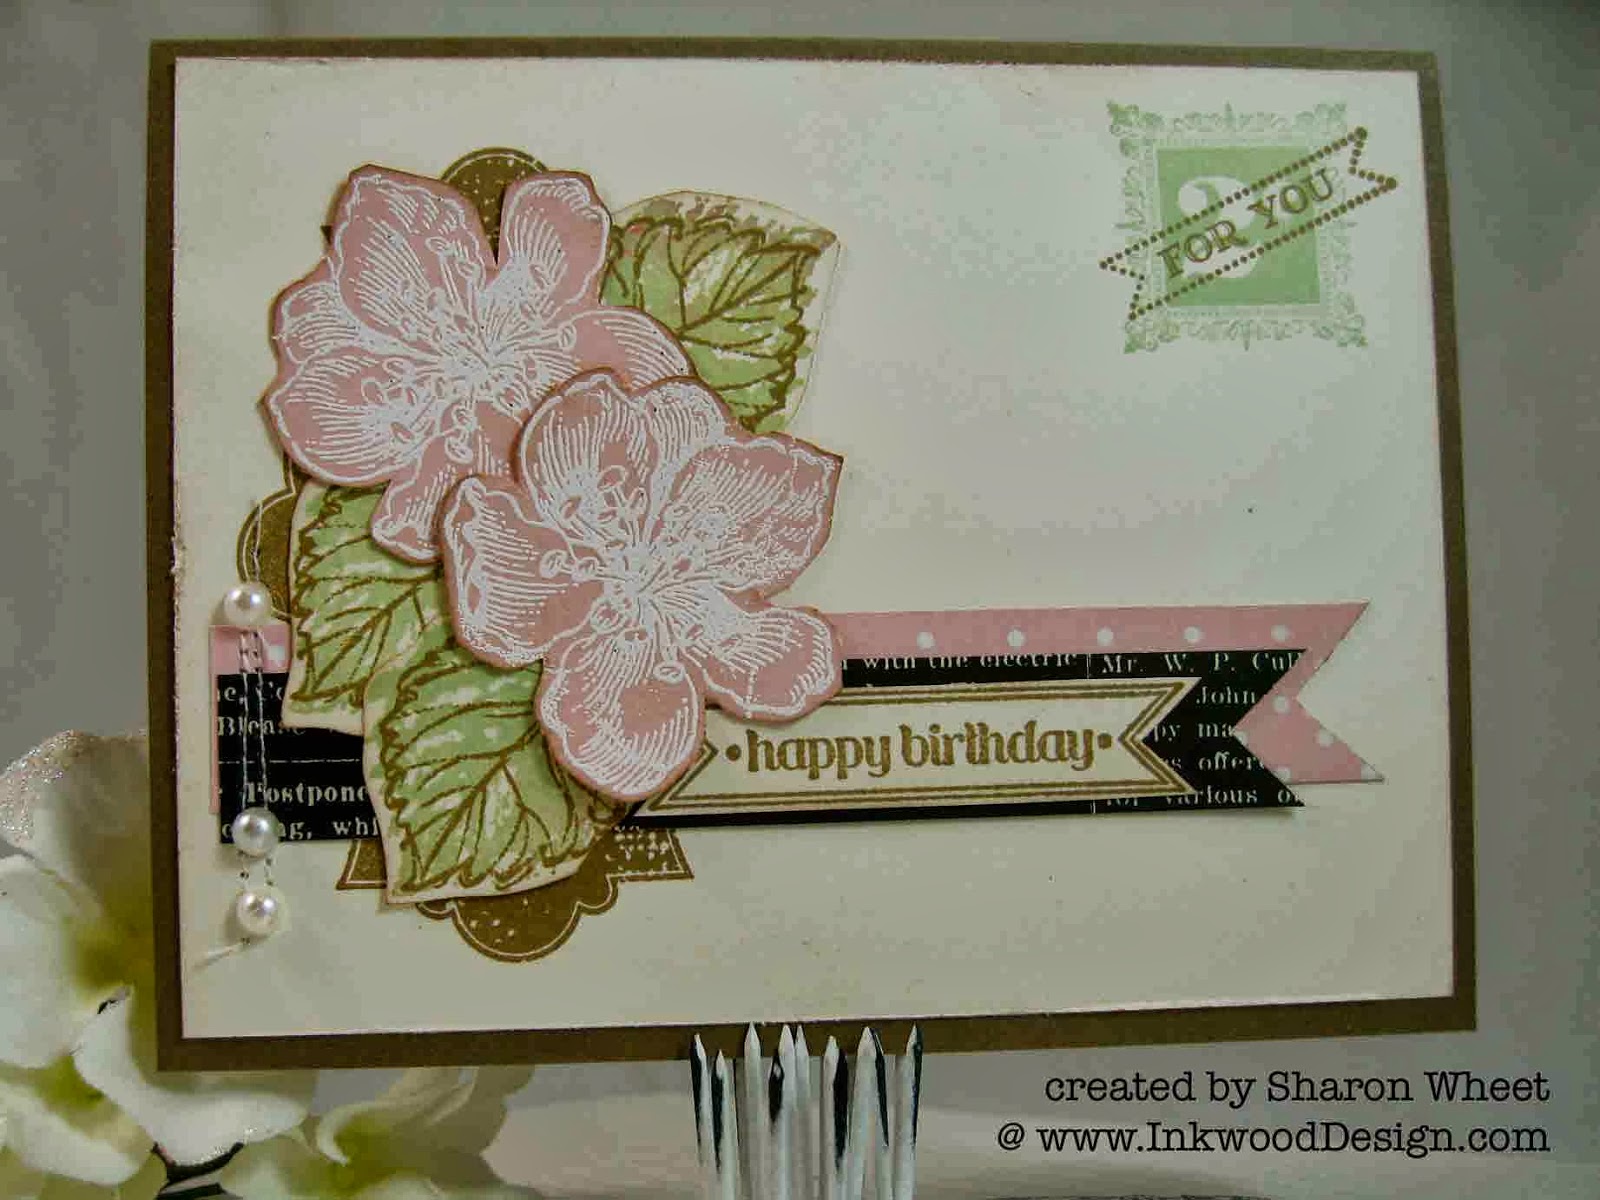
For this card, I tried to keep it pretty flat.  So, it could be mailed easily!  I used a few different stamp sets to create this card.  I stamped the label piece, from Everything Eleanor in baked brown sugar.  I then stamped two blossoms with versa mark ink, onto pink pirouette cardstock, and then added white embossing powder.  I heat embossed the blossoms, and fussy cut them with scissors.  For the leaves, I used the Gently Falling stamp set.  The leaf outlines were stamped with baked brown sugar, and the body of the leaf was stamped with pistachio ink.
I cut two banner pieces out of a few scrap pieces of patten paper.  I added a few lines of machine stitches to add a little home-y touch.  and then a few pearls.  
For the sentiment, I stamped a postage stamp and a itty bity banner piece.
I hope that you get some inspiration from the design team.  We really have quite a few different crafting styles.  I hope that you get a chance to play along with us this week @ SFF!

Thursday, October 17, 2013

Friend and Strength

Thank you for stopping by today.  I have a few things to share with you.  First, I made a quick and easy card.  Ok, maybe not so quick.  And there is a sewing machine involved, so maybe not so easy, either.  Ugh.  Ok, for me, this was quick and easy.  Quick, in that it only took about 30 minutes to make.  
Mojo Monday, has a great sketch for you to try this week.  I love it!  Sketch #315.

and here is what I created with this sketch:


I had to run into one of those big box crafting stores yesterday.  I'll admit, I am using a product that is currently on sale.  And since I was already inside the store, I might as well look around, right?  Anyways, they had this beautiful pattern paper by Prima: Botanical Collection 'my darling' and Romantique Collection 'estella'.  Don't they look just fabulous together?  I matted the 'my darling' pattern paper onto a piece of very vanilla cardstock and machine stitched a simple border.  I then matted the 'Estella' pattern paper onto a piece of Pistachio cardstock, and did a simple border with my sewing machine.  I added some banners made from an old Teresa Collins pattern paper.  I added a hand-dyed pistachio seam binding to the floral piece and tied the seam binding into a multi-loop bow, and added a PTI vintage button tied with cream twine.  I also added a trio of half pearls, to give this card front a sweeter look.  
The sentiment stamp, is also from the big box craft store.  And it was only $1.99 (regular price) and I used my 40% coupon.  I stamped the sentiment in soft suede classic ink, onto very vanilla cardstock.  And matted the sentiment piece onto a piece of crumb cake cardstock.  I used foam adhesive to lift the sentiment piece off the card front. 
I'm pretty happy with how my card came out. Let me know what you think! 
Now, onto to the covered notepad I mentioned in yesterdays post.  I made this notepad cover with a fabulous new stamp set from Farm House: country kitchen.


I love the vintage style labels in this stamp set, along with two different bottle stamps.  The floral pattern paper and the striped pattern paper that I used, is left over from when I made our Christmas cards last year.  Yep, I didn't use 'holiday' pattern papers.  I actually love making holiday cards out of 'regular' pattern papers.  I think it helps freshen the whole season a bit.  Don't get me wrong, I am still a huge fan of pretty holiday pattern paper.  Sometimes, I just really love the unexpected {smile}.  Oh, I almost forgot, the red houndstooth pattern paper is Teresa Collins, He Said, She Said, 'Rulers Paper'.
Thank you for stopping by.  Hope you have been inspired, and get a chance to create!

Wednesday, October 16, 2013

Glistening Pretty

I had a very productive day, yesterday.  I  made some covered note pads, gift bags, canned 2 recipes of  Christmas Cranberry Relish, and 30/+ bottles of homemade vanilla.  I have a few holiday Arts and Craft Fairs coming up, soon.
When I started crafting for Arts and Craft Fairs, about 5 years ago, I have alway created holiday paper crafts with non-traditional Christmas colors.  When I say, 'non-traditional' I mean color combinations that aren't 'red and green', or 'blue and silver'.  My first holiday card of non-traditional colors, was Spring Moss and Basic Black.  It was a big hit.  Alot of folks liked the 'freshness' of this color combination.
Over the last few years, I have become a big fan of Authentique paper.  I love the colors, patterns and graphics.  One of the new holiday collections I have purchased and crafted with is:  Glistening.  It has a soft brown, a pale aqua, a mauve, and cream color combination.  The patterns have polka dots, snowflakes, plaid, lines, and vintage drawings.  I purchased a few sheets to see what I could make with this pattern paper.  And, now I am in love with this pattern paper!
Here is a sneak peak of a gift bag I crafted today.

sneak peak: gift bag
I used a retired mauve card stock: pale plum.  I also used Aqua Mist by PTI and Soft Suede by Stampin' Up!.  I cut a snowflake using silver glitter cardstok.  I painted the edges of the heart with some picket fence distress paint and glitter.  I tied an aqua mist vintage button to the cardboard heart with some cream twine.  The snowman and children silhouette stamp is from CTMH, and was stamped with baked brown sugar classic ink.
Thank you for stopping by, and see what I've been doing.  Tomorrow, I will share a sneak peak of a covered notepad I made yesterday.  I used some vintage inspired pattern paper.  A little teaser: I used a stamp set from Farm House.