Wednesday, December 20, 2017

It's a Blue Wednesday

Welcome.  I am so happy you have decided to stop by today.  I have some good news.  I am a Guest Designer, again, for the wonderful ladies @ Word Art Wednesday.  {smile}  How absolutely fabulous is that?
If you have a chance, you really must play along with this challenge site.  The ladies over @ Word Art Wednesday, run their challenges for 2 weeks, provide you with a scripture to add to your paper craft, and their theme is generally Anything Goes - Family Friendly!  How wonderfully different.
here is what I created:


Recipe:  This blank inside greeting card is a typical A2 size (4 1/4" x 5 1/2").  I used crumb cake card stock by Stampin' Up! as my card base.  I just love this creamy kraft colored, heavy weight card stock for card bases.  
I then layered two pattern papers from Prima Marketing Something Blue collection.  I just love the vintage look of these papers.  I layered the vintage, faded green text pattern paper on top of the distressed black text paper.  I added a simple single border stitch, with my sewing sewing machine.


I wrapped both a matching seam binding and a soft, delicate lace trim around the front of the card.  
I printed a digital library card, that I believe matched these pattern papers beautifully.  
I printed the scripture onto whisper white card stock, then matted it on a scrap piece of crumb cake card stock, and adhered it to the card front with foam tape.
I selected a few pale blue-green blossoms to add to the front of my card.  But first, I painted the petals with a pearl white paint and then dusted them with fine glitter.  I adhered those paper blossoms to the card front.  And then tucked a double bow tied with the seam binding, just below the largest paper blossom.  And the final touch was adding a clear faceted button just below the bow.  Viola!
I hope that you have an opportunity to play along with the wonderful ladies over @ Word Art Wednesday.  {smile}


Saturday, December 16, 2017

Welcome Christmas

Howdy.  I hope this post finds you well, and still have some holiday spirit left after countless hours standing in line, searching for a parking space, and logging in your required hours at work.  {smile}
I, like so many of you out there, I have different groups of friends, and they all want to get together for the holidays.  So, the crafting for family and friends doesn't really stop until, well, never.  It does slow down the few days between Christmas and News Year.  
For this particular group of friends, we always do a white elephant gift exchange.  There are only 2 requirements, $10 limit, and must be something craft-y.  Check, and check.  I grabbed a package of white coffee filters, and the ring from a mason jar.  
I am entering my creation into a 'new-to-me' challenge:  Crafty Calendar Challenge: It's Christmas.  You are free to create anything, JUST make sure, your creation matches their theme.  Check.
And here is what I came-up with:


Ta-Da!  I made a Holiday Ornament.  I cut each coffee filter into quarters, and then a rough circle.  I dyed the cut coffee filters with tea.  Dried them in the dryer; its fast and super easy.
I added the silver star and thin satin ribbon 'hanger' before adding the coffee filter folds.
Then, I created rough folders with each 'circle', and hot glued them to the ring of a mason jar lid.  I lined them up, and got them pretty close, so there wouldn't be any gaps.
I took tiny cream colored paper flowers, and painted them with a shimmer pearl paint.  Then I added glitter while the paint was wet, so the glitter would adhere.  I added an odd number of blossoms, to keep the wreath 'interesting'.
The final addition, is the 'Merry Christmas' banner.  I hand-stamped the sentiment in archival black ink onto white card stock.  I cut flag ends, and bent the strip into this fancy looking banner.  {smile}
Viola.  Something sweet, vintage, shabby chic, and with a bit of country charm.  {smile} Just my style!  Thank you for stopping by.  I hope you have been inspired to create something beautiful for those special folks in your life.

Saturday, December 9, 2017

A Chocolate Hug & Kiss

Howdy, I hope this post finds you well, organized, and in the holiday spirit!  I wanted to share with you a little project I did, for several sweet folks in my life.  
I wanted to 'package' some chocolates in a fun and festive way.  But, something a little different, and sweet.  So, I headed to Pinterest.  (who doesn't these days)  And I stumbled (happily) across these tiny little chocolate packages.  When I say 'tiny' that is exactly what I mean.  T I N Y !!!  But super cute!  Ok, let's just admit somethings are just more adorable when you shrink them.  These little packages are no exception to that rule.  So, I set out to my craft room, and whipped up 13 of them.

here they are:

the whole lot

Now, when I photographed them, I forgot to add something to the photo to show scale.  So, I will just describe the tininess.  Each little teeny tiny package holds one Hershey Kiss and one Hershey Hug.  And you have to put them in point to point, or you won't be able to close the little 'box'.  That's how teeny tiny they are.  But, the adorable-ness is off the charts!
I found a tutorial on-line, so I quickly made one 'sample', and then some whipped them up.  Super fast, and easy.  And they used scraps to complete.  So more bonus points. {smile}  
The original designer is Dani Dziama.  She is a Stampin' Up! demonstrator and on their official design team for 2017.  So, just a quick pointer if you make these: random pattern paper works best.  But if you use directional pattern paper, cut your pattern 4 1/4" wide, and pay close attention as to which end you put the closure.

a close-up

I wrapped the tops with various Stampin' Up! ribbon I had on hand.  These narrow ribbons work best.  Also, I added a dimensional adhesive (aka foam tape) to the back of each small oval sentiment.  Just to elevate it off the package.  I think these turned out super sweet!  And who knows they just may make an appearance at next years holiday craft fair!  {smile}
Well, thank you for stopping by.  I hope you have been inspired to create something unique and sweet for the folks in your life.  I am off to baking cupcakes.  A super sweet friend has placed an order of milk chocolate cake, sweet whipped filling, and green vanilla buttercream icing with tiny red hearts.  So, let's get this baking party started!  {smile}  They are for a Grinch-themed holiday party.  How fun is that?

Wednesday, December 6, 2017

Guest Designer


Now, for the most exciting news:  I am the Guest Designer @ Word Art Wednesday!  How super fabulous is that?  I know I am blessed to have this opportunity to share my paper crafting with all of you, and I hope I don't disappoint you!   My crafting style is vintage, shabby-chic, with a little country flair thrown in.  Let me explain.  Vintage, because I like everything to look worn, used, old, but not grungey.  Think peeling paint, scruff marks, weathered.  Shabby-chic, because I like to add buttons, seam binding, machine stitching, pinks, blues (or any soft hue), and a splash of elegance/bling.  Country flair, because I like 'farmland' imagery: milk caps, chicken wire, vintage scales, mason jars, burlap, chickens (birds), and some recycled items.  I hope that makes my 'style' a little easier to understand/translate. {smile}

The lovely, and super talented ladies over @ Word Art Wednesday, have an Anything Goes - Family Friendly challenge for you to participate in.  The challenge runs for two weeks, to help give you time to play along.  They provide you with a piece of scripture that you are welcome to include in your paper craft, but it is NOT required.  The design team has a wonderful collection of different style of crafters, so I am sure at least one of these creative ladies will inspire you to play along!
Here is the current challenge scripture:


and here is what I made:


Recipe:  I used vintage cream card stock as my card base.  I just love this heavy weight card stock.  It's thick, so it will stand up, even with all my layers and embellishments {smile}.
I used pattern paper from Prima Marketing.  It's not holiday themed paper, but this paper is easy to work with!  
I added a paper doily peaking out of the bottom of the top layer.  Then added some machine stitching.  
I wrapped some pale pink seam binding around the card front and tied a multi-loop bow.  I then tied a pink button to the center of the bow.  I also added a trio of sweet buttons along the bottom left corner.
I printed the scripture onto very vanilla card stock and adhered it over the seam binding.
I cut out a snowflake using champagne glitter paper.  I tucked it in under the sentiment piece.  I then stamped some pine braces using light grey and light pink ink.  I added glitter to the paper blossom, and then adhered it over the pine branches and snowflake.  To give my card a bit more sparkle, I added some sequins around the blossom.
Thank you for stopping by!  I hope you visit again! 


Sunday, December 3, 2017

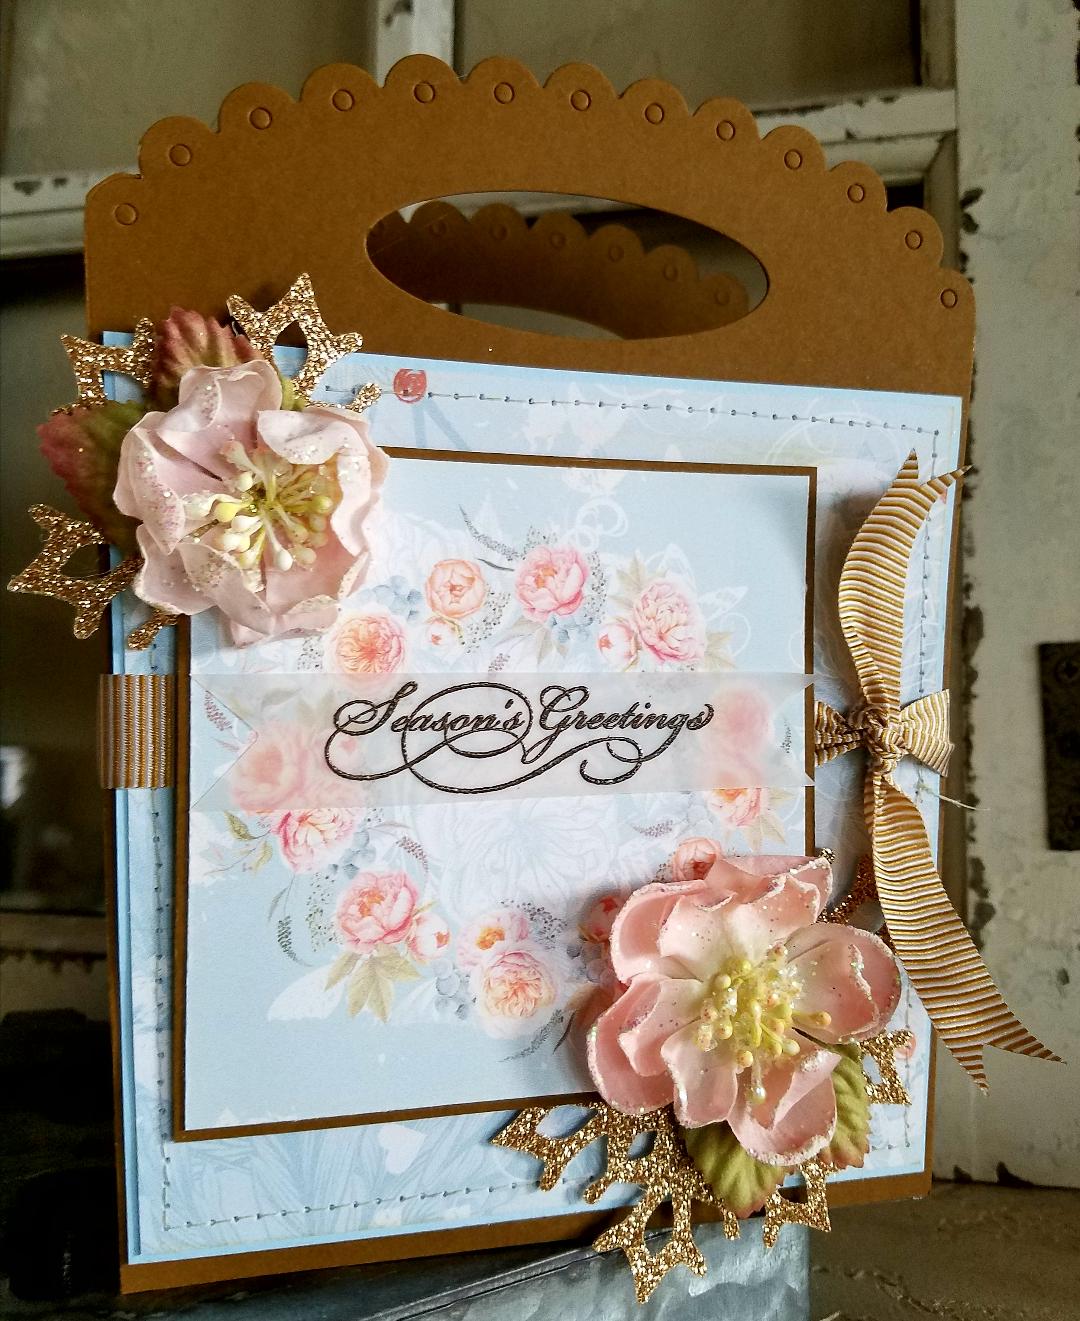
Sweet Floral Holiday Bags

Howdy! I wanted to share with you a project I did.  I made a paper tote and gift bag.  But, I used non-holiday pattern paper, to make holiday themed bags.  Because like a lot of us can't always afford to purchase another collection of pattern paper.  And lets face it, I really need to start using the paper I have, and not keep adding to my collection {smile}.  I am entering the current challenge over @ A Snowflakes Promise Challenge - Anything Goes.


and here are my projects
the paper tote:


and here is my gift bag:


~ disclaimer:  I was crafting late into the evening, and lighting was scarce. ~

Recipe:  I used Cocoa Bean card stock, and snowflake die, are by Paper Trey Ink.  The pattern papers I have used are digital papers.  The sentiment is a stamp.  The vellum card stock, Early Espresso embossing powder, seam binding, ribbon, and champagne glitter paper are by Stampin' Up!.  The tulle trim is Mellissa Frances.    The two peach blossoms (on the tote) are from Recollections.  The beige blossom (on the bag) is from Prima.  The tiny pink ornament bulb is from a big box store.
The Tote:  I used a die from Paper Trey Ink to die cut the tote.  I layered the pattern paper onto solid card stock, and added some machine stitching.  I adhered the floral circle paper to the front of the tote with foam tape.  I tucked the snowflakes between these two layers.  I hot glued the blossoms to the corners.  To create the sentiment piece, I heat embossed the sentiment onto vellum and adhered it off center of the blossom circle.  And lastly, wrapped the ribbon around the tote, to help give it a finished look.
The Gift Bag:  I only had scraps of this pattern paper, so I wanted to use them up, before I started printing again.  The large floral pattern was a 6" x 6" piece.  So, I cut my piece 4 1/2" x 6", to use more of what I had.  I added two different polka dot papers, both of which were scraps.  I added some machine stitching to give it a homespun look.  I added the tulle trim and seam binding to help hide the seam where the two papers meet.  I tied the seam binding into a multiple loop bow, attached a bulb, and tucked in a paper blossom.  I created the sentiment piece, just like I did for the tote (heat embossing).  To hide the seam, at the top, where the two pattern papers joined, I added a scallop trimmed pattern paper.  I adhered the card stock panel to a paper bag.
These two types of bags were for sale at yesterdays craft fair.  I hope these two samples have given you some inspiration to use the non-holiday themed pattern paper for your next holiday paper craft.  {smile}

Saturday, December 2, 2017

Craft Fair

Howdy! and welcome to my little slice of blog-land.  I hope this post finds you well.  Wow, the first weekend in December.  Whew, where does the time go?  I am at my one and only Holiday Arts & Craft fair today @ La Cueve High School, in Albuquerque, from 9a to 4p.  I am in my usual spot: B-Hall.  Stop by and see my paper crafts in person.  


Just like most craft fairs; arrive early for the best selection.  Remember to wear your walking shoes, and bring a bottle of water.  I hope to see you there!  And remember, I do take special requests/orders.  So, if I have made something that you love, but want more of the item (aka: a set of 8, etc) just let me know.  I don't charge more for these requests.  We can work out a time frame, and any other particulars.  Last year, I had a lady ask me to make her a few covers for her kleenex boxes.  Done.
I tried to take photos of various items I made threw out this paper craft extravaganza, so I will be posting them through out the upcoming weeks.  But, as always, if you are interested in any one item or a collection, just email me.  I will get back to you as soon as possible.  Thank you, and have a wonderful weekend!