Wednesday, March 19, 2014

Birthday Wishes, Friend

Welcome.  Glad you have a chance to stop by.  I have been busy this week, working on a recipe for a local baking contest (Sunday).  But I also had a chance to craft a Birthday card for a special friend.  
I used some new paper I received in the mail a few weeks ago.  The paper is called Vintage Bliss.  Ok, doesn't it just sound wonderful?


I did a little machine stitching, using my new favorite silver metallic thread.  Mostly a straight stitch, but I added a little zig zag stitching to add some interest.  I just love this text paper with floral images.  And I have a weakness for the pink polka dot paper and the multi-colored criss cross pattern paper, too {smile}.
I added some Lemon Whip satin ribbon, and added some machine stitching to that too!  I added a half doily under the satin ribbon.  I stamped the sentiment 'Birthday wishes' in a light grey classic ink.  I added a trio of half pearls under the sentiment.
The prize ribbon piece is actually a sticker.  It says, 'H is for Happy'.  I felt it needed something more, but I just couldn't figure out what.???
I made some home-made vanilla sugar cubes the other day.  I know.  How crazy, huh?  Well, I love to make, create, and cook.  What I figured what the heck?
I packaged some of these rough cut sugar cubes into a small craft bag and added a little decorations:


I folded a paper doily over the top edge and created two banner pieces from the same pattern paper.  For the sentiment I used the For a Friend Occasion stamp set by CTMH.  I stamped the 'MADE WITH LOVE' banner in crumb cake classic ink, and grey classic ink, then I fussy cut it out by hand.  I used Shell satin ribbon and added a sparkle clay button I made.

Thank you for looking.  {smile}  I'm pretty sure that my girl friend will love her gift.  She is a big tea drinker, so that was my direction in the gift. 


Sunday, March 16, 2014

Shabby Heart

Welcome.  I had a good time yesterday selling my hand-made paper crafts at the Spring Craft Fair, in Albuquerque, New Mexico.  I met many nice ladies who liked my crafts and bought a few items.  Thank you for your support and words of encouragement {smile}.  I am working on getting things lined up for two more craft fairs in May.  So stay tuned for those announcements!

I hope your weekend is enjoyable and that you get to do the things that make you happy.  For me, that's playing in my craft room {smile}.  
If you are like me, you have your favorite web places to visit.  Stop, look, be inspired, but generally don't 'play along' for whatever reason.  Today, I did stop, look, get inspired, and then did 'play along' {smile}.  I think I should have some bonus points, somewhere.  Right?
One of the blog challenge sites that I like to stalk visit is Sugar Creek Hollow.  They are a vintage and shabby chic challenge blog.  I think I should live there.  Anyways, they have a photo inspiration challenge this time (2 weeks).  Here is their inspiration photo:

use the colors or theme or both
Ok, how gorgeous is this photo?  Pinks, cream, white washed, green, vintage lace, a crystal chandelier, soft fabrics - oh my!


I made a covered notepad!  
The narrow pad of paper is from Paper Trey Ink.  It's a narrow pad of 25 pages of lined-paper.  The perfect little pad for jotting down grocery lists,  to-do lists, shopping lists, chores, any list!
I covered the note pad with blushing bride card stock (retired from Stampin' Up!).  Then I matted the pattern papers onto a piece of very vanilla card stock.  For the pattern papers I used a scrap piece of Lost & Found 2 pink and white criss cross-pattern paper, and a digital pattern paper for the bottom half.  I machine stitched both pattern papers together.  I thought it really added a home-made touch.  I covered the seam with a scallop trimmed piece of silver glitter paper from Stampin' Up! and a scrap piece of this beautifully gathered cream ribbon (retired Stampin' Up!).
For the 'label' I stamped the polka dot frame in Pear Pizzaz classic ink, and the used the Four Frames stamp set, both are from Stampin' Up!.  I have to say that I just love this label-style stamp set.  It is very versatile and the open oval is a nice size for most sentiments to fit.
I stamped the inside of the framed label with another Stampin' Up! stamp set: Water-Color Trio.  But this one is retired.  I just love the font used in this sentiment: FROM THE Heart.  Beautiful.  I 'lifted'  the label off the cover with foam adhesive.
I punched both the heart and the flower pieces from hand punches: Trio of hearts, and Boho Blossom (both retired punches from Stampin' Up!)  The heart shape is from silver glitter paper.  I wanted to repeat the same elements so it looks like these pieces belong.  The flower shape is cut from a text paper.  I added a pink vintage button and tied it with some cream twine.
I wanted to add a little more shabby-ness.  So I added a trio of half pearls to the bottom right corner.  I just love how delicate and sweet these little half pearls look {smile}.
I also wanted the notepad to be versatile.  So, I decorated a simple paper clap with a scrap piece of the pink and white criss cross pattern paper from Lost & Found 2, that I used on the top portion of the pad.  I tied a piece of crochet trim to the clap.
The clap holds the notepad closed if I need to throw the pad in a bag/tote.  And it also allows me to hang the pad from a message board, if I move the clamp to the top of the pad.  Very functional, and very sweet!

Thank you for looking.  I hope you get a chance to play along with the ladies over @ Sugar Creek Hollow .  I'm sure that they would love to see what you create!


Friday, March 14, 2014

Stork Delivery

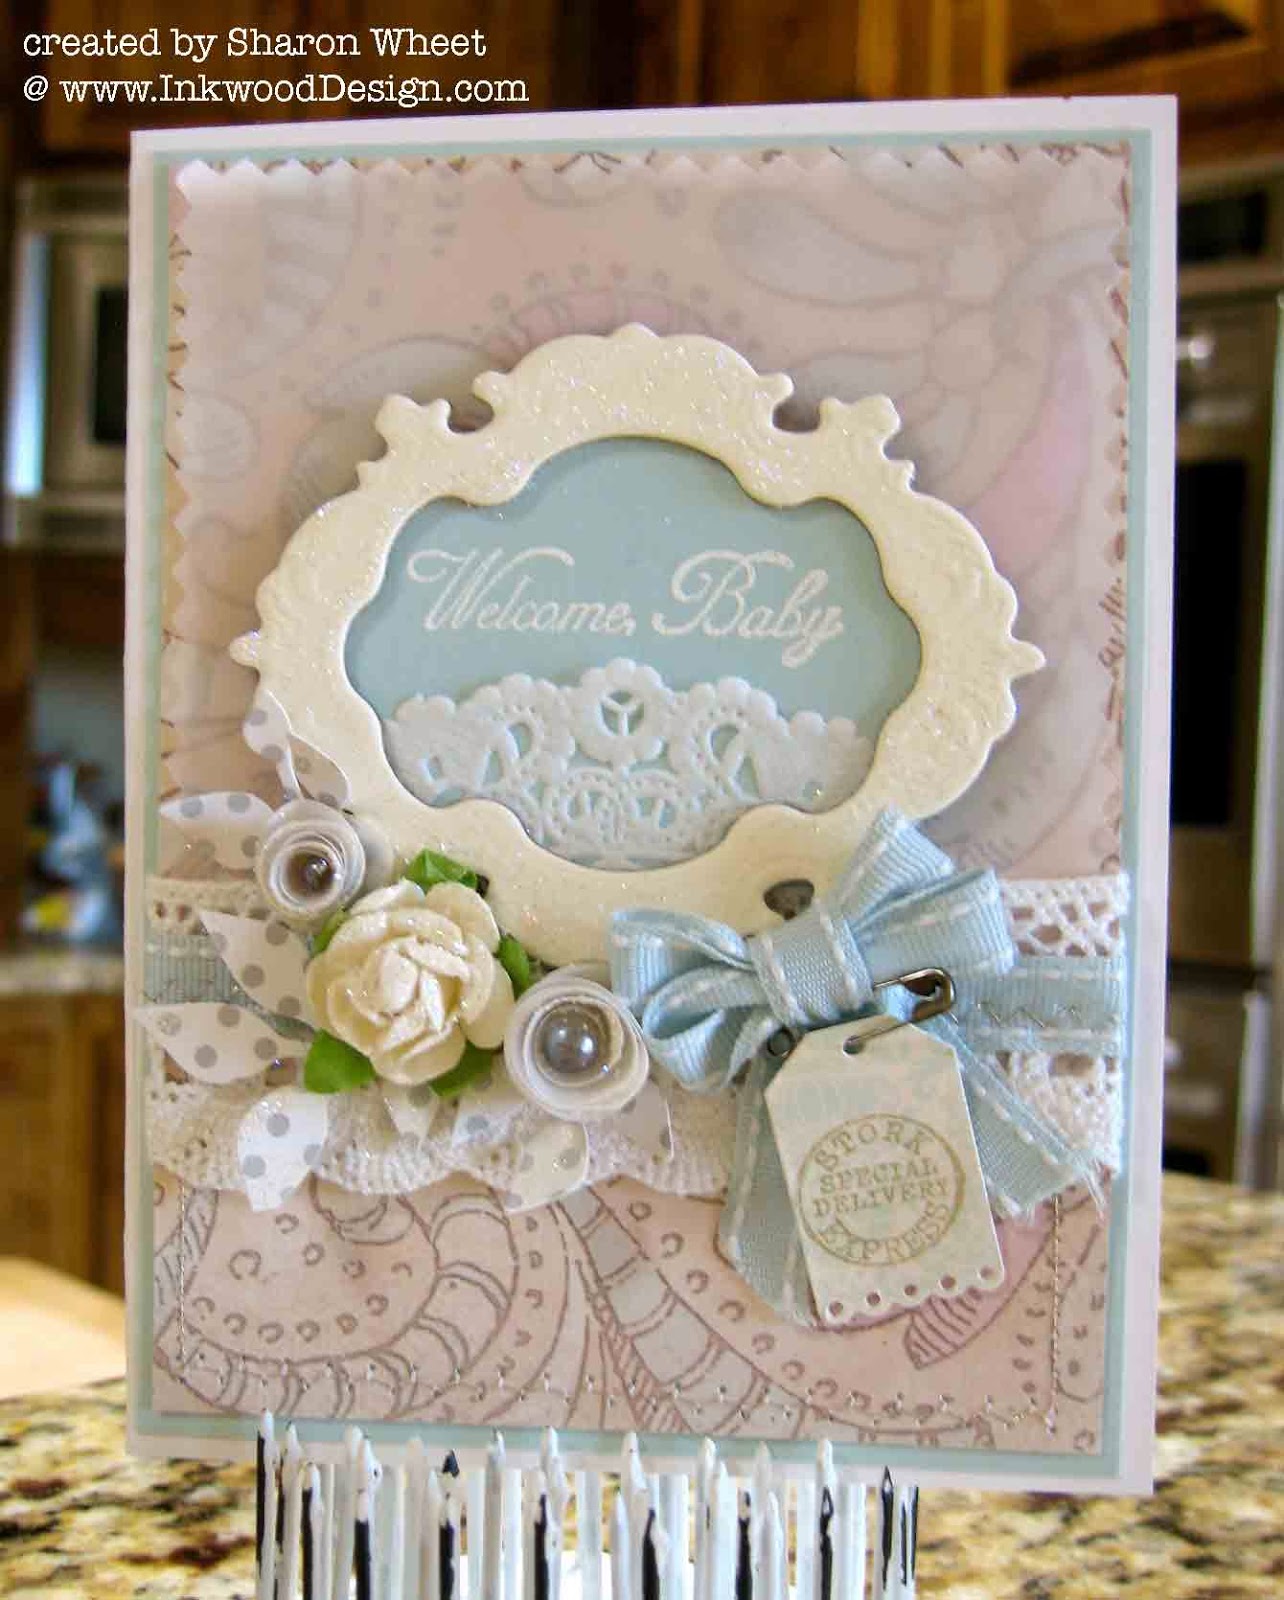
Oh my goodness.  Time just flies these days.  I have a craft fair tomorrow, and I feel like I haven't made a thing to sell.  {frown}   So, let me share with you a sweet baby boy card, and then I must head into my craft room and start creating! {smile}


I opened a delightful package of papers and embellishments from Melissa Frances the other day, and created some soft sweet cards, earlier this week.  Well, I just had to create one more.  Here it is!


Ok, a quick overview and then I must get started on a few other crafts.  I wasn't too wild about this one particular pattern paper.  The colors are soft and pretty but the design is kind of abstract.  So, to soften the whole look, I added a piece of vellum over the pattern paper.  I hope that isn't rude.  To help add some visual interest to the card, I also added some machine stitching using this wonderful silver metallic thread in a zig zag pattern.

Ok, so I have a few of these retired Tattered Angels frames.  LOVE THEM!  I used my TH Picket Fence distress ink to add a bit of a whitewash over the manilla frame.  And while the ink was wet, I dunked it into a tub of dazzling diamond glitter. For the sentiment I stamped and heat embossed in glacier white detail, 'Welcome Baby', onto a scrap piece of pool party card stock.  I added a small piece of a doily to the bottom.
I made two rolled flowers from (2) 1 1/2" circle of vellum card stock.  I added a pearl center, from MF.
I used a die to create the leaf shapes from SU! Neutrals DSP, with the gray polka dot pattern.

I wrapped a piece of white crochet trim over the seam of the vellum card stock.  I added a piece of this gorgeous pool party stitched saddle trim.  To add a little homemade-ness, I used my silver metallic thread and some machine stitching.
I used the same sweet pool party saddle stitch ribbon to make a tiny double bow.
I cute a tiny tag shape from a scrap piece of a pale blue pattern paper.  Stamped the 'Stork Delivery' with an old Crafty Secrets stamp.  I attached the little tag with a tiny safety pin.  I thought it added a little sweetness.  So why not?!
Thank you so much for taking the time to stop by my little piece of blog-land and have a look around.
I will have todays card, and many more, available for sale at tomorrows Spring Craft Sale!  Hope to see you there!


Wednesday, March 12, 2014

Together Forever in Blue

The talented ladies over @ the Shabby Tea Room have the most beautiful inspiration photo, this week.  Just one look, and I am sure you can create something fabulous {smile}.  I typically don't use baby blue color.  However, the application of spring flowers and a bird; easy peasy!
take a look at their inspiration photo:

my disclaimer:
I did not add any spring flowers as embellishments, but rather I used a floral pattern paper.


I used a blue floral/text pattern paper from Melissa Frances, as the main panel.  Love the look.  I used my sewing machine to add some zig zag stitches with some silver metallic thread.
I used a string of hearts die to cut the decorative strip at the left top of the card.  I felt it needed some pizzazz, so I cut a banner piece from My Mind's Eye and stapled it the front.  I thought the crispness of the metal would add some visual interest.  I adhered a single blue button to the banner.  
I took a Tattered Angels flourish frame and covered it with picket fence distress ink and dazzling diamond glitter.  I backed the frame with a script text pattern paper by Paper Studios.  The large '&' is actually a wooden embellishment.  I used the picket fence distress ink and dazzling diamond glitter on it, too {smile}.
The sentiment pieces are from a retired Stampin' Up! stamp set.  I stamped the words in Jet Black Staz-On ink.  I stamped them on whisper white card stock and matted them with pool party textured card stock.
The swallow (bird) was actually cut with a die from Amuse Studios.  I used silver glitter paper from Stampin' Up!.  I cut the leaves from a light grey polka dot pattern paper.  I distressed the edges with picket fence distress ink and dazzling diamond glitter.  I added a light blue button tied with cream twine, and a white button to the middle of the card, to help add some visual interest to the empty space.  
Thank you for stopping by {smile}.  I hope you have been inspired and get a chance to play along with the challenge over @ the Shabby Tea Room.


Tuesday, March 11, 2014

Baby Blue

Whew.  It's been a week since I posted.  My apologies.  I have been busy crafting, and getting some new items in my Etsy shop.  But, I did sit down and craft some projects in blue.  The wonderfully talented ladies over @ the Shabby Tea Room have a super fun and creative challenge this week, entitled: Spring is Near. 

Here is their inspiration photo:

Ok, how gorgeous is that?  The requirements are to use baby blue, a bird and spring flowers.  I'm all over that.  {smile}

here is what I came up with:


Ok, I kinda took the requirements literally.   I don't have any embellishments that are flowers, but I have used some floral pattern papers {don't know if that counts}
Anyways, I used some new and not so new pattern papers.  The  bottom main panel is Melissa Frances.  As for the banners:  Paper Studio, Stampin' Up!, Melissa Frances, Authentique, and My Mind's Eye.   That gorgeous saddle stitch ribbon I used is retired Stampin' Up! and so is the stork image {frown}.

How funny that I used a stork for the 'bird'.  Anyways, I stamped the stork in Jet Black Staz-On solvent ink.  I used my blender pen to 'color' pieces of the image.  The baby is colored with blush blossom classic ink.  The baby's sash and ribbon is Bashful Blue classic ink by Stampin' Up!.  I matted the main image onto a piece of sky blue card stock.  I used a watermark stamp and stamped some random water marks.  
The 'It's A Boy' stamp is from Crafty Secrets.   It's probably 5 yr old, so it may not be available any longer, also.

I used my silver metallic thread to sew the saddle stitch ribbon.  I thought it would add a nice sparkle. {smile}

This pretty organza ribbon is bashful blue by Stampin' Up! and it's retired, too.  Good golly, you'd think that I hadn't shopped for a paper craft item in over 2 years.  I created a simple double bow with the organza ribbon.
I created the tiny tag with the tiny tag die by Paper Trey Ink.  I just love the punched heart piece.  The tag sentiment is from a retired stamp set from Stampin' Up! too; tiny tags.  I stamped 'baby' in Jet Black Staz-On, only because I didn't want to get out of my chair to grab my basic black classic ink.  
To attach the tag to the bow, I simply used a tiny safety pin, in distressed silver.  Nothing fancy, but I thought the addition was quite cute {smile}.
Well, that's all for now.  I'll post a few of the other crafts I have been working on, probably tomorrow or the next day.  Just a heads up, they all use about the same pattern papers and ribbons.  Once I got everything out and started crafting, I just couldn't stop.  I don't typically like things to look too similar, but I am beginning to embrace 'change'.  {smile}
Thank you for stopping by.  I hope you have found some inspiration, and play along with the Shabby Tea Room challenge.


Tuesday, March 4, 2014

homemade #335

I have been in my craft room getting ready for the Spring Craft Fair this month.  I really wanted to use some of this new pattern paper I received in the mail yesterday. . . Vintage Bliss.  It's the new collection from Simple Stories.  To say its gorgeous, is an understatement.  Or at least it is for me.  This pattern paper has all my favorite graphics: polka dots, text, florals, chevrons, doilies, canning jars, and prize ribbons!  Oh my!  
To help get me started into a creative mood (aka mojo) I turned to no other than the creative gals over @ Mojo Monday.  Seemed like the logical step.  Right?  Here is this weeks sketch.  Oh, and its a prize week (the first week of the month).

the sketch:

and here is my card:


I used crumb cake card stock for my base.  I then added pieces of the polka dot and plaid to a piece of whisper white card stock.  I added a thin strip of scallop bordered pool party texture card stock to separate the two patterns.  Then I ran this piece through my sewing machine and used more of that beautiful silver metallic thread around the border.
I took a piece of the floral text pattern paper and matted it with some more crumb cake card stock.  For my banner piece, I just had to add some crochet trim.  I really wanted to add that piece.  To give it some character, I stapled the crochet trim at the edge.
For my sentiment piece I used Country Born stamp set by CTMH.  I used Vintage Labels stamp set and matching die set by A Muse Studio, to create the decorative sentiment label.
For my butterfly, I stamped the image in versa mark, then added pool party embossing powder.  Heat set it onto vellum card stock and fussy cut it out by hand.  I added a small pearl to the butterflies body.
For my blossom, I hand made that.  I used two cotton candy colored sheer fabrics.  I cut 3-4 circles of different sizes.  Then I used my heat gun to melt the fabric.  I'm not a fan of using a flame to create the look, and my heat gun heats up rather nicely for this affect.  I added a single rhinestone bead I had left over from another project.  I used a blossom builder punch for the leaf shapes.  I used a green polka dot pattern paper for those.
Thank you for looking.  Hope you get a chance to head on over to the Mojo Monday blog and play along.  You could win their challenge!  Anyways, I hope I have inspired you, or at least gave you some eye candy {smile}.