Showing posts with label Recollections. Show all posts

Friday, January 6, 2017

Planner

Howdy.  My new year, is off to a good, productive start.  I decided to help me get organized, and focus on tasks, I will start writing it down.  Wonderful idea, right?  Now, how to keep all of these tasks organized and keep me focused on these tasks.  umm.  a Planner!  I know that you have seen them.  Everyone is posting photos of their creative and beautiful planners.  Look @ Pintrest.  Paper crafting companies, like Prima and Simple Stories are producing collections.  Designers, like Frank Garcia and Heidi Swapp are developing embellishments, and creative ideas.  
So, I ventured out to a local big box crafting store and picked up some supplies to get me started.


Now, if you know me, you shouldn't be too surprised by my color scheme.  The gold metallic and ivory stripe planner was calling my name! and the pink, blue, and green washi tapes are just perfect.   
Now, I need to just dive in and get this started!  But, what do I want to keep track of?  
My running/races, my paper crafting projects, menus, my work schedule, and my budget.  So, let me dive in and start getting this started!  {smile}
I hope you are taking steps to help you keep your new year's resolutions, too!


Monday, August 18, 2014

Our Love Story Mini Album

~ photo heavy post ~


I made another flip flop mini album.  I used crafting supplies that I had on hand.  (It's a New Year's Resolution, to use what I have.)  This pattern paper collection is from Prima, Romance Novel.  {smile}  I'm pretty happy with how it turned out.  There are a lot of photos for this album, so I am posting the photos over a few days.   I added text to each photo, so my write up will be short.  Grab a cup of coffee, or tea, and settle in for a journey down this creative road.


Here is a photo of the cover and spine.  We'll work left to right.  So, starting with the spine, I added burlap banner from Maya Road.  I added a metal 'W' coin (wonderful), a multi-loop kraft seam binding bow with a pink button.  The cover was fun to decorate.  I added a Recollection door knob plate.  I added a clear plastic door knob.  I added a collection of paper blossoms.  I sponged linen ink on the blossom petals and glitter.  I cut the leaves with a die, using a textured green card stock.  I added a double strand of pearls between the leaves and blossoms.  I fussy cut the letters out 'OUR' and 'STORY'.  I stamped 'Love' in basic black classic ink.  I die cut a swallow from silver glitter paper and adhered it with foam tape.  There is a trio of iridescent sequins, too.


The inside cover has some hand-stamping.  I did add a date tag to the bottom of the inside cover.  Page one has a few folds that provide layers to this interactive page.


Three journalling cards have been removed from the photo corner.  Use this photo corner to hold a wallet size photo and/or the journalling cards.


Opening the flap, exposes a whole page with a journal block (photo corner) at the upper right corner.  The inside of the flap, holds another wallet-size photo matt (with an 'unforgettable' label), tucked behind the ' perfect day' label.


Tags in the glassine envelope allow you to document '10 things you never want to forget'.

The pages were made with Basic Black card stock by Paper Trey Ink.  The lining of the album is made with Blushing Bride card stock by Stampin' Up!   All edges were sponged with Old Paper distress ink by Ranger. Thank you for stopping by.  I'll post page two and three soon.  I hope you have been inspired to create your now mini album.  This album will be added to my Etsy Shop later this week.


Tuesday, April 15, 2014

Birthday Wishes for A Sister

I'm running out the door, so excuse me for a short and quick post.  
I made a greeting card for a super good friend.  We are so close and so 'alike' that we consider our selves sisters {smile}.  We love the same foods, music, men, hobbies, and more.  But, we have one thing that we are complete opposites: card making.  She is not a big fan of pink, or a girly-girl style like me.   So, making her birthday card, more for her, and not my typical style, was a bit different for me.  I needed to have a specific focus and keep my head into the game plan for her card.
I stopped by Mojo Monday #341 for a sketch.  That way, I didn't have to struggle too much.


here is what I created:


I used various pattern papers.  I did add some machine stitching.  I sponged all the edges with a kraft color ink.  Hope she likes it {smile}.  I hope you get a chance to play along in this and other challenges!  Good luck!

Tuesday, April 8, 2014

Just Because in Shabby Chic

~ photo heave post ~

Howdy, and welcome to my little piece of blog-land.  I apologize for being a bit absent, but I was under the weather.  So much so, that I actually went to the doctor's office, and was not able to post for my #100 days of happiness {frown}.
So, today is my new start of my 100 days of happiness, and an entry to two paper craft challenges {smile}.  Now, onto my paper craft for today.  I created a card.  I wasn't sure as to what the sentiment should be, or would be.  So, I kept it simple, and open:  Just Because.
I just love the sketches over @ Mojo Monday so it was only obvious that I stop there and use this weeks sketch: #340


One of the great things about the internet, is that it allows you to connect with a wide variety of folks from different corners of the world.  I follow, and am followed by other crafts from a variety of countries, and thanks to google translator, I am able to communicate with these super talented crafters.  One of the challenge blog sites that I stalk follow, is from Russia: Shabby Chic.  Here is the current color challenge:


Just look at these beautiful colors and graphics for this challenge.  (It is open until April 15th, 2014)

here is what I made:


I used Blushing Bride for the pink, Pear Pizzazz for the green, Pool Party for the blue, all from Stampin' Up!  Now, for the card recipe:  All card stock edges have been sponged with crumb cake classic ink (including the leaves).
I started with  Blushing Bride card stock for the card base.  I had a scrap piece of this beautiful kraft-neutral colored pattern paper from Recollections, and thought it added a little bit of elegance, without taking away from the main panel.
The main panel for this card, that is tilted, is actually a digital paper I purchased last week.  I love the mix of colors, patterns, text, and graphics.  

I ran the main panel through my sewing machine, to add some character, and a little country charm.  I purposely sewn a crooked line.  And it is actually harder not to sew a straight line {smile}. 
I cut a paper doily in half and adhered it to the top third of the digital paper.  To help 'hold' the doily in place, I wrapped a length of Blushing Bride stitch ribbon around the digital paper.  I tied a simple bow with cream twine and added a multi-loop bow of the blushing bride ribbon.
The sketch doesn't have the doily shape, but I thought it added a softness, and a feminine piece.  I thought the cream twine added a little country charm to the bow.


The blossoms were actually hand-made from white crepe paper.  I used a sponge to add color.  To create the blossom, I punched out several 5-petal shapes.  I used a sponge to 'color' the white crepe paper.  I stacked the blossom pieces and crinkled them.  The blue blossom has 7 blossom pieces stacked.  The pink blossom has 5 blossom pieces stacked.  And the green blossom has 3 blossom pieces stacked.

I used a leaf die to create the leaf stem.  I used a scrap piece of pear pizzazz polka dot pattern paper, that has been retired from Stampin' Up!.  I used my 2-way glue pen to add some adhesive to the sides of the 'leaves' and sprinkled on some dazzling diamond glitter.
The banner pieces is from Maya Road.  I just love this layered, stitched piece.  I stamped the sentiment in Staz-On ink in a dark brown.  
Finally, I added three random sequins, and one silver glitter butterfly.

Thank you for stopping by.  I hope you have been inspired to create something beautiful for both of these challenge sites.  This card will be available to purchase at my craft fairs in May, 2014.  Hope to see you there!


Saturday, December 15, 2012

Purple Christmas

This month is really racing by.  I hope all of you have some sort of handle on your chores, obligations, and other items that need to be completed.  Me, I get them done as I need to.  I feel like I am always behind, and trying to play catch up.  I think, as soon as december is over, I should be ok.  But we all know that that isn't true.  It will be the start of the new year.  So, there are those obligations.  Then, I wanted to re-start my virtual card class.  I also wanted to get some crafters together to start another stamping class, that focuses on techniques.  So, as the days pass, the list of things to get done or at least started grows.
Christina, over @ Our Creative Corner, has a delightful challenge for you to try.  She asks, 'make a last minute Christmas card or project featuring the colors Purple and Silver.  You may add other colors, but make sure purple and silver are the focus colors'.

Here is what I created:


Let me start by saying, I struggled with this one.  I don't know about you, but there are a few things I can't always wrap my head around.  I struggle with Purple and Orange, when crafting.  I also have some difficulty with some of Tim Holtz techniques.  Now, don't get me wrong, I'm a super fan of TH.  But, I just don't think like that.  He is super talented and does stuff that I can't figure out how he thinks of this stuff.  Now, as with purple and orange.  I really struggle with these two colors.  They aren't ugly, I just get a mental block.
I started with one of the only purple pattern papers I have, from Dreamscape.  (Yes, I had one sheet that had a piece missing from a special request.)  The card stock is Elegant Eggplant by Stampin' Up!.  The sentiment tag is from a die set, Lots of Tags, by Stampin' Up!.  As well as the sentiment and the ink I used to stamp it.  The Santa in a purple robe was a digital download.  The purple striped pattern paper is the reverse side of the purple flourish pattern paper.  The silver glitter paper is from Stampin' Up!.  I used the eyelet border punch to create the scallops.   The purple crinkled seam binding is a small scrap I found in my ribbon stash.  The rhinestone brad is from Recollections.  
I was going to add a bit more, and matt the santa image, but the challenge is to make something 'last minute' so to me that means quick and easy.  I can easily spend 2 hours making a single card.  But, that isn't last minute.  
I hope you play along with us this week @ Our Creative Corner.  We would love to see what you create.  I know you're pretty clever, and hopefully you won't struggle as much as I did.  I hope you have been inspired.  The design team has created some wonderfully gorgeous paper crafts.  You should stop on over, and take a look.  You just might be making a last minute purple and silver Christmas craft!

Happy Crafting!  hugs, Sharon W.

Thursday, December 13, 2012

Family Christmas Card

Good Morning.  I hope all of you are well.  How's the Christmas shopping going?  Me, I have been done for a few weeks now.  My DH on the other hand, well, let's say I know where he will be this weekend {smile}.
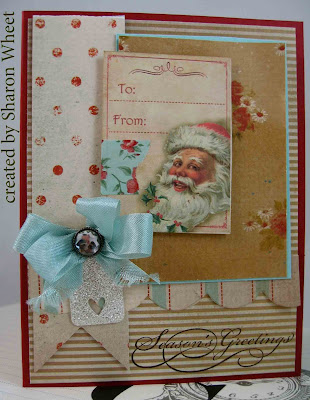
As I mentioned a Saturday or two ago, I make our Christmas cards.  Now, not everyone out there (yes, they do exist) appreciates hand-made Christmas cards.  So, those folks get store bought.  But, the family and close friends extended 'family', who appreciates at least my effort receives a hand-made card.  Now, with all the inspiration out there, I do make a few different versions.  But, I wanted to share the main card being sent through the USPS.  
here is the card:


For those who know me, I don't always follow the 'rules'.  The pattern paper I have used isn't holiday paper.  I saw it in the store, and a Christmas card was screaming to be made!  So, I purchased it.  The pattern paper is Happy Trails by Glitz.  
I just love the colors: deep red, a bit of white, the ocean blue, the stripes and of course the polka dots!  I have an infinity to polka dots.  (My secret obsession.
Here is a close-up of this fabulous digital download I purchased @ iralamija.  I just love her work.  (I have purchased a few different digital downloads from her, and I haven't had a problem.)  The Christmas tag is popped-up with foam tape.  I added a tiny torn piece of Washi tape.  I thought what a perfect match! the same blue, red, and blossoms.  I think that is why it was calling me at the craft store {smile}.
The card base is Cherry Cobbler card stock, from Stampin' Up!.  I layered the different pattern papers on.  I matted the floral paper with Pool Party card stock, from Stampin' Up!.  I just love this color of blue, and really wanted to make the red blossoms pop!.  I made multi-loop bows with Pool Party seam binding, from Stampin' Up!.  The rhinestone brad secures the bow to the card front.  (It's from a big box craft store.)  The tag is cut from Silver glimmer paper, from Stampin' Up!, I used the Tiny Tags die from Paper Trey Ink.  The sentiment is from an old Christmas stamp set Reindeer, by Inkadinkado.
I hope you get a chance to make a holiday card or two.  There are quite a few folks out there, who just LOVE them!  It shows us that you care enough to create!

Happy Crafting!  hugs, Sharon W.