Thursday, November 7, 2013

Christmas Box

Silver and Gold.  Isn't that what the song the snowman sings in the animated show Rudolph?  I made a Christmas box in those colors: silver and gold {smile}.
I'm a paper hoarder collector.  I love paper.  I love paper crafts.  I love creating beautiful things with paper.  My name is Sharon.  
They say the first step to healing/recovery, is admitting that you have a problem.  Paper, is my problem.

I purchase this beautiful silver and gold holiday pattern paper by Anna Griffin about 5/+ years ago.  Saving it, for the perfect paper craft.  And today, I made that perfect paper craft. . .  a decorated gift box!  I am selling these at my craft fair shows, again this year.


I stamped and heat embossed the kraft boxes, with a variety of images: polka dots, doilies, text, and vintage wall paper.  (Just a lovely little addition.)  I wrapped each box with a different mix of pattern papers.  I added a 'bow' and a 'tag' (space to write the recipients name).  Complete!
So, all you have to do, is slide off the pattern paper (belly band), fold the pattern paper flat, and write a name/message, place the gift inside the box, and then slide the pattern paper back on.  Viola! This present is wrapped!
I'll be selling this gift box, as well as others that I have made, at this Saturday's Arts and Craft Fair @ Cleveland Middle School, in Albuquerque, New Mexico.  Hope to see you there!


Wednesday, November 6, 2013

Mailing List = Free Tags

Howdy!  I hope this post finds you well.  Me, busy as a little bee! trying to get more crafts made for my next upcoming Arts and Craft Fair show.  I'll be at Cleveland Middle School, in Albuquerque, NM.  I haven't participated in this craft fair before, so I hope to meet some new folks, and share my paper crafts with them.
Each year, around the summer time, I try to get my schedule of Arts and Craft Fairs together, so I know which venues I'm at, and give my customers a heads up.  Then in October, I mail out my Craft Fair Schedule postcard, to anyone who has requested to be on my mailing list.  
This year, I wanted to add something to the whole process.  So, when I created my post cards, I added a little blurb at the top, letting the recipient know, that if they bring my postcard, to any of the craft shows I am at, they will get an 'exclusive gift'.  It is basically a way for me to thank my past customers.  And here is a look, at their 'exclusive gift'.  
a pair of holiday gift tags:


As you can see, it is a matching duo of tags.  But, before someone gets the wrong idea, or I don't make it clear, the gift is one decorated glassine bag with the two coordinating tags (not both tag collections).
For the tags in the top row, uses my favorite rustic holiday paper: Rustic Snowflakes.  The bottom row, used my favorite traditional holiday paper: Holiday Flourishes & Swirls.  I stamped the 'to' and 'from' onto the tags themselves, using the Holiday Fillers Friendship Jar stamp set.  That font just has a country charm to it.  For the middle sentiment, I used two different stamps.  The 'Merry Christmas' is from the Come to Bethlaham stamp set.  The 'Holiday Cheer' is from a decade old Anna Griffith holiday stamp set.
As for the decorated glassine bags, I simple wrapped a piece of coordinating pattern paper around the middle of the bag, and then I wrapped a piece of ribbon around the pattern paper.  To create the 'label' I  stamped a polka dot frame, using the Four Frames stamp set.  Then I stamped a sentiment inside.  I used the Berry Christmas and Heritage Holiday stamp sets.  I added a vintage button to the front of each bag, just to give it that home-made feel.
I had a few folks ask how much the tag sets are, and well, they aren't for sale.  They are my exclusive 'gift' for those folks who have come to my booth at various craft shows, and have asked to be on my mailing list.
At this point in time, I haven't decided yet, if this will continue to next years Craft show tour, so this may be your only chance to receive this little 'gift'.  I only have two crafts shows left this holiday season!
I want to Thank all the nice, lovely folks who have taken the time, to stop by booth, and take a look at what I have created.  I know that my 'style' is not everyone's favorite.  But, I do appreciate the lovely compliments, and the chance to get my paper crafts into your hands.


Tuesday, November 5, 2013

Dash of Cheer

Whew, this week, is almost as busy as last week.  But, I'm grateful for the work, and the paper craft requests.  But, before I go back into my craft room, I played along with the lovely ladies over @ Nacho Average Challenge.  They have a color challenge this week, and I struggle with those.  So, I kept my card 'clean and simple' (CAS).
here is this week's colors

here is my card:


I used Marina Mist as my main color.  Then added splashes of Melon Mambo and Early Espresso.  The card base is marina mist.  I added a panel of marina mist dsp.  I used my scallop trim border punch to create the decorative border out of early espresso card stock.  I added a strip of plain melon mambo card stock across the front of the card.  
I hand dyed some very vanilla seam binding with my marina mist re inker.  To add a little pizzazz, I tied a vintage faucet button onto the seam binding bow with some thin silver ribbon.
I created my sentiment label with the four frames in marina mist classic ink.  I stamp the sentiment in both early espresso and melon mambo classic inks.  I adhered the frame onto the card front with dimensionals.  But, I felt the card was missing a little something, so I added a trio of half pearls along the right lower edge of the melon mambo card stock strip.
I hope you have been inspired to play along with us @ NAC.  We would love to see what you create.
Now, I need to get back to some chores and crafts.  I'll post a photo of these sweet little gift tags I have made for my 'exclusive' gift for folks who received my holiday craft fair schedule.
Take care, and take some time out of your busy schedule to create something beautiful!


Monday, November 4, 2013

'N' is for . . .

I wanted to share a quirky little side note with you.  But, before we get to that, a little back story.
I am a fan of monograms.  I actually do like them.  Not the weird, misplaced ones of yester-year.  The one's of today.  With scrolling beautiful fonts, and clever ways of incorporating them into our everyday lives.  And with this notion, I started altering chipboards letters.  I adhered strong magnets to the backs, and use them for decoration.  Ok, so the first one I made was for my locker at work.  But, I digress.  I loved the whole process, picking out the papers, collecting little embellishments, and decorating these stark, life-less letters into works of art.  My friends loved them, too.  So, I started making some for the various craft shows I sell my products at.  And what a hit!  These little gems do take quite a bit of time. But, they sure do end up very pretty to look at.  
Anyways, one of my good friends, Nichole, just loved the first 'N' that I ever made.  And boy, does she have an eye for pretty.  That letter 'N' was the first altered monogram magnet I ever sold.  And Nichole has loved every 'N' I have made since.  I typically create 'N's in black and white color combos with splashes of bright yellow.  But this year, I went another route. Cream and black with a pop of lavender. And it sold at my first arts and craft fair this holiday season!

packaged, and displayed on a framed metal sheet

So, my quirky little side note is this:  out of all the altered magnetic monograms I have created, the letter 'N' is my top seller!  I have sold more 'N's than any other letter, I have created.  Isn't that just funny?  And do you wanna guess what letter I am crafting again this week, for the upcoming craft fair?  Ding, ding, ding! We have a winner!  'N'
Thank you, Nichole for all your love, support, and encouragement!


Sunday, November 3, 2013

Holly Days

Whew, what a busy weekend.  I am spending today getting caught up on chores, and carving out an hour to 'put my feet up' {smile}.  I spent a lot of time last week paper crafting, to increase my inventory of products to sell at some up-coming arts and craft fairs.  I know that my husband has 'missed' me, seeing as all my waking time was spent in my craft room.  Poor man.  But, that commitment and focus hasn't changed.  I have another arts and craft fair this next weekend, and I need to make some more items that sold out yesterday.
On a bright and cheery note, the folks who did stop-by my booth and take a look, did say how pretty my things were (smile).  I even have a few special orders that I need to start working on, too.  Busy little bee, I am.  But I do enjoy the whole process of paper crafting {smile}.
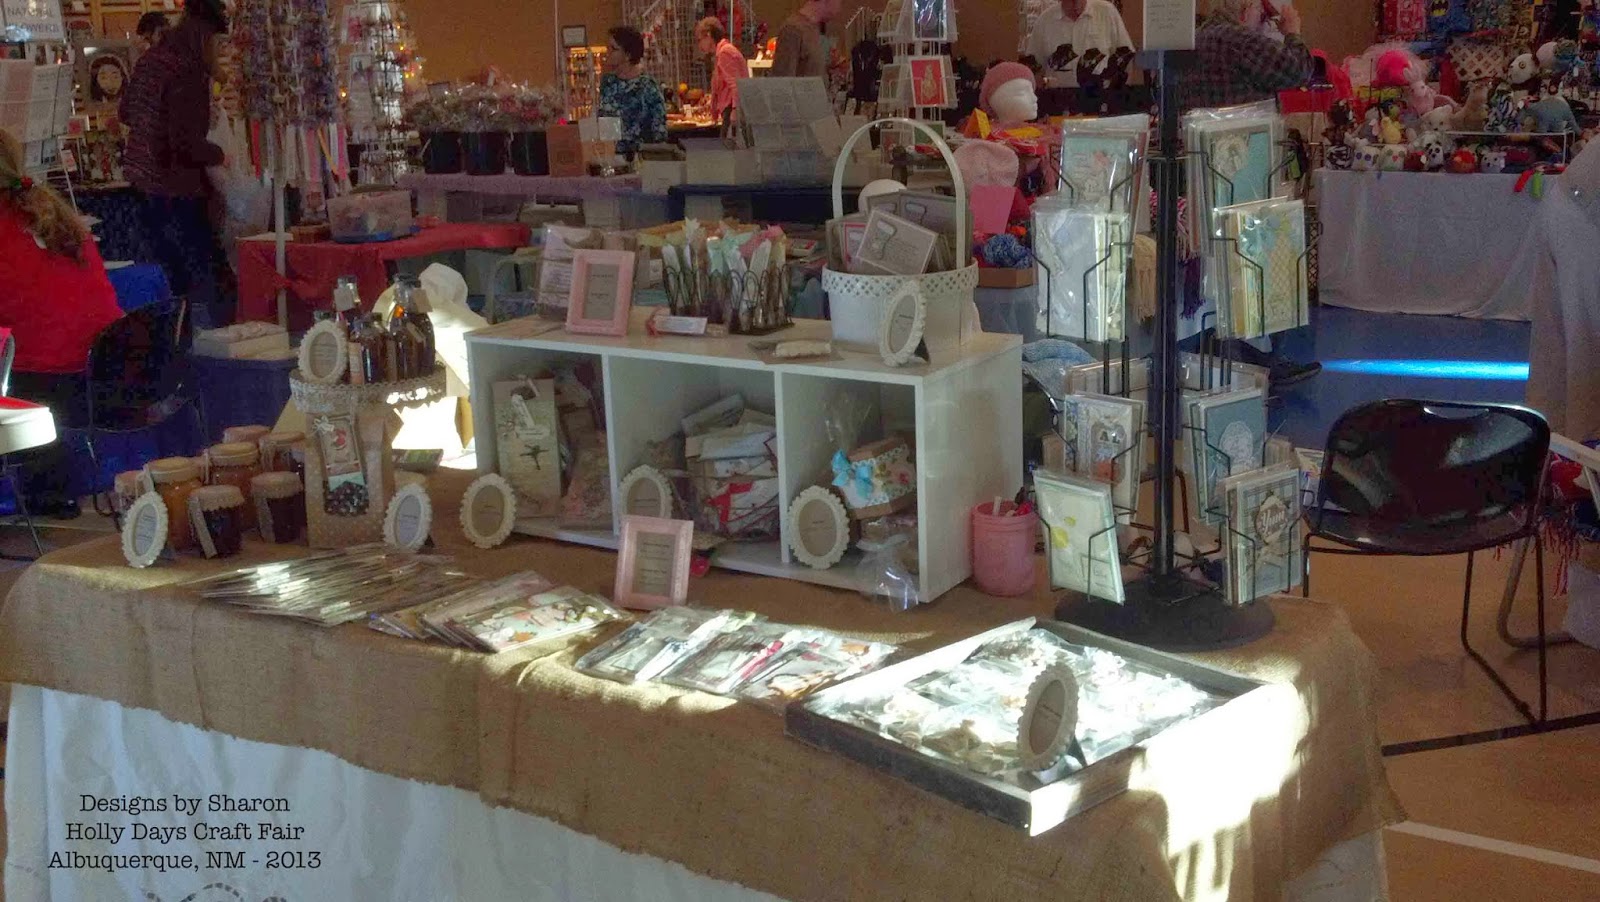
I took a photo of my booth just before the start of the 18th Annual Holly Days Arts and Craft Fair, this year.  However, the photo was taken with my phone, so it isn't the best, and the morning sun was shining right onto my display booth {frown}.  But, all in all, it was good.


Right to Left and Top to Bottom:  the carousel holds hand-made cards that I have made this year.  Just in front of that, is a gray wooden frame that is holding magnetic letters.  On top of the white shelves, is a white 'basket' that is holding snowman poop, in the black wire 'basket' is tubes of magic reindeer food, and the last wire basket holds magic Santa keys.  In the cubbies of the white shelves are (right to left) gift boxes, then gift card holders, and small gift bags.  In front of the white shelves (right to left), are altered mini note books, then covered note pads and then food-safe bags with vintage/shabby tags.
At the end of the table, I have 3 rows of canning jars with Blueberry Spoon Fruit, Vanilla Spiced Peaches, and Cranberry Relish.  On the vintage white cake stand, I have my home-made pure Vanilla extracts made from different vanilla beans from Mexico, Indonesia, Tonga, and Uganda.  These different regions, with their different soils and climates, create unique tasting vanilla beans.
I had a sweet time talking with other crafts, and meeting folks who stopped by to chat.  If you are in the Albuquerque, New Mexico area this coming weekend, please stop by my booth @ the Cleveland Middle School.  And if you received a post card of my craft fair schedule, don't forget to bring it with you, to receive your exclusive gift {smile}.


Friday, November 1, 2013

Dots and Dots

Wow, can you believe that it is Friday, already?  Me, if I were to be completely honest, I'd like to have one more day before the weekend starts.  (and I don't want to count this day, as my 'one more day'.)  I have been busy getting some paper craft items created, and made for this holiday season's upcoming Arts and Craft Fairs.  My first fair is tomorrow - Saturday!
I am planning on using this day, to get all my crafts packaged, priced, and labeled.  I'm hoping that I will have some time to do a mock set-up of my tables and see what works for product placement.  But, we'll see.  
Then early this evening, I'm making a trip into town, to get my tables delivered and set up.  That way, all I have to do tomorrow morning, is put my product out.  And I figure that will take about 30 minutes, but I'll give myself an hour.  Just in case.  Know what I mean?  
But, before I get busy getting all of that together, I want to share a card I made, for Sketch Frenzy Friday.  The lovely Jennifer @ Sketch Frenzy Friday, has a very user friendly sketch for you to try.


here is what i created


I have been Christmas crafting my little heart out, and trying to change my gears, is a bit difficult.  I used a piece of Sweater Weather DSP (blue polka dot) as my main panel.  I wanted to accentuate the polka dots, so I matted this pattern paper onto a piece of very vanilla card stock.  
I also wanted my belly band to be in contrast to the card.  So, I used a piece of black and vanilla polka dot paper (Modern Medley DSP).  I wrapped a piece of pool party seam binding across the belly band.  But I wanted to add a homemade touch to it, so I added a machine stitch to it.  
I dry embossed the oval frame  and then tore around the shape.  I stamped the 'friends forever' button in crumb cake classic ink.  I used dimensionals to lift the button off the card front.
I created a sentiment banner using a scrap piece of very vanilla card stock.  I stamped the sentiment in basic black classic ink, and flagged the ends.
For the bow, I tied a multi-loop bow and then tied a vintage faceted button to the center of the bow with some thin silver ribbon.  I wanted to give the card a little sparkle.
I hope that you have been inspired to play along with us @ SFF.
Thank you for stopping by, and I hope that you have been inspired to create something beautiful of your own (smile).