
I came across Joanne's wonderful flower tutorial, on how to make these super cute blossoms. So, I had to try it myself, and then I thought, why not make a tutorial myself! The thing that I love about this blossom, is that you can use your scraps, and one glue dot. Quick, easy, and not alot of supplies. It's my birthday today, so here is my 'gift' to you!
Here is what you will need. (I punched the different size flowers in different colors, so you can tell what I'm doing.)

Using the hand-held 1/16" hole punch, punch a hole in the center of each flower.

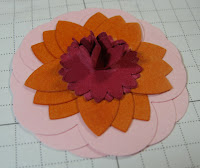
Insert the brad through the smallest flowers first. Then the middle size flowers.
The largest flowers last. Also, you will need to off-set the flowers.
Flay the legs of the brad to hold your blossom together.

Starting with the flower closest to the brad, spray the punched cardstock with water,
to help make the cardstock pliable. (Be careful not to saturate the cardstock.)
Then, start scrunching the flower around the brad.
Spray with water as needed.

If you want to 'color' the edges of the 'petals' of your blossom, this is the time to do so.
You can either sponge on some color to the edges of the petals,
or spray your scrunched-up blossom with shimmer paint.
Now, unfold each layer of petals, one at a time.
The first flower should remain as close to the brad as possible.

This is your opportunity to tweek, or play with how each blossom will look.
Once the blossom dries, it can't be re-shapen.
(So, no more squashed flowers in the mailing process!)
Apply a glue dot to the back of the blossom, and you can adhere it to a card, or project!
Thank you, for stopping by to see what I've been doing! Happy Friday! And try this blossom. If you don't have exactly the same punches, use what you have. Substitute a scallop circle for a flower shape. And, if you don't have enough scraps of cardstock to punch three of each shape, punch two. Or use pattern paper scraps.
I know you will love what you make! Make it yours! Original! Unique! Have fun!
1 comment:
Wow - gorgeous! Thanks for sharing the how-to!
Post a Comment