Wednesday, April 3, 2013

Flower Tutorial


PHOTO HEAVY

Glad you stopped by.  I had a lot of folks ask me just how I did the 3-D paper blossom seen here, and here .
As you know, I typically give explanations as to how I do stuff, or at least a sequence of events. But I felt, if I added some photos, the explanation just might be a bit clearer.  (I'm a visual person myself.)  So, here we go.
Supplies:
white shimmer paper
white embossing powder
versa mark ink
heat tool
aqua painter
classic re-inker
white craft re-inker
glue dots
hot glue & gun
foam matt
curling tools (wooden dowl, wooden skewer)
crumb cake classic ink pad
classic ink pad of the same shade as the classic re-inker

I started with Stampin' Up!'s shimmer white cardstock.  (This is a heavy weight cardstock with a water resistant barrier (so to speak) on it.  It's the cardstock that is recommended to use, when doing any type of color wash.  The water stays on top of the card stock, and doesn't soak through.) 
You could use water coloring paper, but your effect will be slightly different, as well as the texture.  So experiment and have fun {smile}.
To begin, I stamped three blossom patterns with Versa Mark, then used white embossing powder, and heat set the images.  (If  you use water color paper, stamp with a Staz-On color.)

heat embossed white blossom images on shimmer paper
To color wash:  I then placed a drop of re-inker (color of your choice) onto a color palate tray.  First, you will need to wet your paper.  Water color the paper with plain water, or spray the paper with water.  With your aqua painter pick up a dab of reinker and 'wash' the heat embossed paper with the color.  (The more reinker you use, the darker the color.)
Once the color washed images are dry, punch out the blossom shapes.

three blossoms stamped, heat embossed, color washed, and punched.
With your paper snips, cut one petal off one blossom, and two petals off another blossom.  (The more blossoms you have the fuller your finished blossom will be.)  {On this blossom, I used with four blossoms.}

petals cut
Now it's time to bend and curl blossom layers and petals.  I use what I have on hand for this part.  You will need 2 different size curves.  I use a wooden dowl for cakes, and a wooden skewer for BBQ.  But, you can use a pencil, and a paint brush handle, as well.  (The idea, is to have a narrow bend, and a medium bend.)
I used my wooden dowl to curl the petal tips out.  I used my wooden skewer to bend the petal piece inwards, to get the cut ends to meet.  I used a glue dot to hold the cut ends of the petals closed.

curled single and double petals
I like to start from the inside of the blossom and work my way to the outside.  This allows me to ensure that each layer fits snugly together, without too much of a gap.  I nestled the single petal into the double petal blossom.  Now adhere the 2 layers together.
I like to use hot glue to hold everything together.  But you can use any liquid-type of adhesive.  (If you use any liquid adhesive except hot glue, you will need the adhesive to dry before you continue.)
single blossom nestled in double blossom
Now, you just keep building your blossom.  Remember, each piece needs to be curled.  Curl the petal tips out, and the blossom piece inwards.  Don't forget to connect the cut ends together.
As I layer, I also off-set each new addition.  This gives the finished blossom a spiral effect.

the single and double petal blossoms are nestled inside the four petal blossom

the five petal blossom with the cut end joined with a glue dot

the single, double, and four petal blossoms are nestled into the 5 petal blossom

the only whole blossom piece
To complete the blossom, stack the layered blossom into the whole blossom piece.

the whole blossom piece with the stacked blossom pieces
completed layered/stacked blossom
Once all your liquid adhesive has dried, it's time to distress your blossom.  (I use a glue gun, because I can't wait for glue to dry.)  
Place a drop or two of white craft re-inker onto your plastic color palette.  With a paint brush, brush the white craft ink onto the petal tips.  You may need to 'lift' a petal or two, to get the white craft ink where you want it.  But don't fret, since your glue is dry, the blossom won't come apart.
white craft ink applied to petal tips
After you have painted all the petal tips with white craft ink, dunk the whole blossom into a tub of dazzling diamond glitter.  (You can also pour the glitter onto the blossom.)  Tap off any extra glitter that has not adhered to the craft ink.  Let the glitter 'set' with the craft ink, aka allow to dry.  This is a good time, to grab another latte, cup of tea, go the bathroom, grab a sandwich, start another load of laundry.  You get the idea.  This takes about 15 minutes.  Give or take.  It really depends on how thick you painted the white craft ink onto the petals.

Now, it's time to distress the petal tips.  I sponged crumb cake classic ink onto the dried petals ends.  (The dried craft ink holds the glitter in place.)  Sponge little,  or a lot.  This part makes some folks a little nervous.  Just remember how pretty our blossom is when we finish.

crumb cake classic ink sponged onto petal tips
Now, we add the 'real' color.  The 'real' color is the color you used to wash the original whole blossoms with.  Using the same color to sponge over the same areas you used crumb cake classic ink.  (Using a sponge places color randomly without saturating the color.) For this blossom, I sponged perfect plum classic ink.  (By using the same color, but in a different strength/medium adds a certain depth to the color.)

perfect plum classic ink sponged onto petal tips
Viola!  Your blossom is complete.  Just adhere the paper flower to any paper craft.  

completed paper blossom
Remember, this blossom is tall.  So it will add bulk to your project.  If this blossom is placed on a card front, the card will not fit inside the coordinating envelope.  You will need a decorative box or an oversized envelope.

side view of paper blossom, to show height

Thank you for stopping by.  I hope this tutorial helps you see how these paper blossoms are created.  They aren't hard.  But they also don't take 5 minutes.  If you have any questions, please drop me a line.


Tuesday, April 2, 2013

NAC #40

Welcome.  I hope your week is off to a good start.  Mine, light speed.  But then again, what's new?  This is a short week at work for me.  If you live in or near Albuquerque, then you know that the Hen House Stamp retreat is this weekend.  And what does that mean?  Well, if you're a paper crafter (like me) than you are welcome to spend the weekend with others with the same passion.  A whole weekend of uninterrupted time to paper craft.  Nirvana.


But, before I head out the door with a purpose, lets play along with the lovely and talented ladies @ Nacho Average Challenge.  This week, there is a color challenge.  And they are beautiful colors!
If you are a frequent visitor/follower, you know that these colors speak volumes to me.  I love soft, pretty colors.  And these colors scream feminine.  Let's inspire you!


Once I saw the color challenge, I instantly knew what I was going to do!  Use the perfect plum for a blossom.  Use the lucky limeade for folage.  Use the pool party for butterflies, and to ground the whole card add some crumb cake and first edition dsp.  Let's face it.  In my book, Pool Party is only second to Pink Pirouette, for me.  I also knew that I wanted to add some of that gorgeous floral lace trim from the Artisan Emellishment kit.  Add a little machine sewing, to help add charm.  If I could figure out where to add some pearls, you know you would see some.  But, I really couldn't get them to work.  I also really, really wanted to add a bow.   But the card doesn't have a bow or pearls.
Here is what I did.  
I cut twelve 1 1/4" squares of very vanilla card stock.  I placed them in the vintage wallpaper embossing folder, to give this neutral card stock some texture and a feminine feel.  I sponged crumb cake classic ink on all four sides of each square.  
I cut a piece of crumb cake card stock to 4" x 5 1/4".  I then adhered the sponged very vanilla embossed squares to the crumb cake cardstock.  This gave me my crumb cake fix!
I cut a strip of the floral lace trim to go across the card front.  I wrapped a piece of pool party seam binding.  I didn't crinkle the seam binding.  I felt that if I crinkled the seam binding, it would give this card a 'sloppy' look.  I wanted to keep the look clean, soft, and spring-y!  
Then, I added some machine stitching.  I first machine stitched the seam binding and lace.  Then, I started machine stitching the whole parameter of the card, roughly a 1/4" from the edge.  
Now, it's time to build the blossom, that will be the focal point of this card.  This blossom was built with three whole blossoms that were stamped, heat embossed, color washed, punched, cut, bent, stacked, glittered, distressed, and sponged.  Whew.  I used the same floral stamp to stamp on the first edition dsp, and used the build a blossom punch to punch the leaf shapes.  And of course, I distressed the edges of the leaves with crumb cake classic ink.
The butterflies were equally as much fun to create.  I used the kindness matters stamp set.  I stamped the butterflies in jet black staz-on ink, onto white shimmer cardstock.  I color washed the butterflies with pool party re-inker.  I used my detail scissors to fussy cut them out.  Then I sponged perfect plum classic ink on the forward wing tips, sponged pool party classic ink on the back wing tips, and then used a tiny paint brush to add some lucky limeade to the center of the butterflies bodies.  I outlined each butterfly with my 2-way glue pen and then dunked each butterfly into my tub of dazzling diamond glitter.  I used foam tape to adhere the butterflies to the card front.
I hope you have been inspired to create a paper craft item for our color challenge over @ NAC {smile}.


Sunday, March 31, 2013

Stripes Finished Bag


Happy Easter!  I hope this holiday gives you an opportunity to spend time with both family and friends.  We are eating Easter Dinner at my daughter's house.  There is an egg hunt scheduled for the early afternoon.  Im sure the kids will enjoy that.
I finished Stripes sleeping bag, yesterday.  I decided to wait until today, to share this little cutie.  Back story: Stripes is a stuffed animal (zebra) that my oldest granddaughter has carried around since she was 2.  She's 6 1/2 now.  


Haley loves pink.  I purchased these fabrics from a local sewing center (Joann's).  There were originally 4 fabrics that came bundled together, cut into fat quarters.  The patterns are bright and simply beautiful together.  So, this is my first one.  Please have a kind eye, as I am seriously new at sewing.
Here is where I found the instructional PDF.  And I'm glad that I did.
Thank you for stopping by!

Saturday, March 30, 2013

Mail

Aww, the weekend is upon us!  This is a welcome break, from the week of work I had.  Just busy, busy, busy.  So, on this weekend, I don't have any chores to do, or anywhere that i have to be today.  so, I have plans to sit at my sewing machine, and finish a sewing project. {smile}


But, before I get to that, I wanted to take a moment to get you inspired to play along with us this week @ Our Creative Corner.  Lori, is our hostess this week.  She would like you to use two different pattern papers to create a paper craft showing transportation or travel.
The very first thing that I thought of was a travel journal.  But, I guess the stress from this week's work, has really blocked me creatively.  So, I made a card.


This card is not my 'typical' style, but I do like the clean lines of it.  
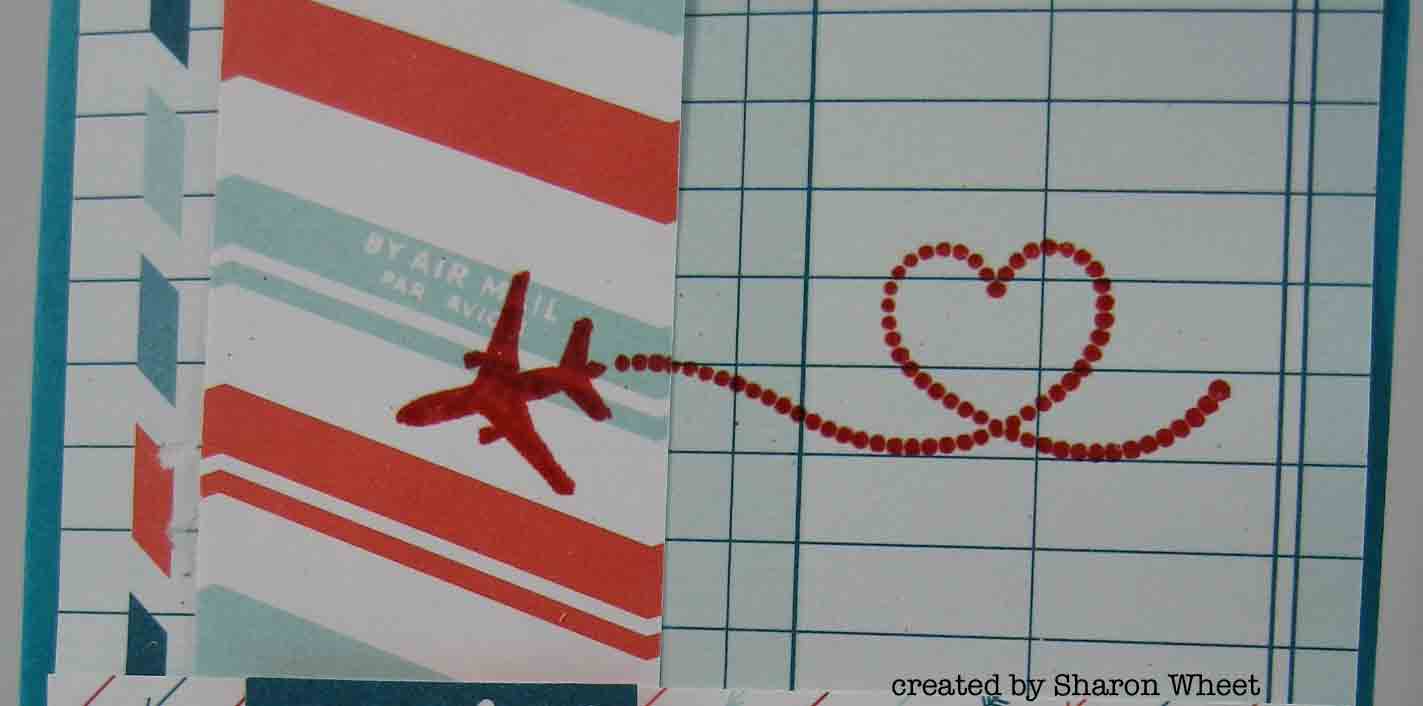
I used a new DSP paper from Stampin' Up!  I used four different pattern papers for this card.  The airplane and 'heart' exhaust are heat embossed.  The banner piece 'sealed with a kiss' is adhered to the card front with foam tape.  I used the tasteful trim die to cut the large scallop trim.  I used my 1 1/4" square punch to make the banner end of the striped paper.
Join us this week, and share with us what you have created from our challenges!

love this card? you can purchase it here, at my Etsy shop.

Friday, March 29, 2013

With Sympathy

Happy Friday.  I hope this post finds you well and motivated to create!  


The wonderfully talented Patrice has a fun and creative sketch for you to try over @ Sketch Frenzy Friday.
Here is her sketch:


Here is what I did with this sketch:


When I first saw the sketch, I had several ideas about the trio of partial ovals along one side.  I was thinking, buttons, flowers, hearts, . . .  you get the idea.  Then I was thinking of adding eyelets and lacing ribbon through.  But, I couldn't get the idea/theme to move forward.  So, I scrubbed that whole thought process.  Then it hit me, what about butterflies cascading. 
For the cascading butterflies, I applied by 2way glue pen to the edges of each butterfly, and then dunked them in my tub of dazzling diamond glitter.  I added tiny pearls to the bodies of the butterflies.
For the large circular object, I went with a doily from the Artisan embellishment kit.  But it looked a bit flat, so I stamped a flower on the doily.  I stamped the flower image from Oh Hello stamp set, in soft suede classic ink.  I thought that shade of brown paired very nicely with the pool party shade of blue.
I wanted to add some pretty embellishments, so I added a metal button from the Artisan embellishment kit.  But, I couldn't decide if bakers twine or ribbon or linen thread threaded through the thread holes.  So, I added a pearl to help soften the whole look.  
I machine stitched a strip of soft suede taffeta ribbon to the front of the card.  I threaded the tails of the taffeta ribbon through the thread holes of the vintage faceted button.  I tied the ribbon into a simple bow.  
I stamped the sentiment in soft suede classic ink along the bottom of my card.  I used a sentiment from the Loving Thoughts stamp set. 
Thank you for stopping by.  I hope you have been inspired to play along with us @ SFF.

love this card? you can purchase it here, @ my Etsy shop.

Thursday, March 28, 2013

a Bed for Stripes

Good Morning.   
an unfinished sleeping bag for Stripes

I wanted to just pop-in real quick, to share a little sewing project I started.  I was spending time on Pinterest, earlier this week.  And I stumbled on this cute sewing project: The Three Bears' Sleeping Bag, by flossieteacakes.  What is that? you ask.  Well, they are quilted sleeping bags for your child's stuffed animals.  How cute is that, right?  Well, after some grumbling, I purchased the PDF instructions, and I'm supper happy I did!  While I was at the fabric store on Tuesday, I purchased some quilting fabric that I wanted to use, to make my oldest granddaughter a sleeping bag for her stuffed zebra, Stripes.  Here are some photos.  (I'm not finished with this project, yet.)

top of the mattress
bottom of the mattress
the quilted top
As you can see, I can't sew a straight line, and I need to cut a few more threads.  But, this was my first ever attempt at quilting.  So, I'm not too hard on myself.  All I have left, is the pillow, and the trim.  I'm pretty sure Haley, will love it.  
I'm fairly new at sewing.  I've made a few rag quilt lap blankets, and a few clutches, some fabric coasters, altered one-sies, and now this.  So, when I say that you can easily whip one (or more) of these together in a weekend, I'm not kidding.  The hardest, but funnest part, is selecting the fabric.  There are so many, many different patterns to choose from, I suggest that you have an idea of what you're looking for, before you start looking.  As with any project from the heart, the hardest part is starting.  But, I'm pretty sure, that once you start, you'll enjoy the process as I have.  I'm not sure if it's the hum of the sewing machine, no distractions, or the fact that I am creating, but I truly love the process.  So, I guess this little sleeping bag has enriched two lives: Haley's and mine.  {smile}.
I hope you get to craft today.  I'll post more photos once I finish.  Thank you for stopping by.