Monday, May 30, 2016

Rag Quilt Insert

Happy Memorial Day!  I hope you are well.  And don't forget to give Thanks to those military personnel who have sacrificed and who have fought for the freedoms we enjoy today!  {a moment of silence to say 'thanks' and say a prayer}
I have been working on my 'bed spring light' over the weekend.   I have the frame, which was shown earlier this month.  But, I was struggling with what to put behind the bed springs.  And I believe that I have it figured out!  (yeah!)  I recently purchased this gorgeous Rachel Ashwell shabby chic fabric, and some linen in a light kraft color and a dark brown-copper color.  I believe that I will be mixing all of them.  {smile}
I took the shabby chic fabric, and the light kraft linen fabrics, and cut them into scallop squares.  I also added some cream colored battling between the two fabric pieces.  Made little 'sandwiches' and sewn them together.  
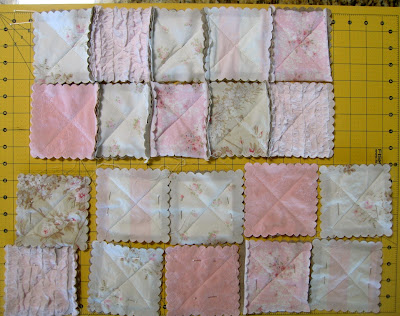
shabby chic fabric squares
I sewn a simple X across each scallop square 'sandwich'.  Then I sewn the squares together in each row.  And then, the rows were sewn together.


Finally, I used super sharp scissors to cut snips in the fabric between the blocks, and machine washed this piece again, to help 'fluff' the snipped fabric between the squares.


Yes, the finally piece has the blocks in a different order. {frown}  Unfortunately, I was doing other 'things' while putting the rows together, and didn't realize I had the bottom two rows switched. {frown}  And now, that I am looking at this photo, I realize that I have two of the same blocks in the same row.  What the heck!  Well, this is the final piece.  I will not be making any changes.  Remember (or at least, this is what I am telling myself) a section of rusty bed springs, with lights will be sitting right on top of this piece.  I created this rag quilt piece to help give the 'bed spring light' a shabby chic, feminine look.  Hopefully, (fingers crossed) that with the bed springs, lights, drag chain, and chandelier crystals on top of this  piece, will distract your eye, and you won't notice the two pink ruffled squares in the same row.
Please stay tuned.  I will be going into town today, to pick up some globe lights for this piece.  The chandelier crystals should arrive around the middle of June; so a few weeks away.  But, I am planning on adding the chandelier crystals after the bed springs and lights are 'attached'.  I'm getting closer to being done!
Thank you for stopping by!  Have a great day, be safe, and take some time to craft something!


Saturday, May 28, 2016

Small {Scale} Sweets Bakes

Howdy.  I know.  I've been absent.  But, in my defense, I have been busy baking! {smile}.  As some of you know, I love baking.  (I basically love all forms of creativity.)  I had a cupcake order (ok, 2), and a picnic to attend, so why not do it all at once!  Bake, bake, and bake some more!
The first order of cupcakes, were my version of a Mexican Hot Chocolate Cupcakes.  It's a rich milk chocolate cake with cinnamon and cayenne pepper.  A layer of milk chocolate ganache, with a cinnamon whipped topping, and milk chocolate drizzle.  They are actually very yummy!


I also had an order for another chocolate cupcake:  Luck-Of-The-Irish.  A different chocolate treat, but equally delightful!  A rich dark chocolate & Guinness cake, with a whipped Irish Cream filling, caramel buttercream frosting, and milk chocolate drizzle.  


And then there is pie!  Who doesn't love a good, fresh, berry pie at a summer-time picnic/cook-out?


It's a slab pie.  [a 'slab' pie is baked in a rimmed cookie sheet, instead of round pie pans.]  You can serve a large crowd with a slab pie.  And it doesn't take any extra time than making a standard round pie.   The flavor of pie?  Junk Berry - apple, peach, strawberry, raspberry, blueberry, and blackberry.  There is not a top crush.  Instead, I did a sour cream topping.  It's a bit lighter, and complements the berries beautifully! {smile}.
* the photo labels of: Small {Scale} Sweets, is the name of my baking company.  It's not official, yet. But, why not get my unofficial name out there.  {smile}.
Enjoy your holiday weekend.  And remember to honor those who have sacrificed so much, so we can enjoy our freedoms today.  


Monday, May 23, 2016

Drag Chain - Steampunk

Howdy.  I wanted to share with you a little piece of my latest home decor project.  While in Phoenix, I had the opportunity to stop by Sweet Salvage and pick up a few treasures.  {smile}  One of my treasures is a section of rusty bed springs.  I know, that doesn't sound like such a 'treasure'.  But, it truly is!
I want to make a light fixture out of this piece of rusty bed springs.   I know, that sounds a bit 'off' or 'crazy', but I have a vision.  And my vision also includes a piece of decorative 'art' to make it special.  While visiting Round Top, Texas, during Antique Week, I saw a piece of very interesting link chain.  I didn't buy it at the time, because the seller wanted to sell over 10yards in one bundle.  And I just couldn't justify the expense for the purchase.  The seller called it 'drag chain', and claimed that it was used in chicken coups.


Well, I found a seller on eBay, who was selling a 10 foot section.  I can handle 10 feet, just not 10  yards.  My chain arrived a few days ago, and well I have been busy.  Until today!  I opened my box, and the excitement bubbled up as if it was Christmas morning!  I plan on using this 'chain' as a decorative accent piece to my bed spring light fixture.  I haven't figured out {yet} how to attach it to the bed springs.  But, don't fret, I believe that I can figure it out.  {smile}
Stay tuned.  I can't make any promises as to when I will post photos.  
Thank you for stopping by.  I hope I have given you a new way to look at 'old' things, with a new eye! {smile}

Sunday, May 22, 2016

Provence-Style Rose

Howdy!  Hope this post finds you well, and enjoying your weekend.  Me, busy as a bee.  But, what's new.  I always wait patiently for the summer, because I tell myself, 'life will slow down, and I can catch my breathe.'  And we all know that is so far from the truth.  No one's life 'slows down' during the summer.  Actually, it is quite opposite.  We are all in a rush to get in some vacation time, and attend as many cook outs as possible.  {smile}
I did however, take some time for myself this morning to create a card for a challenge or two.  (ok, 3) So, here we go!  I stopped by the creative challenge site: Crazy 4 Challenges.  Their current challenge is a sketch.  Awesome!
I turned the sketch 90 degrees to the left

My next stop, was the beautiful challenge site:  Scrap Magic.  They always have great inspiration boards.  Their current challenge is to craft in Provence Style.  {I'm going to try it}


And last, I stopped by the Brown Sugar Challenge site.  Their current challenge is - Anything Goes.

here is what I crafted:


Recipe:  I used kraft card stock for the base of the card.  I love the rustic look of this paper.  I used two different pattern papers, and both are years old.  (sorry, I'm trying to use what I have on hand.)
The main panel is a Valentine's day theme paper from My Minds Eye.  It has that weathered look to it.  The blossoms are done in a faint reddish purple color.  I used the edge of my scissors to distress the edges.  I then swiped some white canvas ink over the edges.  And finally, I added some machine stitching.  
The grayish polka dot pattern paper is from a Christmas collection.  (my scrap piece no longer had the manufacture name on it.  If I had to guess, I'd say another My Minds Eye pattern paper.  I matted that piece with a scrap piece of kraft card stock.  A little more machine stitching.
The cotton-rhinestone piece is actually from Prima.  And probably 6/+ years old.  I still have 5 of these left, in a cream, a brown, and this beautiful rose color.  [I know this sounds like I'm a hoarder, but, really just a collector.]  I painted a wooden button with white acrylic paint, and dunked it into a tub of glitter.  Once the paint was dry, I took a small piece of sand paper to the button, to rough it up a bit.  I tied the button to the card front with kraft twine, from Paper Trey Ink.  I tied a double bow between the card and button.
I added a scrap piece of cotton trim just above the cotton-rhinestone piece.  I felt that the card needed another layer of fabric.  
My sentiment piece is hand-stamped and machine cut.  I used a coordinating stamp and die set from Amuse Studios for that piece.  [Vintage Labels is the die & stamp set]  I stamped the outline, and sentiment with basic grey classic ink, by Stampin' Up!  The Hand Scripted sentiment stamp set comes with various words to mix and match.  The card stock I used for the sentiment piece, is actually the back side of the weathered blossom pattern paper I used for the main panel.  The grey streaking is a distressed look for the paper.
I added a white resin piece from Melissa Frances.  I thought the basket of blossoms was a perfect fit for this card.  I used a retired Pale Plum marker, by Stampin' Up! to color two blossoms and the bow. I thought this color of purple matched the cards overall look perfectly!  And finally, I added a trio of pearl halves.  {smile}

Thank you for stopping by.  I hope that I have inspired you to create something beautiful or simply to play along in any or all of these challenge sites!


Wednesday, May 18, 2016

Hand-Crafting in the Kitchen

Howdy.  I believe that you can 'hand-craft' a variety of things.  I also know, that sometimes, the best things in life are created.  I started making marshmallows last year. And yeah, as my husband has pointed out, 'you can buy marshmallows at the grocery store'.  So, there really isn't any need to make them at home.  I was a bit surprised that my husband took that stand.  I make his cookies, cakes, dinners, bread, and favorite dinner rolls by hand.  
I have tried several different recipes of home-made marshmallows.  And I have failed miserably at several of these recipes.  But, I didn't let that discourage me.  I'm pretty smart, and love a challenge.  
hand-crafted Vanilla Marshmallows

made @ Small {scale} Sweets shop

These vanilla marshmallows are not ridiculously hard to make.  They just take time.  I typically 'make' these in a rectangular pan. I use a serrated knife to cut these marshmallows into cubes.  As you can see, there are air pockets in the marshmallow.  I think these add character and aid in the lightness of these little pillows of sugar.  {smile}

half-recipe of marshmallows

made @ Small {scale} Sweets shop

Recipe:
3  envelopes of unflavored gelatin
1/2 cup cold water
1/4 cup milk
2/3 cup clear corn syrup
2 cups sugar
1 vanilla bean scraped
1 teaspoon vanilla extract 

You will need a stand mixer fitted with a balloon whisk, a heavy sauce pan, a spatula, a rectangle pan, clear plastic wrap, parchment paper, powder sugar, a serrated knife, and Pam.
*if you use homemade vanilla extract, and organic powdered sugar, you will make these light as air pillows of sugar gluten-free! {smile}
Pour the water into the mixing bowl of the stand mixer.  Sprinkle the unflavored gelatin on the water. Let this sit for 10 minutes.  While your waiting, make the sugar. 
Heat the milk, corn syrup, and sugar in a heavy sauce pan, over medium high heat.  Bring the sugar mixture to boil, and boil for one minute.  
Remove the sugar from heat, stir in vanilla bean paste and extract.
Turn the stand mixer on to medium, and slowly pour the hot sugar mixture down the side of the mixing bowl.  Bring the speed of the mixer as high as possible.  Beat on high for 12 minutes. 
While the mixer is going, prep your pan and clear plastic wrap.  Spray the rectangle (9" x 13") pan and plastic wrap with Pam.  Once the sugar is whipped, pour into the rectangle pan.  You will need to use a spatula (sprayed with Pam) to help move the sugar out of the mixing bowl into the pan.  You will need to level the whipped sugar into the pan, to help create a uniform marshmallow.  Lay the plastic wrap, sprayed side toward the whipped sugar.  Lay the plastic wrap directly on the whipped sugar, and sealing the whole surface of the whipped sugar.  
Set your timer for a minimum of 2 hours.  (I personally have not let this set longer than 4hours.)  Remove the plastic wrap, and turn the marshmallow slab onto a piece of parchment paper.  Use a serrated knife to slice the marshmallow slab into strips, and then cut the strips into cubes.  Place a few cubes into a bowl of powdered sugar and toss.  Shake the excess powdered sugar off each cube.  
Store the homemade marshmallows in an air tight container.
Use these marshmallows the same way you would the store purchased ones: roast them to make delicious s'mores, dip them in chocolate, add to hot cocoa, or simply eat them just the way they are!
*if you want to make gluten-free* 'rice krispie treats', there is no need to turn the whipped sugar into a rectangle pan to have them set-up, simply add the cereal into the mixing bowl and then turn the cereal mixture into a butter rectangle pan.

Thank you for stopping by.  I hope I have inspired you to cook something home-made.  {smile}


Wednesday, May 11, 2016

Weathered Rose Card

Howdy.  I am in the kitchen, getting a few dishes together for our Nurse's Week Luncheon tomorrow. But, that didn't stop me from crafting one more card.  I have had a grand time playing along with the latest sketch from CAS(E) this Sketch, so I decided to make one more card {smile}.


and here is my latest card:


and a different view:


Recipe:  The card base is soft suede card stock, by Stampin' Up!.  I love this golden kraft color.  {smile}  The matt paper is from a local shop, and I don't know who makes it, or the color/pattern name.  Sorry.  I just love the aqua color with gold pattern.  Very pretty.   
The blossom pattern paper is from Authentique, the Grace collection.  I believe that it is the last remaining scrap piece I have on hand.  I used my sewing machine to do a double border, to add to the homespun feeling.
I used another Anna Griffin chalkboard sentiment tag for my sentiment.  I had a scrap piece of this beautiful orange polka dot pattern paper, that matched beautifully with the Grace pattern paper.  I adhered it to a scrap piece of soft suede card stock, with foam tape.  
I did wrap a length of Aqua Mist polka dot satin ribbon around the orange polka dot pattern paper and tied it in a simple bow.
Finally, I added a trio of gold sequins.  Viola!  Super simple for me, and pretty!  
Thank you for stopping by, I need to get back into the kitchen as my hand-crafted Lemon Marshmallows are ready to be cut and packaged.  {smile}  Yeah, I make my own marshmallows.  It's not hard, just time consuming.  The beginning part takes about 25-30 minutes.  Then you turn them out into a pan to 'set up' and this part takes 2hrs.  And finally, it takes about another 30 minutes to cut and toss them. {smile}  


Tuesday, May 10, 2016

Rustic Rose Happiness

Howdy!  As you know, I work at a local hospital.  This is Nurse's Week.  The nurses who work in our Radiology department, are wonderful.  All of the nurses there, are incredible.  They always greet you with a smile, and they are always willing to help where they can.  Super group of ladies, and gent.
I am making them lunch tomorrow.  A simple gesture to show my graditude.  And I have to make a card as well! {smile}
I wanted to make a quick card, so I stopped by CAS(E) this Sketch.  This wonderfully talented design team will certainly inspire you, and encourage you to play along.  


and here is what I crafted:


Recipe:  I used crumb cake card stock as the card base.  I used the same sheet of pattern paper for both of the matt and the main panel:  Rustic Harmony by KaiserCraft.  I added some machine stitching around the border.  I wrapped a piece of taupe lace trim, and pink rose vintage seam binding.  I added a multi-loop bow with hot glue.  [My bow, replaces the blossom in the sketch, and my lace & seam binding replace the sentiment piece, in the sketch.]
For the sentiment, I added a sentiment block pre-made by Anna Griffin.  I added this rectangle to a scrap piece of the rustic harmony pattern paper.  I adhered these two pieces together with foam tape.  
I wanted a little bling (and what girl doesn't?), so I added a trio of rhinestones.  I adhered the rhinestones in locations on the card, similar to splatters on the sketch.
Now, all I have to do, is add my hand-written note!  This is as 'clean and simple' as I can do.  For those who are use to my style, know that I would love to add another layer of lace/trim, a paper blossom (or two) a button, and most likely some twine.  But, I am pretty happy with how this CAS card turned out.  {smile}  I hope the nurses love it too!


Mint to Be Crown'd

~ Ikea Frame #2 ~

Howdy! and welcome.  I truly believe that when you are doing anything creative: paper crafting, sewing, crocheting, baking, or any other art form, that when you are in your groove, tapped into your mojo, that you keep going.  Because once you stop, that rhythm will stop.  {frown}  And that is why, I kept going with my frames.  I had the time, and I wanted them to 'match', so I let that creative juices keep flowing through me.  (my first frame was posted yesterday, HERE.)
For todays post, I want to share what I did with my 5" x 7" white, oval, Ikea frame.  I purchased some incredibly gorgeous shabby chic fabric from the Rachel Ashwell collection, while I was in Phoenix, last month.  I washed and dried the fabric, once I arrived home.  I didn't iron the fabric, because I really wanted it to show the 'worn' beauty of the print.
here is what I did:

Rachel Ashwell Shabby Chic Heirloom White Pink Cotton Poplin

I layered two pieces of quilting batting inside the frame.  Then I added my shabby chic fabric on top. I tied a double loop bow with this beautifully sheer, mint, lace trim, by Stampin' Up!. {smile}  I just love this color!  I added this lace because it matched the mint blossoms on the fabric.  [It also matches the crochet doily in the other Ikea frame.]  The sheerness of the lace, with the scallop edge, and the swiss dots adds another level of femininity to the whole look.  {smile}

a direct 'view'


I didn't want to add another door knob to this frame.  But, I wanted them to look like they are a 'pair'. So, I repeated some of the same elements: 
1) shabby chic Rachel Ashwell fabric with mint design elements (leaves in frame #1, and blossoms in frame #2)
2) mint embellishment (crochet doily, and sheer lace) to accent the mint elements in the fabrics
3) white resin piece (bird in frame #1, and crown in frame #2)
4) some bling (rhinestone chain wrapped around bow in frame #1, and rhinestone broach in frame #2)
5) and finally the tails of the bows hang past the edge of the frames.
If you visited me yesterday, you read that I'm a hoarder collector of various items.  The Ikea frames I've had for 3 years, and the resin pieces I have had for a bit longer.  And that beautiful vintage inspired broach?  I've had that almost as long, as well.  A very dear, close friend had used the rhinestone broaches, as an embellishment on wedding announcements when her first daughter got married.  [She has 4 daughters]  I kept the ribbon the broach was pinned to also, because it is this beautifully bright pink color. And you never know when you will need a bright pink bow!


I adhered the bow first, using hot glue.  I used the bow as my 'anchor' for this simple, shabby chic piece.  I kept the tails of the bow too long, so that they would go past the edge of the frame.  I adhered the rhinestone broach just above the bow.  It purposefully looks as if it is secured to the bow.  But it is not.  I then tucked the resin crown in towards the top of the rhinestone broach.  The center of the crown is in line with the center of the frame, and the top decorative piece on the broach overlaps the bottom of the crown, on purpose.  I wanted this to look like one piece, and not three pieces clustered together.  And yeah, the dangle of the broach swings.  {smile}  
I am super happy with how beautiful these framed inserts came out.  Now, all I have to do is hang them.  {smile}  Thank you for stopping by.  I hope I have inspired you to create something you have been waiting to make, or to simply use something from your stash.  It is always a great feeling, creating something from what you have on-hand.  That way, you don't have to change out of your pjs {smile}.


Monday, May 9, 2016

Primrose Birdie Framed Pretty

Howdy!  I got to spend some time crafting yesterday, and well, it was very good for my soul! {smile}  Crafting, sewing, baking, and pretty packaging - all make my soul happy!  I'm not quite sure why, but the whole process of 'creating' is what makes me shine.  {smile}   I hope that you know what truly makes you 'happy' and what fuels your inner peace.  And I know I am blessed to have the time, opportunity, and 'vision' to do these things.  
I picked up two white plastic frames from Ikea, about three years ago.  Both frames are 5" x 7".  One frame is rectangular and the other one is oval.  I knew that I loved the design, but wanted to 'do' something with them.  So they sat in my stash for a  l o n g  time.  At first, I thought that they needed some paint.  Ok, spray, chalk, what?  And do I do a distress technique, or faux metal, or dry brushing, or ????  The thoughts in my head swirled at all the possibilities.  Too many ideas, it made me nauseous.  So, I focused my attention on what to put in them.  And the possibilities were endless.  I tucked the frames away in a cabinet, and moved on.  
While in Phoenix, last month, I picked up some beautiful, and I do mean beautiful fabric.  Ridiculously priced.  But drop dead gorgeous!  I picked up three different materials from the Rachel Ashwell collection.  Three different textures, and weights, and three different prints.  
here is what I did with the rectangle photo frame:

Rachel Ashwell Shabby Chic Primrose Poplin Fabric
Recipe:  I added two pieces of blanket batting, and then one 6" x 8" piece of this beautiful shabby chic fabric!  (I washed and dried the fabric as soon as I got it home, from Phoenix.)  I didn't iron, or adhere the layers of fabric.  I wanted them to have that wrinkled, worn look to them.  
I added the only pale mint crochet doily I had in my stash.  [thank goodness, it is one of the larger ones I had.]  I tried rhinestone pendants, vintage brooches, and antique ribbon sliced.  Nothing looked 'right'.  So, I dung around in my Melissa Frances resin stash.  [I have too many pieces in this stash, as well.]  


At first I tried the bird cage, the nest, a door knocker, and then, I reached for the bird.  But it felt as though it was missing something under the branch.  I tried buttons, vintage brooches, rhinestone buttons, and then it occurred to me!  Add a door knob!  I tied 4 different ones, until I found this one! [and yes, I have a stash of door knobs - don't judge me {smile}]  *To keep the door knob from falling forward, I added two pieces of chip board to the back of this framed insert.  The screw goes through the chip board, batting, fabric and doily.  I did add some diamond glaze to the threads of the screw to help secure the door knob to the piece.  But the door knob was 'missing' something.   


I got it!  ribbon.  More specifically seam binding!  and I purchased a whole roll [yes, 125 yards, of this beautifully soft, pale, pink seam binding] while in Phoenix.  So, I made a triple bow.  I purposefully left the tails of the bow long.   I wanted them to hang over the photo space.  I wanted some bling.  I cut a 2" length from my rhinestone chain stash [I have a lot of stashes] and hot glued the rhinestones to the center of the bow.  And viola!
I am super happy with how this little project turned out.  Now, I need to start the oval frame.  {smile}
Thank you for stopping by.  I hope that I have inspired you to look at some ordinary items around your home with a 'new' eye.  Jazz-up some of those ordinary items, and make them work in your space.  This frame [along with it's other part of the pair] are to be hung in the hall bathroom.  I have decorated that space shabby chic, and very feminine.  As, I am the one who mostly uses it.  I wanted a pretty space.  {smile}


Sunday, May 8, 2016

Think To Remember Card

~ Happy Mother's Day ~


Howdy!  I hope this post finds you well, and happy! {smile}  Me, YeS!  I have made several cards for today, for some very special ladies, and today's post isn't any different.  This card is for my daughter.  She is a very good mom to her children.  
I used the current sketch from Mojo Monday Card Sketch Challenge to create a card for my daughter.  The sketches here are easy to work with, and the design team will certainly inspire you.  

My daughter isn't a shabby chic enthusiast like her mom.  She is more of a clean and simple gal, with a modern twist.  So, I wanted to make her card in a style she would love.  I picked up some (new to me) pattern paper at my local scrapbook store, and set out to make her a card she would love. {smile}
this is what I came up with:


Recipe:  I used Pool Party card stock from Stampin' Up! for the card base.  I thought it matched the light blue in the chevron striped paper.  I used three different pattern papers from the Think To Remember collection by Photo Play Paper Co.  I just loved the mix of patterns: bold stripes, chevron, and a pretty floral pattern.
I used the Tasteful Trim die (retired) by Stampin' Up! to create the large scallop piece.  I wrapped some pale pink seam binding around the card front and added a multi-loop bow.  I positioned a fabric covered brad just below the bow.  (the fabric is navy blue, with a light blue circle and tiny rhinestones on the light blue circle)
I stamped the sentiment in Not Quite Navy classic ink (retired) onto a scrap piece of whisper white card stock, both from Stampin' Up!.  I used a photo corner punch to create the banner ends.  I adhered the sentiment to the card front with foam tape.
At the top of this beautiful floral pattern paper, I added a trio of buttons.  A large navy blue button, a pale pink button, and finally a light blue blossom shaped button.  I wanted to repeat those three colors that I used on this card.  
I also finished the inside:


I have started 'finishing' the insides of my cards lately.  I'm not sure what started this habit, but I really like who 'finished' the cards become.  I cut a piece of Marina Mist card stock, by Stampin' Up!, for the matt.  I added a piece of whisper white card stock for the main panel, and then I added two scrap pieces of the pattern paper at the bottom.  Simple, sweet, and super pretty.  {I have since added a hand-written message}

Thank you for looking, and I hope you have a wonderful Mother's Day!  

Thursday, May 5, 2016

Repurpose into Art ?

Howdy.  I wanted to share with you, a little progress I have made on an altered art project.   Now, it is by no means, complete.  Still trying to figure out a few things.  But, I have a friend who assures me that folks would love to see 'what's going on'.  So, here it is:

pre-wash

I purchased these rusty bed springs while junking @ Sweet Salvage (in Phoenix) last month.  And I have a 'vision' for them.  You know the mantra: repurpose, reuse, recycle.  Great idea, and it goes sweetly with my little saying, 'use what you have'.  So, this 'art' piece is the marriage of the two.  {smile}  It can't get any sweeter than that!
I digress.  Once I saw the bed springs, I 'saw' art.  And I just had to get them.  So, I made my purchase, and yes, they went on the air plane with me.  This is the start of my 'art' project.
I distressed a frame I had.  I wanted the frame to look worn, so I did some simple distressing, nothing crazy of labor intensive.   I wanted to add burlap to the inside of the frame.  But the smell of burlap is nauseating, to say the least.  Instead, I purchased this natural linen.  I laundered the material, to help accentuate the weave, and assist in bringing out the 'weathered' look.  I cut the fabric to fit inside the frame.  Now, the technical part.  I want to add lights to the springs, and attach some chandelier crystals to hang off the bottom of the springs.  But, I can't decide if I want battery operated lights or an electrical card coming down from the back of the frame.  At this point my thought process is to use spray adhesive (E6000) on a piece of matt board, and adhere the material to the matt board.  Attach the bed springs to the matt board with a staple gun.  I'm thinking, create a small hole through the matt board, and a slit in the fabric to run the lights through.  But, I haven't made my final decision, yet.  [I like everything laid out, and arranged before I start cutting, gluing, and final assembly.]
If you are wondering where this 'art' piece is going to go?  Well, in my granddaughter's bedroom, here, at our house.  I would love to make a larger version, for my bedroom, but let me finish this one, before I try to convince my husband.  {smile}
Thank you for stopping by.  I hope I have given you a new vision when looking at 'junk'.  {smile}


Tuesday, May 3, 2016

Sweet Rustic Mother's Day Card

~ photo heavy post ~

Howdy!  and welcome back to my little slice of blog-land.  I've busy crafting, and I love it!  It is very good for my soul!  As many of you know, Mother's Day is right around the corner!  And I wanted to make something pretty, soft, vintage, country, and over all sweet!  So, while surfing the internet, I stumbled upon two (new to me) paper craft challenge sites, and I'm anxious to play along! So, without further ado, let's get to it! {smile}

I stopped by an old favorite challenge site to get a sketch:  Mojo Monday Sketch Challenge.  These folks have some of the most user-friendly sketches out there!  And the design team will inspire you if you need it.  {smile}  Oh, and it's prize week!

My next stop is a (new to me) challenge site:  Crafting When We Can Challenge.  Their current challenge is: add flowers.  Oh my, YES!  The design team varies in styles, so I am sure that you will be inspired to play along with this talented group.
My last stop, is another (new to me) challenge site:  Robyn's Fetish Challenge.   This challenge is: Mother's Day Cards.  Thank you ladies, that's right up my alley!  This lovely group of designers will certainly inspire you with their soft, tender style!

and here is what I have created:


and different view:


Recipe:  The card base is crumb cake card stock by Stampin' Up!  I just love this soft kraft color and heavy weight card stock.  The perfect card stock for your cards!
I used Ocean Tides card stock, by Paper Trey Ink, for the matts.  I just love this different shade of blue.  {smile}  The wood grain/floral 'pattern paper' is actually a digital paper.  I love the colors and the sweet rustic look.    The pale kraft star pattern paper is from Tilda.    Ok, we'll start from the top and work our way down the card.

The canvas banner piece is from Maya Road.  I adhered it to the card front with hot glue just at the top.  I wanted it to have some movement.
I added a trio of paper blossoms.  Each blossom was painted with white acrylic paint and then dunked in a tub a dazzling diamond glitter, by Stampin' Up!  I adhered the paper blossoms to the card front with more hot glue.
The large white blossom and the pale blue blossom are from a big box store, different Reflections collections.  The tiny white blossom is from Kaiser Krafts.  To help add a little bling, I added a trio of gold sequins to the top half of this card.  Yeah, they are tucked in, to reveal a sweet surprise.
I stamped the sentiment onto very vanilla card stock, by Stampin' Up!  I stamped the sentiment in Early Espresso classic ink.  I used a very retired stamp set:  Something to Celebrate.  I used a photo corner punch to create the banner ends.  I adhered the sentiment piece to the card front with foam tape.
For the lower half of the card, I layered a trio of different materials.  I cut a large scallop border out of a scrap piece of pale pink polka dot pattern paper with my Tasteful Trims die, by Stampin' Up!.  I added a strip of white cotton trim just above the pink polka dot pattern paper.  And then I wrapped a piece of this beautiful pale pink seam binding, that I purchased while junking in Phoenix.
I created a multi-loop bow with the seam binding.  I tied an altered wooden button* with kraft twine. (*white acrylic paint and glitter)  I created my own tag with the Tiny Tag stamp set by Paper Trey Ink.  I stamped the 'tag' in ocean tides ink.  (It is actually a second generation stamp) and I stamped the 'XOXO' in crumb cake classic ink.  I fussy cut the tag with a pair of small scissors.  I used sand paper to smooth out the rough edges of my hand cutting.  Strung the kraft twine through the tag and tied it to the multi-loop bow, and altered wooden button.  I cut a too long length of kraft twine, so I added a single loop of twine behind the seam binding bow.  I added a small piece of foam tape behind the tag, so it would be anchored to the card front.   I also added a pair of gold sequins around this beautiful bow.  {smile}
For those of you who are frequent visitors to my blog, you are probably wondering about the missing machine stitching.  And, all I can say, is me too!  I actually ran out of thread, and wasn't able to pick some up before creating this card.  So, I am trying to embrace this 'plain jane' card.
Thank you for stopping by.  I hope I have inspired you to play along with all or any of these challenges.  Hopefully your week is off to a great start!


Sunday, May 1, 2016

Silent Auction Items

Good Morning.  At the beginning of the year, I joined a gym with a friend and entered a challenge to loose weight and get in shape.  We went to almost every one of the classes.  (We missed one class to go to Texas for Antique Week.)  Anyways, at the end of the challenge, they have an After Party with a silent auction.  The money raised @ the silent auction, help support Paws & Stripes.  It's an organization that helps military veterans who suffer from PTS, and pairs them with shelter dogs.  [If you get a chance, please click on the link and take a moment to see what these folks are doing.  Its great work, and it helps our military veterans who have fought, and served our country to keep you free.]
I wanted to donate an item or two to the silent auction.  But, you know me.  I can't simply throw something down on the table.  I am happy [and proud] to say, that I donated three items to the silent action and helped raise $200 for this great, local cause. {big smile}
If you are a paper crafter, you know that presentation is pretty much everything! and who doesn't love to jazz up a 'package'!
I love to bake.  Love it.  So much so, that I have started seriously thinking about purchasing a food truck to tote and sell my wears out of.  Crazy but true.  I have a name, a logo, ideas on presentation, and I even have menu items, and how to serve.  But, I digress.  Baking.  I baked some cupcakes for one of the coaches, and he just loved them.  So, I made some more.  And then again.  And for our final weigh in, and measurement, I made even more.  So, the folks at the gym, have had my cupcakes.  No pies, or tarts, or cookies.  Just cupcakes.  One of my silent auction items was a half dozen cupcakes, along with a gift certificate for a free dozen, when you order a dozen.  Here is how I packaged the gift certificate:


Now, I hope that you are not surprised by the seam binding.  I love seam binding.  Just be surprised that I couldn't find a way to add a button.  {smile}.
For my next silent auction donation, was 4 passes to a local race track.  Not horses, cars!  My husband has been involved with auto racing for years, over 20.  He use to be crew chief for an Alcohol Dragster for over 10yrs.  He loves it.  But, he stepped down once we were married.  It takes a lot, and oh my do I mean a lot of your time.  Anyways, he managed to get me 4 passes to the Albuquerque National Dragway.  I didn't want to just put four passes on the table, held together with a paper clip.  So, this is how I presented them: 


Yep, I love seam binding.  I wanted to do something masculine, [even though a woman 'won' the passes] so I went with the colors on the passes, and grabbed some pattern papers from my stash box.  I did two colors and a text paper.  All three are different widths, and lengths.  I did a banner/flag end and adhered them together.   I added a brad from My Mind's Eye that I had in my stash.  I wrapped some black seam binding around the glassine bag and tied it in a knot.  I strung a key from Prima to the seam binding knot.  I don't really 'do' masculine, so I'm pretty happy with my packaging.  {smile}
And finally, I created, ordered, and donated a bracelet from KEEP Collective.  I loved how it turned out.


I didn't have to do anything for this packaging.  KEEP Collective does a great job at that.  So, I simply added the charms (keys) to the bracelet (keeper) how I wanted them, and viola!  The bracelet is reversible; the other side is black.  So, if you want the black side, just turn your charms (keys) to the other side.  Easy peasy! and their products come in a great gift/jewelry box.  
I had a great time last night.  Oh, and my girlfriend and I came in third place for our challenge.  (yeah for us!)  It was really nice to see everyone again.  We all have seen each other sweating, and huffing and puffing.  But last night, we were all looking good!  A big Thank You goes out to the coaches.  They didn't give up on any of us.  They kept us motivated and encouraged us to keep going, to keep pushing ourselves, and to simply stick with it.  Thank You Duke City Strength!  I'll be joining the next challenge, too!