Friday, April 29, 2016

Junking

While in Phoenix, this past week, I stopped by two very special, vintage, 'junking' shops:  Sweet Salvage and Melrose Vintage.  And oh my!  I just love both of these vintage, chippy paint, junking stores.  They are both very different, but very wonderful!
My first stop was @ Sweet Salvage.  This shop is on 7th Street.  And only open 4 days a month.  Yeah, you read that correctly.  4 days a month.  The third thursday thru that Sunday, this vintage, retro, 'junking' store opens its doors to an eager community.  I took my oldest granddaughter, and she loved it too!  We are now planning another trip.  {smile}


I picked up these bed springs.  Well, I also picked up a vintage skirt, some cheese graters, a window, and a few other little trinkets. {smile}  Now, when I brought these home, my husband was speechless.  Rusty bedsprings?  You paid cash?  Yes, I did!  I have plans for these bed springs.  I want to create a decor piece with them.  My current 'plan' is to distress a wooden frame, insert a burlap covered matt board.  I want to attach the bed springs to the burlap.  I'm thinking with a staple gun.  I also want to string lights through the bed springs.  I'll take pictures, during my process and share those with you, soon.  {smile}

And right down 7th street, is this charming, vintage shop: Melrose Vintage.  This little shop is open a few days a week, Wednesday thru Saturday.  This beautifully decorated shop has vintage, french furniture, antiques, decor items, Rachel Ashwell fabrics and paints, and a scrapbook section.


I picked up three different Rachel Ashwell fabrics at this vintage shop, along with a whole roll of this sweet pale pink seam binding.  I know, how super beautiful!  I don't have any 'real' plans for the fabric, but these beautiful, pink blossom fabrics, will add just the right amount of shabby chic-ness to any project.  {smile}


I also picked up some pattern papers, these paper blossoms, sequins, tins, and 2 rolls of this beautiful frayed-edge fabric.  The tins are pretty shallow, so those will make wonderful holiday ornaments.  The roll of fabric will be used for another fabric strip banner.

Thank you for stopping by.  I will be baking cupcakes tomorrow for a party.  I'll take a photo or two and share those with you, too!  Have a great weekend, and hopefully you get a chance to create something beautiful!


Thursday, April 28, 2016

Dreamy Mint Card

I know that I have been absent lately.  Life has gotten crazy.  I went to Phoenix last week, and was gone the whole week.  I had a blast, did some junking, shopping, swimming, and spending some really great quality time with my oldest granddaughter.  These moments are precious, and don't happen often.  So, I was totally present, and we had a blast!
So, now that I am home, and back into the groove of working, and unpacked, I wanted to create something.  So, I headed to a couple of  my favorite challenge sites, and created something beautiful! {smile}
I started with a great sketch @ Mojo Monday Challenge.  And I love this current sketch.  Very user friendly, and easy to work with regardless of the pattern paper you select.

My last stop was @ Crazy 4 Challenges, to check out their current theme: use springtime flowers.  


and here is what I crafted:


First, let me give the disclaimer: this is NOT a square card.  I don't do square cards.  I know, how crazy.  But, I just don't. {frown}
The card base and the journalling card are matted with my favorite kraft card stock - Paper Studio.  I love the color.  But the weight isn't as heavy as I love, so I always add card stock to the inside of the card.  
I wanted something mint, something girl-y, something pretty, and I found a sheet of this beautiful mint and gold foil polka dot pattern paper from My Mind's Eye, from their On Trend collection.
I added a peach-pink pattern paper for the belly band.  This pattern paper is from Authentique, the Grace collection.
I added some machine stitching.  I did a double border stitch.  Nothing fancy, just super sweet.
I used a journalling card from the Coffee Break collection by Prima.  I did my hand-stamping to the journal card before I adhered it to the card front.  I used the Loving Thoughts stamp set by Stampin' Up!  I also used basic black classic ink, by Stampin' Up!  I adhered the journalling card to the front of this card with foam tape.
I wrapped some pale pink seam binding around the card front and tied a multi-loop bow.  To add some sparkle, I tied some thin gold tinsel around the bow and tied a simple bow.  I adhered a pale blue/aqua mist paper blossom to the top of the bow.
And finally, I added a black cork coffee cup to the upper right corner.  
Well, thank you for looking.  This card is actually for a very special girl friend.  We are spending a whole day crafting next weekend! and I got her a little gift. {smile}  I hope she loves it!


Wednesday, April 27, 2016

Start Small

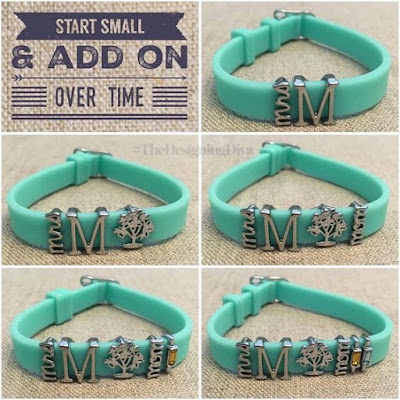
Howdy, and welcome.   My KEEP Collective party is coming to a close, but I did want to share one more idea with you: start small.  It's really the thought that counts!

         www.keepcollective.com/soc/qc33j       
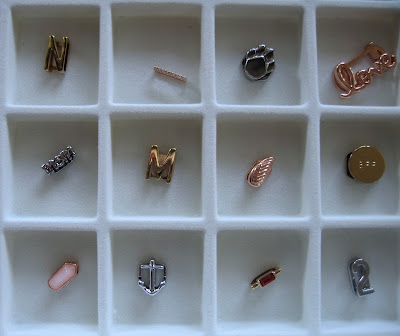
To start, purchase a keeper (bracelet, pendant, necklace, or key fob) and pick one or two keys (charms) to get started.  The keepers come in a variety of materials: leather, metal, or silicone.   Then over time, add onto your statement piece.  These add-on keys (charms) make the perfect gift during any celebration: birthday, anniversary, christmas, or any other holiday!
Get started today! and place an order, just in time for Mother's Day!  my party is ending soon, so hurry over to www.keepcollective.com/soc/qc33j  to place your order TODAY!


Wednesday, April 20, 2016

Happy Birthday T

Howdy! and welcome.  It was my daughter's birthday yesterday.  So, we spent half the day together {smile].  I got up early, and made her a dozen of ButterBeer Cupcakes.  She is a fan of Harry Potter.  On my way over to her house yesterday morning, I brought her, her favorite drink from Starbucks to start her morning.  Along with some roses and a hand-made Birthday card.  We spent a few hours, yesterday morning sitting at her dining room table chatting, like ol' friends.  It was a very good morning.  Then, I took her to lunch.   
I wanted a little direction on creating her birthday card.  She isn't a 'shabby chic, vintage' kind of girl. She is more clean and simple, with a flair for modern.  
I stopped by the CAS(E) this Sketch challenge site.  Their current sketch, #168, was pretty easy to work with.  {smile}.

here is what I made:


Recipe:  I used one of my favorite kraft card stock for the base.  It's by Paper Studio.  Love the color! I added the last two scrap pieces I have of this beautiful pattern paper.  My daughter loves blue, and the confetti pattern paper looks festive!  I matted the confetti pattern paper onto a scrap piece of Indigo card stock by Stampin' Up!.  
I tied some thin pink ribbon around the card front, in place of the horizontal strip.  I also added a tag in place of the 'notch'.  I hand stamped the tag outline in baked brown sugar and the sentiment in basic black, both classic inks by Stampin' Up!.  and viola!  modern, and clean and simple.  
Yeah, I wanted to add some machine stitching, a button, and some sequins.  But, my daughter loves clean and simple.  And the card is for her.  {smile}  Happy Birthday!  
We are going out to dinner tonight.  My mom is in town, so it will be nice to have the whole family together.  Her birthday present is a bread maker.  She has been asking for one.


Sunday, April 17, 2016

Be{e} Sweet

Welcome.   I set out in to my craft room this morning.  I have a few cards to make, so I decided to get started before my deadline.  It's snowing again at my house, so I don't really want to adventure outdoors.  (yes, snowing in the middle of April.)
I stopped by a few favorite challenge sites to get my creative juices flowing, and found these two challenges to participate in: Scrap Magic & Shabby Scrap.  (Both of these challenge sites are in Russian, so please be aware.)
My first stop is Scrap Magic.  They always have the most beautiful inspiration boards I have seen.  They typically have a mandatory element and a few embellishment requirements.  But not this challenge.  Here is their inspiration board:
(You need to do a monochromatic color scheme with a contrast color. ) 
My next stop is this beautifully shabby chic challenge site Shabby Scrap.  They have some very talented ladies on their design team, who will certainly inspire you.  
(their current challenge is this sketch)

and here is what I made:
my monochromatic is yellow and my contrast is green

Recipe:  My card is an A6 size (4 1/4" x 6").  I used some scrap pieces from my scrap box.  I really need to get this scrap stash dwindled down.  {smile}
The bee print and floral pattern paper are from the same collection.  But, I only had these two strips, so I am not sure who the manufacturer is.  {sorry}.  The yellow polka dot glitter paper is from My Mind's Eye.  
I started to do a simple border stitch with my sewing machine, but I ran out of thread before I could get all the way around the card.  But I love the 'un-finished' look it gave my card front.
The black script text pattern paper is from Teresa Collins.  And yeah, that is all I had left of that piece.   
I stamped my sentiment onto whisper white card stock by Stampin' Up!.  I used the You're Cherished stamp set.  (It is easily 5years retired.)
I wrapped some medium green crinkled seam binding around the middle-ish of the card.
I added a bee resin medallion by Melissa Frances, to the sentiment & text stack, then adhered this piece to the card front.  I made sure to leave room for my multi-loop bow.  
I really love the sparkle of the gold glitter outline to the text circle/polka dot pattern paper, so I made sure to add some gold accents.  I tied a double loop bow with thin gold cord from Stampin' Up!  It was in the holiday mini catalog for 2015, and I simply fell in love with it!  I added my multi-loop seam binding bow over the gold cord and adhered it to the card front with my glue gun.  I cut off the legs to this nostalgic brad, and simply adhered the 'button' part to the center of the layered bow.
I wanted a bit more gold, so I added a trio of gold sequins to the card front.

My card is off to the mail box, as I am sending this to a very special friend.  She has been by my side cheering me on, as I conquer new challenges in my life.  So, I want to make sure she knows how blessed I am to have her by my side.  {smile}


Saturday, April 16, 2016

KEEP Collective Social

Howdy! and welcome.  I am hosting a KEEP Collective Social.  If you are not familiar with KEEP Collective, it is a 'new' to me company, that sells keys (charms) and keepers (bracelet, tags, key fobs, and necklaces).   By selling these pieces separately, it allows you, the designer, to create your own one-of-a-kind jewelry piece.  A piece that represents YOU, what you love, what you believe in, and what is important to you.  The 'what' can be a word, or phrase (live your dream, joy, etc) it can be a symbol (barbell, birthstone, heart, wishbone, running shoe, etc) or it can be initials (letters, or greek letters) or wishing stones (amethyst, lapis, etc)  or decorative stones (geo bar, mother of pearl, etc) and then there are decorative charms (keys) (star, horseshoe, arrow, etc) to convey YOUR message.  
With you as the designer, to create a beautiful jewelry piece that consists of what is important to you, what has meaning to you, is endless!   So, why not create a special piece for that special MOM in your life, in just 10 easy steps!

1. Pick a jewelry piece (keepers) that she would love to wear: bracelet, necklace, pendant/tag.


2. Pick her favorite material to wear: leather*, mesh, or metal.
3. Pick her favorite color to wear: black, cool grey, spearmint, lavender, silver, gold, rose gold, hermatite, snake skin, came, etc.  (*leather bracelets are two-sided.  It's like getting two bracelets in one!)


4. Start selecting keys (charms) that are important to her:  birthstone bars, wish bone, her initials, words of faith, a cross, etc.


5.   Place these items in your virtual shopping cart.
6.   Fill-out the on-line order form.  (You fill out your address, and keep your credit card number with you.)
7.   Press 'submit' and your order is placed.
8.   Wait a few days, check your snail mailbox, and retrieve your package from KEEP Collective.
9.   Assemble your jewelry piece the way you want to present it, and place it in the decorative box.
10.  Add a wonderful Mother's Day card*, and viola! you are done!  [*all orders of $35/+ (in product), placed during this social, will receive a hand-made Mother's Day card from me, in your snail mailbox to the 'shipping address' you have entered.]


If you would like to host a social yourself, either in person, or on-line, please contact me, so we can get your party started!  Share these beautiful pieces with your family, friends, co-workers, the ladies at church, the ladies in your book club, the folks in your car pool, and so many more opportunities to share!  With qualifying party, you can get your uniquely YOU jewelry piece FREE!

Sunday, April 10, 2016

Peach Matthew Card

Howdy.  I needed to get a card in the mail this weekend, and needed a bit of inspiration to get those mojo juices moving.   I am entering my card into five different, but very inspirational challenges.  Lets get started.  I stopped by Scrap Magic to work with their current inspirational board. 
Mandatory to use Peach and Green, you must also include floral pattern, fabric or gold.
I stopped by Sugar Pea Design to check out their sketch challenge.  These ladies are sure to inspire you with their creativity.

I stopped by the faithful challenge of Word Art Wednesday, to see what scripture they are using this week.   The scripture of Matthew 11:28 is perfect for my card.  {smile}

I stopped by the Brown Sugar Challenge, to see what this talented challenge site has for their current challenge: Anything Goes!  Well, that couldn't be simpler!
And finally, I stopped by Really Reasonable Ribbon Blog for their current challenge:  Flowers & Trim.  They don't have a required number of flowers, so this one will do {smile}.
and here is what I made:


this card was selected as a Top 3 Winner @ Really Reasonable Ribbon Challenge Blog.  

Recipe:  I used crumb cake card stock for the card base.  I used a green polka dot pattern paper from Authentique.  The peach blossom pattern paper is from Authentique, from the Grace collection.  The peach pattern paper used for the scallop trim, as well as the peach text pattern paper are from the Grace collection, as well.  I added a simple border stitch with my sewing machine, to help convey that homespun feeling.
I tied peach seam binding around the card, and added a little more machine stitching.  I tied a multi-loop bow with the same peach seam binding.  I added a green paper blossom, from Kaiser crafts, just above the bow.  I tied a scrap piece of gold thin tinsel around the multi-loop bow.  
To help tie the gold accent, I added a trio gold sequins.  I printed the scripture onto whisper white card stock.  I cut the scripture into a tag, and adhered it to the card front with foam tape.  I added a scrap piece of peach seam binding.  I tied the seam binding with a scrap piece of pistachio twine.
Thank you for looking.  I might be able to get a better photo tomorrow.  


Tuesday, April 5, 2016

On the {Shabby} Farm

Howdy! and welcome to my little slice of blog-land.  I have missed quite a few posts and been a bit absent.  Life has really gotten busy, and I have struggled to find time to do the things that make my soul happy.  {frown}  Things like paper crafting, baking, sewing, and sitting in the {mountain} quiet.  But, I can see the 'light' at the end of this busy tunnel {smile}.  I am working on scheduling time to do those things that make me the happiest!  Have patience and you will be delighted!
Last week, was 'Antique Week' in Round Top, Texas.  And yes, I hopped on a plane, and traveled over 700 miles, to hunt, peck, and look for antique, rustic, shabby treasures.  Oh my!  Was it splendid!  A wonderfully adventurous girlfriend accompanied me.  And, yes, we did have a blast!  We stayed at this super cute, super country, incredibly nostalgic farm-style cottage @ Olle Hotel, in Flatonia, Texas.  LOVE IT!
Anyways, I wanted to make the B & B owner a hand-made card, thanking her for the hospitality and great attention to detail.  I am entering this card in a few challenges, too!
The wonderful talented folks over @ Brown Sugar Challenge Blog, have an Anything Goes challenge.  
The creative & whimsical folks over @ Crafty Sentiments Designs, want you to use Lace & Pearls on your entry.
here is what I created:


Recipe:  I used kraft card stock for the base of the card.  I used card stock from paper trey ink.  I just love the heavy weight of their card stock.  I added two strips of pattern papers from two different manufacturers.  The pink gingham is the reverse side of a pink floral pattern paper from Lost & Found.  The pink, yellow, and grey floral pattern paper is from My Mind's Eye (My Sweetest Things).
I sewn a simple border with my sewing machine to help convey a homespun look.  I added three trims: white lace trim, white cotton trim, and a pale pink seam binding.  All of which were machine sewn to attach them to the card front.

I created a multi-loop bow with the same seam binding.  I tied a vintage pink button with cream twine to the seam binding bow.  I also added a double large loop bow with the cream twine.  I stuck a large perl stick pin in just behind the bow.
I added a square of dark grey polka dot pattern paper as the matt for the yellow stamped distressed square.  I stamped the distressed square, onto a scrap piece of very vanilla card stock, in so saffron classic ink.  I fussy cut the square and inked the edges with crumb cake classic ink.  I stamped two images in going grey classic ink.  The 'post mark' was masked not to go beyond the edges, and the farm silhouette.  
I stamped the sentiment in basic black classic ink onto a scrap piece of very vanilla card stock.  I used a photo corner punch to create the flag ends.  I sponged the edges of the card stock with crumb cake classic ink.  I adhered the sentiment banner with foam tape to 'lift' it off the card front.
I added a single white paper blossom.  I painted the petal tips with white paint and added glitter before allowing the paper blossom to dry.  
The final touch was a single white/clear vintage button tied with cream twine.  And you know me, I could add sequins, and white paint to the edges of the card.  But, I showed restraint.  I wanted something simple, sweet, country, and shabby.  Not too over done.
Thank you for looking!  Oh, I only used one stamp set: On The Farm, by paper trey ink.