Saturday, February 26, 2011

Distress to De-Stress Sketch!

Good Morning! The Design Team @ Our Creative Corner has another challenge for you! It's a two parter: theme and sketch. The theme: distress to de-stress, how cute huh? So, check out the sketch, and distress your paper, embellishments, sentiments and submit an entry! The sketch is very user-friendly! So, create something and work-out your stress at the same time!
Here is what I have done. The pattern paper is from Basic Grey. The sentiment is from Paper Trey Ink. The solid cardstock, ink, die cuts, rhinestones, and brad are all from Stampin' Up!. (as always, if you need a complete list of materials, please email me privately.)
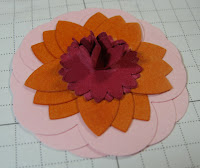
The flower, was simple to create. I used three pieces of pattern paper for each flower shape. I stacked them on top of each other and cut them all at the same time with my Big Shot die cutting machine. I used the Fun Flowers die. After cutting out the shapes, I stacked them on top of each other, and I punched a hole in the center for my brad. I spritz the top flower with water and began scrunching-up the flower. I continued to the last flower. Then I began un-scrunching the flowers in reverse order. (I posted a tutorial here.)
I used two different mediums to distress my paper. I used a sponge and Crumb Cake classic ink from Stampin' Up! first. Then, I used this white paint writer stick. You know, the kind they use at car dealerships to write on the windshields. That! I like how sometimes it comes out thin and sometimes it just slaps on. Random, and not uniform. I distressed the flower once it was open.
Thank you for taking the time to see what I have made. And I hope to see an entry of yours @ OCC!

Friday, February 25, 2011

Creative Sketches - 21H

Good Morning! and thank you for stopping by today. I am on two design teams, and so that helps keep me on track to post a few times a week. This week, I am preparing for the Chocolate Fantasy in Albuquerque, New Mexico. So, being on a design team (ok, 2) forces me to take time away from chocolate (I know, how sad) and paper craft. It helps me to take a 'brake' and change my focus. Sometimes, I need to do that, to 'work-out' some of the trouble spots.
So, I'm sure you are probably on your second cup of coffee, reading about my ramblings. Sorry.
Here is the card I created for the sketch challenge @ Creative Sketches. If you haven't played along in their challenges, give it a try. What's the worse thing that can happen? You take time out of your busy life, to create! To use the other half of your brain. You know, the creative half. The half that lets you express your self through paper, ink, chip board, canvas. The half that lets you design, create, evolve! Let's see what you can create!
FYI: next week, my posts will be minimal. I will most likely only have two/three for the whole week. But, check back on Sunday, March 6th, so see some wonderfully creative pieces done in chocolate! All sculptures have to be 100% edible. So, its a feast for your eyes!

Wednesday, February 23, 2011

Double Challenge

I'm sorry that I have been absent lately. I've been a little pre-occupied. Mostly work, ugh. But, thank you for your patience. I wanted to make something 'pretty' to share with you. So, I first went to Cupcake's Creations to look at their color challenge this week. Light Pink, Medium Violet, and Gray. These are super pretty and feminine. Then, I needed some inspiration and some creative outlook, so I went to My Favorite Things, to incorporate their sketch challenge. Their sketch has some girl-y elements. So, here is what I created. I used some of my favorite products. (For a complete list of products, please contact me privately.)

I am participating in the Chocolate Fantasy, in Albuquerque, New Mexico this year. So, the remainder of this week, and next, my post will be minimal. But, I will have some fantastic photos of chocolate creations March 6th.

Sunday, February 20, 2011

Vintage Pop-Up Card

I love interactive cards! And that's what this one is. You can actually close the card and mail it. and pull the tab and it pops up! :) My Saturday card club made this card this weekend, and of course we used all Stampin' Up! products. The pink card base was stamped with the Bella Toile background stamp. I thought that it gave this card a little feminine look. The dictionary paper is from the new First Edition DSP. We stamped the Bliss flourish in Basic Gray classic ink. We sponged the paper flower with blushing bride classic ink and frost white shimmer paint. We used one of the definitions from Define Your Life stamp set. The bird from Notably Ornate stamp set was heat embossed with silver embossing powder. When creating this card, I used two different ribbons to keep the card feminine and interesting; crochet trim in Victoria and Very Vanilla Seam Binding.
The 'brown' flower on the front of this card was made with three different hand punches and un-bleached coffee filters. The extra large flower punch, 5-petal flower punch, and boho flowers punch.

Saturday, February 19, 2011

beautiful baby

Sarah G., over @ THinKING STAMPS is the hostess for this weeks challenge over @ Our Creative Corner. The challenge is to use a sentiment stamp and stamp it repeatedly to create a background. Sounds pretty easy, huh? Well, it kinda wasn't for me. But, here is my card. My boss's wife had her baby earlier this week, and so I made them a 'baby' card. Yeah, they had a boy! Almost all the products used to create this card are from Stampin' Up! The stamp I used is a retired. But, I thought just stamping it repeatedly would be 'boring'. So, I used three different colors of classic ink (Crumb Cake, Baja Breeze, & Chocolate Chip) since those colors were in the retired pattern paper I used. Boy, that stamp-a-ma-jig got a workout!
Thank you for taking the time to see what I've been doing. Now, get out a sentiment stamp and enter our challenge. Once you start stamping, it really isn't too much of a challenge. :) We would love to see what you come up with. Enjoy your weekend!

Thursday, February 17, 2011

Watercolor Sketch


I also am on the Design Team for a wonderful challenge blog Creative Sketches. And this week, they have a new sketch with a technique - water coloring! How fun is that? So, here is my sample to help get you inspired and motivated!
I stamped the bird with the flowers in StazOn ink, watercolor paper, and used my Stampin' Up! water color crayons to 'color' the image. I layered different papers to give the card some interest. I tied some Very Vanilla silk ribbon around one the pattern papers and poked a fabric brad through the bow. Flayed the legs, so it would lay flat. I sponged all the edges with either the dark green ink, or a light brown ink. The upper right corner seemed 'empty', so I stamped a word there. I hope this card inspires you to play along with our challenge.

Wednesday, February 16, 2011

Neutral Happy Birthday

I originally made this card for a girlfriend. Well, not just any girlfriend. A very special, sister-close girlfriend. And, I have been 'playing' with it for a few days now. But, I am still not happy with it. After I got it all together, I spritz it with some frost white shimmer paint. And it jacked my tag. Ugh.. So, don't look at the smudged words. What's missing? My DH says it doesn't have a button. Well, I put in a large rhinestone brad through the center of my bow. But, I'm still not 'happy' with it. Yes, I even thought about sponging it. But then it takes away from the crisp, clean lines. Help me!
Post a comment on what you think. I may be too critical of my own work.
Have a nice evening, and I already have my next post lined-up for Friday! So, check back and see what I've made with all Stampin' Up! supplies!

Monday, February 14, 2011

Happy Valentine's Day


Happy Valentine's Day to all my readers!

I found this pretty vintage collage paper back in December at a local Scrap-booking store. Once I saw it, I grabbed the last sheet of it! Isn't it just to die for? I like all the vintage images, and the collage aspect of it, just puts the cherry on top! You can orient your paper vertical or horizontal, which ever way you want to accent the image of your choice!
I made my card base out of Cherry Cobbler (Stampin' Up!) cardstock. The tag was cute from Very Vanilla (Stampin' Up!) cardstock and ran through my big shot, using the Lots of Tags (Stampin' Up!) die. 'Happy Valentine's Day' is from the Teeny Tiny Wishes (Stampin' Up!) stamp set. The ribbon is actually Seam Binding - Baja Breeze (Stampin' Up!).
To achieve the crinkled look of the ribbon, I just spritz it with some water and wadded it up in my hands. Tied the bow, and then pulled one of the threads to help it bind. Viola!
Happy Valentine's Day! I hope your day is filled with love and laughter, and that you get to share this day with family and friends!

Saturday, February 12, 2011

Cut it Out

Over at Our Creative Corner, we have posted another challenge! This week, our hostess, Lori Rider, is challenging us to feature some kind of cutting technique in our projects. Some examples of possible techniques could be paper piecing, fussy cutting, out of the box, paper tole, etc. Anything that requires you to get out your paper snips will qualify!

So, here is what I came-up with. When I sat down to create this card, I really did want to use just a few companies products. Because sometimes it is just over-whelming to list 100 companies. My craft room is well-stocked (ask my husband). But, when you start listing all the supplies and companies, it sounds like my craft room is a craft store. So, if the list is too crazy, scroll past it. Some readers really do want to know what I use. So...
I used products from six different companies this time. I just find these cute little treasures, and they just end up in my cart! (virtual and real). Recipe follows.
Cardstock: Stampin' Up! and Paper Trey Ink
Stamps: Stampin' Up!, 7-Gypsies, and Crafty Secrets
Ribbon: Stampin' Up!, and Spare Parts
Rhinestone Button: my misc. stash.
Stick Pin: Fancy Pants
Ink: Stampin' Up!
Tag Shapes: Stampin' Up!

Ok, so back to my card. I really do love the floral spray image from the Elements of Style stamp set that Stampin' Up! has produced. So, I stamped the image in Basic Brown classic ink, and colored the image with various colors from Stampin' Up!. Cut out the image, and ran it through one of Stampin' Up!s embossing folders, to give it a 'quilt'-ed look. I stamped and cut-out the mannequin, too. My Very Vanilla cardstock looked to 'blank', so I stamped the Sanded background stamp on the cardstock first. Then added my layers. The oval tag is actually from a retired SU! stamp set (Vintage Labels) and the white embossed angle is from the Clearly For You stamp set (SU!). The blue ribbon is actually seam binding from Stampin' Up! I'm really happy that they started carrying it! I just love it. You can leave it flat to help give your craft some elegant lines, or wad it up and the ribbon takes the crinkled look to a vintage style! Love it! I added some white wide crochet trim to help balance out the card, and give it some soft texture. And found this wonderful rhinestone button and tied it on. You have to add a little sparkle sometimes!

Thank you for taking a moment to stop by and see what I have been doing. I am off to my sewing class. Yes, I have like a hundred hobbies. Tomorrow, my oldest grand-daughter (she is 4) and I are baking some brownies and chocolate cupcakes. The Radio Pharmacy that supplies my department with Radioactive Imaging agents, is getting some brownies for Valentine's Day, and the Radiology department I work in, is getting some chocolate cupcakes. How wonderful, huh? Let me know what you got 'cooking' for Valentine's Day, or what you think about my latest creation. Have a wonderful weekend! And stop-by soon!

Friday, February 11, 2011

My First Blog Tutorial

I came across Joanne's wonderful flower tutorial, on how to make these super cute blossoms. So, I had to try it myself, and then I thought, why not make a tutorial myself! The thing that I love about this blossom, is that you can use your scraps, and one glue dot. Quick, easy, and not alot of supplies. It's my birthday today, so here is my 'gift' to you!

Here is what you will need. (I punched the different size flowers in different colors, so you can tell what I'm doing.)

Using the hand-held 1/16" hole punch, punch a hole in the center of each flower.

Insert the brad through the smallest flowers first. Then the middle size flowers.
The largest flowers last. Also, you will need to off-set the flowers.
Flay the legs of the brad to hold your blossom together.
Starting with the flower closest to the brad, spray the punched cardstock with water,
to help make the cardstock pliable. (Be careful not to saturate the cardstock.)
Then, start scrunching the flower around the brad.
Spray with water as needed.
If you want to 'color' the edges of the 'petals' of your blossom, this is the time to do so.
You can either sponge on some color to the edges of the petals,
or spray your scrunched-up blossom with shimmer paint.

Now, unfold each layer of petals, one at a time.
The first flower should remain as close to the brad as possible.

This is your opportunity to tweek, or play with how each blossom will look.
Once the blossom dries, it can't be re-shapen.
(So, no more squashed flowers in the mailing process!)
Apply a glue dot to the back of the blossom, and you can adhere it to a card, or project!


Thank you, for stopping by to see what I've been doing! Happy Friday! And try this blossom. If you don't have exactly the same punches, use what you have. Substitute a scallop circle for a flower shape. And, if you don't have enough scraps of cardstock to punch three of each shape, punch two. Or use pattern paper scraps.
I know you will love what you make! Make it yours! Original! Unique! Have fun!

Thursday, February 10, 2011

CS Color Challenge

Over at Creative Sketches, they are having a color challenge this week. If you have a moment, you should stop-by and see what the DT has created, and enter yourself! The colors are Navy, White, & Cherry Cobbler. I don't know why, but this color challenge was just that for me; a challenge. This is my card. I used all Stampin' Up! products to create this little beauty!
I saw a flower tutorial over on Joanne's blog, and just had to try it myself. (Joanne uses a three flower punch that is retired, so I did change that punch to a current punch.) So, the flower on my card, is from her flower tutorial. The thing I like most about 'her' flower, is that you don't need a whole sheet of cardstock, or a new bottle of glue. You can use your scraps, and they turn-out so beautifully.
Tomorrow, I will post my own version of the flower tutorial, here. So stay tuned! Until then, go get crafty and enter the color challenge over @ Creative Sketches!

Tuesday, February 8, 2011

Match-Box Pretty

Not my best work, but I did want to share this little cutie with you! (Only Stampin' Up! products used to create this project.) I used the Stampin' Up! die to create this match box. I ran the 'top' of the box through the embossing folder Elegant Lines to give it some pizazz. The box is made with Crumb Cake cardstock, so it needed something, (and yes, I'm trying to run out the door to go to work). The flower is made with 3 scallop circles (I used the standard hand held punch by Stampin' Up!). You wad-up the scallop circles repeatedly until the fibers in the cardstock break down, and then you separate the layers. So, you punch 3 scallop circles, but after your 'altering' you get 6 scallop circles. Then you stack the layers, use a brad to hold the 'flower' together and fluff the scallop circles until you like the 'look'. (If you spritz the flower with water, the flower will be 'stuck' in that position.) You can spritz your flower with some shimmer paint or smooch to give it some sparkle. If you sponge the edges of the scallop circles before assembly, there will be some color variations. So, you can really jazz-up this beauty, or leave it plain and simple, like I have. After I made this, I thought, wow, this would be a cute wedding favor. What do you think?
Post a comment and let me know how you would use this little box. Remember, its a match box, so the box itself is not deep. But, isn't it a little cutie?

Monday, February 7, 2011

Sketch Challenge Thank You

My most wonderful daughter threw me a surprise birthday party this past Saturday! And, yes she pulled it off! It was a surprise! (my birthday is this coming weekend.) She took care of the food, inviting my friends, and even had everyone make my birthday cards! (those will be posted later) Isn't she just the Greatest?! So, I wanted to make her a very special Thank You card. Thank You, for being so wonderful, thoughtful, and special. I came across Stamping 411 sketch challenge, and it seems the perfect layout for such a card. (click here, to see their sketch.)
The stamp set I used, is called Find Your Style. The pattern paper I used is from the Pink Plum collection. The solid card stock is from Stampin' Up!, as well as the butterfly embosslit. The ribbon is from Paper Trey Ink, and the buttons are from a mixed stash I have.
I stamped 'Beautiful' instead of 'Thank You', because my daughter is a beautiful person inside and out, and I really wanted to focus on that. She does alot of great things for people, and so I just wanted to let her know how truly special she is.
So, if you have gone to the Stamping 411 site and seen the sketch, you can tell that I did add a few things. In the sketch there is no 'ribbon' or 'flower' on the sketch. Those I added to jazz it up a bit. So, I'm not sure if I qualify for being selected as a 'winner'. But, I really do like their sketch. Its pretty versatile and easy to work with.
To make the flower, I just cut out the floral shapes with my Birds & Blooms die from Stampin' Up! I used blushing bride, pumpkin pie, and very vanilla card stock. I added some crochet trim from Stampin' Up! in the flower to give it some added texture. I used a rose red brad from Stampin' Up! to hold the flower together. The butterflies were made with very vanilla card stock and the Butterfly Wings embosslit from Stampin' Up! I sponged the butterflies and my stamped card stock with river rock classic ink. I also hand sewed the buttons onto the card stock, so I didn't use any glue dots. I thought that the linen thread would give the buttons some added interest.
Thank you for looking. And get your mojo moving and enter the sketch challenge over @ Stamping 411. Have a great week!

Sunday, February 6, 2011

Branch Out - OCC

Over at Our Creative Corner, this weeks challenge is to create a CAS card/project/scrapbook page, etc. with a tree. To see what the other wonderfully talented ladies came up with, click here. Here is what I came up with.
For those who may not know me, Clean And Simple, is not so simple for me. I'm one of those crafters who thinks more is more; not less is more. So, this challenge was just that; a challenge! According to OCC: 'what qualifies as CAS? Well, that's mostly up to you - generally it will be a quicker/less cluttered/clean line style. If you're not sure, then just aim for something simpler than you might usually make.' So, I encourage each of you to take this challenge! Challenge yourself, challenge your creative side, step outside your comfort zone. It can be amazing to see something wonderful that you create, that you probably wouldn't have. Stretch those creative wings, and come fly with us!
I used stamp sets from two of my all-time favorite companies: Stampin' Up! and Paper Trey Ink. I used Sahara sand & whisper white cards stock, Sahara sand classic ink, whisper white craft ink and watercolor crayons from Stampin' Up!. The ribbon is from Paper Trey Ink.
To create the water coloring affect of my tree, I 'colored' the stamp with watercolor crayons and misted the stamp with water before I stamped. (I'm not sure of the technique's name.) It's pretty and looks great (I think).
I can't say it enough, but this card was a real struggle for me. But, I have to say, that I am really pleased with the finished product!
If you have any questions, please contact me. I have a new 'Facebook Badge' close to the bottom of my blog, that has my email address.

Friday, February 4, 2011

Fabulous Friday!

Wow! February keeps getting better and better for me! Yesterday, I was accepted to be on the design team for Creative Sketches, and today, I am a featured designer on Noor Nahdi's blog: Fond of Crafts. Noor, has posted some of my work, and she asked me some paper crafting questions, so her followers could get to know me better. Thank you, Noor, for the opportunity to show some of my work to your followers.
If you have a moment, please check out Noor's blog to see what all she has posted (besides me).

Thursday, February 3, 2011

Creative Sketches - Sketch Challenge #18

So, more good news! I am on another design team! Wow, 2 different design teams! Its my birthday month, and when it rains it pours! I can't seem to get the smile off my face. This is just so GREAT! So, if you have some free time to craft, come on, you can carve out an hour, please play along!

The original sketch is vertical, but I turned the sketch on its side. I wanted something different. So, here is what I came up with.
So, check out what the rest of the design team has created at Creative Sketches, and play along. I used pretty in pink, pink pirouette, early espresso, and very vanilla cards stock. The dictionary paper is from First Edition DSP. The flourish is from Friends 24-7 stamp set.

Wednesday, February 2, 2011

You Have To Add a Card

I had sooo much fun altering a notebook for Dawn's Color Cue {11} challenge and JUGs wild card challenge, that I decided to make a card, to complete my 'gift'. These colors work beautifully together, and it so made me think 'wedding' and 'baby'. So, I chose 'wedding' and ran with it! Paper cones, and dollies are all the rage these days, so I put them together. The JUGs challenge is to make your own paper flower, so the 'aqua' flower in the cone I made, and the sponged 'aqua' flower on the seam binding on the paper cone, I made. The crochet flower, I purchased. I don't crochet. And if I did, I fear I'd be making too many of them. The ribbon rolled flower I purchased at one of those big box stores. It comes on a strip of toile and you purchase it by the foot. So, I just cut one off, and tucked the 'tails' underneath. I 'girl-y'ed my card, made it feminine, and tinkered with it for a day. The butterfly was a last minute thought. But, I think it looks great! I found these super cute bling-y 'beads' at a local bead store, so I added one to my corsage pin. I sprayed the whole card with some Vanilla Shimmer smooch. I like how it gave it a bit of sparkle without covering-up my stamping. My neutral for this 'item' was vanilla. At first, I didn't think it would go. But, I like how it turned out.
Thanks for taking a look. And, if you have time, you should check out the challenge blogs listed above and play along.
Let me know what you think about pairing vanilla/cream with white on a project. Have a wonderful day. Stay warm, and be safe out there!